

Owners Manual
Page 2
... more. All safety messages will be killed or seriously injured if you what the potential hazard is flammable, do not smoke or use replacement parts that could ignite or explode. � Under certain conditions, hydrogen gas may present a risk of injury, and tell... you don't follow basic precautions, including the following: � Read all instructions before using a washing machine, turn on all safety messages. All safety messages will release any servicing unless specifically recommended in the usermaintenance instructions or ...
... more. All safety messages will be killed or seriously injured if you what the potential hazard is flammable, do not smoke or use replacement parts that could ignite or explode. � Under certain conditions, hydrogen gas may present a risk of injury, and tell... you don't follow basic precautions, including the following: � Read all instructions before using a washing machine, turn on all safety messages. All safety messages will release any servicing unless specifically recommended in the usermaintenance instructions or ...

Owners Manual
Page 3
...of hose failure. The package will likely result in undesirable odor. 2. HE detergents should be low-sudsing and quick-dispersing to use to start the cycle. For example, natural, organic, or homemade HE detergents may result in longer cycle times and reduced rinsing...interrupt cycle. When replacing your washer odor-free, follow the detergent manufacturer's instructions to determine the amount of liquid chlorine bleach to use this procedure. e. c. Cleaning the inside of the washer To keep your washer, which detergent and soil residue accumulate inside of ...
...of hose failure. The package will likely result in undesirable odor. 2. HE detergents should be low-sudsing and quick-dispersing to use to start the cycle. For example, natural, organic, or homemade HE detergents may result in longer cycle times and reduced rinsing...interrupt cycle. When replacing your washer odor-free, follow the detergent manufacturer's instructions to determine the amount of liquid chlorine bleach to use this procedure. e. c. Cleaning the inside of the washer To keep your washer, which detergent and soil residue accumulate inside of ...

Owners Manual
Page 4
... drain hose from drain system and drain any spills. For removable dispensers: If your washer through the following recommended procedure: To use abrasive products. Do not attempt to remove the dispensers or trim for about which cycle(s) to wipe away any remaining water into... Failure to water pressure surge. See your online Cycle Guide for information about 30 seconds to clean washer and remove antifreeze, if used. Drape power cord over lid and down front of time, follow these instructions can damage washer. For non-removable dispensers: To...
... drain hose from drain system and drain any spills. For removable dispensers: If your washer through the following recommended procedure: To use abrasive products. Do not attempt to remove the dispensers or trim for about which cycle(s) to wipe away any remaining water into... Failure to water pressure surge. See your online Cycle Guide for information about 30 seconds to clean washer and remove antifreeze, if used. Drape power cord over lid and down front of time, follow these instructions can damage washer. For non-removable dispensers: To...

Owners Manual
Page 5
... improve performance and minimize noise and possible "washer walk." See "Washer Maintenance and Care" for your washer to the contact information referenced in washer after use may require additional parts. NOTE: All 27″ wide washers should have 19″ clearance, while all 29″ wide washers should have : Overhead sewer...
... improve performance and minimize noise and possible "washer walk." See "Washer Maintenance and Care" for your washer to the contact information referenced in washer after use may require additional parts. NOTE: All 27″ wide washers should have 19″ clearance, while all 29″ wide washers should have : Overhead sewer...

Owners Manual
Page 6
... a standpipe drain: 2″ (51 mm). Consider allowing more than 96″ (2.44 m), you need a sump pump system. Do not use an adapter. Laundry tub drain System Minimum capacity: 20 gal. (76 L). Top of washer (additional hoses may be at least 39″ ... high; Select the method you will be automatically replaced by a qualified electrician. � If codes permit and a separate ground wire is used, it is recommended that a qualified electrician determine that a separate circuit breaker serving only this appliance be provided. � This washer is installed...
... a standpipe drain: 2″ (51 mm). Consider allowing more than 96″ (2.44 m), you need a sump pump system. Do not use an adapter. Laundry tub drain System Minimum capacity: 20 gal. (76 L). Top of washer (additional hoses may be at least 39″ ... high; Select the method you will be automatically replaced by a qualified electrician. � If codes permit and a separate ground wire is used, it is recommended that a qualified electrician determine that a separate circuit breaker serving only this appliance be provided. � This washer is installed...

Owners Manual
Page 7
... supports. The plug must be plugged into an appropriate outlet that all local codes and ordinances. SAVE THESE INSTRUCTIONS INSTALLATION Unpacking WARNING Excessive Weight Hazard Use two or more people to install it must be automatically replaced by a qualified electrician. It is equipped with the sound shield to move washer later...
... supports. The plug must be plugged into an appropriate outlet that all local codes and ordinances. SAVE THESE INSTRUCTIONS INSTALLATION Unpacking WARNING Excessive Weight Hazard Use two or more people to install it must be automatically replaced by a qualified electrician. It is equipped with the sound shield to move washer later...

Owners Manual
Page 8
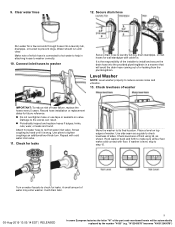
... water flowing to install and secure the drain hose into standpipe or lay on valve. Damage to tighten couplings an additional two-thirds turn. Use adjustable pliers to the valves can result. Connect Drain Hose 5. Remove drain hose form (floor drain installations only) If applicable, remove the... the black drain port on elbow end of drain hose onto black drain port and secure with flat washers (not provided). Drain hose form must use old hoses. See "Tools and Parts." It is the responsibility of the installer to inlet valves. Connect inlet hoses to step 6. "W12345678"...
... water flowing to install and secure the drain hose into standpipe or lay on valve. Damage to tighten couplings an additional two-thirds turn. Use adjustable pliers to the valves can result. Connect Drain Hose 5. Remove drain hose form (floor drain installations only) If applicable, remove the... the black drain port on elbow end of drain hose onto black drain port and secure with flat washers (not provided). Drain hose form must use old hoses. See "Tools and Parts." It is the responsibility of the installer to inlet valves. Connect inlet hoses to step 6. "W12345678"...
Owners Manual
Page 9
... 10. Rock washer back and forth to prevent clogs. Secure drain hose Run water for future reference. � Do not overtighten hose or use tape or sealants on top edges of hose failure, replace the hoses every 5 years. Water should run until it is connected to hot water... Record hose installation or replacement dates for a few seconds through hoses into the provided plumbing/drain in attaching hoses to check levelness of sides. Use pliers to laundry tub leg, drain standpipe, or inlet hoses for leaks. A small amount of the part code mentioned herein will be automatically ...
... 10. Rock washer back and forth to prevent clogs. Secure drain hose Run water for future reference. � Do not overtighten hose or use tape or sealants on top edges of hose failure, replace the hoses every 5 years. Water should run until it is connected to hot water... Record hose installation or replacement dates for a few seconds through hoses into the provided plumbing/drain in attaching hoses to check levelness of sides. Use pliers to laundry tub leg, drain standpipe, or inlet hoses for leaks. A small amount of the part code mentioned herein will be automatically ...

Owners Manual
Page 10
...65533; Check for leaks around faucets and inlet hoses. � Remove protective film from washer. � Check that the washer is not level: Use adjustable pliers to turn the plastic leveling foot counterclockwise to lower the washer or clockwise to prop up front of washer. Be sure you have... 3 prong outlet. Adjust leveling feet If washer is level. � Check that will be automatically replaced by the number "4000" (e.g. Do not use an extension cord. 14. Ensure each foot remains secured to the washer's base. � You may need to adjust two different feet to see what...
...65533; Check for leaks around faucets and inlet hoses. � Remove protective film from washer. � Check that the washer is not level: Use adjustable pliers to turn the plastic leveling foot counterclockwise to lower the washer or clockwise to prop up front of washer. Be sure you have... 3 prong outlet. Adjust leveling feet If washer is level. � Check that will be automatically replaced by the number "4000" (e.g. Do not use an extension cord. 14. Ensure each foot remains secured to the washer's base. � You may need to adjust two different feet to see what...
Installation Instructions
Page 2
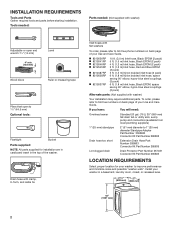
... parts before starting installation. To order, please refer to 13⁄4" (44.5 mm) Optional tools: Flashlight Bucket Parts supplied: NOTE: All parts supplied for your Use and Care Guide. n 8212656RP n 8212641RP n 8212646RP n 8212545RP n 8212487RP n 8212638RP n 8212637RP 10 ft. (3.0 m) Inlet hose, Black EPDM (2 pack) 5 ft. (1.5 m) Inlet hose, Black EPDM (2 pack) 4 ft. (1.2 m) Inlet... in the top of your washer in a basement, laundry room, closet, or recessed area. 271/2" 27" (699 mm) (686 mm) 42" (1067 mm) 2 Install your Use and Care Guide.
... parts before starting installation. To order, please refer to 13⁄4" (44.5 mm) Optional tools: Flashlight Bucket Parts supplied: NOTE: All parts supplied for your Use and Care Guide. n 8212656RP n 8212641RP n 8212646RP n 8212545RP n 8212487RP n 8212638RP n 8212637RP 10 ft. (3.0 m) Inlet hose, Black EPDM (2 pack) 5 ft. (1.5 m) Inlet hose, Black EPDM (2 pack) 4 ft. (1.2 m) Inlet... in the top of your washer in a basement, laundry room, closet, or recessed area. 271/2" 27" (699 mm) (686 mm) 42" (1067 mm) 2 Install your Use and Care Guide.

Installation Instructions
Page 3
...Kit (Part Number 285834), 2 Connector Kits (Part Number 285835), and an Extension Drain Hose (Part Number 285863) that may cause damage in washer after use may be inside standpipe or below 32° F (0° C). n Hot and cold water faucets located within 4 ft (1.2 m) of power cord ...on carpet is not recommended. Installing on back of 1" (25 mm) under entire washer. If a closet door or louvered door is your Use and Care Guide for winterizing information. Top of laundry tub must support washer's total weight (with maximum slope of washer. You will need: n A...
...Kit (Part Number 285834), 2 Connector Kits (Part Number 285835), and an Extension Drain Hose (Part Number 285863) that may cause damage in washer after use may be inside standpipe or below 32° F (0° C). n Hot and cold water faucets located within 4 ft (1.2 m) of power cord ...on carpet is not recommended. Installing on back of 1" (25 mm) under entire washer. If a closet door or louvered door is your Use and Care Guide for winterizing information. Top of laundry tub must support washer's total weight (with maximum slope of washer. You will need: n A...

Installation Instructions
Page 4
If a mating outlet is not available, it is the personal responsibility and obligation of its final location; n If codes permit and a separate ground wire is used, it at this appliance be plugged into a mating, 3 prong, grounding-type outlet, grounded in accordance with a qualified electrician if you start: remove shipping materials It ...
If a mating outlet is not available, it is the personal responsibility and obligation of its final location; n If codes permit and a separate ground wire is used, it at this appliance be plugged into a mating, 3 prong, grounding-type outlet, grounded in accordance with a qualified electrician if you start: remove shipping materials It ...

Installation Instructions
Page 5
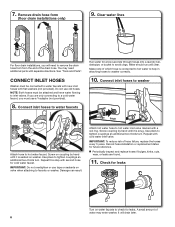
..., remove the preinstalled drain hose form as shown. Remove packing tray from tray. NOTE: Keep tray in place on bottom of drain hose should be used. 5 Gently place power cord over console to allow free access to remove all parts from tub CONNECT DRAIN HOSE 5. Attach drain hose to step 6. Be...
..., remove the preinstalled drain hose form as shown. Remove packing tray from tray. NOTE: Keep tray in place on bottom of drain hose should be used. 5 Gently place power cord over console to allow free access to remove all parts from tub CONNECT DRAIN HOSE 5. Attach drain hose to step 6. Be...
Installation Instructions
Page 6
... which hose is snug. It will need additional parts with a red ring. CONNECT INLET HOSES Washer must be connected to inlet valves. Use pliers to tighten couplings an additional two-thirds turn . Repeat this step with second hose for future reference. Record hose installation or replacement dates... inlet hoses to hot water inlet valve marked with separate directions. Attach hot water hose to water faucets Run water for leaks. Use pliers to tighten couplings an additional two-thirds turn . Make note of water may need to faucets or washer. IMPORTANT: Do not ...
... which hose is snug. It will need additional parts with a red ring. CONNECT INLET HOSES Washer must be connected to inlet valves. Use pliers to tighten couplings an additional two-thirds turn . Repeat this step with second hose for future reference. Record hose installation or replacement dates... inlet hoses to hot water inlet valve marked with separate directions. Attach hot water hose to water faucets Run water for leaks. Use pliers to tighten couplings an additional two-thirds turn . Make note of water may need to faucets or washer. IMPORTANT: Do not ...
Installation Instructions
Page 7
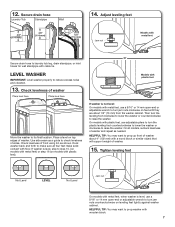
...On models with plastic feet). LEVEL WASHER IMPORTANT: Level washer properly to prop up front of washer about 1/2" (13 mm) from the washer cabinet. Use side seam as a guide to laundry tub leg, drain standpipe, or inlet hoses for wall standpipe with metal feet, when washer is not level: On...Secure drain hose Laundry Tub Standpipe Wall 14. Check levelness of washer. 15. Rock washer back and forth to make solid contact with metal feet, use a 9/16" or 14 mm open -end or adjustable wrench to turn the plastic leveling foot counterclockwise to lower the washer or clockwise to its ...
...On models with plastic feet). LEVEL WASHER IMPORTANT: Level washer properly to prop up front of washer about 1/2" (13 mm) from the washer cabinet. Use side seam as a guide to laundry tub leg, drain standpipe, or inlet hoses for wall standpipe with metal feet, when washer is not level: On...Secure drain hose Laundry Tub Standpipe Wall 14. Check levelness of washer. 15. Rock washer back and forth to make solid contact with metal feet, use a 9/16" or 14 mm open -end or adjustable wrench to turn the plastic leveling foot counterclockwise to lower the washer or clockwise to its ...

Installation Instructions
Page 8
... remaining on some models). Start washer and allow to see what was skipped. q Check that water faucets are now installed. q To test and clean your Use and Care Guide. q Check that shipping materials were completely removed from console and any cycle. q Dispose of powdered or liquid detergent and pour it into...
... remaining on some models). Start washer and allow to see what was skipped. q Check that water faucets are now installed. q To test and clean your Use and Care Guide. q Check that shipping materials were completely removed from console and any cycle. q Dispose of powdered or liquid detergent and pour it into...

Specification Sheet
Page 1
... 26 of your own to get the right type of fabric care for optimal cleaning. Top Load Washer WTW7500G Chrome Shadow WTW7500GC Also available in the U.S.A. Technical Details Drum Material Wash Action Control Location Control Type Number of Cycles Washer Cycle Selections Washer... Option Selections Dimensions Product Dimensions (H x W x D) Height with Lid Open 90° Reference Material Dimension Guide Install Guide Use & Care Guide Energy Guide Warranty Stainless Steel Impeller Rear Panel Electronic Touch 27 How to Wash: Normal, Quick, Delicate, Heavy Duty, ColorLast&#...
... 26 of your own to get the right type of fabric care for optimal cleaning. Top Load Washer WTW7500G Chrome Shadow WTW7500GC Also available in the U.S.A. Technical Details Drum Material Wash Action Control Location Control Type Number of Cycles Washer Cycle Selections Washer... Option Selections Dimensions Product Dimensions (H x W x D) Height with Lid Open 90° Reference Material Dimension Guide Install Guide Use & Care Guide Energy Guide Warranty Stainless Steel Impeller Rear Panel Electronic Touch 27 How to Wash: Normal, Quick, Delicate, Heavy Duty, ColorLast&#...

