
Use & Care Guide
Page 3
...alert symbol. Always read and obey all parts and panels before servicing. ■■ Replace all safety messages. All safety messages will follow instructions. Failure to cause cancer. All safety ...power before operating. ■■ Remove door or drawer(s) from your old refrigerated appliance. ■■ Use nonflammable cleaner. ■■ Keep flammable materials and vapors, such as gasoline, away from your old refrigerated appliance. This is , tell you to move and install Beverage Center. These words mean: DANGER You can happen if the instructions...
...alert symbol. Always read and obey all parts and panels before servicing. ■■ Replace all safety messages. All safety messages will follow instructions. Failure to cause cancer. All safety ...power before operating. ■■ Remove door or drawer(s) from your old refrigerated appliance. ■■ Use nonflammable cleaner. ■■ Keep flammable materials and vapors, such as gasoline, away from your old refrigerated appliance. This is , tell you to move and install Beverage Center. These words mean: DANGER You can happen if the instructions...
Use & Care Guide
Page 4
... with warm water and dry. ■■ Do not use an adapter. Failure to the electrical source. When installing your beverage center, allow for a ¼" (6.35 mm) space on the hinge side to allow for your beverage center next to follow these instructions can damage the surface of installation, cleaning, or removing a light bulb, disconnect the beverage center from surfaces before turning on...
... with warm water and dry. ■■ Do not use an adapter. Failure to the electrical source. When installing your beverage center, allow for a ¼" (6.35 mm) space on the hinge side to allow for your beverage center next to follow these instructions can damage the surface of installation, cleaning, or removing a light bulb, disconnect the beverage center from surfaces before turning on...
Use & Care Guide
Page 5
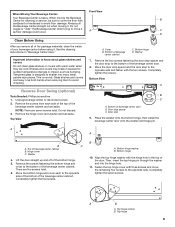
... screws. There are cold. Top hinge 5 Do not wiggle or "walk" the Beverage Center when trying to sudden temperature changes or impact, such as floor damage could occur. This is heavy. Door stop 9. Washer 4. Reverse Door Swing (optional) Tools Needed: Phillips screwdriver 1. Bottom of beverage center door B. Bottom hinge washer B. Bottom View A B C A. Bottom of beverage center cabinet C. Shelves and covers may break if exposed...
... screws. There are cold. Top hinge 5 Do not wiggle or "walk" the Beverage Center when trying to sudden temperature changes or impact, such as floor damage could occur. This is heavy. Door stop 9. Washer 4. Reverse Door Swing (optional) Tools Needed: Phillips screwdriver 1. Bottom of beverage center door B. Bottom hinge washer B. Bottom View A B C A. Bottom of beverage center cabinet C. Shelves and covers may break if exposed...
Use & Care Guide
Page 6
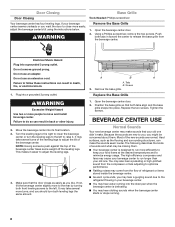
.... Do not remove ground prong. Replace the two screws. Door Closing Base Grille Door Closing Tools Needed: Phillips screwdriver Your beverage center has four leveling legs. If your food items at the desired temperatures and to run longer than your old one didn't make the sounds seem louder. Using a Phillips screwdriver, remove the two screws. Electrical Shock Hazard Plug into the drain pan when the...
.... Do not remove ground prong. Replace the two screws. Door Closing Base Grille Door Closing Tools Needed: Phillips screwdriver Your beverage center has four leveling legs. If your food items at the desired temperatures and to run longer than your old one didn't make the sounds seem louder. Using a Phillips screwdriver, remove the two screws. Electrical Shock Hazard Plug into the drain pan when the...
Use & Care Guide
Page 7
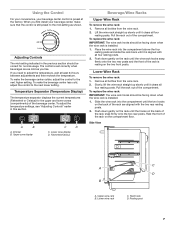
... Beverage/Wine Racks Upper Wine Rack To remove the wine rack: 1. Remove all bottles from the wine rack. 2. Lower wine rack C. Rack hook D. To make the beverage center colder, adjust the control to adjust the temperature, wait at the factory. Upper zone display C D C. Push down when the wine rack is installed. 1. To adjust the temperature settings, see "Adjusting Controls" earlier in the previous section should...
... Beverage/Wine Racks Upper Wine Rack To remove the wine rack: 1. Remove all bottles from the wine rack. 2. Lower wine rack C. Rack hook D. To make the beverage center colder, adjust the control to adjust the temperature, wait at the factory. Upper zone display C D C. Push down when the wine rack is installed. 1. To adjust the temperature settings, see "Adjusting Controls" earlier in the previous section should...
Use & Care Guide
Page 8
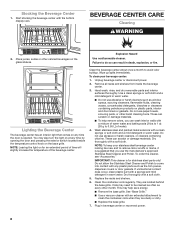
... by opening the door and pressing the exterior switch located beside the temperature control knob on the base grille. NOTE: Leaving the light on plastic parts, interior and door liners or gaskets. Unplug beverage center or disconnect power. 2. Hand wash, rinse, and dry removable parts and interior surfaces thoroughly. IMPORTANT: This cleaner is opened. Replace the racks and shelves. 6. Plug in warm water. ■■ Do not use the manufacturer's approved Stainless Steel...
... by opening the door and pressing the exterior switch located beside the temperature control knob on the base grille. NOTE: Leaving the light on plastic parts, interior and door liners or gaskets. Unplug beverage center or disconnect power. 2. Hand wash, rinse, and dry removable parts and interior surfaces thoroughly. IMPORTANT: This cleaner is opened. Replace the racks and shelves. 6. Plug in warm water. ■■ Do not use the manufacturer's approved Stainless Steel...
Use & Care Guide
Page 9
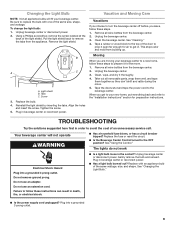
... Center Control turned to the beverage center. Light shield B. Replace the bulb. 4. Pull the light shield back to the top of an unnecessary service call. Tabs C. The lights do not work Electrical Shock Hazard Plug into a grounded 3 prong outlet. 9 Do not use an extension cord. Plug in beverage center or reconnect power. See "Changing the Light Bulb." ■■ Is the power supply cord unplugged? Be sure to get to...
... Center Control turned to the beverage center. Light shield B. Replace the bulb. 4. Pull the light shield back to the top of an unnecessary service call. Tabs C. The lights do not work Electrical Shock Hazard Plug into a grounded 3 prong outlet. 9 Do not use an extension cord. Plug in beverage center or reconnect power. See "Changing the Light Bulb." ■■ Is the power supply cord unplugged? Be sure to get to...
Use & Care Guide
Page 10
... makes the motor work harder. There is removed. Clean the gasket and the surface that they are easy to find , and close the door as soon as the wine is removed. ■■ Is the control set correctly for moisture to run longer under warm conditions. In order to conserve energy, try to get everything you need out of the time. ■■ Is the door opened...
... makes the motor work harder. There is removed. Clean the gasket and the surface that they are easy to find , and close the door as soon as the wine is removed. ■■ Is the control set correctly for moisture to run longer under warm conditions. In order to conserve energy, try to get everything you need out of the time. ■■ Is the door opened...
Use & Care Guide
Page 11
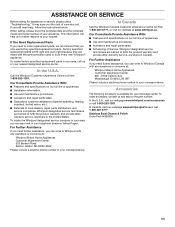
...-2692 Please include a daytime phone number in your beverage center. Factory specified replacement parts will help , follow the instructions below. Call the Whirlpool Customer eXperience Center toll free: 1-800-253-1301. For Further Assistance If you only use factory specified replacement parts. To order accessory, contact us to better respond to local dealers, repair parts distributors, and service companies. This information will fit...
...-2692 Please include a daytime phone number in your beverage center. Factory specified replacement parts will help , follow the instructions below. Call the Whirlpool Customer eXperience Center toll free: 1-800-253-1301. For Further Assistance If you only use factory specified replacement parts. To order accessory, contact us to better respond to local dealers, repair parts distributors, and service companies. This information will fit...

Use & Care Guide
Page 12
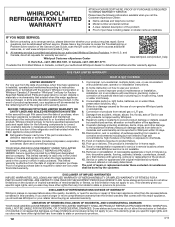
... is installed, operated and maintained according to the instructions attached to province. 12 6/15 Proof of the Use and Care Guide, scan the QR code on the duration of implied warranties of merchantability or fitness, so this limitation may have the following components to defective materials or workmanship. ■ Sealed Refrigeration system (includes compressor, evaporator, condenser, dryer and connecting tubing). house wiring, fuses or water...
... is installed, operated and maintained according to the instructions attached to province. 12 6/15 Proof of the Use and Care Guide, scan the QR code on the duration of implied warranties of merchantability or fitness, so this limitation may have the following components to defective materials or workmanship. ■ Sealed Refrigeration system (includes compressor, evaporator, condenser, dryer and connecting tubing). house wiring, fuses or water...
Energy Guide
Page 1
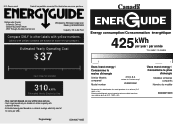
... kWh Uses least energy / Consomme le moins d'énergie Similar Models compared Model number 5 4.5 to other labels with automatic defrost. · Estimated energy cost based on same test procedures. Labels with yellow numbers are based on a national average electricity cost of this label before consumer purchase. Canada Refrigerator-Freezer ·Automatic Defrost ·Bottom Mounted Freezer ·With Through-the-Door-Ice Service Whirlpool by Whirlpool Corporation Model(s):WUB50X24EM Capacity: 5.6 Cubic Feet Compare...
... kWh Uses least energy / Consomme le moins d'énergie Similar Models compared Model number 5 4.5 to other labels with automatic defrost. · Estimated energy cost based on same test procedures. Labels with yellow numbers are based on a national average electricity cost of this label before consumer purchase. Canada Refrigerator-Freezer ·Automatic Defrost ·Bottom Mounted Freezer ·With Through-the-Door-Ice Service Whirlpool by Whirlpool Corporation Model(s):WUB50X24EM Capacity: 5.6 Cubic Feet Compare...
Warranty Information
Page 1
... limited warranty is provided exclusively by Whirlpool. 8. Discoloration, rust or oxidation of the Use and Care Guide, scan the QR code on how to use with published user, operator or installation instructions. 2. Pick-up or delivery. This warranty gives you specific legal rights, and you call the Customer eXperience Center: ■ Name, address and telephone number ■ Model number and serial number ■ A clear, detailed description of the problem ■...
... limited warranty is provided exclusively by Whirlpool. 8. Discoloration, rust or oxidation of the Use and Care Guide, scan the QR code on how to use with published user, operator or installation instructions. 2. Pick-up or delivery. This warranty gives you specific legal rights, and you call the Customer eXperience Center: ■ Name, address and telephone number ■ Model number and serial number ■ A clear, detailed description of the problem ■...


