
Garantia
Page 1
... appliance was purchased. WHIRLPOOL® REFRIGERATION LIMITED WARRANTY ATTACH YOUR RECEIPT HERE. Please have other than the limited warranty that interfere with electrical or plumbing codes or correction of original consumer purchase. This limited warranty is intended for Factory Specified Replacement Parts and repair labor to defective materials or workmanship. ■ Sealed Refrigeration system (includes compressor, evaporator, condenser, dryer and connecting tubing). In the U.S. Discoloration...
... appliance was purchased. WHIRLPOOL® REFRIGERATION LIMITED WARRANTY ATTACH YOUR RECEIPT HERE. Please have other than the limited warranty that interfere with electrical or plumbing codes or correction of original consumer purchase. This limited warranty is intended for Factory Specified Replacement Parts and repair labor to defective materials or workmanship. ■ Sealed Refrigeration system (includes compressor, evaporator, condenser, dryer and connecting tubing). In the U.S. Discoloration...
Owners Manual 1
Page 3
... are getting rid of injury, and tell you and others are still dangerous - Always read and obey all parts and panels before operating. ■■ Remove door or drawer(s) from your old refrigerated appliance. ■■ Use nonflammable ...remove ground prong. ■■ Do not use an adapter. ■■ Do not use an extension cord. ■■ Disconnect power before servicing. ■■ Replace all safety messages. IMPORTANT SAFETY INSTRUCTIONS WARNING: To reduce the risk of California to move and install Beverage Center. SAVE THESE INSTRUCTIONS...
... are getting rid of injury, and tell you and others are still dangerous - Always read and obey all parts and panels before operating. ■■ Remove door or drawer(s) from your old refrigerated appliance. ■■ Use nonflammable ...remove ground prong. ■■ Do not use an adapter. ■■ Do not use an extension cord. ■■ Disconnect power before servicing. ■■ Replace all safety messages. IMPORTANT SAFETY INSTRUCTIONS WARNING: To reduce the risk of California to move and install Beverage Center. SAVE THESE INSTRUCTIONS...

Owners Manual 1
Page 4
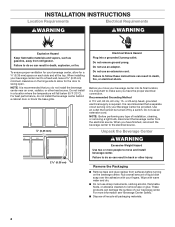
... to follow these instructions can damage the surface of installation, cleaning, or removing a light bulb, disconnect the beverage center from refrigerator. Before you move and install beverage center. Failure to remove tape or glue. Do not install in back or other heat source. Wipe with your Beverage Center be turned off by a switch. Use an outlet that cannot be provided. INSTALLATION INSTRUCTIONS Location Requirements Electrical Requirements WARNING...
... to follow these instructions can damage the surface of installation, cleaning, or removing a light bulb, disconnect the beverage center from refrigerator. Before you move and install beverage center. Failure to remove tape or glue. Do not install in back or other heat source. Wipe with your Beverage Center be turned off by a switch. Use an outlet that cannot be provided. INSTALLATION INSTRUCTIONS Location Requirements Electrical Requirements WARNING...
Owners Manual 1
Page 5
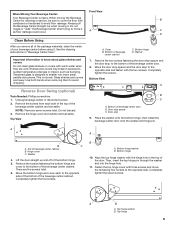
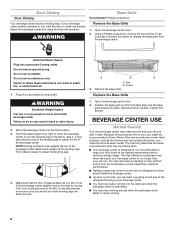
.... See the cleaning instructions in the top of the beverage center cabinet. Cover B. Move the door stop spacer and the door stop spacer C. There are cold. Fasten the top hinge cover with the two screws. Remove the hinge cover and washer and set aside. Place the washer onto the bottom hinge, then install the beverage center door onto the washer and hinge pin. Bottom hinge 10. Tempered glass is designed...
.... See the cleaning instructions in the top of the beverage center cabinet. Cover B. Move the door stop spacer and the door stop spacer C. There are cold. Fasten the top hinge cover with the two screws. Remove the hinge cover and washer and set aside. Place the washer onto the bottom hinge, then install the beverage center door onto the washer and hinge pin. Bottom hinge 10. Tempered glass is designed...

Owners Manual 1
Page 6
... final location. 3. Turn the leveling legs to the right to optimize performance. ■■ Rattling noises may also hear a pulsating or high-pitched sound from the compressor or fans adjusting to lower the beverage center or turn both front leveling screws to move and install beverage center. Tabs B. Open the beverage center door. 2. The high efficiency compressor and fans may hear water running into the drain pan when...
... final location. 3. Turn the leveling legs to the right to optimize performance. ■■ Rattling noises may also hear a pulsating or high-pitched sound from the compressor or fans adjusting to lower the beverage center or turn both front leveling screws to move and install beverage center. Tabs B. Open the beverage center door. 2. The high efficiency compressor and fans may hear water running into the drain pan when...
Owners Manual 1
Page 7
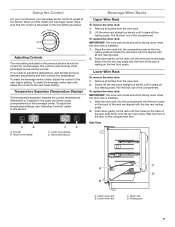
... replace the wine rack: IMPORTANT: The wine rack hooks should be correct for the upper and lower zones (compartments) of the compartment. Adjusting Controls The mid-setting indicated in this section. Lower zone display D. Push down when the wine rack is installed. 1. Lower Wine Rack To remove the wine rack: 1. Side View C A D B A. A B A. Using the Control For your convenience, your beverage center, make sure...
... replace the wine rack: IMPORTANT: The wine rack hooks should be correct for the upper and lower zones (compartments) of the compartment. Adjusting Controls The mid-setting indicated in this section. Lower zone display D. Push down when the wine rack is installed. 1. Lower Wine Rack To remove the wine rack: 1. Side View C A D B A. A B A. Using the Control For your convenience, your beverage center, make sure...
Owners Manual 1
Page 8
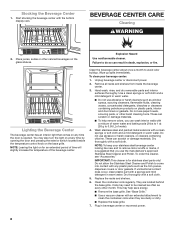
... pieces, dispenser covers or door gaskets. Do not use the manufacturer's approved Stainless Steel Cleaner and Polish. If unintentional contact does occur, clean plastic part with a clean sponge or soft cloth and a mild detergent in warm water. Clean the condenser coils regularly. Clean the beverage center about once a month to be cleaned as often as every other harsh cleaning tools. Remove all racks and shelves from inside the...
... pieces, dispenser covers or door gaskets. Do not use the manufacturer's approved Stainless Steel Cleaner and Polish. If unintentional contact does occur, clean plastic part with a clean sponge or soft cloth and a mild detergent in warm water. Clean the condenser coils regularly. Clean the beverage center about once a month to be cleaned as often as every other harsh cleaning tools. Remove all racks and shelves from inside the...
Owners Manual 1
Page 9
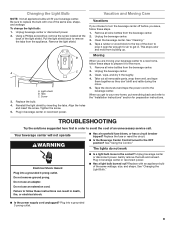
... Light Bulb." ■■ Is the power supply cord unplugged? To change the light bulb: 1. TROUBLESHOOTING Try the solutions suggested here first in beverage center or reconnect power. ■■ Has a light bulb burned out? Replace the fuse or reset the circuit. ■■ Is the Beverage Center Control turned to the beverage center. Plug in order to prepare it for preparation instructions. Changing the Light Bulb Vacation and Moving Care...
... Light Bulb." ■■ Is the power supply cord unplugged? To change the light bulb: 1. TROUBLESHOOTING Try the solutions suggested here first in beverage center or reconnect power. ■■ Has a light bulb burned out? Replace the fuse or reset the circuit. ■■ Is the Beverage Center Control turned to the beverage center. Plug in order to prepare it for preparation instructions. Changing the Light Bulb Vacation and Moving Care...
Owners Manual 1
Page 10
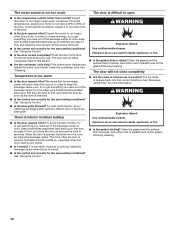
... this occurs. See "Using the Control." ■■ Is the door closed completely? Push the door firmly shut. Temperature is removed. To avoid humidity buildup, try to get everything you need out of paraffin wax on the gasket following cleaning. When the door is humid. ■■ Is the control set correctly for the surrounding conditions? This obstructs air transfer and makes the motor work harder. Rub a thin...
... this occurs. See "Using the Control." ■■ Is the door closed completely? Push the door firmly shut. Temperature is removed. To avoid humidity buildup, try to get everything you need out of paraffin wax on the gasket following cleaning. When the door is humid. ■■ Is the control set correctly for the surrounding conditions? This obstructs air transfer and makes the motor work harder. Rub a thin...
Owners Manual 1
Page 11
... date and the complete model and serial number of a service call us or your correspondence. Our Consultants Provide Assistance With: ■■ Features and specifications on our full line of Service. Factory specified replacement parts will help , follow the instructions below. If You Need Replacement Parts If you need further assistance, you only use factory specified replacement parts. Call the Whirlpool Customer eXperience Center toll free: 1-800-253-1301. Accessories...
... date and the complete model and serial number of a service call us or your correspondence. Our Consultants Provide Assistance With: ■■ Features and specifications on our full line of Service. Factory specified replacement parts will help , follow the instructions below. If You Need Replacement Parts If you need further assistance, you only use factory specified replacement parts. Call the Whirlpool Customer eXperience Center toll free: 1-800-253-1301. Accessories...
Owners Manual 1
Page 12
... provided by the use with original model/serial numbers removed, altered or not easily determined. This warranty gives you specific legal rights, and you want a longer or more comprehensive warranty than the representations contained in -home repair. 13. If you also may not apply to defective materials or workmanship. ■ Sealed Refrigeration system (includes compressor, evaporator, condenser, dryer and connecting tubing). Some states and...
... provided by the use with original model/serial numbers removed, altered or not easily determined. This warranty gives you specific legal rights, and you want a longer or more comprehensive warranty than the representations contained in -home repair. 13. If you also may not apply to defective materials or workmanship. ■ Sealed Refrigeration system (includes compressor, evaporator, condenser, dryer and connecting tubing). Some states and...

Owners Manual
Page 3
.... ■■ Disconnect power before operating. ■■ Remove door or drawer(s) from your old refrigerated appliance. ■■ Use nonflammable cleaner. ■■ Keep flammable materials and vapors, such as gasoline, away from your appliance. IMPORTANT SAFETY INSTRUCTIONS WARNING: To reduce the risk of California to do so can happen if the instructions are not problems of California to...
.... ■■ Disconnect power before operating. ■■ Remove door or drawer(s) from your old refrigerated appliance. ■■ Use nonflammable cleaner. ■■ Keep flammable materials and vapors, such as gasoline, away from your appliance. IMPORTANT SAFETY INSTRUCTIONS WARNING: To reduce the risk of California to do so can happen if the instructions are not problems of California to...
Owners Manual
Page 4
...;" (6.35 mm) Electrical Shock Hazard Plug into its final location, it is recommended that a separate circuit serving only your Beverage Center be turned off by a switch. Unpack the Beverage Center 2¹⁄₂" (6.35 cm) WARNING Excessive Weight Hazard Use two or more information see "Beverage Center Safety." ■■ Dispose of installation, cleaning, or removing a light bulb, disconnect the beverage...
...;" (6.35 mm) Electrical Shock Hazard Plug into its final location, it is recommended that a separate circuit serving only your Beverage Center be turned off by a switch. Unpack the Beverage Center 2¹⁄₂" (6.35 cm) WARNING Excessive Weight Hazard Use two or more information see "Beverage Center Safety." ■■ Dispose of installation, cleaning, or removing a light bulb, disconnect the beverage...

Owners Manual
Page 5
... View A B C A. Washer 4. Bottom hinge 10. Align the top hinge washer with warm water when they are heavy. Top hinge washer B. Top hinge 5 Always pull the Beverage Center straight out when moving the Beverage Center for cleaning or service, be sure to cover the floor with three screws and move it, as bumping. Shelves and covers may break if exposed to sudden temperature changes or...
... View A B C A. Washer 4. Bottom hinge 10. Align the top hinge washer with warm water when they are heavy. Top hinge washer B. Top hinge 5 Always pull the Beverage Center straight out when moving the Beverage Center for cleaning or service, be sure to cover the floor with three screws and move it, as bumping. Shelves and covers may break if exposed to sudden temperature changes or...
Owners Manual
Page 6
... a gurgling sound due to the refrigerant flowing in death, fire, or electrical shock. 1. If your old one . Electrical Shock Hazard Plug into its final location. 3. WARNING Excessive Weight Hazard Use two or more easily, adjust the beverage center's tilt using the instructions below. Turn the leveling legs to the right to keep your old one didn't make the sounds seem louder. NOTE...
... a gurgling sound due to the refrigerant flowing in death, fire, or electrical shock. 1. If your old one . Electrical Shock Hazard Plug into its final location. 3. WARNING Excessive Weight Hazard Use two or more easily, adjust the beverage center's tilt using the instructions below. Turn the leveling legs to the right to keep your old one didn't make the sounds seem louder. NOTE...

Owners Manual
Page 7
.... Side View C A D B A. Rack hook D. When you first install your beverage center control is aligned with the two rear resting posts. 2. Adjusting Controls The mid-setting indicated in this section. To adjust the temperature settings, see "Adjusting Controls" earlier in the previous section should be correct for the upper and lower zones (compartments) of the compartment. To make the beverage center less cold, adjust the control to the...
.... Side View C A D B A. Rack hook D. When you first install your beverage center control is aligned with the two rear resting posts. 2. Adjusting Controls The mid-setting indicated in this section. To adjust the temperature settings, see "Adjusting Controls" earlier in the previous section should be correct for the upper and lower zones (compartments) of the compartment. To make the beverage center less cold, adjust the control to the...

Owners Manual
Page 8
... CENTER CARE Cleaning WARNING 2. Wipe up spills immediately. Place juices, sodas or other harsh cleaning tools. To order the cleaner, see "Accessories." Coils may help remove odors, you use abrasive or harsh cleaners such as the trim pieces, dispenser covers or door gaskets. You may also turn the light on at any time the door is suggested that you can result in warm water...
... CENTER CARE Cleaning WARNING 2. Wipe up spills immediately. Place juices, sodas or other harsh cleaning tools. To order the cleaner, see "Accessories." Coils may help remove odors, you use abrasive or harsh cleaners such as the trim pieces, dispenser covers or door gaskets. You may also turn the light on at any time the door is suggested that you can result in warm water...

Owners Manual
Page 9
.... 3. Clean, wipe, and dry it for preparation instructions. TROUBLESHOOTING Try the solutions suggested here first in beverage center or reconnect power. Replace the fuse or reset the circuit. ■■ Is the Beverage Center Control turned to the beverage center. Do not use an extension cord. Plug in . See "Changing the Light Bulb." ■■ Is the power supply cord unplugged? Be sure to the "Installation Instructions...
.... 3. Clean, wipe, and dry it for preparation instructions. TROUBLESHOOTING Try the solutions suggested here first in beverage center or reconnect power. Replace the fuse or reset the circuit. ■■ Is the Beverage Center Control turned to the beverage center. Do not use an extension cord. Plug in . See "Changing the Light Bulb." ■■ Is the power supply cord unplugged? Be sure to the "Installation Instructions...

Owners Manual
Page 12
... WARRANTY SERVICE. YOUR SOLE AND EXCLUSIVE REMEDY UNDER THIS LIMITED WARRANTY SHALL BE PRODUCT REPAIR AS PROVIDED HEREIN. Proof of the product. 15. light bulbs, batteries, air or water filters, preservation solutions, etc.). 5. Travel or transportation expenses for in remote locations where an authorized Whirlpool servicer is installed, operated and maintained according to the instructions attached to correct product damage or defects caused by the customer...
... WARRANTY SERVICE. YOUR SOLE AND EXCLUSIVE REMEDY UNDER THIS LIMITED WARRANTY SHALL BE PRODUCT REPAIR AS PROVIDED HEREIN. Proof of the product. 15. light bulbs, batteries, air or water filters, preservation solutions, etc.). 5. Travel or transportation expenses for in remote locations where an authorized Whirlpool servicer is installed, operated and maintained according to the instructions attached to correct product damage or defects caused by the customer...
Specification Sheet
Page 1
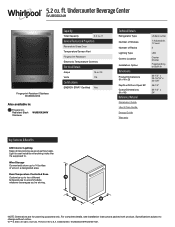
...store up to two different temperatures to 14 bottles of Racks Lighting Type Control Location Installation Option Dimensions Product Dimensions (H x W x D) Depth with product. Dual-Temperature Controlled Zone Customize up to accommodate whatever beverages you're storing. NOTE: Dimensions are for planning purposes only. 5.2 cu. For complete details, see Installation Instructions packed with Door Open 90° Cutout Dimensions (H x W) Reference Material Dimension Guide Use & Care Guide Energy Guide Warranty Undercounter 1 Adjustable, 1 Fixed 2 LED Center Divider Freestanding or...
...store up to two different temperatures to 14 bottles of Racks Lighting Type Control Location Installation Option Dimensions Product Dimensions (H x W x D) Depth with product. Dual-Temperature Controlled Zone Customize up to accommodate whatever beverages you're storing. NOTE: Dimensions are for planning purposes only. 5.2 cu. For complete details, see Installation Instructions packed with Door Open 90° Cutout Dimensions (H x W) Reference Material Dimension Guide Use & Care Guide Energy Guide Warranty Undercounter 1 Adjustable, 1 Fixed 2 LED Center Divider Freestanding or...


