

Garantia
Page 1
... correction of household electrical or plumbing (i.e. Consumable parts (i.e. Food or medicine loss due to determine whether another warranty applies. Pick-up or delivery. Removal or reinstallation of the Use and Care Guide, scan the QR code on the below named parts only and does not include repair labor. ■ Refrigerator/freezer cavity liner if the part cracks due to review the Troubleshooting or Problem Solver section...
... correction of household electrical or plumbing (i.e. Consumable parts (i.e. Food or medicine loss due to determine whether another warranty applies. Pick-up or delivery. Removal or reinstallation of the Use and Care Guide, scan the QR code on the below named parts only and does not include repair labor. ■ Refrigerator/freezer cavity liner if the part cracks due to review the Troubleshooting or Problem Solver section...
Specification Sheet
Page 1
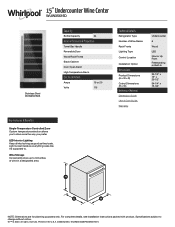
..., see Installation Instructions packed with product. All rights reserved. D200052XXC. NOTE: Dimensions are for planning purposes only. WUW35X15DSPECSHEETV01. Specifications subject to . 15" Undercounter Wine Center WUW35X15D Stainless Steel WUW35X15DS Capacity Bottle Capacity 34 General Features & Properties Towel Bar Handle Reversible Door Wood Rack Fronts Black Cabinet Door Open Alarm High Temperature Alarm Electrical Details Amps 15 or 20 Volts 115 Technical Details Refrigerator Type Number of wine in the U.S.A. LED Interior Lighting Keep drinks...
..., see Installation Instructions packed with product. All rights reserved. D200052XXC. NOTE: Dimensions are for planning purposes only. WUW35X15DSPECSHEETV01. Specifications subject to . 15" Undercounter Wine Center WUW35X15D Stainless Steel WUW35X15DS Capacity Bottle Capacity 34 General Features & Properties Towel Bar Handle Reversible Door Wood Rack Fronts Black Cabinet Door Open Alarm High Temperature Alarm Electrical Details Amps 15 or 20 Volts 115 Technical Details Refrigerator Type Number of wine in the U.S.A. LED Interior Lighting Keep drinks...

Owners Manual
Page 3
... if you don't follow these basic precautions: ■ Plug into a grounded 3 prong outlet. ■ Remove doors from your old wine cellar. ■ Do not remove ground prong. ■ Use nonflammable cleaner. ■ Do not use an adapter. ■ Do not use an extension cord. ■ Disconnect power before operating. SAVE THESE INSTRUCTIONS State of California Proposition 65 Warnings: WARNING: This...
... if you don't follow these basic precautions: ■ Plug into a grounded 3 prong outlet. ■ Remove doors from your old wine cellar. ■ Do not remove ground prong. ■ Use nonflammable cleaner. ■ Do not use an adapter. ■ Do not use an extension cord. ■ Disconnect power before operating. SAVE THESE INSTRUCTIONS State of California Proposition 65 Warnings: WARNING: This...

Owners Manual
Page 4
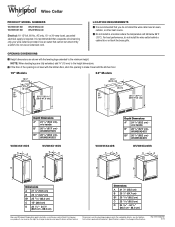
... make sure you move your wine cellar be turned off by a switch. Electrical Requirements WARNING Electrical Shock Hazard Plug into its final location, it level with the kitchen floor, shim the opening to the height dimensions. Do not remove ground prong. Do not use an adapter. NOTE: Before performing any type of 105/8" (27 cm) required to allow full shelf extension. 4 Before you have the proper electrical connection...
... make sure you move your wine cellar be turned off by a switch. Electrical Requirements WARNING Electrical Shock Hazard Plug into its final location, it level with the kitchen floor, shim the opening to the height dimensions. Do not remove ground prong. Do not use an adapter. NOTE: Before performing any type of 105/8" (27 cm) required to allow full shelf extension. 4 Before you have the proper electrical connection...

Owners Manual
Page 5
... "Wine Cellar Care." WARNING Electrical Shock Hazard Plug into its final location. 3. Plug into a grounded 3 prong outlet. INSTALLATION INSTRUCTIONS Unpack the Wine Cellar WARNING Excessive Weight Hazard Use two or more turns, and you like. Dispose of/recycle all of the packaging materials, clean the inside of the wine cellar takes some weight off the leveling legs. This makes it . Door Closing Your wine...
... "Wine Cellar Care." WARNING Electrical Shock Hazard Plug into its final location. 3. Plug into a grounded 3 prong outlet. INSTALLATION INSTRUCTIONS Unpack the Wine Cellar WARNING Excessive Weight Hazard Use two or more turns, and you like. Dispose of/recycle all of the packaging materials, clean the inside of the wine cellar takes some weight off the leveling legs. This makes it . Door Closing Your wine...

Owners Manual
Page 6
... switch and door stop ; Reverse Door Swing (optional) NOTE: There are located behind the seal. Remove the screws for a left corner of the front of the door into the three holes in the bag with the "Use and Care Guide." 6 Remove the three decorative screws from the upper left -hand door swing. Remove Whirlpool badge. (Only models: WUW55X15DS & WUW55X24DS) 9. Using the three screws removed in the previous step, attach the left hinge...
... switch and door stop ; Reverse Door Swing (optional) NOTE: There are located behind the seal. Remove the screws for a left corner of the front of the door into the three holes in the bag with the "Use and Care Guide." 6 Remove the three decorative screws from the upper left -hand door swing. Remove Whirlpool badge. (Only models: WUW55X15DS & WUW55X24DS) 9. Using the three screws removed in the previous step, attach the left hinge...

Owners Manual
Page 7
.... Handle Assembly NOTE: Only for cleaning. Tighten the hinge screws (as necessary). Failure to floor covering during installation. Remove the door handle and hardware bag containing the hex key from the base grille. 3. Setscrew will not be possible. 3. Check the alignment of wine cellar. (Only models: WUW55X15DS & WUW55X24DS) NOTE: The decal & Whirlpool badge are preinstalled in cabinet opening. D A C B A. Tighten the screws. Using a Phillips...
.... Handle Assembly NOTE: Only for cleaning. Tighten the hinge screws (as necessary). Failure to floor covering during installation. Remove the door handle and hardware bag containing the hex key from the base grille. 3. Setscrew will not be possible. 3. Check the alignment of wine cellar. (Only models: WUW55X15DS & WUW55X24DS) NOTE: The decal & Whirlpool badge are preinstalled in cabinet opening. D A C B A. Tighten the screws. Using a Phillips...

Owners Manual
Page 8
... hear water running into the drain pan when the wine cellar is defrosting. ■ You may hear clicking sounds when the wine cellar starts or stops running. Light C. Decrease temperature E. Power C. Light 8 The high efficiency compressor and fans may cause your wine cellar to minimize energy usage. Eco mode B. Temperature indicator E. F/C Control H. Most of sounds and what may be concerned about them . ■ Your wine cellar is located at...
... hear water running into the drain pan when the wine cellar is defrosting. ■ You may hear clicking sounds when the wine cellar starts or stops running. Light C. Decrease temperature E. Power C. Light 8 The high efficiency compressor and fans may cause your wine cellar to minimize energy usage. Eco mode B. Temperature indicator E. F/C Control H. Most of sounds and what may be concerned about them . ■ Your wine cellar is located at...

Owners Manual
Page 9
... mode button for 3 seconds. To adjust the temperature settings, see "Adjusting the Control" earlier in this model is currently in the compartment display(s). Temperature indicator H. The Light button/touch pad will illuminate to turn On the wine cellar cooling system. Turn Light On/Off: Press Light button/touch pad to indicate which temperature setting is located in the compartment display(s). The Light button/touch pad and °F/°C control button/touch pad will display. To make the wine cellar less cold, adjust...
... mode button for 3 seconds. To adjust the temperature settings, see "Adjusting the Control" earlier in this model is currently in the compartment display(s). Temperature indicator H. The Light button/touch pad will illuminate to turn On the wine cellar cooling system. Turn Light On/Off: Press Light button/touch pad to indicate which temperature setting is located in the compartment display(s). The Light button/touch pad and °F/°C control button/touch pad will display. To make the wine cellar less cold, adjust...

Owners Manual
Page 10
...Replace Racks: 1. Insert the rack into the rack supports until properly in this manner until it toward the rear of wine, use the wine producer's recommended temperature setting. Align the bracket support pins with the holes in the rack on its side with the bottom display rack. 2. Recommended Storing Locations (on some models...left-hand side, place the first bottle in the shelf brackets, and then place the shelf into the compartment and slide it stops... facing the back of the wine cellar, light red wines in before pulling the next one...Remove and Replace the Top and Middle Racks To...
...Replace Racks: 1. Insert the rack into the rack supports until properly in this manner until it toward the rear of wine, use the wine producer's recommended temperature setting. Align the bracket support pins with the holes in the rack on its side with the bottom display rack. 2. Recommended Storing Locations (on some models...left-hand side, place the first bottle in the shelf brackets, and then place the shelf into the compartment and slide it stops... facing the back of the wine cellar, light red wines in before pulling the next one...Remove and Replace the Top and Middle Racks To...

Owners Manual
Page 11
... remove odors, you can result in warm water, hand wash and rinse thoroughly the removable parts and interior surfaces. WINE CELLAR CARE Cleaning WARNING Style 1 - Using a clean sponge or soft cloth and a mild detergent dissolved in the grooves on plastic parts, interior and door liners or gaskets. Wipe up spills immediately. Lighting the Wine Cellar The refrigerator has an interior light that comes on controlling the interior light. Remove all racks from inside...
... remove odors, you can result in warm water, hand wash and rinse thoroughly the removable parts and interior surfaces. WINE CELLAR CARE Cleaning WARNING Style 1 - Using a clean sponge or soft cloth and a mild detergent dissolved in the grooves on plastic parts, interior and door liners or gaskets. Wipe up spills immediately. Lighting the Wine Cellar The refrigerator has an interior light that comes on controlling the interior light. Remove all racks from inside...

Owners Manual
Page 12
... opened often? If there is power to be cleaned as often as the trim pieces, dispenser covers or door gaskets. To order the cleaner, see "The door will not operate WARNING Electrical Shock Hazard Plug into a grounded 3 prong outlet. ■ Your wine cellar is removed. ■ Is the control set correctly for service or assistance. This may need to the wine cellar and the lights do not work...
... opened often? If there is power to be cleaned as often as the trim pieces, dispenser covers or door gaskets. To order the cleaner, see "The door will not operate WARNING Electrical Shock Hazard Plug into a grounded 3 prong outlet. ■ Your wine cellar is removed. ■ Is the control set correctly for service or assistance. This may need to the wine cellar and the lights do not work...

Owners Manual
Page 13
... more often the door is opened often? See "Reverse Door Swing." 13 See "Using the Control." In order to keep the wine cellar cool, try to get everything you need out of position? When the door is removed. ■ Is the control set correctly for the surrounding conditions? The door is humid. ■ Is the control set correctly for the surrounding conditions? Clean the gasket and the surface...
... more often the door is opened often? See "Reverse Door Swing." 13 See "Using the Control." In order to keep the wine cellar cool, try to get everything you need out of position? When the door is removed. ■ Is the control set correctly for the surrounding conditions? The door is humid. ■ Is the control set correctly for the surrounding conditions? Clean the gasket and the surface...

Owners Manual
Page 14
... designated service center. Stainless Steel Cleaner & Polish Order Part #4396095 14 Factory specified replacement parts will help , follow the instructions below. Our Consultants Provide Assistance With: Features and specifications on our full line of appliances. Whirlpool designated service technicians are made with the same precision used to fulfill the product warranty and provide afterwarranty service, anywhere in your appliance. Installation information. Accessory and repair parts sales...
... designated service center. Stainless Steel Cleaner & Polish Order Part #4396095 14 Factory specified replacement parts will help , follow the instructions below. Our Consultants Provide Assistance With: Features and specifications on our full line of appliances. Whirlpool designated service technicians are made with the same precision used to fulfill the product warranty and provide afterwarranty service, anywhere in your appliance. Installation information. Accessory and repair parts sales...

Owners Manual
Page 15
... LP (hereafter "Whirlpool") will be addressed without service. house wiring, fuses or water inlet hoses). 4. If you . All warranty service is installed, operated and maintained according to province. WHIRLPOOL® REFRIGERATION LIMITED WARRANTY ATTACH YOUR RECEIPT HERE. In-home Instruction on the below named parts only and does not include repair labor. ■ Refrigerator/freezer cavity liner if the part cracks due to use with servicing, removal or replacement of purchase...
... LP (hereafter "Whirlpool") will be addressed without service. house wiring, fuses or water inlet hoses). 4. If you . All warranty service is installed, operated and maintained according to province. WHIRLPOOL® REFRIGERATION LIMITED WARRANTY ATTACH YOUR RECEIPT HERE. In-home Instruction on the below named parts only and does not include repair labor. ■ Refrigerator/freezer cavity liner if the part cracks due to use with servicing, removal or replacement of purchase...
Dimension Guide
Page 1
... change materials and specifications without notice. Use an outlet that you do not install the wine cellar behind a cabinet door or block the base grille. Wine Cellar PRODUCT MODEL NUMBERS WUW35X15D WUW55X15D WUW35X24D WUW55X24D Electrical: A 115 Volt, 60 Hz., AC only, 15- NOTE: When leveling legs are fully extended, add 15 mm) to the minimum height. Do not install in a location where the temperature...
... change materials and specifications without notice. Use an outlet that you do not install the wine cellar behind a cabinet door or block the base grille. Wine Cellar PRODUCT MODEL NUMBERS WUW35X15D WUW55X15D WUW35X24D WUW55X24D Electrical: A 115 Volt, 60 Hz., AC only, 15- NOTE: When leveling legs are fully extended, add 15 mm) to the minimum height. Do not install in a location where the temperature...


