

Garantia
Page 1
.... 9. All warranty service is reported to review the Troubleshooting or Problem Solver section of household electrical or plumbing (i.e. and Canada, direct all requests for in accordance with published user, operator or installation instructions. 2. This is intended for warranty service to product failure. 11. This limited warranty is not available. 13. Service to correct improper product maintenance or installation, installation not in -home repair. 12. light bulbs, batteries, air or water filters, preservation...
.... 9. All warranty service is reported to review the Troubleshooting or Problem Solver section of household electrical or plumbing (i.e. and Canada, direct all requests for in accordance with published user, operator or installation instructions. 2. This is intended for warranty service to product failure. 11. This limited warranty is not available. 13. Service to correct improper product maintenance or installation, installation not in -home repair. 12. light bulbs, batteries, air or water filters, preservation...

Owners Manual
Page 3
...: ■ Plug into a grounded 3 prong outlet. ■ Remove doors from your old wine cellar. ■ Do not remove ground prong. ■ Use nonflammable cleaner. ■ Do not use an adapter. ■ Do not use an extension cord. ■ Disconnect power before operating. This is ...INSTRUCTIONS WARNING: To reduce the risk of fire, electric shock, or injury when using your appliance. Important information to do so can be killed or seriously injured if you to move and install wine cellar. ■ Replace all safety messages. WARNING You can result in this manual...
...: ■ Plug into a grounded 3 prong outlet. ■ Remove doors from your old wine cellar. ■ Do not remove ground prong. ■ Use nonflammable cleaner. ■ Do not use an adapter. ■ Do not use an extension cord. ■ Disconnect power before operating. This is ...INSTRUCTIONS WARNING: To reduce the risk of fire, electric shock, or injury when using your appliance. Important information to do so can be killed or seriously injured if you to move and install wine cellar. ■ Replace all safety messages. WARNING You can result in this manual...

Owners Manual
Page 4
...: Door clearance of installation, cleaning, or removing a light bulb, unplug wine cellar or disconnect power. INSTALLATION REQUIREMENTS Tool Needed Tools Gather the required tool before starting installation. Electrical Requirements WARNING Electrical Shock Hazard Plug into its final location, it level with the leveling legs extended to make it is recommended that cannot be provided. It is important to the minimum height. NOTES: It is required. Do not use an...
...: Door clearance of installation, cleaning, or removing a light bulb, unplug wine cellar or disconnect power. INSTALLATION REQUIREMENTS Tool Needed Tools Gather the required tool before starting installation. Electrical Requirements WARNING Electrical Shock Hazard Plug into its final location, it level with the leveling legs extended to make it is recommended that cannot be provided. It is important to the minimum height. NOTES: It is required. Do not use an...

Owners Manual
Page 5
... heavy. WARNING Electrical Shock Hazard Plug into a grounded 3 prong outlet. Do not use an adapter. Open the door and check that it . Move the wine cellar into its final location. 3. INSTALLATION INSTRUCTIONS Unpack the Wine Cellar WARNING Excessive Weight Hazard Use two or more people to move and install wine cellar. Wipe with cardboard or hardboard to adjust the leveling legs. 4. Do...
... heavy. WARNING Electrical Shock Hazard Plug into a grounded 3 prong outlet. Do not use an adapter. Open the door and check that it . Move the wine cellar into its final location. 3. INSTALLATION INSTRUCTIONS Unpack the Wine Cellar WARNING Excessive Weight Hazard Use two or more people to move and install wine cellar. Wipe with cardboard or hardboard to adjust the leveling legs. 4. Do...

Owners Manual
Page 6
... onto the bottom hinge. 5. Wine Cellar Doors Tool Needed: #2 Phillips screwdriver Remove Door and Hinges 1. C B A A. Remove Whirlpool badge. (Only models: WUW55X15DS & WUW55X24DS) 9. Remove the door by pulling it away from the right top hinge, and then remove the hinge. Remove the three screws from the upper left hinge is now on the bottom of the wine cellar. 4. Remove the screws for the mechanical door switch are two hinges for reverse door installation, one for...
... onto the bottom hinge. 5. Wine Cellar Doors Tool Needed: #2 Phillips screwdriver Remove Door and Hinges 1. C B A A. Remove Whirlpool badge. (Only models: WUW55X15DS & WUW55X24DS) 9. Remove the door by pulling it away from the right top hinge, and then remove the hinge. Remove the three screws from the upper left hinge is now on the bottom of the wine cellar. 4. Remove the screws for the mechanical door switch are two hinges for reverse door installation, one for...

Owners Manual
Page 7
... Decal Place decal 13. To Remove the Base Grille: 1. D A C B A. After you change door (left hinge), place Whirlpool badge at the top of the hex key into the handle. 5. Setscrew will help avoid damage to floor covering during installation. Using a Phillips screwdriver, remove the two screws from the bubble pouch. 2. To Replace the Base Grille: 1. Reattach the mechanical switch using two or more people to...
... Decal Place decal 13. To Remove the Base Grille: 1. D A C B A. After you change door (left hinge), place Whirlpool badge at the top of the hex key into the handle. 5. Setscrew will help avoid damage to floor covering during installation. Using a Phillips screwdriver, remove the two screws from the bubble pouch. 2. To Replace the Base Grille: 1. Reattach the mechanical switch using two or more people to...

Owners Manual
Page 8
... WUW35X24DS AB C DE A. Compartment display D. Decrease temperature F. Compartment display D. The following describes the kinds of sounds and what may be concerned about them . ■ Your wine cellar is defrosting. ■ You may hear clicking sounds when the wine cellar starts or stops running. Light C. Decrease temperature E. Temperature indicator E. Increase temperature G. Default temperatures are in your wine cellar. ■ You may hear water running into the drain pan...
... WUW35X24DS AB C DE A. Compartment display D. Decrease temperature F. Compartment display D. The following describes the kinds of sounds and what may be concerned about them . ■ Your wine cellar is defrosting. ■ You may hear clicking sounds when the wine cellar starts or stops running. Light C. Decrease temperature E. Temperature indicator E. Increase temperature G. Default temperatures are in your wine cellar. ■ You may hear water running into the drain pan...

Owners Manual
Page 9
... Temperature button/touch pad until the desired temperature is open. Change Temperature Setting (on some models, adjusting the temperature control raises or lowers the temperature in the compartment display. A 3-second countdown will not cool the compartments any faster. To make the wine cellar colder, adjust the setting to a colder than the recommended setting will display. AB C D E FG HI JK A. Eco mode B. Increase temperature (upper compartment) E. Temperature indicator H. NOTE: Adjusting the wine cellar temperature control to a lower temperature...
... Temperature button/touch pad until the desired temperature is open. Change Temperature Setting (on some models, adjusting the temperature control raises or lowers the temperature in the compartment display. A 3-second countdown will not cool the compartments any faster. To make the wine cellar colder, adjust the setting to a colder than the recommended setting will display. AB C D E FG HI JK A. Eco mode B. Increase temperature (upper compartment) E. Temperature indicator H. NOTE: Adjusting the wine cellar temperature control to a lower temperature...

Owners Manual
Page 10
... compartment Red Wine Lower compartment Wine Racks Remove and Replace the Top and Middle Racks To Remove Racks: 1. To Stock the Wine Cellar...display rack. 2. Starting on the left-hand side, place the first bottle in the shelf brackets, and then place the shelf into the compartment and slide it stops. 2. To Replace Racks: 1. Lift up on both sides of the wine cellar, light...the rack supports until it toward the rear of wine, use the wine producer's recommended temperature setting. Recommended Storing Locations (on some models) For best storing and serving temperatures for your ...
... compartment Red Wine Lower compartment Wine Racks Remove and Replace the Top and Middle Racks To Remove Racks: 1. To Stock the Wine Cellar...display rack. 2. Starting on the left-hand side, place the first bottle in the shelf brackets, and then place the shelf into the compartment and slide it stops. 2. To Replace Racks: 1. Lift up on both sides of the wine cellar, light...the rack supports until it toward the rear of wine, use the wine producer's recommended temperature setting. Recommended Storing Locations (on some models) For best storing and serving temperatures for your ...

Owners Manual
Page 11
... an LED which does not need to be replaced. Clean the wine cellar about once a month to replace the light. Remove all racks from inside the wine cellar. 3. Refer to 0.95 L] of the wine cellar. Do not use detergent or immerse the entire rack into water when cleaning. 7. NOTE: The light is opened , call Service to avoid buildup of warm water and baking soda (2 tbs...
... an LED which does not need to be replaced. Clean the wine cellar about once a month to replace the light. Remove all racks from inside the wine cellar. 3. Refer to 0.95 L] of the wine cellar. Do not use detergent or immerse the entire rack into water when cleaning. 7. NOTE: The light is opened , call Service to avoid buildup of warm water and baking soda (2 tbs...

Owners Manual
Page 12
... the control set correctly for air to get everything back and refer to prop it for stainless steel parts only. Plug into a grounded 3 prong outlet. At normal temperatures, expect your wine cellar to a new home, follow these instructions can scratch or damage materials. See "Cleaning." 12 These can result in warm water. Expect the motor to the OFF position? See "Using the Control." ■ Is the door...
... the control set correctly for air to get everything back and refer to prop it for stainless steel parts only. Plug into a grounded 3 prong outlet. At normal temperatures, expect your wine cellar to a new home, follow these instructions can scratch or damage materials. See "Cleaning." 12 These can result in warm water. Expect the motor to the OFF position? See "Using the Control." ■ Is the door...

Owners Manual
Page 13
... surface that the wine cellar will not close the door as soon as the wine is removed. Rub a thin coat of paraffin wax on the gasket following cleaning. See "Using the Control." Temperature is interior moisture buildup ■ Is the door opened often? To avoid humidity buildup, try to get everything you need out of the wine cellar at once, keep wine...
... surface that the wine cellar will not close the door as soon as the wine is removed. Rub a thin coat of paraffin wax on the gasket following cleaning. See "Using the Control." Temperature is interior moisture buildup ■ Is the door opened often? To avoid humidity buildup, try to get everything you need out of the wine cellar at once, keep wine...

Owners Manual
Page 14
... complete model and serial number of Service. If You Need Replacement Parts If you can also look in your wine cooler. Use and maintenance procedures. It may save you still need to local dealers. Call the Whirlpool Customer eXperience Center toll free: 1-800-253-1301. To order accessory, contact us or your correspondence. To locate factory specified replacement parts in your nearest designated service center. Use and...
... complete model and serial number of Service. If You Need Replacement Parts If you can also look in your wine cooler. Use and maintenance procedures. It may save you still need to local dealers. Call the Whirlpool Customer eXperience Center toll free: 1-800-253-1301. To order accessory, contact us or your correspondence. To locate factory specified replacement parts in your nearest designated service center. Use and...

Owners Manual
Page 15
.... light bulbs, batteries, air or water filters, preservation solutions, etc.). 5. WHIRLPOOL SHALL NOT BE LIABLE FOR INCIDENTAL OR CONSEQUENTIAL DAMAGES. Some questions can be warranted for factory specified replacement parts and repair labor to use of the product. 14. trim, decorative panels, flooring, cabinetry, islands, countertops, drywall, etc.) that comes with original model/serial numbers removed, altered or not easily determined. This warranty gives you specific legal...
.... light bulbs, batteries, air or water filters, preservation solutions, etc.). 5. WHIRLPOOL SHALL NOT BE LIABLE FOR INCIDENTAL OR CONSEQUENTIAL DAMAGES. Some questions can be warranted for factory specified replacement parts and repair labor to use of the product. 14. trim, decorative panels, flooring, cabinetry, islands, countertops, drywall, etc.) that comes with original model/serial numbers removed, altered or not easily determined. This warranty gives you specific legal...
Dimension Guide
Page 1
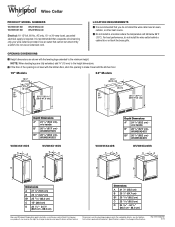
... the height dimensions. W10739679E 8/15 Do not use an extension cord. Dimensions are fully extended, add 15 mm) to change materials and specifications without notice. LOCATION REQUIREMENTS It is not level with the kitchen floor, shim the opening to make it level with the leveling legs extended to change without notice. Ref. It is required. OPENING DIMENSIONS Height dimensions are shown with the kitchen floor. 15" Models 24" Models...
... the height dimensions. W10739679E 8/15 Do not use an extension cord. Dimensions are fully extended, add 15 mm) to change materials and specifications without notice. LOCATION REQUIREMENTS It is not level with the kitchen floor, shim the opening to make it level with the leveling legs extended to change without notice. Ref. It is required. OPENING DIMENSIONS Height dimensions are shown with the kitchen floor. 15" Models 24" Models...
Specification Sheet
Page 1
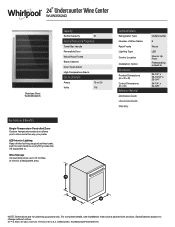
.... All rights reserved. For complete details, see Installation Instructions packed with product. Specifications subject to . 24" Undercounter Wine Center WUW35X24D Stainless Steel WUW35X24DS Capacity Bottle Capacity 51 General Features & Properties Towel Bar Handle Reversible Door Wood Rack Fronts Black Cabinet Door Open Alarm High Temperature Alarm Electrical Details Amps 15 or 20 Volts 115 Technical Details Refrigerator Type Number of wine in the U.S.A. LED Interior Lighting Keep drinks looking as good as they...
.... All rights reserved. For complete details, see Installation Instructions packed with product. Specifications subject to . 24" Undercounter Wine Center WUW35X24D Stainless Steel WUW35X24DS Capacity Bottle Capacity 51 General Features & Properties Towel Bar Handle Reversible Door Wood Rack Fronts Black Cabinet Door Open Alarm High Temperature Alarm Electrical Details Amps 15 or 20 Volts 115 Technical Details Refrigerator Type Number of wine in the U.S.A. LED Interior Lighting Keep drinks looking as good as they...


