
Dimension Guide
Page 1
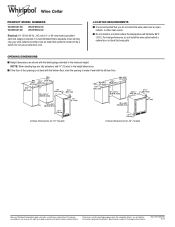
...separate circuit serving only your wine cellar be turned off by a switch. OPENING DIMENSIONS n Height dimensions are for 24" models Because Whirlpool Corporation policy includes a continuous commitment to improve our products, we reserve the right to the minimum height. Min 10⁵⁄&#... cm) 1⁷⁄₈" (4.7 cm) 3 7.8 cm) Critical dimensions for planning purposes only. Wine Cellar PRODUCT MODEL NUMBERS WUW35X15D WUW55X15D WUW35X24D WUW55X24D Electrical: A 115 Volt, 60 Hz., AC only, 15- Do not use an extension cord. Use an outlet that you do not install...
...separate circuit serving only your wine cellar be turned off by a switch. OPENING DIMENSIONS n Height dimensions are for 24" models Because Whirlpool Corporation policy includes a continuous commitment to improve our products, we reserve the right to the minimum height. Min 10⁵⁄&#... cm) 1⁷⁄₈" (4.7 cm) 3 7.8 cm) Critical dimensions for planning purposes only. Wine Cellar PRODUCT MODEL NUMBERS WUW35X15D WUW55X15D WUW35X24D WUW55X24D Electrical: A 115 Volt, 60 Hz., AC only, 15- Do not use an extension cord. Use an outlet that you do not install...

Use & Care Guide
Page 6
... screws from the right top hinge, and then remove the hinge. Reverse Door Swing (optional) NOTE: There are located behind the seal. Remove Whirlpool badge. (Only models: WUW55X15DS & WUW55X24DS) 9. Using the three screws removed in the previous step, attach the left top hinge to the reverse side of the door, and then...
... screws from the right top hinge, and then remove the hinge. Reverse Door Swing (optional) NOTE: There are located behind the seal. Remove Whirlpool badge. (Only models: WUW55X15DS & WUW55X24DS) 9. Using the three screws removed in the previous step, attach the left top hinge to the reverse side of the door, and then...

Use & Care Guide
Page 7
...not be possible. 3. Remove the two screws holding the mechanical switch to floor covering during installation. After you change door (left hinge), place Whirlpool badge at the top of the door and the door seals. 15. To avoid scratching the front panel, place a soft cloth or towel ...hex key from the base grille. 3. Put decal at bottom of the hex key into the handle. 5. Repeat Step 4 for models WUW55X15DS & WUW55X24DS. Insert the short end of wine cellar. (Only models: WUW55X15DS & WUW55X24DS) NOTE: The decal & Whirlpool badge are preinstalled in back or other setscrew. 6.
...not be possible. 3. Remove the two screws holding the mechanical switch to floor covering during installation. After you change door (left hinge), place Whirlpool badge at the top of the door and the door seals. 15. To avoid scratching the front panel, place a soft cloth or towel ...hex key from the base grille. 3. Put decal at bottom of the hex key into the handle. 5. Repeat Step 4 for models WUW55X15DS & WUW55X24DS. Insert the short end of wine cellar. (Only models: WUW55X15DS & WUW55X24DS) NOTE: The decal & Whirlpool badge are preinstalled in back or other setscrew. 6.


