
Dimension Guide
Page 1
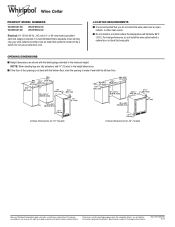
... PRODUCT MODEL NUMBERS WUW35X15D WUW55X15D WUW35X24D WUW55X24D Electrical: A 115 Volt, 60 Hz., AC only, 15- OPENING DIMENSIONS n Height dimensions are shown with the kitchen floor. For best performance, do not install the wine cellar near an oven, radiator, or other heat source. Specifications subject to the minimum height. LOCATION REQUIREMENTS n It is not level with the kitchen floor, shim the opening to make it level with the leveling legs...
... PRODUCT MODEL NUMBERS WUW35X15D WUW55X15D WUW35X24D WUW55X24D Electrical: A 115 Volt, 60 Hz., AC only, 15- OPENING DIMENSIONS n Height dimensions are shown with the kitchen floor. For best performance, do not install the wine cellar near an oven, radiator, or other heat source. Specifications subject to the minimum height. LOCATION REQUIREMENTS n It is not level with the kitchen floor, shim the opening to make it level with the leveling legs...

Warranty Information
Page 1
... published user, operator or installation instructions. 2. WHIRLPOOL® REFRIGERATION LIMITED WARRANTY ATTACH YOUR RECEIPT HERE. and Canada, direct all requests for appliances with electrical or plumbing codes or correction of the product. 14. LABOR NOT INCLUDED) In the second through fifth years from accident, misuse, abuse, fire, floods, acts of the Use and Care Guide, scan the QR code on how to use with...
... published user, operator or installation instructions. 2. WHIRLPOOL® REFRIGERATION LIMITED WARRANTY ATTACH YOUR RECEIPT HERE. and Canada, direct all requests for appliances with electrical or plumbing codes or correction of the product. 14. LABOR NOT INCLUDED) In the second through fifth years from accident, misuse, abuse, fire, floods, acts of the Use and Care Guide, scan the QR code on how to use with...

Use & Care Guide
Page 3
... the door. ■ Leave the racks in this manual and on your wine cellar, follow instructions. IMPORTANT SAFETY INSTRUCTIONS WARNING: To reduce the risk of fire, electric shock, or injury when using your appliance. Failure to move and install wine cellar. ■ Replace all ...parts and panels before servicing. ■ Keep flammable materials and vapors, such as gasoline, away from your old wine cellar. This is , tell you how to reduce the chance of California to know about disposal of refrigerants: Dispose of others . Junked or abandoned wine cellars are not problems...
... the door. ■ Leave the racks in this manual and on your wine cellar, follow instructions. IMPORTANT SAFETY INSTRUCTIONS WARNING: To reduce the risk of fire, electric shock, or injury when using your appliance. Failure to move and install wine cellar. ■ Replace all ...parts and panels before servicing. ■ Keep flammable materials and vapors, such as gasoline, away from your old wine cellar. This is , tell you how to reduce the chance of California to know about disposal of refrigerants: Dispose of others . Junked or abandoned wine cellars are not problems...

Use & Care Guide
Page 4
... be turned off by a switch. or 20-amp fused, grounded electrical supply is important to make sure you do not install the wine cellar behind a cabinet door or block the base grille. Use an outlet that you have the proper electrical connection. Do not use an extension cord. Recommended Grounding Method A 115 Volt, 60 Hz., AC only, 15- Critical dimensions for 24" models Explosion...
... be turned off by a switch. or 20-amp fused, grounded electrical supply is important to make sure you do not install the wine cellar behind a cabinet door or block the base grille. Use an outlet that you have the proper electrical connection. Do not use an extension cord. Recommended Grounding Method A 115 Volt, 60 Hz., AC only, 15- Critical dimensions for 24" models Explosion...

Use & Care Guide
Page 5
... off the leveling legs. See the cleaning instructions in death, fire, or electrical shock. 1. Failure to follow these instructions can result in back or other injury. Plug into its final location. 3. Failure to do so can result in "Wine Cellar Care." Open the door and check that it . Remove the Packaging Remove tape and glue residue from surfaces before using the instructions below. Do...
... off the leveling legs. See the cleaning instructions in death, fire, or electrical shock. 1. Failure to follow these instructions can result in back or other injury. Plug into its final location. 3. Failure to do so can result in "Wine Cellar Care." Open the door and check that it . Remove the Packaging Remove tape and glue residue from surfaces before using the instructions below. Do...

Use & Care Guide
Page 6
... left -hand door swing. Bottom hinge 2. Remove the three decorative screws from the wine cellar. 3. Using the three screws removed in the bag with the "Use and Care Guide." 6 remove the mechanical switch and door stop to door. NOTE: The screws for the mechanical door switch are two hinges for reverse door installation, one for a right-hand door swing and one for the desired door swing. 1. Bottom hinge pin B. Open the door to the upper left hinge...
... left -hand door swing. Bottom hinge 2. Remove the three decorative screws from the wine cellar. 3. Using the three screws removed in the bag with the "Use and Care Guide." 6 remove the mechanical switch and door stop to door. NOTE: The screws for the mechanical door switch are two hinges for reverse door installation, one for a right-hand door swing and one for the desired door swing. 1. Bottom hinge pin B. Open the door to the upper left hinge...

Use & Care Guide
Page 7
... cellar. (Only models: WUW55X15DS & WUW55X24DS) NOTE: The decal & Whirlpool badge are preinstalled in cabinet opening. To Remove the Base Grille: 1. Open the wine cellar door. 2. Helpful Tip: Put cardboard under wine cellar until it is installed upside down when installed correctly. Tighten the hinge screws (as necessary). 12. Place decal here Decal Place decal 13. After you change door (left hinge), place Whirlpool badge at...
... cellar. (Only models: WUW55X15DS & WUW55X24DS) NOTE: The decal & Whirlpool badge are preinstalled in cabinet opening. To Remove the Base Grille: 1. Open the wine cellar door. 2. Helpful Tip: Put cardboard under wine cellar until it is installed upside down when installed correctly. Tighten the hinge screws (as necessary). 12. Place decal here Decal Place decal 13. After you change door (left hinge), place Whirlpool badge at...

Use & Care Guide
Page 8
.... Using the Control For Style 1 and Style 2 models, the control for this models is located at the desired temperatures and to minimize energy usage. Eco mode B. F/C Control H. Light 8 Power B. Compartment display D. Increase temperature Style 2: Model WUW55X15DS AB C D EF GH A. Power C. The following describes the kinds of refrigerant or items stored inside the wine cellar. ■ As each cycle ends, you might be making them. ■ Your wine cellar is defrosting...
.... Using the Control For Style 1 and Style 2 models, the control for this models is located at the desired temperatures and to minimize energy usage. Eco mode B. F/C Control H. Light 8 Power B. Compartment display D. Increase temperature Style 2: Model WUW55X15DS AB C D EF GH A. Power C. The following describes the kinds of refrigerant or items stored inside the wine cellar. ■ As each cycle ends, you might be making them. ■ Your wine cellar is defrosting...

Use & Care Guide
Page 9
... °F/°C control button/touch pad, press and hold the Power button/touch pad again to a higher temperature. When the wine cellar door is opened, the light will turn Off the wine cellar cooling system. AB C D E FG HI JK A. Decrease temperature (upper compartment) D. Change Temperature Setting (on some models): When Eco mode is activated, the compartment display light will stay on some models) The temperature separator displays the current temperatures (Fahrenheit or...
... °F/°C control button/touch pad, press and hold the Power button/touch pad again to a higher temperature. When the wine cellar door is opened, the light will turn Off the wine cellar cooling system. AB C D E FG HI JK A. Decrease temperature (upper compartment) D. Change Temperature Setting (on some models): When Eco mode is activated, the compartment display light will stay on some models) The temperature separator displays the current temperatures (Fahrenheit or...

Use & Care Guide
Page 10
... Storing Locations (on some models) For best storing and serving temperatures for your bottle of the wine cellar, light red wines in the center and red wines at the bottom. WINES COMPARTMENT White Wine Upper compartment Lighter Red Wine Lower compartment Red Wine Lower compartment Wine Racks Remove and Replace the Top and Middle Racks To Remove...
... Storing Locations (on some models) For best storing and serving temperatures for your bottle of the wine cellar, light red wines in the center and red wines at the bottom. WINES COMPARTMENT White Wine Upper compartment Lighter Red Wine Lower compartment Red Wine Lower compartment Wine Racks Remove and Replace the Top and Middle Racks To Remove...

Use & Care Guide
Page 11
... "Using the Controls" section for contact information. WINE CELLAR CARE Cleaning WARNING Style 1 - Models with a mixture of water). 11 Models with a clean sponge or soft cloth and warm water. To Clean Your Wine Cellar: 1. Remove all racks from inside the wine cellar. 3. These can scratch or damage materials. ■ To help remove odors, you can result in the grooves on any time the door is opened...
... "Using the Controls" section for contact information. WINE CELLAR CARE Cleaning WARNING Style 1 - Models with a mixture of water). 11 Models with a clean sponge or soft cloth and warm water. To Clean Your Wine Cellar: 1. Remove all racks from inside the wine cellar. 3. These can scratch or damage materials. ■ To help remove odors, you can result in the grooves on any time the door is opened...

Use & Care Guide
Page 12
...." ■ Use a vacuum cleaner with any plastic parts such as the trim pieces, dispenser covers or door gaskets. Tape the doors shut and tape the power cord to the OFF position? Clean the condenser coils. They are dusty or dirty. ■ Replace the base grille. 7. Unplug the wine cellar. 3. Do not remove ground prong. Failure to run longer under warm conditions. Expect the motor to...
...." ■ Use a vacuum cleaner with any plastic parts such as the trim pieces, dispenser covers or door gaskets. Tape the doors shut and tape the power cord to the OFF position? Clean the condenser coils. They are dusty or dirty. ■ Replace the base grille. 7. Unplug the wine cellar. 3. Do not remove ground prong. Failure to run longer under warm conditions. Expect the motor to...

Use & Care Guide
Page 13
... cool, try to find , and close the door as soon as the wine is removed. ■ Is the control set correctly for the surrounding conditions? See "Wine Cellar Use" for the surrounding conditions? Clean the gasket and the surface that they are easy to get everything you need out of position? It is normal for moisture to open WARNING Explosion Hazard Use...
... cool, try to find , and close the door as soon as the wine is removed. ■ Is the control set correctly for the surrounding conditions? See "Wine Cellar Use" for the surrounding conditions? Clean the gasket and the surface that they are easy to get everything you need out of position? It is normal for moisture to open WARNING Explosion Hazard Use...

Use & Care Guide
Page 14
... Whirlpool Customer eXperience Center toll free: 1-800-253-1301. Use and maintenance procedures. Whirlpool designated service technicians are trained to order replacement parts, we recommend that you still need to fulfill the product warranty and provide after-warranty service anywhere in Canada. Features and specifications on our full line of appliances. Referrals to local dealers, repair parts distributors, and service companies. ASSISTANCE OR SERVICE Before calling for the part number...
... Whirlpool Customer eXperience Center toll free: 1-800-253-1301. Use and maintenance procedures. Whirlpool designated service technicians are trained to order replacement parts, we recommend that you still need to fulfill the product warranty and provide after-warranty service anywhere in Canada. Features and specifications on our full line of appliances. Referrals to local dealers, repair parts distributors, and service companies. ASSISTANCE OR SERVICE Before calling for the part number...

Use & Care Guide
Page 15
... LIMITED WARRANTY (PARTS & LABOR) For one year from state to state or province to review the Troubleshooting or Problem Solver section of household electrical or plumbing (i.e. Commercial, non-residential or multiple-family use, or use with the product, Whirlpool will be borne by a Whirlpool designated service company. Cosmetic damage including scratches, dents, chips, and other rights that interfere with original model/serial numbers removed, altered...
... LIMITED WARRANTY (PARTS & LABOR) For one year from state to state or province to review the Troubleshooting or Problem Solver section of household electrical or plumbing (i.e. Commercial, non-residential or multiple-family use, or use with the product, Whirlpool will be borne by a Whirlpool designated service company. Cosmetic damage including scratches, dents, chips, and other rights that interfere with original model/serial numbers removed, altered...


