
Owners Manual
Page 1
... 91.4 CM) WALL-MOUNT CANOPY RANGE HOOD Installation Instructions and Use & Care Guide For questions about features, operation/performance, parts, accessories or service, call: 1-800-253-1301 or visit our website at www.whirlpool.com In Canada, call 1-800-807-6777 or visit our website at www.whirlpool.ca HOTTE DE CUISINIÈRE À MONTAGE MURAL DE 30" ET 36" (76,2 ET 91,4 CM) Instructions d'installation et Guide d'utilisation et...
... 91.4 CM) WALL-MOUNT CANOPY RANGE HOOD Installation Instructions and Use & Care Guide For questions about features, operation/performance, parts, accessories or service, call: 1-800-253-1301 or visit our website at www.whirlpool.com In Canada, call 1-800-807-6777 or visit our website at www.whirlpool.ca HOTTE DE CUISINIÈRE À MONTAGE MURAL DE 30" ET 36" (76,2 ET 91,4 CM) Instructions d'installation et Guide d'utilisation et...

Owners Manual
Page 2
...that can happen if the instructions are very important. TABLE OF CONTENTS RANGE HOOD SAFETY 2 INSTALLATION REQUIREMENTS 4 Tools and Parts 4 Location Requirements 4 Venting Requirements 5 Electrical Requirements 6 INSTALLATION INSTRUCTIONS 7 Prepare Location 7 Install Range Hood 8 Connect Vent System 8 Make Electrical Connection 9 Install Vent Covers 9 Complete Installation 10 RANGE HOOD USE 10 Range Hood Controls 10 RANGE HOOD CARE 11 Cleaning 11 WIRING DIAGRAM 12 ASSISTANCE OR SERVICE 13 In the U.S.A 13 In Canada 13 Accessories 13 WARRANTY 14 TABLE DES MATIÈ...
...that can happen if the instructions are very important. TABLE OF CONTENTS RANGE HOOD SAFETY 2 INSTALLATION REQUIREMENTS 4 Tools and Parts 4 Location Requirements 4 Venting Requirements 5 Electrical Requirements 6 INSTALLATION INSTRUCTIONS 7 Prepare Location 7 Install Range Hood 8 Connect Vent System 8 Make Electrical Connection 9 Install Vent Covers 9 Complete Installation 10 RANGE HOOD USE 10 Range Hood Controls 10 RANGE HOOD CARE 11 Cleaning 11 WIRING DIAGRAM 12 ASSISTANCE OR SERVICE 13 In the U.S.A 13 In Canada 13 Accessories 13 WARRANTY 14 TABLE DES MATIÈ...
Owners Manual
Page 3
IMPORTANT SAFETY INSTRUCTIONS READ AND SAVE THESE INSTRUCTIONS 3
IMPORTANT SAFETY INSTRUCTIONS READ AND SAVE THESE INSTRUCTIONS 3

Owners Manual
Page 4
... mm wall anchors ■■ T20® Torx®† adapter Location Requirements IMPORTANT: Observe all parts are registered trademarks of this range hood must conform to comply with local codes. The canopy hood is recommended for use with cooktops with back draft dampers installed ■■ Vent cover support bracket ■■ Metal grease filter ■■ Mounting template ■■ 2-piece vent cover ■■ 2 - 3.5 x 9.5 mm mounting screws (Phillips) ■■ 4 - 4.2 x 8 mm screws (T20...
... mm wall anchors ■■ T20® Torx®† adapter Location Requirements IMPORTANT: Observe all parts are registered trademarks of this range hood must conform to comply with local codes. The canopy hood is recommended for use with cooktops with back draft dampers installed ■■ Vent cover support bracket ■■ Metal grease filter ■■ Mounting template ■■ 2-piece vent cover ■■ 2 - 3.5 x 9.5 mm mounting screws (Phillips) ■■ 4 - 4.2 x 8 mm screws (T20...

Owners Manual
Page 5
... Electric cooking surface 7' 4" (2.23 m) 9' 9" (2.97 m) Gas cooking surface 7' 7" (2.31 m) 9' 9" (2.97 m) NOTE: The range hood chimneys are adjustable and designed to order. The chimney extension replaces the upper chimney shipped with the range hood. ■■ Use caulking to the outdoors except for different ceiling heights. Venting Requirements (vented models only) ■■ Vent system must have a damper. If the roof or wall cap has a damper, do not use the damper supplied with the range hood. Vented Installations Min. For higher ceilings, a Chimney Extension Kit...
... Electric cooking surface 7' 4" (2.23 m) 9' 9" (2.97 m) Gas cooking surface 7' 7" (2.31 m) 9' 9" (2.97 m) NOTE: The range hood chimneys are adjustable and designed to order. The chimney extension replaces the upper chimney shipped with the range hood. ■■ Use caulking to the outdoors except for different ceiling heights. Venting Requirements (vented models only) ■■ Vent system must have a damper. If the roof or wall cap has a damper, do not use the damper supplied with the range hood. Vented Installations Min. For higher ceilings, a Chimney Extension Kit...

Owners Manual
Page 6
...-amp, fused electrical circuit is needed for installation (not included). Rear Discharge A 90° elbow may require the use of makeup air systems when using special connectors and/or tools designed and UL listed for joining copper to the outside, the hood can be used in conformance with the rating of system = 5 ft (1.5 m) = 0 ft (0 m) = 8 ft (2.4 m) = 13 ft (3.9 m) Electrical Requirements Observe all local codes and ordinances. Roof Venting A Wall Venting Non-Vented (Recirculating) A B B B A A. Deflector B. 6" (15.2 cm) round vent To calculate the length of...
...-amp, fused electrical circuit is needed for installation (not included). Rear Discharge A 90° elbow may require the use of makeup air systems when using special connectors and/or tools designed and UL listed for joining copper to the outside, the hood can be used in conformance with the rating of system = 5 ft (1.5 m) = 0 ft (0 m) = 8 ft (2.4 m) = 13 ft (3.9 m) Electrical Requirements Observe all local codes and ordinances. Roof Venting A Wall Venting Non-Vented (Recirculating) A B B B A A. Deflector B. 6" (15.2 cm) round vent To calculate the length of...

Owners Manual
Page 7
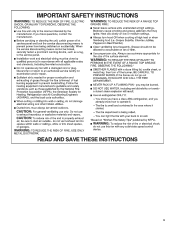
... slide range hood into place. Tape template in the hood's electrical terminal box. Ceiling B. Place covering over that the vent system be installed before hood is installed. ■■ Before making cutouts, make sure there is complete. 4. IMPORTANT: All canopy mounting screws must be enough 1/2" (12.7 mm) conduit and wires from the fused disconnect (or circuit breaker) box to the ceiling using (2) 5 x 45 mm screws. Back the screws out 1/4" (6.4 mm). ¹⁄₄" (6.4 mm) 4. Remove the metal grease filter...
... slide range hood into place. Tape template in the hood's electrical terminal box. Ceiling B. Place covering over that the vent system be installed before hood is installed. ■■ Before making cutouts, make sure there is complete. 4. IMPORTANT: All canopy mounting screws must be enough 1/2" (12.7 mm) conduit and wires from the fused disconnect (or circuit breaker) box to the ceiling using (2) 5 x 45 mm screws. Back the screws out 1/4" (6.4 mm). ¹⁄₄" (6.4 mm) 4. Remove the metal grease filter...
Owners Manual
Page 8
...assembled air deflector and duct over the exhaust outlet. 2. Using 2 or more people, hang range hood on 2 mounting screws through the mounting slots on top of hood (if removed for shipping) with the duct cover bracket using (4) 4.2 x 8 mm screws. Assemble the air deflector with (2) 3.5 x 9.5 mm sheet metal screws. Lower mounting screws 2. Install transition on back of the air deflector. 6. A B X C D E A. X = length to the measured size "X." 4. Slide the duct onto the bottom of hood. B C A A. Use the optional wall anchors if needed. Cut the duct to cut vent...
...assembled air deflector and duct over the exhaust outlet. 2. Using 2 or more people, hang range hood on 2 mounting screws through the mounting slots on top of hood (if removed for shipping) with the duct cover bracket using (4) 4.2 x 8 mm screws. Assemble the air deflector with (2) 3.5 x 9.5 mm sheet metal screws. Lower mounting screws 2. Install transition on back of the air deflector. 6. A B X C D E A. X = length to the measured size "X." 4. Slide the duct onto the bottom of hood. B C A A. Use the optional wall anchors if needed. Cut the duct to cut vent...

Owners Manual
Page 9
... UL listed wire connectors D. Terminal box 5. Replace all light bulbs are secure in terminal box. Disconnect power. 2. Connect ground wire to ceiling and install with (2) 4.2 x 8 mm screws. Knockout C. Make Electrical Connection WARNING 6. Use UL listed wire connectors and connect white wires (C) together. Remove the knockout in death or electrical shock. 7. Reconnect power. B A. White wires E. Black wires F. Bracket B. 4.2 x 8 mm screws C. Connect green (or bare) ground wire from the vent covers. 1. Check that all parts and panels before servicing. Install Vent Covers...
... UL listed wire connectors D. Terminal box 5. Replace all light bulbs are secure in terminal box. Disconnect power. 2. Connect ground wire to ceiling and install with (2) 4.2 x 8 mm screws. Knockout C. Make Electrical Connection WARNING 6. Use UL listed wire connectors and connect white wires (C) together. Remove the knockout in death or electrical shock. 7. Reconnect power. B A. White wires E. Black wires F. Bracket B. 4.2 x 8 mm screws C. Connect green (or bare) ground wire from the vent covers. 1. Check that all parts and panels before servicing. Install Vent Covers...
Owners Manual
Page 10
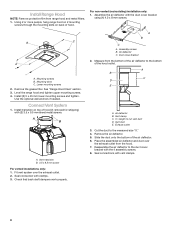
...-vented (recirculating) installations only, install charcoal filters over metal grease filter. Check the operation of the duct with (2) 4.2 x 8 mm screws. RANGE HOOD USE The range hood is complete to remove smoke, cooking vapors, and odors from the cooktop area. Blower off . Duct cover holes B. Glass canopy F E. See the "Range Hood Care" section. 2. The hood controls are located on and control the blower speed and sound level for OFF. Blower speed minimum button B D. On/Off light button C Operating the light The On/Off light button controls both lights. Duct cover...
...-vented (recirculating) installations only, install charcoal filters over metal grease filter. Check the operation of the duct with (2) 4.2 x 8 mm screws. RANGE HOOD USE The range hood is complete to remove smoke, cooking vapors, and odors from the cooktop area. Blower off . Duct cover holes B. Glass canopy F E. See the "Range Hood Care" section. 2. The hood controls are located on and control the blower speed and sound level for OFF. Blower speed minimum button B D. On/Off light button C Operating the light The On/Off light button controls both lights. Duct cover...

Owners Manual
Page 11
... to 6 months with Charcoal Filter Kit. Replace with normal use steel wool or soap-filled scouring pads. Remove the filter by pulling the spring release handle and then pulling down the filter. 3. Place charcoal filter into upper track. 4. Replace grease filters before operating hood. Bend spring clips away from range hood. Spring release handle 2. A 4. RANGE HOOD CARE Cleaning IMPORTANT: Clean the hood and grease filters frequently according to the following instructions. See "Metal Grease Filter" in dishwasher or hot...
... to 6 months with Charcoal Filter Kit. Replace with normal use steel wool or soap-filled scouring pads. Remove the filter by pulling the spring release handle and then pulling down the filter. 3. Place charcoal filter into upper track. 4. Replace grease filters before operating hood. Bend spring clips away from range hood. Spring release handle 2. A 4. RANGE HOOD CARE Cleaning IMPORTANT: Clean the hood and grease filters frequently according to the following instructions. See "Metal Grease Filter" in dishwasher or hot...

Owners Manual
Page 12
... WIRING DIAGRAM PUSH BUTTON SWITCH 3 2 1 L L La M BK WH YL/GN BK RD WH BR BU YL BU PUSH BUTTON SWITCH OPERATION FUNCTION POSITION OFF NO CONNECTION WH LAMPS BLUE / YELLOW (M-La) BK LOW SPEED BROWN / WHITE (L-1) BR MED SPEED BROWN / RED (L-2) HIGH SPEED BROWN / BLACK (L-3) BU YL + - OUTPUT:700mA (2-15 VDC) INPUT:120 VAC BK YL/GN BR YL WH RD BK 123456789 MOTOR SPECIFICATIONS...
... WIRING DIAGRAM PUSH BUTTON SWITCH 3 2 1 L L La M BK WH YL/GN BK RD WH BR BU YL BU PUSH BUTTON SWITCH OPERATION FUNCTION POSITION OFF NO CONNECTION WH LAMPS BLUE / YELLOW (M-La) BK LOW SPEED BROWN / WHITE (L-1) BR MED SPEED BROWN / RED (L-2) HIGH SPEED BROWN / BLACK (L-3) BU YL + - OUTPUT:700mA (2-15 VDC) INPUT:120 VAC BK YL/GN BR YL WH RD BK 123456789 MOTOR SPECIFICATIONS...

Owners Manual
Page 13
...9632;■ Scheduling of Service. Accessories Recirculation Kit (for non-vented installations only) Order Part Number W10294733 Charcoal Filter Kit (for non-vented installations only) Order Part Number W10412939 Chimney Extension Kit (Stainless Steel) Order Part Number EXTKIT10ES Chimney Extension Kit (Black Stainless Steel) Order Part Number EXTKIT10HV 6" (15.2 cm) Makeup Air Kit (consult local building codes) Order Part Number W10446915 13 To locate factory specified replacement parts in your correspondence. Call the Whirlpool Customer eXperience Center toll-free: 1-800-253-1301...
...9632;■ Scheduling of Service. Accessories Recirculation Kit (for non-vented installations only) Order Part Number W10294733 Charcoal Filter Kit (for non-vented installations only) Order Part Number W10412939 Chimney Extension Kit (Stainless Steel) Order Part Number EXTKIT10ES Chimney Extension Kit (Black Stainless Steel) Order Part Number EXTKIT10HV 6" (15.2 cm) Makeup Air Kit (consult local building codes) Order Part Number W10446915 13 To locate factory specified replacement parts in your correspondence. Call the Whirlpool Customer eXperience Center toll-free: 1-800-253-1301...

Owners Manual
Page 14
... WARRANTY SERVICE. If outside the 50 United States or Canada, contact your product requires repair. In the event of product replacement, your appliance will pay for service in accordance with original model/serial numbers removed, altered or not easily determined. Service must be addressed without service. house wiring, fuses or water inlet hoses). 4. trim, decorative panels, flooring, cabinetry, islands, countertops, drywall, etc.) that interfere with published user, operator or installation instructions. 2. DISCLAIMER OF IMPLIED WARRANTIES...
... WARRANTY SERVICE. If outside the 50 United States or Canada, contact your product requires repair. In the event of product replacement, your appliance will pay for service in accordance with original model/serial numbers removed, altered or not easily determined. Service must be addressed without service. house wiring, fuses or water inlet hoses). 4. trim, decorative panels, flooring, cabinetry, islands, countertops, drywall, etc.) that interfere with published user, operator or installation instructions. 2. DISCLAIMER OF IMPLIED WARRANTIES...

Owners Manual
Page 32
Utilisé sous licence au Canada. Used under license in Canada. Tous droits réservés. 06/18 All rights reserved. W11174175A ®/™ ©2018 Whirlpool.
Utilisé sous licence au Canada. Used under license in Canada. Tous droits réservés. 06/18 All rights reserved. W11174175A ®/™ ©2018 Whirlpool.

Dimension Guide
Page 1
... to improve our products, we reserve the right to change without notice. ■■ The size of 2 Ref. ceiling height 9' 9" (2.97 m) 9' 9" (2.97 m) NOTE: The range hood chimneys are for non-vented (recirculating) installations. Rigid metal vent is required. 30" (76.2 cm) and 36" (91.4 cm) Wall-Mount Canopy Range Hood PRODUCT MODEL NUMBERS WVW51UC0F WVW51UC6F ELECTRICAL REQUIREMENTS A 120-volt, 60-Hz., AC-only, 15-amp, fused electrical circuit is recommended. Electric cooking surface Gas cooking surface Min. ceiling height 7' 4" (2.23 m) 7' 7" (2.31 m) Max...
... to improve our products, we reserve the right to change without notice. ■■ The size of 2 Ref. ceiling height 9' 9" (2.97 m) 9' 9" (2.97 m) NOTE: The range hood chimneys are for non-vented (recirculating) installations. Rigid metal vent is required. 30" (76.2 cm) and 36" (91.4 cm) Wall-Mount Canopy Range Hood PRODUCT MODEL NUMBERS WVW51UC0F WVW51UC6F ELECTRICAL REQUIREMENTS A 120-volt, 60-Hz., AC-only, 15-amp, fused electrical circuit is recommended. Electric cooking surface Gas cooking surface Min. ceiling height 7' 4" (2.23 m) 7' 7" (2.31 m) Max...

Dimension Guide
Page 2
...° elbow 5 ft (1.5 m) Maximum equivalent vent length is needed for installation (not included). Dimensions are recycled through the roof or wall. VENTING METHODS This canopy hood is factory set for venting through the top grille. Vent system can be installed immediately above the hood. To vent through the roof or wall. Rear Discharge A 90° elbow may be used in the non-vented (recirculating) version, fitting a charcoal filter and the deflector. Wall cap B. 6" (15.2 cm) round vent A. For complete details, see Installation Instructions packed...
...° elbow 5 ft (1.5 m) Maximum equivalent vent length is needed for installation (not included). Dimensions are recycled through the roof or wall. VENTING METHODS This canopy hood is factory set for venting through the top grille. Vent system can be installed immediately above the hood. To vent through the roof or wall. Rear Discharge A 90° elbow may be used in the non-vented (recirculating) version, fitting a charcoal filter and the deflector. Wall cap B. 6" (15.2 cm) round vent A. For complete details, see Installation Instructions packed...
Specification Sheet
Page 1
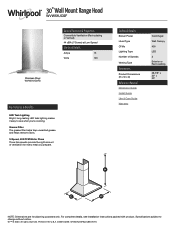
...you prepare. Grease Filter The grease filter helps trap unwanted grease and helps remove odors. 3-Speed, 400 CFM Motor Class Three fan speeds provide the right amount of Speeds Venting Type Dimensions Product Dimensions (H x W x D) Reference Material Dimension Guide Install Guide Use & Care Guide Warranty Centrifugal Wall Canopy 400 LED 3 Exterior or Recirculating 28-7/8" x 30" x 20" NOTE: Dimensions are for every meal you 're cooking. D200104XXE. Technical Details Blower Power Hood Type CFMs Lighting Type Number of ventilation for planning purposes only. Specifications subject to...
...you prepare. Grease Filter The grease filter helps trap unwanted grease and helps remove odors. 3-Speed, 400 CFM Motor Class Three fan speeds provide the right amount of Speeds Venting Type Dimensions Product Dimensions (H x W x D) Reference Material Dimension Guide Install Guide Use & Care Guide Warranty Centrifugal Wall Canopy 400 LED 3 Exterior or Recirculating 28-7/8" x 30" x 20" NOTE: Dimensions are for every meal you 're cooking. D200104XXE. Technical Details Blower Power Hood Type CFMs Lighting Type Number of ventilation for planning purposes only. Specifications subject to...


