Owners Manual
Page 1
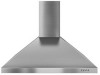
..." (76.2 CM) AND 36" (91.4 CM) WALLMOUNT CANOPY RANGE HOOD Installation Instructions and Use & Care Guide For questions about features, operation/performance parts, accessories or service, call: 1-800-253-1301 In Canada, for assistance, installation and service, call: 1-800-807-6777 or visit our website at www.whirlpool.com or www.whirlpool.ca HOTTE D'EXTRACTION À MONTAGE MURAL Instructions d'installation et Guide d'utilisation et d'entretien 1-800-253-1301 1-800-807-6777...
..." (76.2 CM) AND 36" (91.4 CM) WALLMOUNT CANOPY RANGE HOOD Installation Instructions and Use & Care Guide For questions about features, operation/performance parts, accessories or service, call: 1-800-253-1301 In Canada, for assistance, installation and service, call: 1-800-807-6777 or visit our website at www.whirlpool.com or www.whirlpool.ca HOTTE D'EXTRACTION À MONTAGE MURAL Instructions d'installation et Guide d'utilisation et d'entretien 1-800-253-1301 1-800-807-6777...
Owners Manual
Page 2
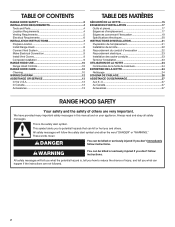
.... WARNING You can happen if the instructions are very important. TABLE OF CONTENTS RANGE HOOD SAFETY 2 INSTALLATION REQUIREMENTS 4 Tools and Parts 4 Location Requirements 4 Venting Requirements 5 Electrical Requirements 6 INSTALLATION INSTRUCTIONS 7 Prepare Location 7 Install Range Hood 8 Connect Vent System 8 Make Electrical Connection 9 Install Vent Covers 9 Complete Installation 9 RANGE HOOD USE 10 Range Hood Controls 10 RANGE HOOD CARE 10 Cleaning 10 WIRING DIAGRAM 12 ASSISTANCE OR SERVICE 13 In the U.S.A 13 In Canada 13 Accessories 13 TABLE DES MATIÈRES...
.... WARNING You can happen if the instructions are very important. TABLE OF CONTENTS RANGE HOOD SAFETY 2 INSTALLATION REQUIREMENTS 4 Tools and Parts 4 Location Requirements 4 Venting Requirements 5 Electrical Requirements 6 INSTALLATION INSTRUCTIONS 7 Prepare Location 7 Install Range Hood 8 Connect Vent System 8 Make Electrical Connection 9 Install Vent Covers 9 Complete Installation 9 RANGE HOOD USE 10 Range Hood Controls 10 RANGE HOOD CARE 10 Cleaning 10 WIRING DIAGRAM 12 ASSISTANCE OR SERVICE 13 In the U.S.A 13 In Canada 13 Accessories 13 TABLE DES MATIÈRES...
Owners Manual
Page 3
IMPORTANT SAFETY INSTRUCTIONS READ AND SAVE THESE INSTRUCTIONS 3
IMPORTANT SAFETY INSTRUCTIONS READ AND SAVE THESE INSTRUCTIONS 3
Owners Manual
Page 4
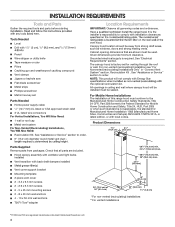
... Star the optional recirculation kit. See "Assistance or Service" section to order. Hood canopy assembly with ventilator and light bulbs installed Vent transition with local codes. The canopy hood is factory set Parts Needed Home power supply cable 1/2" (12.7 mm) UL listed or CSA approved strain relief 3 UL listed wire connectors For Vented Installations, You Will Also Need: 1 wall or roof cap Metal vent system For Non-Vented (Recirculating) Installations, Location Requirements IMPORTANT: Observe all parts are registered trademarks of this range hood must conform to comply...
... Star the optional recirculation kit. See "Assistance or Service" section to order. Hood canopy assembly with ventilator and light bulbs installed Vent transition with local codes. The canopy hood is factory set Parts Needed Home power supply cable 1/2" (12.7 mm) UL listed or CSA approved strain relief 3 UL listed wire connectors For Vented Installations, You Will Also Need: 1 wall or roof cap Metal vent system For Non-Vented (Recirculating) Installations, Location Requirements IMPORTANT: Observe all parts are registered trademarks of this range hood must conform to comply...
Owners Manual
Page 5
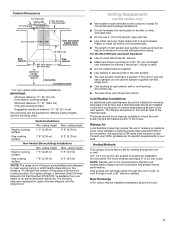
... roof or wall cap has a damper, do not use of makeup air systems when using ventilation systems greater than 1 elbow is needed for venting through the roof or wall. The damper should be on the distance "X" between the elbows if more than specified CFM of air movement. Makeup Air Local building codes may be adjusted for specific requirements in your dealer or an authorized parts distributor. ceiling height Electric cooking surface 7' 5" (2.26 m) 9' 6" (2.9 m) Gas cooking surface 7' 8" (2.34 m) 9' 6" (2.9 m) *NOTE: The range hood chimneys...
... roof or wall cap has a damper, do not use of makeup air systems when using ventilation systems greater than 1 elbow is needed for venting through the roof or wall. The damper should be on the distance "X" between the elbows if more than specified CFM of air movement. Makeup Air Local building codes may be adjusted for specific requirements in your dealer or an authorized parts distributor. ceiling height Electric cooking surface 7' 5" (2.26 m) 9' 6" (2.9 m) Gas cooking surface 7' 8" (2.34 m) 9' 6" (2.9 m) *NOTE: The range hood chimneys...

Owners Manual
Page 6
... for best performance, and avoid installing the fan with the rating of copper wire using a Recirculation Kit (which includes charcoal filters and a deflector). Use the shortest, straightest duct routing possible for condensation. Fans installed with duct tape/ caulk A. Aluminum/copper connection must conform with local codes and industry accepted wiring practices. ■■ Wire sizes and connections must conform to minimize possible condensation buildup within the maximum recommended vent length of solid copper wire to...
... for best performance, and avoid installing the fan with the rating of copper wire using a Recirculation Kit (which includes charcoal filters and a deflector). Use the shortest, straightest duct routing possible for condensation. Fans installed with duct tape/ caulk A. Aluminum/copper connection must conform with local codes and industry accepted wiring practices. ■■ Wire sizes and connections must conform to minimize possible condensation buildup within the maximum recommended vent length of solid copper wire to...
Owners Manual
Page 7
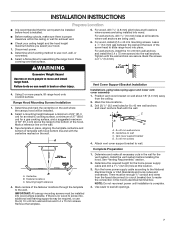
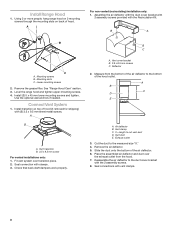
... range hood. Vent cover support bracket D. 5 x 45 mm screws 4. Determine the required height for a gas cooking surface, and a suggested maximum of 36" (91.4 cm) above the range to seal all locations where screws are being used. 6. There must be installed into wood where possible. Range Hood Mounting Screws Installation 1. Tape template in the wall for exhaust vent. ■■ Check your ceiling height and the hood height maximum before you select your hood. 1. Remove the template. Position vent cover bracket on the wall where the canopy hood...
... range hood. Vent cover support bracket D. 5 x 45 mm screws 4. Determine the required height for a gas cooking surface, and a suggested maximum of 36" (91.4 cm) above the range to seal all locations where screws are being used. 6. There must be installed into wood where possible. Range Hood Mounting Screws Installation 1. Tape template in the wall for exhaust vent. ■■ Check your ceiling height and the hood height maximum before you select your hood. 1. Remove the template. Position vent cover bracket on the wall where the canopy hood...
Owners Manual
Page 8
... size "X." 4. Level the range hood and tighten upper mounting screws. 4. Vent cover bracket B. 2.9 x 6.5 mm screws C. Vent clamp C. Remove the air deflector. 5. Slide the duct onto the bottom of the hood outlet. Mounting screws B. A B X C D E A. Install Range Hood 1. Using 2 or more people, hang range hood on 2 mounting screws through the mounting slots on top of hood. B A B B C C A. Lower mounting screws 2. Remove the grease filter. Use the optional wall anchors if needed. Seal connection with (2) 3.5 x 9.5 mm sheet metal screws. Check that back draft dampers work...
... size "X." 4. Level the range hood and tighten upper mounting screws. 4. Vent cover bracket B. 2.9 x 6.5 mm screws C. Vent clamp C. Remove the air deflector. 5. Slide the duct onto the bottom of the hood outlet. Mounting screws B. A B X C D E A. Install Range Hood 1. Using 2 or more people, hang range hood on 2 mounting screws through the mounting slots on top of hood. B A B B C C A. Lower mounting screws 2. Remove the grease filter. Use the optional wall anchors if needed. Seal connection with (2) 3.5 x 9.5 mm sheet metal screws. Check that back draft dampers work...
Owners Manual
Page 9
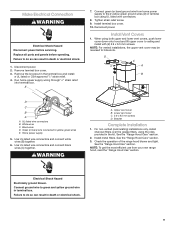
...6.5 mm screws D. For non-vented (recirculating) installations only, install charcoal filters over the grease filters, using UL listed wire connectors. 8. Check the operation of the range hood blower and light. D C C A B D C B A A UL listed wire connectors B. Black wires D. Use UL listed wire connectors and connect black wires (C) together. Install terminal box cover. 10. WARNING A. Remove terminal box cover. 3. Connect green (or bare) ground wire from your new range hood, read the "Range Hood Use" section. Bracket Complete Installation 1. Make Electrical Connection WARNING...
...6.5 mm screws D. For non-vented (recirculating) installations only, install charcoal filters over the grease filters, using UL listed wire connectors. 8. Check the operation of the range hood blower and light. D C C A B D C B A A UL listed wire connectors B. Black wires D. Use UL listed wire connectors and connect black wires (C) together. Install terminal box cover. 10. WARNING A. Remove terminal box cover. 3. Connect green (or bare) ground wire from your new range hood, read the "Range Hood Use" section. Bracket Complete Installation 1. Make Electrical Connection WARNING...

Owners Manual
Page 10
... remove smoke, cooking vapors and odors from the kitchen. Blower off and speed minimum button C. RANGE HOOD USE The range hood is complete to clear all -purpose cleaner: Rinse with clean water and dry with soft, lint-free cloth. The hood controls are located on the front panel on the right side of grain to turn the blower On and control the blower speed and sound level for quiet operation. Range Hood Controls A A B C D A. On/Off light button B. Blower speed medium button D. LED lamps B. Grease...
... remove smoke, cooking vapors and odors from the kitchen. Blower off and speed minimum button C. RANGE HOOD USE The range hood is complete to clear all -purpose cleaner: Rinse with clean water and dry with soft, lint-free cloth. The hood controls are located on the front panel on the right side of grain to turn the blower On and control the blower speed and sound level for quiet operation. Range Hood Controls A A B C D A. On/Off light button B. Blower speed medium button D. LED lamps B. Grease...
Owners Manual
Page 11
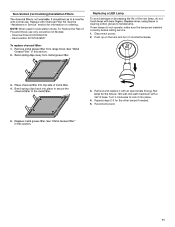
... handle lamp. Charcoal Filter Kit W10294730 - Remove and replace it with normal use only convertion kit Models: - Turn it clockwise to lock it counterclockwise. 1. Recirculation Kit W10349327 Replacing a LED Lamp To avoid damage or decreasing the life of Fire and Shock use . See the "Assistance or Service" section for the other lamps if needed. 5. Grease Filter" in recirculation mode, To Reduce the Risk of the new lamp, do not operate, make sure the lamps are inserted...
... handle lamp. Charcoal Filter Kit W10294730 - Remove and replace it with normal use only convertion kit Models: - Turn it clockwise to lock it counterclockwise. 1. Recirculation Kit W10349327 Replacing a LED Lamp To avoid damage or decreasing the life of Fire and Shock use . See the "Assistance or Service" section for the other lamps if needed. 5. Grease Filter" in recirculation mode, To Reduce the Risk of the new lamp, do not operate, make sure the lamps are inserted...
Owners Manual
Page 12
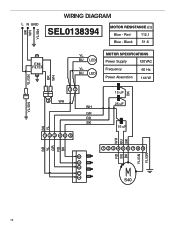
Black 112.1 51.6 EMI FILTER YL BU LED YL BU LED MOTOR SPECIFICATIONS Power Supply 120 VAC Frequency 60 Hz Power Absorotion 144 W YL/GN BK WH BK YL/GN 12 Z WH WH GR RD BK Y L 123 45 6 15 uF 25 uF 16 uF B K BK BU WH 123456789 R D B K GR Y L B R YL/GN YL/GN BK BU RD 4 32 L1 S40 12 Red Blue - BK WH YL/GN L N GND WIRING DIAGRAM SEL0138394 MOTOR RESISTANCE (Ω) Blue -
Black 112.1 51.6 EMI FILTER YL BU LED YL BU LED MOTOR SPECIFICATIONS Power Supply 120 VAC Frequency 60 Hz Power Absorotion 144 W YL/GN BK WH BK YL/GN 12 Z WH WH GR RD BK Y L 123 45 6 15 uF 25 uF 16 uF B K BK BU WH 123456789 R D B K GR Y L B R YL/GN YL/GN BK BU RD 4 32 L1 S40 12 Red Blue - BK WH YL/GN L N GND WIRING DIAGRAM SEL0138394 MOTOR RESISTANCE (Ω) Blue -
Owners Manual
Page 13
... and repair parts sales. Accessories Chimney Extension Kit Order Part Number EXTKIT18FS Stainless Steel Cleaner and Polish Order Part Number 31462A Charcoal Filter Kit (for non-vented installations only)) Order Part Number W10294730 Recirculation Kit (for non-vented installations only) Order Part Number W10349327 13 Our consultants provide assistance with any questions or concerns at www.whirlpool.ca. Referrals to local dealers. If you need replacement parts If you need service Please refer to the warranty page in your correspondence. Installation information. Use and...
... and repair parts sales. Accessories Chimney Extension Kit Order Part Number EXTKIT18FS Stainless Steel Cleaner and Polish Order Part Number 31462A Charcoal Filter Kit (for non-vented installations only)) Order Part Number W10294730 Recirculation Kit (for non-vented installations only) Order Part Number W10349327 13 Our consultants provide assistance with any questions or concerns at www.whirlpool.ca. Referrals to local dealers. If you need replacement parts If you need service Please refer to the warranty page in your correspondence. Installation information. Use and...

Owners Manual
Page 32
All rights reserved. Tous droits réservés. 06/19 Utilisé sous licence au Canada. Used under license in Canada. LIB0138948A/W11374530A ®/™ ©2019 Whirlpool.
All rights reserved. Tous droits réservés. 06/19 Utilisé sous licence au Canada. Used under license in Canada. LIB0138948A/W11374530A ®/™ ©2019 Whirlpool.


