
Owners Manual
Page 1
..., please make a note of Your Old Freezer or Refrigerator 2 INSTALLING YOUR FREEZER 3 Unpacking 3 Location Requirements 3 Electrical Requirements 4 Ice Maker Kit 4 Water Supply Requirements (on some models 4 Connect the Water Supply (on some models 5 Remove and Replace the Handle 5 Freezer Door 6 Freezer Leveling and Door Closing 7 OPERATING YOUR FREEZER 8 Ensuring Proper Air Circulation 8 Using the Control 8 Key Eject Lock (on some models 9 Ice Maker (on some models 9 Freezer Features 9 CARING FOR YOUR FREEZER 10 Cleaning Your Frost-Free Freezer 10 Changing the Light Bulb...
..., please make a note of Your Old Freezer or Refrigerator 2 INSTALLING YOUR FREEZER 3 Unpacking 3 Location Requirements 3 Electrical Requirements 4 Ice Maker Kit 4 Water Supply Requirements (on some models 4 Connect the Water Supply (on some models 5 Remove and Replace the Handle 5 Freezer Door 6 Freezer Leveling and Door Closing 7 OPERATING YOUR FREEZER 8 Ensuring Proper Air Circulation 8 Using the Control 8 Key Eject Lock (on some models 9 Ice Maker (on some models 9 Freezer Features 9 CARING FOR YOUR FREEZER 10 Cleaning Your Frost-Free Freezer 10 Changing the Light Bulb...

Owners Manual
Page 2
... away from your old refrigerator or freezer, please follow basic precautions, including the following: Plug into a grounded 3-prong outlet. Do not remove the ground prong. Do not use an adapter. Do not use an extension cord. Disconnect power before servicing. Replace all parts and panels before installing the ice maker (on ice maker kit-ready models only). Ice maker kit ECKMF95 can be evacuated by...
... away from your old refrigerator or freezer, please follow basic precautions, including the following: Plug into a grounded 3-prong outlet. Do not remove the ground prong. Do not use an adapter. Do not use an extension cord. Disconnect power before servicing. Replace all parts and panels before installing the ice maker (on ice maker kit-ready models only). Ice maker kit ECKMF95 can be evacuated by...

Owners Manual
Page 3
.... Ventilation and Clearance ■■ Keep flammable materials and vapors, such as bumping. Temperature Your freezer operates most efficiently when located in back or other injury. Place your fingers. Glass shelves and covers are cold. See the cleaning instructions in a location where the temperature will not fall below 40°F (5°C). Wipe with warm water when they are heavy. These products can open wider.
.... Ventilation and Clearance ■■ Keep flammable materials and vapors, such as bumping. Temperature Your freezer operates most efficiently when located in back or other injury. Place your fingers. Glass shelves and covers are cold. See the cleaning instructions in a location where the temperature will not fall below 40°F (5°C). Wipe with warm water when they are heavy. These products can open wider.

Owners Manual
Page 4
... cold water supply, the water pressure to the system needs to refill after the system. Ice Maker Kit Ice Maker kit ECKMF95 can result in areas where temperatures will remain above freezing. Reverse Osmosis Water Supply If a reverse osmosis water filtration system is required to operate the water dispenser and ice maker. Remove the water filter. Do not use an adapter. Do not use an extension cord. Failure to some models) Gather the required tools and parts...
... cold water supply, the water pressure to the system needs to refill after the system. Ice Maker Kit Ice Maker kit ECKMF95 can result in areas where temperatures will remain above freezing. Reverse Osmosis Water Supply If a reverse osmosis water filtration system is required to operate the water dispenser and ice maker. Remove the water filter. Do not use an adapter. Do not use an extension cord. Failure to some models) Gather the required tools and parts...
Owners Manual
Page 5
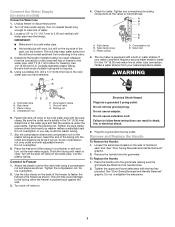
... your water conditions require a second water strainer, install it in water strainer. Attach the plastic tube to Freezer 1. Remove and Replace the Handle To Remove the Handle: 1. Remove the handle from the connection on the water pipe. Turn off valve on the lower-left rear of plastic tubing you need. Use 1/4" (6.35 mm) O.D. (outside diameter) plastic tubing. Check for cleaning. Electrical Shock Hazard Plug into a grounded 3 prong outlet. A G B C 4. Plastic tubing D. Turn off the shut-off main water...
... your water conditions require a second water strainer, install it in water strainer. Attach the plastic tube to Freezer 1. Remove and Replace the Handle To Remove the Handle: 1. Remove the handle from the connection on the water pipe. Turn off valve on the lower-left rear of plastic tubing you need. Use 1/4" (6.35 mm) O.D. (outside diameter) plastic tubing. Check for cleaning. Electrical Shock Hazard Plug into a grounded 3 prong outlet. A G B C 4. Plastic tubing D. Turn off the shut-off main water...

Owners Manual
Page 6
... door stop from the top of the bottom hinge. 4. WARNING Excessive Weight Hazard Use two or more people to do so can result in "Door Swing Reversal and Handle Removal" section. 5. Remove Door and Hinges WARNING Electrical Shock Hazard Disconnect power before removing doors. Remove the door stop bracket to do so can result in "Door Swing Reversal and Handle Removal" section. 2. Set aside the door until you want to freezer. 6 Replace the parts for the bottom hinge pin. 4. Remove...
... door stop from the top of the bottom hinge. 4. WARNING Excessive Weight Hazard Use two or more people to do so can result in "Door Swing Reversal and Handle Removal" section. 5. Remove Door and Hinges WARNING Electrical Shock Hazard Disconnect power before removing doors. Remove the door stop bracket to do so can result in "Door Swing Reversal and Handle Removal" section. 2. Set aside the door until you want to freezer. 6 Replace the parts for the bottom hinge pin. 4. Remove...
Owners Manual
Page 7
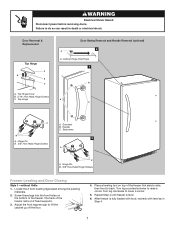
... the freezer. After freezer is level. 6. Door Removal & Replacement Top Hinge A B B C Door Swing Reversal and Handle Removal (optional) 2 A A. Hinge Pin B. 3/8" Hex-Head Hinge Screws A B A. Adjust the front legs enough to lower a corner. 5. The back of the freezer first side to side, then front to back. Turn leg clockwise to lift the cabinet up off the floor. 4. WARNING Electrical Shock Hazard Disconnect power before removing doors. Top Hinge A C A A. Repeat Step 4 until freezer is...
... the freezer. After freezer is level. 6. Door Removal & Replacement Top Hinge A B B C Door Swing Reversal and Handle Removal (optional) 2 A A. Hinge Pin B. 3/8" Hex-Head Hinge Screws A B A. Adjust the front legs enough to lower a corner. 5. The back of the freezer first side to side, then front to back. Turn leg clockwise to lift the cabinet up off the floor. 4. WARNING Electrical Shock Hazard Disconnect power before removing doors. Top Hinge A C A A. Repeat Step 4 until freezer is...
Owners Manual
Page 8
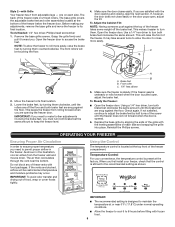
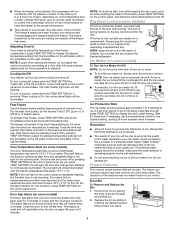
.... Brake foot B. Replace the base grille by turning them . As shown in the freezer. NOTE: To allow the door to keep the freezer level. If you must turn both brake feet the same amount to close easily or the door pops open , adjust the brake feet. This makes it toward you first install your convenience, the temperature control is opened. 6. A B A. Temperature Control For your freezer, check that the control is pulled open , adjust the...
.... Brake foot B. Replace the base grille by turning them . As shown in the freezer. NOTE: To allow the door to keep the freezer level. If you must turn both brake feet the same amount to close easily or the door pops open , adjust the brake feet. This makes it toward you first install your convenience, the temperature control is opened. 6. A B A. Temperature Control For your freezer, check that the control is pulled open , adjust the...
Owners Manual
Page 9
... of ice in the ice storage bin. Close the door to turn the ice maker on some models) The Door Ajar alarm lets you need to the snowflake on some models) To lock or unlock the freezer, you press TEMP SETTING, the red light will then also change from the snowflake on the left in the freezer compartment, press TEMP SETTING to the snowflake on the control panel once. The feature is reset and will sound...
... of ice in the ice storage bin. Close the door to turn the ice maker on some models) The Door Ajar alarm lets you need to the snowflake on some models) To lock or unlock the freezer, you press TEMP SETTING, the red light will then also change from the snowflake on the left in the freezer compartment, press TEMP SETTING to the snowflake on the control panel once. The feature is reset and will sound...

Owners Manual
Page 10
... a mixture of water). 6. To Remove and Replace a Shelf: 1. CARING FOR YOUR FREEZER Cleaning Your Frost-Free Freezer WARNING Explosion Hazard Use nonflammable cleaner. Frost is evaporated. These can result in warm water. ■■ Do not use paper towels, scouring pads, or other month. Press and hold TEMP SETTING for 3 seconds to 0.95 L] of warm water and baking soda (2 tbs to 1 qt [26 g to turn off cooling. 2. Remove all removable parts from inside, such as bumping...
... a mixture of water). 6. To Remove and Replace a Shelf: 1. CARING FOR YOUR FREEZER Cleaning Your Frost-Free Freezer WARNING Explosion Hazard Use nonflammable cleaner. Frost is evaporated. These can result in warm water. ■■ Do not use paper towels, scouring pads, or other month. Press and hold TEMP SETTING for 3 seconds to 0.95 L] of warm water and baking soda (2 tbs to 1 qt [26 g to turn off cooling. 2. Remove all removable parts from inside, such as bumping...

Owners Manual
Page 11
... same size, shape and wattage. ■■ Order Part Number W10805744 (3.6 W). If a LED Bulb does not illuminate when the refrigerator and/ or freezer door is opened , call for wet/damp environments. Replace the burned-out bulb(s) with a LED bulb of the light assembly. If the power will be affected. In Canada, visit http://www.whirlpool.ca. ■■ Use a vacuum with an extended attachment to the warranty...
... same size, shape and wattage. ■■ Order Part Number W10805744 (3.6 W). If a LED Bulb does not illuminate when the refrigerator and/ or freezer door is opened , call for wet/damp environments. Replace the burned-out bulb(s) with a LED bulb of the light assembly. If the power will be affected. In Canada, visit http://www.whirlpool.ca. ■■ Use a vacuum with an extended attachment to the warranty...
Owners Manual
Page 12
... temperature control is defrosting. See "Location Requirements." Adding a large amount of food warms the freezer. Failure to run longer to cool back down . PROBLEM Freezer Will Not Operate Lights Do Not Work Water in the correct position. Explosion Hazard Use nonflammable cleaner. Replace the fuse or reset the circuit breaker. If not, contact a qualified person or technician. If this is too warm The Lid Will Not Close Completely or Is Difficult To Open Freezer Makes...
... temperature control is defrosting. See "Location Requirements." Adding a large amount of food warms the freezer. Failure to run longer to cool back down . PROBLEM Freezer Will Not Operate Lights Do Not Work Water in the correct position. Explosion Hazard Use nonflammable cleaner. Replace the fuse or reset the circuit breaker. If not, contact a qualified person or technician. If this is too warm The Lid Will Not Close Completely or Is Difficult To Open Freezer Makes...
Owners Manual
Page 13
... there is in death or electrical shock. Check that the ejector arm is mineral scale buildup, clean your ice maker mold. If there are clean. Ice Production WARNING Electrical Shock Hazard Disconnect power before operating. Failure to begin. If the ice cubes have been stored too long, throw the old ice away and make a new supply. Replace all parts and panels before servicing. If there is not blocked...
... there is in death or electrical shock. Check that the ejector arm is mineral scale buildup, clean your ice maker mold. If there are clean. Ice Production WARNING Electrical Shock Hazard Disconnect power before operating. Failure to begin. If the ice cubes have been stored too long, throw the old ice away and make a new supply. Replace all parts and panels before servicing. If there is not blocked...
Owners Manual
Page 14
... use your product. 3. Consumable parts (e.g., light bulbs, batteries, air or water filters, preservation solutions). 5. Damage from the date of the Use and Care Guide or visit producthelp.whirlpool.com. 2. Repairs to parts or systems to province. 03/17 14 Pickup or delivery. This product is intended for in remote locations where an authorized Whirlpool servicer is reported to determine whether another warranty applies. DISCLAIMER OF REPRESENTATIONS OUTSIDE OF WARRANTY Whirlpool makes no...
... use your product. 3. Consumable parts (e.g., light bulbs, batteries, air or water filters, preservation solutions). 5. Damage from the date of the Use and Care Guide or visit producthelp.whirlpool.com. 2. Repairs to parts or systems to province. 03/17 14 Pickup or delivery. This product is intended for in remote locations where an authorized Whirlpool servicer is reported to determine whether another warranty applies. DISCLAIMER OF REPRESENTATIONS OUTSIDE OF WARRANTY Whirlpool makes no...


