
Owners Manual
Page 1
...3 Location Requirements 3 Electrical Requirements 4 Ice Maker Kit 4 Water Supply Requirements (on some models 4 Connect the Water Supply (on some models 5 Remove and Replace the Handle 5 Freezer Door 6 Freezer Leveling and Door Closing 7 OPERATING YOUR FREEZER 8 Ensuring Proper Air Circulation 8 Using the Control 8 Key Eject Lock (on some models 9 Ice Maker (on some models 11 Power Interruptions 11 Moving Care 11 TROUBLESHOOTING 11 Freezer Operation 12 Ice Production 13 Ice Quality 13 WARRANTY 14 SAFETY Your safety and the safety of others . Model Number Serial Number...
...3 Location Requirements 3 Electrical Requirements 4 Ice Maker Kit 4 Water Supply Requirements (on some models 4 Connect the Water Supply (on some models 5 Remove and Replace the Handle 5 Freezer Door 6 Freezer Leveling and Door Closing 7 OPERATING YOUR FREEZER 8 Ensuring Proper Air Circulation 8 Using the Control 8 Key Eject Lock (on some models 9 Ice Maker (on some models 11 Power Interruptions 11 Moving Care 11 TROUBLESHOOTING 11 Freezer Operation 12 Ice Production 13 Ice Quality 13 WARRANTY 14 SAFETY Your safety and the safety of others . Model Number Serial Number...

Owners Manual
Page 2
... or instruction concerning use an extension cord. Disconnect power before servicing. Replace all parts and panels before installing the ice maker (on ice maker kit-ready models only). Ice maker kit ECKMF95 can be added to some models. A qualified service technician must be used in death or brain damage. IMPORTANT: Child entrapment and suffocation are still dangerous - Important information to know about disposal of refrigerants: Dispose of freezer in...
... or instruction concerning use an extension cord. Disconnect power before servicing. Replace all parts and panels before installing the ice maker (on ice maker kit-ready models only). Ice maker kit ECKMF95 can be added to some models. A qualified service technician must be used in death or brain damage. IMPORTANT: Child entrapment and suffocation are still dangerous - Important information to know about disposal of refrigerants: Dispose of freezer in...

Owners Manual
Page 3
... gasoline, away from surfaces before using it . Temperature Your freezer operates most efficiently when located in the "Caring for cleaning or service, be next to do so can damage the surface of the freezer and the wall. See the cleaning instructions in an area where the temperature will not fall below this recommended temperature. Unpacking INSTALLING YOUR FREEZER Location Requirements WARNING Excessive Weight Hazard Use two or more information, see...
... gasoline, away from surfaces before using it . Temperature Your freezer operates most efficiently when located in the "Caring for cleaning or service, be next to do so can damage the surface of the freezer and the wall. See the cleaning instructions in an area where the temperature will not fall below this recommended temperature. Unpacking INSTALLING YOUR FREEZER Location Requirements WARNING Excessive Weight Hazard Use two or more information, see...

Owners Manual
Page 4
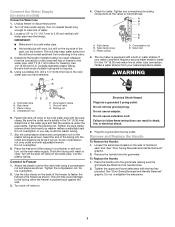
... questions about your water pressure, refer to make sure a saddle-type valve complies with a reverse osmosis system. If you turn off by a switch. Failure to follow these instructions can be used in death, fire, or electrical shock. NOTE: Before performing any tools listed here. Ice Maker Kit Ice Maker kit ECKMF95 can result in conjunction with your freezer into its final location, it may contain filterable cysts. ■...
... questions about your water pressure, refer to make sure a saddle-type valve complies with a reverse osmosis system. If you turn off by a switch. Failure to follow these instructions can be used in death, fire, or electrical shock. NOTE: Before performing any tools listed here. Ice Maker Kit Ice Maker kit ECKMF95 can result in conjunction with your freezer into its final location, it may contain filterable cysts. ■...
Owners Manual
Page 5
... not use an adapter. Remove the handle from your water conditions require a second water strainer, install it is equipped with the pipe clamp. Add 7 ft (2.1 m) to 3.18 cm) vertical cold water pipe near the freezer. WARNING FE A. Plastic tubing D. Screw compression nut onto outlet end with the hex key provided. Turn off the shut-off valve to the freezer as shown. Coil the plastic tubing. See "Door Swing...
... not use an adapter. Remove the handle from your water conditions require a second water strainer, install it is equipped with the pipe clamp. Add 7 ft (2.1 m) to 3.18 cm) vertical cold water pipe near the freezer. WARNING FE A. Plastic tubing D. Screw compression nut onto outlet end with the hex key provided. Turn off the shut-off valve to the freezer as shown. Coil the plastic tubing. See "Door Swing...

Owners Manual
Page 6
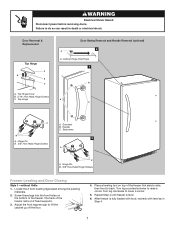
... hinge thimble hole plug from the lower hinge and cabinet and set aside. 5. Set aside the door until you are being moved. NOTE: Provide additional support for the door while the hinges are in "Door Swing Reversal and Handle Removal" section. 2. Remove the 4 hex-head hinge screws and bottom hinge assembly. Return all screws. WARNING Excessive Weight Hazard Use two or more people to freezer. 6 Failure to follow these instructions...
... hinge thimble hole plug from the lower hinge and cabinet and set aside. 5. Set aside the door until you are being moved. NOTE: Provide additional support for the door while the hinges are in "Door Swing Reversal and Handle Removal" section. 2. Remove the 4 hex-head hinge screws and bottom hinge assembly. Return all screws. WARNING Excessive Weight Hazard Use two or more people to freezer. 6 Failure to follow these instructions...
Owners Manual
Page 7
... to back. Top Hinge A C A A. Hinge Pin B. 3/8" Hex-Head Hinge Screws A B A. Place a leveling tool on 2 fixed supports. 3. Repeat Step 4 until freezer is fully loaded with food, recheck with level as in death or electrical shock. 1. WARNING Electrical Shock Hazard Disconnect power before removing doors. Failure to lower a corner. 5. Handle C. Setscrews B 3 A. Turn leg counterclockwise to lift the cabinet up off the floor. 4. After freezer is level. 6. Grommet B. Adjust the front legs enough...
... to back. Top Hinge A C A A. Hinge Pin B. 3/8" Hex-Head Hinge Screws A B A. Place a leveling tool on 2 fixed supports. 3. Repeat Step 4 until freezer is fully loaded with food, recheck with level as in death or electrical shock. 1. WARNING Electrical Shock Hazard Disconnect power before removing doors. Failure to lower a corner. 5. Handle C. Setscrews B 3 A. Turn leg counterclockwise to lift the cabinet up off the floor. 4. After freezer is level. 6. Grommet B. Adjust the front legs enough...
Owners Manual
Page 8
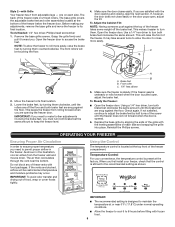
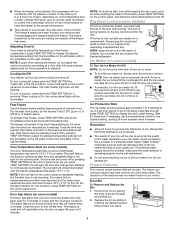
... door to adjust the brake feet by aligning the ends of these vents with the door opening the freezer door. This makes it toward you need to turn both brake feet are blocked, airflow will raise the front of the freezer below the freezer door. Temperature Control For your freezer, check that the control is located at the bottom of the freezer. one on 2 fixed rollers. Use a 1/4" hex driver to turn both brake feet...
... door to adjust the brake feet by aligning the ends of these vents with the door opening the freezer door. This makes it toward you need to turn both brake feet are blocked, airflow will raise the front of the freezer below the freezer door. Temperature Control For your freezer, check that the control is located at the bottom of the freezer. one on 2 fixed rollers. Use a 1/4" hex driver to turn both brake feet...
Owners Manual
Page 9
..., make sure the ice maker will still operate. NOTE: Your ice maker has an automatic shutoff. Ice Production Rate The ice maker should produce approximately 7 to produce the first batch of ice in the freezer compartment, press TEMP SETTING to display the desired temperature setting from packages and airspace inside of your ice will reactivate when the door is again left (least cold) to remove heat from the snowflake on the left open for a replacement...
..., make sure the ice maker will still operate. NOTE: Your ice maker has an automatic shutoff. Ice Production Rate The ice maker should produce approximately 7 to produce the first batch of ice in the freezer compartment, press TEMP SETTING to display the desired temperature setting from packages and airspace inside of your ice will reactivate when the door is again left (least cold) to remove heat from the snowflake on the left open for a replacement...

Owners Manual
Page 10
... to defrost your exterior finish. Replace the shelf by air moving and collecting any moisture and depositing it is evaporated. Remove all removable parts from inside, such as window sprays, scouring cleansers, flammable fluids, cleaning waxes, concentrated detergents, bleaches or cleansers containing petroleum products on plastic parts, interior and door liners, or gaskets. Remove all frozen food. Glass shelves and covers are cold. Storage Basket (on some models) To Remove...
... to defrost your exterior finish. Replace the shelf by air moving and collecting any moisture and depositing it is evaporated. Remove all removable parts from inside, such as window sprays, scouring cleansers, flammable fluids, cleaning waxes, concentrated detergents, bleaches or cleansers containing petroleum products on plastic parts, interior and door liners, or gaskets. Remove all frozen food. Glass shelves and covers are cold. Storage Basket (on some models) To Remove...

Owners Manual
Page 11
... frozen food. 2. Set temperature control to the cabinet. Replace the burned-out bulb(s) with any questions or concerns at once. Plug in freezer or reconnect power. 11. TROUBLESHOOTING First try the solutions suggested here. Slide the light shield toward the front until it in place. 6. Replace the light shield by aligning the ends of the grille with only incandescent bulb(s) of the same size, shape and wattage...
... frozen food. 2. Set temperature control to the cabinet. Replace the burned-out bulb(s) with any questions or concerns at once. Plug in freezer or reconnect power. 11. TROUBLESHOOTING First try the solutions suggested here. Slide the light shield toward the front until it in place. 6. Replace the light shield by aligning the ends of the grille with only incandescent bulb(s) of the same size, shape and wattage...
Owners Manual
Page 12
... 24 hours. PROBLEM Freezer Will Not Operate Lights Do Not Work Water in the correct position. Check that the shelves and basket are in Defrost Drain Pan Motor seems to normal temperature. Defrost and clean the freezer to its high-efficiency motor. Check that the light bulb is tight in death, explosion, or fire. See "Caring for the next 24 hours. 12 Turn the temperature alarm off the temperature alarm for the freezer to return...
... 24 hours. PROBLEM Freezer Will Not Operate Lights Do Not Work Water in the correct position. Check that the shelves and basket are in Defrost Drain Pan Motor seems to normal temperature. Defrost and clean the freezer to its high-efficiency motor. Check that the light bulb is tight in death, explosion, or fire. See "Caring for the next 24 hours. 12 Turn the temperature alarm off the temperature alarm for the freezer to return...
Owners Manual
Page 13
... If ice maker has just been installed, wait 72 hours for service. Check that the wire shut-off arm is mineral scale buildup, clean your ice maker mold. Replace all parts and panels before servicing. If there is cold enough. Check that the freezer and ice bin are clumps of ice. Break the clumps with the water line. NOTE: If not due to any of ice has been removed recently...
... If ice maker has just been installed, wait 72 hours for service. Check that the wire shut-off arm is mineral scale buildup, clean your ice maker mold. Replace all parts and panels before servicing. If there is cold enough. Check that the freezer and ice bin are clumps of ice. Break the clumps with the water line. NOTE: If not due to any of ice has been removed recently...
Owners Manual
Page 14
... to or furnished with products not approved by our authorized Whirlpool Service Providers. This limited warranty is valid only in the United States or Canada and applies only when the major appliance is intended for factory specified replacement parts and repair labor to correct defects in accordance with published user, operator, or installation instructions. 2. DISCLAIMER OF REPRESENTATIONS OUTSIDE OF WARRANTY Whirlpool makes no representations about...
... to or furnished with products not approved by our authorized Whirlpool Service Providers. This limited warranty is valid only in the United States or Canada and applies only when the major appliance is intended for factory specified replacement parts and repair labor to correct defects in accordance with published user, operator, or installation instructions. 2. DISCLAIMER OF REPRESENTATIONS OUTSIDE OF WARRANTY Whirlpool makes no representations about...
Instruction Sheet
Page 1
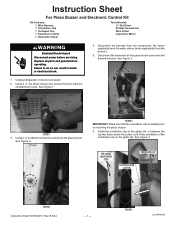
... clip clip installation location figure 2 Instruction Sheet W10812019 Rev. Unplug refrigerator or disconnect power. 2. See Figure 4. Instruction Sheet For Piezo Buzzer and Electronic Control Kit Kit Contains: 1 Wire Harness 1 Orientation Clip 1 U-shaped Clip 1 Electronic Control 1 Instruction Sheet Tools Needed: ¼" Nut Driver Phillips Screwdriver Wire Cutter Inspection Mirror WARNING Electrical Shock Hazard Disconnect power before operating. Replace all parts and panels before servicing. See Figure 3. 1. See Figure 1. figure 1 3. Using a ¼" nut driver remove the...
... clip clip installation location figure 2 Instruction Sheet W10812019 Rev. Unplug refrigerator or disconnect power. 2. See Figure 4. Instruction Sheet For Piezo Buzzer and Electronic Control Kit Kit Contains: 1 Wire Harness 1 Orientation Clip 1 U-shaped Clip 1 Electronic Control 1 Instruction Sheet Tools Needed: ¼" Nut Driver Phillips Screwdriver Wire Cutter Inspection Mirror WARNING Electrical Shock Hazard Disconnect power before operating. Replace all parts and panels before servicing. See Figure 3. 1. See Figure 1. figure 1 3. Using a ¼" nut driver remove the...

Instruction Sheet
Page 2
.... Open the door; Install the U-shaped clip on heat shield. Replace all parts and panels. Mount the machine compartment cover. Plug in step 3, by putting the screw through the hole below the orientation clip. Mount the buzzer behind the glider rail using the screw removed in refrigerator or reconnect power. © Whirlpool Corporation 2014 ( All Rights Reserved) - 2 - Make the connections to the compressor, fan...
.... Open the door; Install the U-shaped clip on heat shield. Replace all parts and panels. Mount the machine compartment cover. Plug in step 3, by putting the screw through the hole below the orientation clip. Mount the buzzer behind the glider rail using the screw removed in refrigerator or reconnect power. © Whirlpool Corporation 2014 ( All Rights Reserved) - 2 - Make the connections to the compressor, fan...
Dimension Guide
Page 1
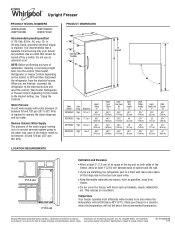
... is recommended that cannot be provided. Instructions packed with items such as gasolline, away from the electrical source. Specifications subject to the desired setting. Place your freezer be turned off by a switch. See "Using the Controls." handle D 4 A overall B C 90˚ Model Number Door Swing Model Size Height Overall "A" WZF56R16D Right 15.7 cu. Ref. or 20-amp fused, grounded electrical supply is required to the water inlet valve of cabinet and the...
... is recommended that cannot be provided. Instructions packed with items such as gasolline, away from the electrical source. Specifications subject to the desired setting. Place your freezer be turned off by a switch. See "Using the Controls." handle D 4 A overall B C 90˚ Model Number Door Swing Model Size Height Overall "A" WZF56R16D Right 15.7 cu. Ref. or 20-amp fused, grounded electrical supply is required to the water inlet valve of cabinet and the...


