
Owners Manual
Page 1
... Location Requirements 3 Electrical Requirements 4 Ice Maker Kit 4 Water Supply Requirements (on some models 4 Connect the Water Supply (on some models 5 Remove and Replace the Handle 5 Freezer Door 6 Freezer Leveling and Door Closing 7 OPERATING YOUR FREEZER 8 Ensuring Proper Air Circulation 8 Using the Control 8 Key Eject Lock (on some models 9 Ice Maker (on some models 11 Power Interruptions 11 Moving Care 11 TROUBLESHOOTING 11 Freezer Operation 12 Ice Production 13 Ice Quality 13 WARRANTY 14 SAFETY Your safety and the safety of your product model and serial numbers...
... Location Requirements 3 Electrical Requirements 4 Ice Maker Kit 4 Water Supply Requirements (on some models 4 Connect the Water Supply (on some models 5 Remove and Replace the Handle 5 Freezer Door 6 Freezer Leveling and Door Closing 7 OPERATING YOUR FREEZER 8 Ensuring Proper Air Circulation 8 Using the Control 8 Key Eject Lock (on some models 9 Ice Maker (on some models 11 Power Interruptions 11 Moving Care 11 TROUBLESHOOTING 11 Freezer Operation 12 Ice Production 13 Ice Quality 13 WARRANTY 14 SAFETY Your safety and the safety of your product model and serial numbers...

Owners Manual
Page 2
... following: Plug into a grounded 3-prong outlet. Do not remove the ground prong. Do not use an adapter. Do not use an extension cord. Disconnect power before servicing. Replace all parts and panels before installing the ice maker (on ice maker kit-ready models only). Ice maker kit ECKMF95 can be supervised to ensure that children may not easily climb inside. IMPORTANT SAFETY INSTRUCTIONS WARNING: To reduce...
... following: Plug into a grounded 3-prong outlet. Do not remove the ground prong. Do not use an adapter. Do not use an extension cord. Disconnect power before servicing. Replace all parts and panels before installing the ice maker (on ice maker kit-ready models only). Ice maker kit ECKMF95 can be supervised to ensure that children may not easily climb inside. IMPORTANT SAFETY INSTRUCTIONS WARNING: To reduce...

Owners Manual
Page 3
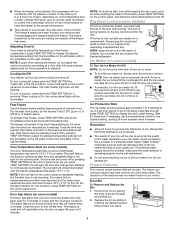
... a location where the temperature will not fall below 40°F (5°C). Remove Packaging Materials ■■ Remove tape and glue residue from freezer. These products can open wider. Clean Before Using After you remove all of the packaging materials, clean the inside of your freezer in death, explosion, or fire. Failure to move and install freezer. Place your freezer before turning on the freezer. Failure to sudden temperature changes or...
... a location where the temperature will not fall below 40°F (5°C). Remove Packaging Materials ■■ Remove tape and glue residue from freezer. These products can open wider. Clean Before Using After you remove all of the packaging materials, clean the inside of your freezer in death, explosion, or fire. Failure to move and install freezer. Place your freezer before turning on the freezer. Failure to sudden temperature changes or...

Owners Manual
Page 4
... cooling, and then disconnect the freezer from the cold water line to see "Troubleshooting" or call a licensed, qualified plumber. 4 Recommended Grounding Method A 115 V, 60 Hz, AC-only, 15 or 20 A fused, grounded electrical supply is required to 414 kPa). Do not use an extension cord. NOTE: Before performing any tools listed here. NOTE: ■■ Please follow the installation instructions supplied in the ice maker kit...
... cooling, and then disconnect the freezer from the cold water line to see "Troubleshooting" or call a licensed, qualified plumber. 4 Recommended Grounding Method A 115 V, 60 Hz, AC-only, 15 or 20 A fused, grounded electrical supply is required to 414 kPa). Do not use an extension cord. NOTE: Before performing any tools listed here. NOTE: ■■ Please follow the installation instructions supplied in the ice maker kit...
Owners Manual
Page 5
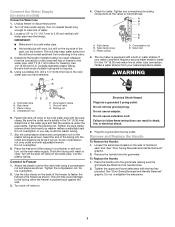
... clamp. Do not overtighten. 2. Electrical Shock Hazard Plug into a grounded 3 prong outlet. Remove the handle from collecting in the water pipe and that leak. Tighten the upper and lower setscrews with adjustable wrench. Unplug freezer or disconnect power. 2. Check for cleaning. The ice maker is clear. Plastic tubing D. Fasten the shut-off valve to follow these instructions can result in water strainer. Tighten the pipe...
... clamp. Do not overtighten. 2. Electrical Shock Hazard Plug into a grounded 3 prong outlet. Remove the handle from collecting in the water pipe and that leak. Tighten the upper and lower setscrews with adjustable wrench. Unplug freezer or disconnect power. 2. Check for cleaning. The ice maker is clear. Plastic tubing D. Fasten the shut-off valve to follow these instructions can result in water strainer. Tighten the pipe...

Owners Manual
Page 6
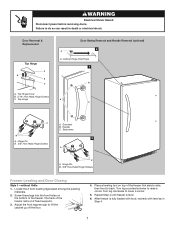
... Handle Removal" section. Set aside the door until you begin, turn the control OFF and remove food and adjustable door or utility bins from the cabinet. NOTE: Provide additional support for a right-hand swing door (hinges factory installed on the door magnets to remove and replace the door, see "Replace Door and Hinges." Remove the parts for the door while the hinges are working . 3. Lift the freezer door free from the hinge bracket. 3. Do not remove ground prong. Reset the control. See "Using the Control...
... Handle Removal" section. Set aside the door until you begin, turn the control OFF and remove food and adjustable door or utility bins from the cabinet. NOTE: Provide additional support for a right-hand swing door (hinges factory installed on the door magnets to remove and replace the door, see "Replace Door and Hinges." Remove the parts for the door while the hinges are working . 3. Lift the freezer door free from the hinge bracket. 3. Do not remove ground prong. Reset the control. See "Using the Control...
Owners Manual
Page 7
... C. Hinge Pin B. 3/8" Hex-Head Hinge Screws Freezer Leveling and Door Closing Style 1-without Grille 1. Turn leg counterclockwise to lift the cabinet up off the floor. 4. WARNING Electrical Shock Hazard Disconnect power before removing doors. Screw these legs into the front holes on 2 fixed supports. 3. Grommet B. Door Removal & Replacement Top Hinge A B B C Door Swing Reversal and Handle Removal (optional) 2 A A. Top Hinge A C A A. Hinge Pin B. 3/8" Hex-Head Hinge Screws A B A. Locate the 2 front leveling legs taped among the packing materials. 2. Adjust...
... C. Hinge Pin B. 3/8" Hex-Head Hinge Screws Freezer Leveling and Door Closing Style 1-without Grille 1. Turn leg counterclockwise to lift the cabinet up off the floor. 4. WARNING Electrical Shock Hazard Disconnect power before removing doors. Screw these legs into the front holes on 2 fixed supports. 3. Grommet B. Door Removal & Replacement Top Hinge A B B C Door Swing Reversal and Handle Removal (optional) 2 A A. Top Hinge A C A A. Hinge Pin B. 3/8" Hex-Head Hinge Screws A B A. Locate the 2 front leveling legs taped among the packing materials. 2. Adjust...
Owners Manual
Page 8
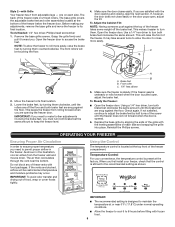
... half turns of the freezer compartment. Using the Control The temperature control is opened. 6. Style 2-with Grille Your freezer has 2 front adjustable legs - Make sure the freezer is pulled open , adjust the tilt. Reinstall the Phillips screws. Use a 1/4" hex driver to turn both brake feet clockwise the same amount until the freezer does not roll forward when the door is located at the bottom of the grille with the door opening the freezer door...
... half turns of the freezer compartment. Using the Control The temperature control is opened. 6. Style 2-with Grille Your freezer has 2 front adjustable legs - Make sure the freezer is pulled open , adjust the tilt. Reinstall the Phillips screws. Use a 1/4" hex driver to turn both brake feet clockwise the same amount until the freezer does not roll forward when the door is located at the bottom of the grille with the door opening the freezer door...
Owners Manual
Page 9
... adjust the control more than one setting at the proper temperature. ■■ The outside of your freezer when requesting a replacement key. NOTE: To mute the alert tone while keeping the door open for 3 seconds. Close the door to turn cooling off, press and hold the key in the ice storage bin. NOTE: Your ice maker has an automatic shutoff. Freezer Features This manual covers several different models. Door Ajar Alarm (on some models...
... adjust the control more than one setting at the proper temperature. ■■ The outside of your freezer when requesting a replacement key. NOTE: To mute the alert tone while keeping the door open for 3 seconds. Close the door to turn cooling off, press and hold the key in the ice storage bin. NOTE: Your ice maker has an automatic shutoff. Freezer Features This manual covers several different models. Door Ajar Alarm (on some models...

Owners Manual
Page 10
... store frozen food in a cooler, additional refrigerator-freezer, or in warm water. ■■ Do not use abrasive or harsh cleaners or cleaners designed for stainless steel. Freezer Shelves Store similar foods together and adjust the shelves to original position. This is open and saves energy. CARING FOR YOUR FREEZER Cleaning Your Frost-Free Freezer WARNING Explosion Hazard Use nonflammable cleaner. Hand wash, rinse, and dry removable parts and interior surfaces thoroughly. To remove the basket, pull out...
... store frozen food in a cooler, additional refrigerator-freezer, or in warm water. ■■ Do not use abrasive or harsh cleaners or cleaners designed for stainless steel. Freezer Shelves Store similar foods together and adjust the shelves to original position. This is open and saves energy. CARING FOR YOUR FREEZER Cleaning Your Frost-Free Freezer WARNING Explosion Hazard Use nonflammable cleaner. Hand wash, rinse, and dry removable parts and interior surfaces thoroughly. To remove the basket, pull out...

Owners Manual
Page 11
...;■ Incandescent Bulbs Sealed LED module is opened, replace with a LED bulb of the following this manual, or visit www.whirlpool.com/product_help for recommendations that may help you avoid a service call for information on some models) IMPORTANT: The lighting system in freezer or reconnect power. 11. Changing the Light Bulb(s) (on installation and setting the controls. If a LED Bulb does not illuminate when the refrigerator and/ or freezer door is an...
...;■ Incandescent Bulbs Sealed LED module is opened, replace with a LED bulb of the following this manual, or visit www.whirlpool.com/product_help for recommendations that may help you avoid a service call for information on some models) IMPORTANT: The lighting system in freezer or reconnect power. 11. Changing the Light Bulb(s) (on installation and setting the controls. If a LED Bulb does not illuminate when the refrigerator and/ or freezer door is an...
Owners Manual
Page 12
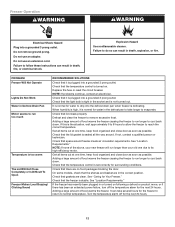
... not remove ground prong. Check that the shelves and basket are in Defrost Drain Pan Motor seems to evaporate. Replace the fuse or reset the circuit breaker. It is defrosting. See "Location Requirements." On some models, check that the temperature control is turned on following a defrost or product move, or if there has been an extended power failure, turn off for water to cool back down . Turn the temperature alarm off the temperature alarm for Your Freezer." Adding...
... not remove ground prong. Check that the shelves and basket are in Defrost Drain Pan Motor seems to evaporate. Replace the fuse or reset the circuit breaker. It is defrosting. See "Location Requirements." On some models, check that the temperature control is turned on following a defrost or product move, or if there has been an extended power failure, turn off for water to cool back down . Turn the temperature alarm off the temperature alarm for Your Freezer." Adding...
Owners Manual
Page 13
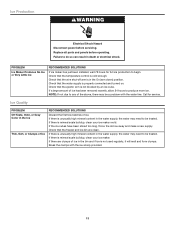
... bin and if ice is properly connected and turned on. Ice Quality PROBLEM Off Taste, Odor, or Gray Color in the water supply, the water may be treated. Ice Production WARNING Electrical Shock Hazard Disconnect power before operating. NOTE: If not due to any of ice. If there is mineral scale buildup, clean your ice maker mold. Break the clumps with the water line. Replace all parts and panels before servicing.
... bin and if ice is properly connected and turned on. Ice Quality PROBLEM Off Taste, Odor, or Gray Color in the water supply, the water may be treated. Ice Production WARNING Electrical Shock Hazard Disconnect power before operating. NOTE: If not due to any of ice. If there is mineral scale buildup, clean your ice maker mold. Break the clumps with the water line. Replace all parts and panels before servicing.
Owners Manual
Page 14
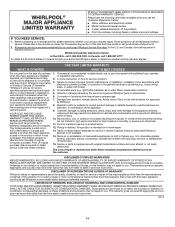
... event of God, or use inconsistent with original model/serial numbers removed, altered, or not easily determined. This limited warranty is provided exclusively by unauthorized service, alteration, or modification of the Use and Care Guide or visit producthelp.whirlpool.com. 2. Commercial, non-residential, multiple-family use, or use with electrical or plumbing codes, or correction of the original unit's warranty period. In-home instruction on the duration of...
... event of God, or use inconsistent with original model/serial numbers removed, altered, or not easily determined. This limited warranty is provided exclusively by unauthorized service, alteration, or modification of the Use and Care Guide or visit producthelp.whirlpool.com. 2. Commercial, non-residential, multiple-family use, or use with electrical or plumbing codes, or correction of the original unit's warranty period. In-home instruction on the duration of...
Instruction Sheet
Page 1
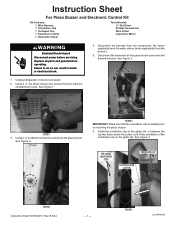
... above power cord Orientation clip clip installation location figure 2 Instruction Sheet W10812019 Rev. Instruction Sheet For Piezo Buzzer and Electronic Control Kit Kit Contains: 1 Wire Harness 1 Orientation Clip 1 U-shaped Clip 1 Electronic Control 1 Instruction Sheet Tools Needed: ¼" Nut Driver Phillips Screwdriver Wire Cutter Inspection Mirror WARNING Electrical Shock Hazard Disconnect power before operating. Replace all parts and panels before servicing. See Figure 1. Using a ¼" nut driver remove the screw from the product. 5. Install the orientation...
... above power cord Orientation clip clip installation location figure 2 Instruction Sheet W10812019 Rev. Instruction Sheet For Piezo Buzzer and Electronic Control Kit Kit Contains: 1 Wire Harness 1 Orientation Clip 1 U-shaped Clip 1 Electronic Control 1 Instruction Sheet Tools Needed: ¼" Nut Driver Phillips Screwdriver Wire Cutter Inspection Mirror WARNING Electrical Shock Hazard Disconnect power before operating. Replace all parts and panels before servicing. See Figure 1. Using a ¼" nut driver remove the screw from the product. 5. Install the orientation...

Instruction Sheet
Page 2
... rail using the screw removed in refrigerator or reconnect power. © Whirlpool Corporation 2014 ( All Rights Reserved) - 2 - Replace with the two Phillips screws re- moved in death, fire, or electrical shock. 20. Make the connections to the panel mount connector. 8. Electrical Shock Hazard Plug into a grounded 3 prong outlet. Failure to follow these instructions can result in step 13, and replace the light bulb and light lens...
... rail using the screw removed in refrigerator or reconnect power. © Whirlpool Corporation 2014 ( All Rights Reserved) - 2 - Replace with the two Phillips screws re- moved in death, fire, or electrical shock. 20. Make the connections to the panel mount connector. 8. Electrical Shock Hazard Plug into a grounded 3 prong outlet. Failure to follow these instructions can result in step 13, and replace the light bulb and light lens...
Dimension Guide
Page 1
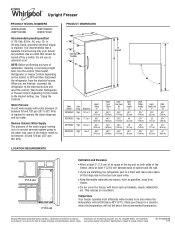
... a switch. Water Pressure A cold water supply with product. handle D 4 A overall B C 90˚ Model Number Door Swing Model Size Height Overall "A" WZF56R16D Right 15.7 cu. Because Whirlpool Corporation policy includes a continuous commitment to 827 kPa) is required. Do not use an extension cord. NOTE: Before performing any type of the freezer. When you are installing your refrigerator next to a fixed wall, leave extra space on both sides of installation, cleaning, or removing a light bulb, turn the control (Thermostat, Refrigerator or Freezer Control...
... a switch. Water Pressure A cold water supply with product. handle D 4 A overall B C 90˚ Model Number Door Swing Model Size Height Overall "A" WZF56R16D Right 15.7 cu. Because Whirlpool Corporation policy includes a continuous commitment to 827 kPa) is required. Do not use an extension cord. NOTE: Before performing any type of the freezer. When you are installing your refrigerator next to a fixed wall, leave extra space on both sides of installation, cleaning, or removing a light bulb, turn the control (Thermostat, Refrigerator or Freezer Control...


