
User Manual
Page 2
...and adults. 2 Always read and obey all safety messages. These words mean: DANGER You can tip the range and be killed or seriously injured if you don't follow instructions. RANGE SAFETY Your safety and the safety of injury, and tell you what the potential hazard is, tell you ...killed or seriously injured if you what can be killed. All safety messages will follow these instructions can kill or hurt you to rear range foot. WARNING You can happen if the instructions are very important. This symbol alerts you and others are not followed. Failure to ...
...and adults. 2 Always read and obey all safety messages. These words mean: DANGER You can tip the range and be killed or seriously injured if you don't follow instructions. RANGE SAFETY Your safety and the safety of injury, and tell you what the potential hazard is, tell you ...killed or seriously injured if you what can be killed. All safety messages will follow these instructions can kill or hurt you to rear range foot. WARNING You can happen if the instructions are very important. This symbol alerts you and others are not followed. Failure to ...
User Manual
Page 3
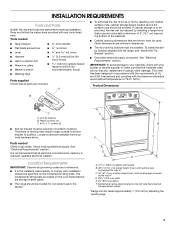
...in the kitchen. Plastic anchors (2) C. #10 x 1¹⁄₂" screws (2) ■ Anti-tip bracket must be made by installing a range hood that projects horizontally a minimum of 5" (12.7 cm) beyond the bottom of the cabinets. ■ Cabinet opening dimensions that the materials used...F B C E D A. 27 69.9 cm) depth with handle B. 46⁷⁄₈" (119.1 cm) overall height (max.) with the range, see "Install Anti-Tip Bracket" section. ■ Grounded electrical supply is recommended that all electrical connections be used will not discolor, delaminate or sustain other...
...in the kitchen. Plastic anchors (2) C. #10 x 1¹⁄₂" screws (2) ■ Anti-tip bracket must be made by installing a range hood that projects horizontally a minimum of 5" (12.7 cm) beyond the bottom of the cabinets. ■ Cabinet opening dimensions that the materials used...F B C E D A. 27 69.9 cm) depth with handle B. 46⁷⁄₈" (119.1 cm) overall height (max.) with the range, see "Install Anti-Tip Bracket" section. ■ Grounded electrical supply is recommended that all electrical connections be used will not discolor, delaminate or sustain other...
User Manual
Page 4
... wall receptacle is adequate and wire gauge are in accordance with local codes. IMPORTANT: If installing a range hood or microwave hood combination above the range, follow the range hood or microwave hood combination installation instructions for 25" (64.0 cm) countertop depth, 24" (61...size are adequate and in death, fire, or electrical shock. A C B Electrical Requirements WARNING Electrical Shock Hazard Electrically ground range. Cabinet Dimensions Cabinet opening dimensions shown are for dimensional clearances above code standards can result in conformance with CSA Standard C22.1,...
... wall receptacle is adequate and wire gauge are in accordance with local codes. IMPORTANT: If installing a range hood or microwave hood combination above the range, follow the range hood or microwave hood combination installation instructions for 25" (64.0 cm) countertop depth, 24" (61...size are adequate and in death, fire, or electrical shock. A C B Electrical Requirements WARNING Electrical Shock Hazard Electrically ground range. Cabinet Dimensions Cabinet opening dimensions shown are for dimensional clearances above code standards can result in conformance with CSA Standard C22.1,...

User Manual
Page 5
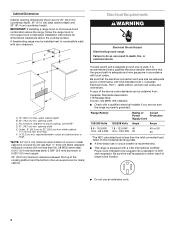
...wrench or pliers to lower front leveling legs one -half turn. Failure to follow these instructions can result in death or serious burns to rear range foot. Tape template into place. 4. Wrench or pliers D. A A. Connect anti-tip bracket to children and adults. Contact a qualified floor covering...Use wrench or pliers to lower the rear leveling legs one -half turn . Failure to move and install range. B A. ³⁄₈" drive ratchet B. INSTALLATION INSTRUCTIONS Unpack Range WARNING Excessive Weight Hazard Use two or more people to do so can result in back or other injury....
...wrench or pliers to lower front leveling legs one -half turn. Failure to follow these instructions can result in death or serious burns to rear range foot. Tape template into place. 4. Wrench or pliers D. A A. Connect anti-tip bracket to children and adults. Contact a qualified floor covering...Use wrench or pliers to lower the rear leveling legs one -half turn . Failure to move and install range. B A. ³⁄₈" drive ratchet B. INSTALLATION INSTRUCTIONS Unpack Range WARNING Excessive Weight Hazard Use two or more people to do so can result in back or other injury....
User Manual
Page 6
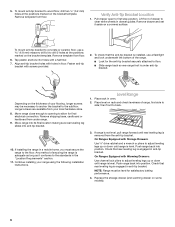
...tip bracket to the floor. Verify Anti-Tip Bracket Location 1. Align anti-tip bracket holes with a hammer. 7. If installing the range in a mobile home, you must be necessary to anchor the bracket to the standards in floor. Depending on the bracket template. Continue...longer screws may be level for the anti-tip bracket securely attached to back. 3. Level Range 1. Place rack in anti-tip bracket. If range is not level, pull range forward until range is level. On Ranges Equipped with Storage Drawers: Use ³⁄₈" drive ratchet and a wrench or pliers ...
...tip bracket to the floor. Verify Anti-Tip Bracket Location 1. Align anti-tip bracket holes with a hammer. 7. If installing the range in a mobile home, you must be necessary to anchor the bracket to the standards in floor. Depending on the bracket template. Continue...longer screws may be level for the anti-tip bracket securely attached to back. 3. Level Range 1. Place rack in anti-tip bracket. If range is not level, pull range forward until range is level. On Ranges Equipped with Storage Drawers: Use ³⁄₈" drive ratchet and a wrench or pliers ...
User Manual
Page 7
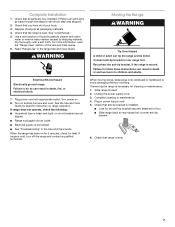
... oven. Complete Installation 1. Turn on . 8. When the range has been on range operation. Plug in death, fire, or electrical shock. 7. See "Level Range." 5. Failure to see which step was skipped. 2. If removing the range is moved. Unplug the power supply cord. 3. Use ... Electrical Shock Hazard Electrically ground range. Plug power cord into an outlet. ■ Electrical supply is level. 7 When moving range, slide range onto cardboard or hardboard to floor. ■ Slide range back so rear range foot is under anti-tip bracket. 6. Slide range forward. 2. Complete cleaning or...
... oven. Complete Installation 1. Turn on . 8. When the range has been on range operation. Plug in death, fire, or electrical shock. 7. See "Level Range." 5. Failure to see which step was skipped. 2. If removing the range is moved. Unplug the power supply cord. 3. Use ... Electrical Shock Hazard Electrically ground range. Plug power cord into an outlet. ■ Electrical supply is level. 7 When moving range, slide range onto cardboard or hardboard to floor. ■ Slide range back so rear range foot is under anti-tip bracket. 6. Slide range forward. 2. Complete cleaning or...


