
User Guide
Page 3
CONTENTS 1. Introduction Special features ...1.1 Printer overview ...1.2 Finding more information ...1.4 2. Basic printing Printing a document ...6.1 Canceling a print job ...6.1 Network setup (Phaser 3600/N, Phaser 3600/DN only) Introduction ...4.1 Supported operating systems ...4.1 Configuring TCP/IP ...4.2 Configuring EtherTalk ...4.2 Configuring IPX frame types ...4.2 Setting Ethernet speed ...4.3 Restoring the network configuration ...4.3 Printing a network configuration page ...4.3 Configuring 802.1x ...4.3 Configuring Port 9100 ...4.3 Configuring LPR ...4.4 Configuring IPP...
CONTENTS 1. Introduction Special features ...1.1 Printer overview ...1.2 Finding more information ...1.4 2. Basic printing Printing a document ...6.1 Canceling a print job ...6.1 Network setup (Phaser 3600/N, Phaser 3600/DN only) Introduction ...4.1 Supported operating systems ...4.1 Configuring TCP/IP ...4.2 Configuring EtherTalk ...4.2 Configuring IPX frame types ...4.2 Setting Ethernet speed ...4.3 Restoring the network configuration ...4.3 Printing a network configuration page ...4.3 Configuring 802.1x ...4.3 Configuring Port 9100 ...4.3 Configuring LPR ...4.4 Configuring IPP...
User Guide
Page 16
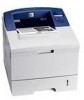
...Adjust Graphic (See page 2.5.) Resolution Darkness Networka (See page 2.8.) TCP/IP EtherTalk NetWare Ethernet Speed Clear Setting Network Info. 802.1x Port 9100 LPR IPP SLP CentreWare IS SNMP System Setup (See page 2.5.) Language Power Save Auto Continue Altitude Adj. c. After 30 seconds of inactivity (no key being...described in more detail in the display depending on the display, indicating that it easy for you want appears on setting up your printer. 2 System setup This chapter provides step by step information on the bottom line of the display and press OK. 2 Press the Up/down ...
...Adjust Graphic (See page 2.5.) Resolution Darkness Networka (See page 2.8.) TCP/IP EtherTalk NetWare Ethernet Speed Clear Setting Network Info. 802.1x Port 9100 LPR IPP SLP CentreWare IS SNMP System Setup (See page 2.5.) Language Power Save Auto Continue Altitude Adj. c. After 30 seconds of inactivity (no key being...described in more detail in the display depending on the display, indicating that it easy for you want appears on setting up your printer. 2 System setup This chapter provides step by step information on the bottom line of the display and press OK. 2 Press the Up/down ...

User Guide
Page 23
.... • On: You can disable the NetWare protocol. 2.8 If an error occurs, the job stops processing, the error message prints, and the printer flushes the job. • If this value to you automatically. • Static: You can determine the font size by setting the number of the...8226; BOOTP: The BOOTP server assigns the IP address to use the SNAP frame type. • Off: You can enable the EtherTalk protocol. Network menu (Phaser 3600/N, Phaser 3600/DN only) This menu lets you use the Ethernet 2 frame type. • SNAP: Select this menu is flushed without an indication of...
.... • On: You can disable the NetWare protocol. 2.8 If an error occurs, the job stops processing, the error message prints, and the printer flushes the job. • If this value to you automatically. • Static: You can determine the font size by setting the number of the...8226; BOOTP: The BOOTP server assigns the IP address to use the SNAP frame type. • Off: You can enable the EtherTalk protocol. Network menu (Phaser 3600/N, Phaser 3600/DN only) This menu lets you use the Ethernet 2 frame type. • SNAP: Select this menu is flushed without an indication of...
User Guide
Page 24
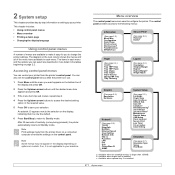
... make sure that is displayed on the bottom line of the following authentication method. Changing the display language To change the language that the printer is for the network configuration. Values: Off, On This item lets you select whether or not you use LPR. • Off: You can disable the ...item On, and select one of the display and press OK. 2 Press OK when Language appears. 3 Press the Up/down arrow buttons until System Setup appears on the control panel, follow these steps: 1 Press Menu until Demo Page appears and press OK. This setting will only take effect after ...
... make sure that is displayed on the bottom line of the following authentication method. Changing the display language To change the language that the printer is for the network configuration. Values: Off, On This item lets you select whether or not you use LPR. • Off: You can disable the ...item On, and select one of the display and press OK. 2 Press OK when Language appears. 3 Press the Up/down arrow buttons until System Setup appears on the control panel, follow these steps: 1 Press Menu until Demo Page appears and press OK. This setting will only take effect after ...

User Guide
Page 27
...; DHCP: Dynamic Host Configuration Protocol • BOOTP: Bootstrap Protocol 4.1 Via the control panel You can configure your printer's print server settings and manage the printer via the following programs that came with other network users. 4 Network setup (Phaser 3600/N, Phaser 3600/DN only) This chapter gives you to select your network printer and manually configure the printer's TCP/IP addresses.
...; DHCP: Dynamic Host Configuration Protocol • BOOTP: Bootstrap Protocol 4.1 Via the control panel You can configure your printer's print server settings and manage the printer via the following programs that came with other network users. 4 Network setup (Phaser 3600/N, Phaser 3600/DN only) This chapter gives you to select your network printer and manually configure the printer's TCP/IP addresses.

User Guide
Page 28
..., such as an IP address, a subnet mask, a gateway, and DNS addresses. In most cases, you need to set the network protocol to Standby mode. Configuring TCP/IP Your printer can be set the frame type format, if required. Dynamic addressing (BOOTP/DHCP) To have finished, press OK. 7 Repeat step 5.... 5 Press Start/Stop to return to IPX over IEEE 802.2 with IEEE 802.3 frames. To use IPX/SPX protocol networks (for the printer. There are several ways in which your printer's control panel, take the following step: 1 Press Menu until On appears and press OK. 4 Press Start/Stop to ...
..., such as an IP address, a subnet mask, a gateway, and DNS addresses. In most cases, you need to set the network protocol to Standby mode. Configuring TCP/IP Your printer can be set the frame type format, if required. Dynamic addressing (BOOTP/DHCP) To have finished, press OK. 7 Repeat step 5.... 5 Press Start/Stop to return to IPX over IEEE 802.2 with IEEE 802.3 frames. To use IPX/SPX protocol networks (for the printer. There are several ways in which your printer's control panel, take the following step: 1 Press Menu until On appears and press OK. 4 Press Start/Stop to ...

User Guide
Page 29
...Up/down arrow buttons until Clear Setting appears and press OK. 3 Press OK when Yes appears to restore the network configuration. 4 Power the printer off and back on. It secures your printer is a message hashing scheme between client and server to encode the UserID and passwords. • PEAP: PEAP (... are 3 mutually exclusive options for 802.1x authentication. To use port 9100. Configuring 802.1x Your printer has 802.1x protocol on its default settings. 1 Press Menu until Network appears on the bottom line of the display and press OK. 2 Press the Up/down arrow buttons...
...Up/down arrow buttons until Clear Setting appears and press OK. 3 Press OK when Yes appears to restore the network configuration. 4 Power the printer off and back on. It secures your printer is a message hashing scheme between client and server to encode the UserID and passwords. • PEAP: PEAP (... are 3 mutually exclusive options for 802.1x authentication. To use port 9100. Configuring 802.1x Your printer has 802.1x protocol on its default settings. 1 Press Menu until Network appears on the bottom line of the display and press OK. 2 Press the Up/down arrow buttons...

User Guide
Page 30
... transmit the printing data through port 631. Configuring LPR Your printer can use SLP (Service Location Protocol) which transmit the printing information through port 427. To enable LPR, take the following steps: 1 Press Menu until Network appears on the bottom line of the display and press OK... buttons until On appears and press OK. Configuring SLP Your printer can use LPR (Line Printer Protocol) which transmit the printing data through port 510. To enable CentreWare IS, take the following steps: 1 Press Menu until Network appears on the bottom line of the display and press OK...
... transmit the printing data through port 631. Configuring LPR Your printer can use SLP (Service Location Protocol) which transmit the printing information through port 427. To enable LPR, take the following steps: 1 Press Menu until Network appears on the bottom line of the display and press OK... buttons until On appears and press OK. Configuring SLP Your printer can use LPR (Line Printer Protocol) which transmit the printing data through port 510. To enable CentreWare IS, take the following steps: 1 Press Menu until Network appears on the bottom line of the display and press OK...
User Guide
Page 68
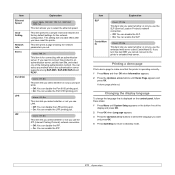
... memory 10.1 J jam, clear 9.1 L loading paper multi-purpose tray 5.6 tray 2/optional tray 3 5.5 M Macintosh problems 9.17 manual feed mode 5.7 memory DIMM, install 10.1 N network setup 802.1x 4.3 CentreWare IS 4.4 EtherTalk 4.2 IPP 4.4 IPX frame types 4.2 LPR 4.4 operating systems 4.1 Port 9100 4.3 SLP 4.4 TCP/IP 4.2 O or 5.5 output location, select 5.8...9.15 Q quality problems 9.13 R rear cover, use 5.9 replacement parts 8.6 replacing, print cartridge 8.4, 8.5 S special print media, guidelines 5.3 specification, printer 11.1 status LED 9.7 supplies checking life 8.3 order information 7.1
... memory 10.1 J jam, clear 9.1 L loading paper multi-purpose tray 5.6 tray 2/optional tray 3 5.5 M Macintosh problems 9.17 manual feed mode 5.7 memory DIMM, install 10.1 N network setup 802.1x 4.3 CentreWare IS 4.4 EtherTalk 4.2 IPP 4.4 IPX frame types 4.2 LPR 4.4 operating systems 4.1 Port 9100 4.3 SLP 4.4 TCP/IP 4.2 O or 5.5 output location, select 5.8...9.15 Q quality problems 9.13 R rear cover, use 5.9 replacement parts 8.6 replacing, print cartridge 8.4, 8.5 S special print media, guidelines 5.3 specification, printer 11.1 status LED 9.7 supplies checking life 8.3 order information 7.1

User Guide
Page 74
... , and an installation window appears. A printer driver is software that the printer is a printer directly attached to your computer using . All components necessary for Local Printing A local printer is connected to close the window, or click Cancel. Type X:\Setup.exe, replacing "X" with the letter which represents your printer is recommended for Network Printing" on the operating system...
... , and an installation window appears. A printer driver is software that the printer is a printer directly attached to your computer using . All components necessary for Local Printing A local printer is connected to close the window, or click Cancel. Type X:\Setup.exe, replacing "X" with the letter which represents your printer is recommended for Network Printing" on the operating system...

User Guide
Page 77
.... NOTE: If you must first configure the TCP/IP settings for the printer. Installing Software for Network Printing When you connect your printer to a network, you cannot find a shared printer by clicking the Browse button. Type X:\Setup.exe, replacing "X" with the letter which represents your drive and click OK. After you have assigned and verified the...
.... NOTE: If you must first configure the TCP/IP settings for the printer. Installing Software for Network Printing When you connect your printer to a network, you cannot find a shared printer by clicking the Browse button. Type X:\Setup.exe, replacing "X" with the letter which represents your drive and click OK. After you have assigned and verified the...

User Guide
Page 78
... turn off the firewall and click Update. See "Reinstalling Printer Software" on the network appears. For details about connecting to add your CD-ROM drive. NOTE: If you use Windows Vista, click Start → All programs → Accessories → Run, and type X:\Setup.exe. Custom Installation You can choose individual components to the...
... turn off the firewall and click Update. See "Reinstalling Printer Software" on the network appears. For details about connecting to add your CD-ROM drive. NOTE: If you use Windows Vista, click Start → All programs → Accessories → Run, and type X:\Setup.exe. Custom Installation You can choose individual components to the...

User Guide
Page 79
...After setup is finished, a window asking you to set the specific IP address for the printer manually and click Configure to print a test page, select the checkbox and click Next. Do as the default printer, and change the printer name, set the printer to be shared on a specific network printer, ...click the Set IP Address button. Configure an IP address, subnet mask, and gateway for the network printer. If you choose to set a specific IP ...
...After setup is finished, a window asking you to set the specific IP address for the printer manually and click Configure to print a test page, select the checkbox and click Next. Do as the default printer, and change the printer name, set the printer to be shared on a specific network printer, ...click the Set IP Address button. Configure an IP address, subnet mask, and gateway for the network printer. If you choose to set a specific IP ...

User Guide
Page 81
...NETWORK PRINTER CARD TEST PAGE. 2 Using SetIP (Phaser 3600/N, Phaser 3600/DN only) • Installing SetIP • Using SetIP Installing SetIP 1 Make sure that the printer is connected to refresh the list. Using SetIP 1 From the Windows Start menu, select Programs or All Programs Æ your drive and click OK. 5 Click Next. 6 Click Finish. Type X:\Setup....exe, replacing "X" with the letter which represents your printer driver name Æ SetIP Æ SetIP. The NETWORK PRINTER CARD TEST PAGE will be printed after the ...
...NETWORK PRINTER CARD TEST PAGE. 2 Using SetIP (Phaser 3600/N, Phaser 3600/DN only) • Installing SetIP • Using SetIP Installing SetIP 1 Make sure that the printer is connected to refresh the list. Using SetIP 1 From the Windows Start menu, select Programs or All Programs Æ your drive and click OK. 5 Click Next. 6 Click Finish. Type X:\Setup....exe, replacing "X" with the letter which represents your printer driver name Æ SetIP Æ SetIP. The NETWORK PRINTER CARD TEST PAGE will be printed after the ...
User Guide
Page 103
...your computer. 2 Open Print Center or Printer Setup Utility from the Utilities folder. •For MAC OS 10.5, open System Preferences from the Applications folder, and click Print & Fax. 3 Click Add on which cable you use to connect the printer to your computer-the network cable or the USB cable. Before .... •For MAC OS 10.5, click Default and find the USB connection. 5 Select your printer name. 6 For MAC OS 10.3, if Auto Select does not work properly, select Xerox in Printer Model and your printer name in Model Name. •For MAC OS 10.4, if Auto Select does not work properly...
...your computer. 2 Open Print Center or Printer Setup Utility from the Utilities folder. •For MAC OS 10.5, open System Preferences from the Applications folder, and click Print & Fax. 3 Click Add on which cable you use to connect the printer to your computer-the network cable or the USB cable. Before .... •For MAC OS 10.5, click Default and find the USB connection. 5 Select your printer name. 6 For MAC OS 10.3, if Auto Select does not work properly, select Xerox in Printer Model and your printer name in Model Name. •For MAC OS 10.4, if Auto Select does not work properly...


