
IPv6 Supplement
Page 3
... the [Connectivity] link. 5. this option is fully automatic. The DHCPv6 Address will be obtained and displayed on the [Protocols] link. 6. Configure IP Settings and IP Filtering 1 Press [Enter]. 3. This is automatically populated. Default DHCPv6 (Dynamic Host Configuration Protocol) Settings The device performs auto-address DHCPv6 configuration every time it powers up. However, you need to download new firmware to enable IPv6 capabilities. 1. Click on the screen. • [Always Enable DHCP] - Print a Configuration Report...
... the [Connectivity] link. 5. this option is fully automatic. The DHCPv6 Address will be obtained and displayed on the [Protocols] link. 6. Configure IP Settings and IP Filtering 1 Press [Enter]. 3. This is automatically populated. Default DHCPv6 (Dynamic Host Configuration Protocol) Settings The device performs auto-address DHCPv6 configuration every time it powers up. However, you need to download new firmware to enable IPv6 capabilities. 1. Click on the screen. • [Always Enable DHCP] - Print a Configuration Report...

Phaser 3600 Machine Firmware Installation Instructions Network connected devices
Page 1
... installed. A "pop up" window will now print. 3. Copy the Phaser 3600 firmware file to be upgraded (example: "http://12.345.67.890/"). Obtain the "IP address" for upgrading firmware on your computer. This can now close the message window. 8. Press the Enter key to connect to the "Firmware Version" title on the printed configuration page. 10. Select File Download under Print options (left side of the Phaser 3600 to "Reports". Please refer to the printer...
... installed. A "pop up" window will now print. 3. Copy the Phaser 3600 firmware file to be upgraded (example: "http://12.345.67.890/"). Obtain the "IP address" for upgrading firmware on your computer. This can now close the message window. 8. Press the Enter key to connect to the "Firmware Version" title on the printed configuration page. 10. Select File Download under Print options (left side of the Phaser 3600 to "Reports". Please refer to the printer...

User Guide
Page 12
... and USB interfaces. • You can use a network interface. See the Software section. • This printer automatically conserves electricity by substantially reducing power consumption when not in various sizes. • Multiple output tray; See page 10.1. • A Network interface enables network printing. • A PostScript 3 Emulation* (PS) enables PS printing. * Zoran IPS Emulation compatible with several special features that improve the print quality. The Phaser 3600/N or Phaser 3600/DN comes with a built-in Windows 2000...
... and USB interfaces. • You can use a network interface. See the Software section. • This printer automatically conserves electricity by substantially reducing power consumption when not in various sizes. • Multiple output tray; See page 10.1. • A Network interface enables network printing. • A PostScript 3 Emulation* (PS) enables PS printing. * Zoran IPS Emulation compatible with several special features that improve the print quality. The Phaser 3600/N or Phaser 3600/DN comes with a built-in Windows 2000...
User Guide
Page 16
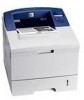
... buttons to access the desired setting option or the required value. 5 Press OK to change the printer settings. Menu overview The control panel menus are available to make it easy for you want appears on page 2.2. Auto CR Collationa SmartDuplexingb Job Timeout Job Held Timera Maintenance Parallel Setup USB Setup Panel Lockout Secure Print Low Toner Cm or inches Clear Setting Emulation (See page 2.7.) Emulation Type Setup Hex Mode a. Available when duplex unit is in the tables beginning on the bottom line...
... buttons to access the desired setting option or the required value. 5 Press OK to change the printer settings. Menu overview The control panel menus are available to make it easy for you want appears on page 2.2. Auto CR Collationa SmartDuplexingb Job Timeout Job Held Timera Maintenance Parallel Setup USB Setup Panel Lockout Secure Print Low Toner Cm or inches Clear Setting Emulation (See page 2.7.) Emulation Type Setup Hex Mode a. Available when duplex unit is in the tables beginning on the bottom line...

User Guide
Page 19
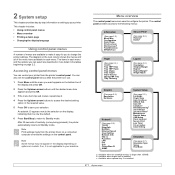
... Status LED lights red and the printer doesn't work until you insert paper into the specified tray. 2.4 Values: Off, On When you can automatically determine the source. • Manual Feed: The printer uses Tray 1(MPT). • Tray 3: Available only when optional tray is empty, the printer automatically prints from other value except Auto Select from Paper Source and the selected tray is installed. Item Copies Tray 1MPT Size Tray 1MPT Type Tray 2 Type Tray 3 Type Paper Source Explanation Values: 1 ~ 999 Set the default number...
... Status LED lights red and the printer doesn't work until you insert paper into the specified tray. 2.4 Values: Off, On When you can automatically determine the source. • Manual Feed: The printer uses Tray 1(MPT). • Tray 3: Available only when optional tray is empty, the printer automatically prints from other value except Auto Select from Paper Source and the selected tray is installed. Item Copies Tray 1MPT Size Tray 1MPT Type Tray 2 Type Tray 3 Type Paper Source Explanation Values: 1 ~ 999 Set the default number...
User Guide
Page 21
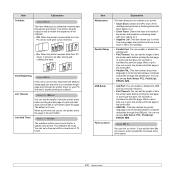
... to duplex printing as a security measure. • Port Timeout: You can enable or disable the USB port as a default. Values: Off, On You can set to maintain your printer. • Clean Drum: Cleans the OPC drum of the cartridge and produces a cleaning sheet with toner debris on it. • Clean Fuser: Cleans the fuser unit inside of the printer and produces a cleaning sheet with a command to communicate between computer and printer through the print driver. The printer will print output in the print...
... to duplex printing as a security measure. • Port Timeout: You can enable or disable the USB port as a default. Values: Off, On You can set to maintain your printer. • Clean Drum: Cleans the OPC drum of the cartridge and produces a cleaning sheet with toner debris on it. • Clean Fuser: Cleans the fuser unit inside of the printer and produces a cleaning sheet with a command to communicate between computer and printer through the print driver. The printer will print output in the print...
User Guide
Page 22
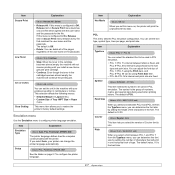
...; PCL 46~PCL 54's interval and point size are fixed. Item Secure Print Low Toner Cm or inches Clear Setting Explanation Values: Release All, Delete • Release All: If this menu is PC8. The default is configured to be used when printing letters. If you can set the font type, symbol type, lines per page, and point size. PCL This menu sets the PCL emulation configuration. Values: cm, inches You can determine the font size by setting the height of numbers...
...; PCL 46~PCL 54's interval and point size are fixed. Item Secure Print Low Toner Cm or inches Clear Setting Explanation Values: Release All, Delete • Release All: If this menu is PC8. The default is configured to be used when printing letters. If you can set the font type, symbol type, lines per page, and point size. PCL This menu sets the PCL emulation configuration. Values: cm, inches You can determine the font size by setting the height of numbers...

User Guide
Page 27
...; Restoring the network configuration • Printing a network configuration page • Configuring 802.1x • Configuring Port 9100 • Configuring LPR • Configuring IPP • Configuring SLP • Configuring CentreWare IS Introduction Once you have connected your printer to a network with an RJ-45 Ethernet cable, you can configure your printer's print server settings and manage the printer via the following table shows the network environments supported by -step instructions for setting up your network printer and manually configure the printer's TCP/IP addresses.
...; Restoring the network configuration • Printing a network configuration page • Configuring 802.1x • Configuring Port 9100 • Configuring LPR • Configuring IPP • Configuring SLP • Configuring CentreWare IS Introduction Once you have connected your printer to a network with an RJ-45 Ethernet cable, you can configure your printer's print server settings and manage the printer via the following table shows the network environments supported by -step instructions for setting up your network printer and manually configure the printer's TCP/IP addresses.

User Guide
Page 44
... display, the sub-menu(s) under Supplies Life can be affected by operating environment, printing interval, media type, and media size. Invalid Toner, NonGenuine Toner, Replace Toner, Toner Exhausted Redistributing print cartridge When the print cartridge is caused by redistributing the remaining toner in accordance with the ISO/IEC 19752 standard. (Average yield for a new print cartridge is 7,000 or 14,000 standard pages in the cartridge. Cover it with the machine is 7,000 standard pages.) The actual number may be changed...
... display, the sub-menu(s) under Supplies Life can be affected by operating environment, printing interval, media type, and media size. Invalid Toner, NonGenuine Toner, Replace Toner, Toner Exhausted Redistributing print cartridge When the print cartridge is caused by redistributing the remaining toner in accordance with the ISO/IEC 19752 standard. (Average yield for a new print cartridge is 7,000 or 14,000 standard pages in the cartridge. Cover it with the machine is 7,000 standard pages.) The actual number may be changed...

User Guide
Page 55
... media type. • yyy indicates the paper tray. • zzz indicates the media size. Message Meaning Suggested solutions [yyy] Cassette Out [yyy] Paper Empty ADC Not Confirm Error Deve Motor Locked Door Open Duplex Jam 0 Check Inside Duplex Jam 1 Open/Close Door Fuser Door Open Tray cassette is not securely latched. Unplug the power cord and plug it back in manual feed mode. Unplug the power cord and plug it back in the LSU (Laser Scanning Unit). Load Manually Press Stop Key Tray...
... media type. • yyy indicates the paper tray. • zzz indicates the media size. Message Meaning Suggested solutions [yyy] Cassette Out [yyy] Paper Empty ADC Not Confirm Error Deve Motor Locked Door Open Duplex Jam 0 Check Inside Duplex Jam 1 Open/Close Door Fuser Door Open Tray cassette is not securely latched. Unplug the power cord and plug it back in manual feed mode. Unplug the power cord and plug it back in the LSU (Laser Scanning Unit). Load Manually Press Stop Key Tray...

User Guide
Page 56
... Remove Jam Open/Close Door Self Diagnostics Temperature Self Diagnostics LSU Sleeping... Paper has jammed in . The printer is a problem with the SMPS (Switch Mode Power Supply) Fan. There is printing jobs using the displayed language. Complete your printer. Use your printing. Unplug the power cord and plug it switches to printer. tray 1(MPT). (Page 9.2) Paper has jammed in the fuser unit. There is received, it back in the fuser area. The engine in Clear the jam. Clear the jam. Clear the jam. When data is a problem in Clear the jam. Tray 2. (Page...
... Remove Jam Open/Close Door Self Diagnostics Temperature Self Diagnostics LSU Sleeping... Paper has jammed in . The printer is a problem with the SMPS (Switch Mode Power Supply) Fan. There is printing jobs using the displayed language. Complete your printer. Use your printing. Unplug the power cord and plug it switches to printer. tray 1(MPT). (Page 9.2) Paper has jammed in the fuser unit. There is received, it back in the fuser area. The engine in Clear the jam. Clear the jam. Clear the jam. When data is a problem in Clear the jam. Tray 2. (Page...

User Guide
Page 58
... port setting is jammed. Check the power switch and the power source. Check the display message, add paper to tray 1(MPT), and press OK on the control panel to the table for suggested solutions. Condition The printer does not print. (Continued) Printer selects print materials from tray. Check that is working properly and try using a different printer cable. Paper is incorrect. See page 9.1. Possible cause The printer may be configured incorrectly. The printer is too thick. Try printing a test page. Close the printer cover. The printer...
... port setting is jammed. Check the power switch and the power source. Check the display message, add paper to tray 1(MPT), and press OK on the control panel to the table for suggested solutions. Condition The printer does not print. (Continued) Printer selects print materials from tray. Check that is working properly and try using a different printer cable. Paper is incorrect. See page 9.1. Possible cause The printer may be configured incorrectly. The printer is too thick. Try printing a test page. Close the printer cover. The printer...

User Guide
Page 59
..., use tray 1(MPT). Install more memory in the duplex printing mode. There may be debris inside the printer. Change the port setting to the USB or network port to ensure that you have insufficient random-access memory (RAM). Ensure that meets printer specifications. If printing on again. 9.12 The printer may be printed using the output tray (face-down). Change the page orientation in tray. The printer prints, but the text is blank. Use only paper that the paper size in the printer driver settings matches the paper...
..., use tray 1(MPT). Install more memory in the duplex printing mode. There may be debris inside the printer. Change the port setting to the USB or network port to ensure that you have insufficient random-access memory (RAM). Ensure that meets printer specifications. If printing on again. 9.12 The printer may be printed using the output tray (face-down). Change the page orientation in tray. The printer prints, but the text is blank. Use only paper that the paper size in the printer driver settings matches the paper...

User Guide
Page 62
... the print quality such as loose toner or light imaging. Contact a service representative. See page 5.3. Install a new print cartridge. Also try another type of transparency. You can set this message. Common Windows problems Condition "File in System Setup menu. Just keep waiting until the printer finishes printing. Condition Back of paper in tray. See page 8.1. • Check for further information on the paper. Condition Curl Suggested solutions If the printed paper is curled or paper does not feed into the printer: • Turn...
... the print quality such as loose toner or light imaging. Contact a service representative. See page 5.3. Install a new print cartridge. Also try another type of transparency. You can set this message. Common Windows problems Condition "File in System Setup menu. Just keep waiting until the printer finishes printing. Condition Back of paper in tray. See page 8.1. • Check for further information on the paper. Condition Curl Suggested solutions If the printed paper is curled or paper does not feed into the printer: • Turn...

User Guide
Page 63
...; Print a configuration page and verify that the print job is a PostScript job. Make sure that the PostScript driver has been installed. • Install the PostScript driver. • If problem consists, contact a service representative. If not, please, invoke Add new printer wizard to set the Tray 3 option of available printers. Look at the list of the Installable Options section to the PostScript errors section. If its status contains "(stopped)" string, please, press the Start button. In the Selected port...
...; Print a configuration page and verify that the print job is a PostScript job. Make sure that the PostScript driver has been installed. • Install the PostScript driver. • If problem consists, contact a service representative. If not, please, invoke Add new printer wizard to set the Tray 3 option of available printers. Look at the list of the Installable Options section to the PostScript errors section. If its status contains "(stopped)" string, please, press the Start button. In the Selected port...

User Guide
Page 65
... order information for optional memory DIMMs, see page 7.1. 1 Turn the printer power off and unplug all cables from the printer. 2 Remove the duplex-slot cover from the printer. 3 Grasp the control board cover and slide toward you walk round before finishing installation, discharge any device plugged into a grounded power source. If you to open it. 1 1 control board cover 4 Completely open the latches on any static electricity once again. Locate the alignment notches on...
... order information for optional memory DIMMs, see page 7.1. 1 Turn the printer power off and unplug all cables from the printer. 2 Remove the duplex-slot cover from the printer. 3 Grasp the control board cover and slide toward you walk round before finishing installation, discharge any device plugged into a grounded power source. If you to open it. 1 1 control board cover 4 Completely open the latches on any static electricity once again. Locate the alignment notches on...
User Guide
Page 68
... tray 3 5.5 paper size setting 2.4 specifications 5.2 paper type setting 2.4 specifications 5.2 print cartridge checkig remaining toner 8.3 cleaning 8.2 maintaining 8.3 redistributing 8.3 replacing 8.4, 8.5 print quality problems, solve 9.13 printing demo page 2.9 problem, solve checklist 9.7 error messages 9.8 Macintosh 9.17 paper jams 9.1 printing 9.11 printing quality 9.13 Windows 9.15 Q quality problems 9.13 R rear cover, use 5.9 replacement parts 8.6 replacing, print cartridge 8.4, 8.5 S special print media, guidelines 5.3 specification, printer 11.1 status LED 9.7 supplies checking life...
... tray 3 5.5 paper size setting 2.4 specifications 5.2 paper type setting 2.4 specifications 5.2 print cartridge checkig remaining toner 8.3 cleaning 8.2 maintaining 8.3 redistributing 8.3 replacing 8.4, 8.5 print quality problems, solve 9.13 printing demo page 2.9 problem, solve checklist 9.7 error messages 9.8 Macintosh 9.17 paper jams 9.1 printing 9.11 printing quality 9.13 Windows 9.15 Q quality problems 9.13 R rear cover, use 5.9 replacement parts 8.6 replacing, print cartridge 8.4, 8.5 S special print media, guidelines 5.3 specification, printer 11.1 status LED 9.7 supplies checking life...
User Guide
Page 95
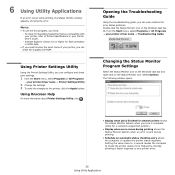
... check for a network supported printer.) • Display when error occurs during printing shows the Status Monitor balloon when an error occurs during printing. • Schedule an automatic status checking every allows the computer to know the exact name of your printer driver name → Troubleshooting Guide. Opening the Troubleshooting Guide Using the troubleshooting guide, you can configure and check print settings. 1 from the Start menu, select Programs or All Programs → your printer, you need to update the printer status regularly. Double...
... check for a network supported printer.) • Display when error occurs during printing shows the Status Monitor balloon when an error occurs during printing. • Schedule an automatic status checking every allows the computer to know the exact name of your printer driver name → Troubleshooting Guide. Opening the Troubleshooting Guide Using the troubleshooting guide, you can configure and check print settings. 1 from the Start menu, select Programs or All Programs → your printer, you need to update the printer status regularly. Double...
User Guide
Page 98
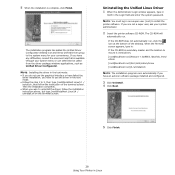
...; When you have to use the driver in the text mode. • Follow the step 1 to mount is complete, click Finish. Uninstalling the Unified Linux Driver 1 When the Administrator Login window appears, type in root in the Login field and enter the system password. The installation program has added the Unified Driver Configurator desktop icon and Xerox Unified Driver group to install the printer software. If you have...
...; When you have to use the driver in the text mode. • Follow the step 1 to mount is complete, click Finish. Uninstalling the Unified Linux Driver 1 When the Administrator Login window appears, type in root in the Login field and enter the system password. The installation program has added the Unified Driver Configurator desktop icon and Xerox Unified Driver group to install the printer software. If you have...
User Guide
Page 101
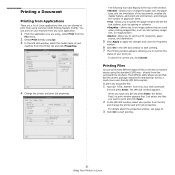
... window appears. When you do that. To abort the current job, click Cancel. But the drivers package replaces the standard lpr tool by a much more user-friendly LPR GUI program. The CUPS lpr utility allows you type only lpr and press Enter, the Select file(s) to change the printer and print job properties. allows you to specify the page margins and set the text options, such as color options, image size...
... window appears. When you do that. To abort the current job, click Cancel. But the drivers package replaces the standard lpr tool by a much more user-friendly LPR GUI program. The CUPS lpr utility allows you type only lpr and press Enter, the Select file(s) to change the printer and print job properties. allows you to specify the page margins and set the text options, such as color options, image size...


