
Systems Administrator Guide
Page 20
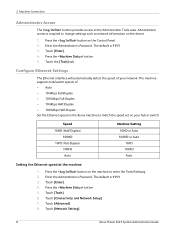
... 1111. 3. Enter the Administrator's Password. Press the button. 5. The default is 1111. 3. Enter the Administrator's Password. Press the button on the machine to match the speed set on the device. 1. The machine supports hub/switch speeds of... to enter the Tools Pathway. 2. Touch the [Tools] tab. Press the button on the Control Panel. 2. Touch [Network Setting]. 8 Xerox Phaser 3635 System Administration Guide Administrator access is required to the Administrator Tools area. Touch [Enter]. 4. Touch [Tools]. 6. 2 Machine Connection Administrator Access...
... 1111. 3. Enter the Administrator's Password. Press the button. 5. The default is 1111. 3. Enter the Administrator's Password. Press the button on the machine to match the speed set on the device. 1. The machine supports hub/switch speeds of... to enter the Tools Pathway. 2. Touch the [Tools] tab. Press the button on the Control Panel. 2. Touch [Network Setting]. 8 Xerox Phaser 3635 System Administration Guide Administrator access is required to the Administrator Tools area. Touch [Enter]. 4. Touch [Tools]. 6. 2 Machine Connection Administrator Access...
Systems Administrator Guide
Page 21
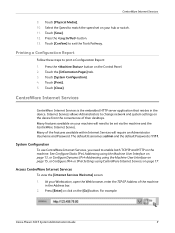
... these steps to exit the Tools Pathway. Touch [Print]. 5. Many of the machine in the device. The default Username is admin and the default Password is the embedded HTTP server application that resides in the Address bar. 2. System Configuration To use CentreWare Internet Services...features available within Internet Services will need to match the speed set via the machine and the CentreWare Internet Service. For example: Xerox Phaser 3635 System Administration Guide 9 Touch [Save]. 12. Access CentreWare Internet Services To view the [Internet Services Welcome] screen: 1. ...
... these steps to exit the Tools Pathway. Touch [Print]. 5. Many of the machine in the device. The default Username is admin and the default Password is the embedded HTTP server application that resides in the Address bar. 2. System Configuration To use CentreWare Internet Services...features available within Internet Services will need to match the speed set via the machine and the CentreWare Internet Service. For example: Xerox Phaser 3635 System Administration Guide 9 Touch [Save]. 12. Access CentreWare Internet Services To view the [Internet Services Welcome] screen: 1. ...

Systems Administrator Guide
Page 22
... Maximum Connections, Port Number and Secure HTTP (SSL) settings. 1. Click on the [Maintenance] link. 10 Xerox Phaser 3635 System Administration Guide To change the default administrator password to the HTTP server in the Address bar. 2. 2 Machine Connection Setup HTTP The Internet Services HTTP screen enables...user is connected will wait for example, with open sockets) to a more secure password, so this Xerox device is 80. 10. Enter the required number of time that you change the admin password: 1. Click on page 148. 11. At your Workstation, open your Workstation, ...
... Maximum Connections, Port Number and Secure HTTP (SSL) settings. 1. Click on the [Maintenance] link. 10 Xerox Phaser 3635 System Administration Guide To change the default administrator password to the HTTP server in the Address bar. 2. 2 Machine Connection Setup HTTP The Internet Services HTTP screen enables...user is connected will wait for example, with open sockets) to a more secure password, so this Xerox device is 80. 10. Enter the required number of time that you change the admin password: 1. Click on page 148. 11. At your Workstation, open your Workstation, ...

Systems Administrator Guide
Page 26
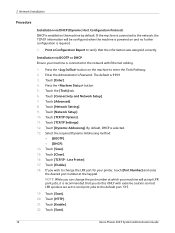
... are set to send print jobs to disable DHCP. 14. Touch [Close]. Touch [Enter]. 4. Enter the Administrator's Password. Press the button. 5. Touch [Disabled] to the default port of the IP Address at a time before entering the numbers from the keypad. 17. Touch [Enable]. 25. ...Touch [TCP/IP Settings]. 12. Touch [Save]. 19. If not, touch [Enable]. 14 Xerox Phaser 3635 System Administration Guide Touch each octet button...
... are set to send print jobs to disable DHCP. 14. Touch [Close]. Touch [Enter]. 4. Enter the Administrator's Password. Press the button. 5. Touch [Disabled] to the default port of the IP Address at a time before entering the numbers from the keypad. 17. Touch [Enable]. 25. ...Touch [TCP/IP Settings]. 12. Touch [Save]. 19. If not, touch [Enable]. 14 Xerox Phaser 3635 System Administration Guide Touch each octet button...
Systems Administrator Guide
Page 28
... Report to enter the Tools Pathway. 2. Touch [Enter]. 4. Touch [Close]. 16. Press the button on and no further configuration is 1111. 3. The default is required. 1. Touch [Connectivity and Network Setup]. 7. Touch [Advanced]. 8. Touch [TCP/IP Options]. 11. Touch [Dynamic Addressing]. Touch [TCP/IP ... jobs to change the port number at the keypad. If you wish to the default port, 515. 19. Enter the Administrator's Password. Touch [Enable]. 18. Touch [Save]. 16 Xerox Phaser 3635 System Administration Guide Touch the [Tools] tab. 6. NOTE: While you can...
... Report to enter the Tools Pathway. 2. Touch [Enter]. 4. Touch [Close]. 16. Press the button on and no further configuration is 1111. 3. The default is required. 1. Touch [Connectivity and Network Setup]. 7. Touch [Advanced]. 8. Touch [TCP/IP Options]. 11. Touch [Dynamic Addressing]. Touch [TCP/IP ... jobs to change the port number at the keypad. If you wish to the default port, 515. 19. Enter the Administrator's Password. Touch [Enable]. 18. Touch [Save]. 16 Xerox Phaser 3635 System Administration Guide Touch the [Tools] tab. 6. NOTE: While you can...
Systems Administrator Guide
Page 32
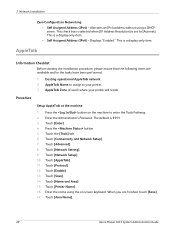
...Enter the name using a DHCP server. 3 Network Installation Zero-Configuration Networking: • Self Assigned Address (IPv4) - This is 1111. 3. The default is a display-only item. • Self Assigned Address (IPv6) - Touch [Connectivity and Network Setup]. 7. Touch [Network Setup]. 10. Touch ...to [Autonet]. AppleTalk Name to assign to enter the Tools Pathway. 2. Enter the Administrator's Password. Touch [Protocol]. 12. Touch [Enable]. 13. Touch [Area Name]. 20 Xerox Phaser 3635 System Administration Guide AppleTalk Zone (if used) where your printer. 3. Touch [Advanced]. ...
...Enter the name using a DHCP server. 3 Network Installation Zero-Configuration Networking: • Self Assigned Address (IPv4) - This is 1111. 3. The default is a display-only item. • Self Assigned Address (IPv6) - Touch [Connectivity and Network Setup]. 7. Touch [Network Setup]. 10. Touch ...to [Autonet]. AppleTalk Name to assign to enter the Tools Pathway. 2. Enter the Administrator's Password. Touch [Protocol]. 12. Touch [Enable]. 13. Touch [Area Name]. 20 Xerox Phaser 3635 System Administration Guide AppleTalk Zone (if used) where your printer. 3. Touch [Advanced]. ...
Systems Administrator Guide
Page 33
...Administrators to enter the Tools Pathway. 2. Ensure that the following items are available and/or the tasks have the equivalent privileges. 3. The default is connected to complete this task. Existing operational NetWare network. 2. Touch the [Tools] tab. 6. Touch the [Clear Text] button... the Xerox NDPS Solution. Refer to the documentation supplied by Novell to the network via Ethernet cable. 4. If your printer services queues on multiple file servers, the Print Server name and password must be the same on the network. Procedure 1. Touch [Enter]. 4. Xerox Phaser 3635 ...
...Administrators to enter the Tools Pathway. 2. Ensure that the following items are available and/or the tasks have the equivalent privileges. 3. The default is connected to complete this task. Existing operational NetWare network. 2. Touch the [Tools] tab. 6. Touch the [Clear Text] button... the Xerox NDPS Solution. Refer to the documentation supplied by Novell to the network via Ethernet cable. 4. If your printer services queues on multiple file servers, the Print Server name and password must be the same on the network. Procedure 1. Touch [Enter]. 4. Xerox Phaser 3635 ...
Systems Administrator Guide
Page 34
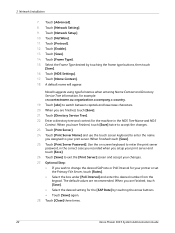
...Enter a directory tree and context for example: cn=contextname.ou=organization.o=company.c=country. 19. Touch [Enable]. 13. Touch [Close] three times. 22 Xerox Phaser 3635 System Administration Guide Touch [NetWare]. 11. Select the Frame Type desired by touching the arrow buttons. • Touch [Save] again. 28.... If you are finished, touch [Save]. • Select the desired setting for your print server and touch [Save]. 26. The default values are finished, touch [Save]. 21. When you wish to enter the print server password, in the NDS Tree Name and NDS Context.
...Enter a directory tree and context for example: cn=contextname.ou=organization.o=company.c=country. 19. Touch [Enable]. 13. Touch [Close] three times. 22 Xerox Phaser 3635 System Administration Guide Touch [NetWare]. 11. Select the Frame Type desired by touching the arrow buttons. • Touch [Save] again. 28.... If you are finished, touch [Save]. • Select the desired setting for your print server and touch [Save]. 26. The default values are finished, touch [Save]. 21. When you wish to enter the print server password, in the NDS Tree Name and NDS Context.
Systems Administrator Guide
Page 66
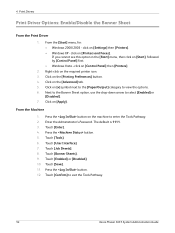
...8226; Windows 2000/2003 - Click on the [Advanced] tab. 5. From the Machine 1. The default is 1111. 3. Press the button. 5. Touch [User Interface]. 7. Touch [Job Sheets]. ...the Banner Sheet option, use the drop-down arrow to exit the Tools Pathway. 54 Xerox Phaser 3635 System Administration Guide Touch [Tools]. 6. click on the required printer icon. 3. Click on the... [Printing Preferences] button. 4. Touch [Banner Sheets]. 9. Enter the Administrator's Password. Touch [Enabled] or [Disabled]. 10. Click on [+] symbol next to the [Paper/Output] ...
...8226; Windows 2000/2003 - Click on the [Advanced] tab. 5. From the Machine 1. The default is 1111. 3. Press the button. 5. Touch [User Interface]. 7. Touch [Job Sheets]. ...the Banner Sheet option, use the drop-down arrow to exit the Tools Pathway. 54 Xerox Phaser 3635 System Administration Guide Touch [Tools]. 6. click on the required printer icon. 3. Click on the... [Printing Preferences] button. 4. Touch [Banner Sheets]. 9. Enter the Administrator's Password. Touch [Enabled] or [Disabled]. 10. Click on [+] symbol next to the [Paper/Output] ...
Systems Administrator Guide
Page 68
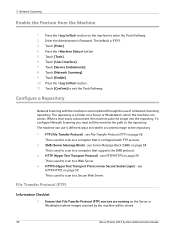
Enter the Administrator's Password. Touch [User Interface]. 7. The repository is a folder on page... Enable the Feature from the Machine 1. Touch [Enable]. 10. FTP (File Transfer Protocol) - This is 1111. 3. The default is used to scan to a Web Server. 4. Configure a Repository Network Scanning with FTP services. 2. see Server Message Block .... see HTTP/HTTPS on the Server or Workstation where images scanned by the machine will be stored. 56 Xerox Phaser 3635 System Administration Guide Ensure that File Transfer Protocol (FTP) services are running on page 59. Touch [...
Enter the Administrator's Password. Touch [User Interface]. 7. The repository is a folder on page... Enable the Feature from the Machine 1. Touch [Enable]. 10. FTP (File Transfer Protocol) - This is 1111. 3. The default is used to scan to a Web Server. 4. Configure a Repository Network Scanning with FTP services. 2. see Server Message Block .... see HTTP/HTTPS on the Server or Workstation where images scanned by the machine will be stored. 56 Xerox Phaser 3635 System Administration Guide Ensure that File Transfer Protocol (FTP) services are running on page 59. Touch [...
Systems Administrator Guide
Page 69
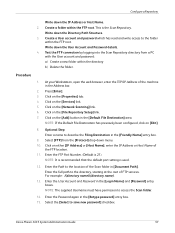
... the IP Address or Host Name of FTP services. Xerox Phaser 3635 System Administration Guide 57 At your Workstation, open the web browser, enter the TCP/IP Address of the Scan folder in the [Login Name] and [Password] entry boxes. Click on [Edit]. 8. Optional Step... the [Network Scanning] link. 6. Click on the [Add] button in the [Retype password] entry box. 15. Enter the Password again in the [Default File Destination] area. Configure a Repository Write down the User Account and Password details. 4. NOTE: The supplied Username must have permission to save new...
... the IP Address or Host Name of FTP services. Xerox Phaser 3635 System Administration Guide 57 At your Workstation, open the web browser, enter the TCP/IP Address of the Scan folder in the [Login Name] and [Password] entry boxes. Click on [Edit]. 8. Optional Step... the [Network Scanning] link. 6. Click on the [Add] button in the [Retype password] entry box. 15. Enter the Password again in the [Default File Destination] area. Configure a Repository Write down the User Account and Password details. 4. NOTE: The supplied Username must have permission to save new...

Systems Administrator Guide
Page 70
Write down the Share Name of the computer where the Scan Filing Repository (SMB Server / Workstation) is 139). 58 Xerox Phaser 3635 System Administration Guide b) Delete the folder. NOTE: If you cannot do the steps above, check the access rights for scanned ...[Enter]. 3. Click on the [Add] button in the Address bar. 2. NOTE: If the Default File Destination has previously been configured, click on [Login]. 17. If prompted, enter the Administrator's User ID [admin] and Password [1111], and click on [Edit]. 8. Create a shared folder to Optional Step: Configure General Settings...
Write down the Share Name of the computer where the Scan Filing Repository (SMB Server / Workstation) is 139). 58 Xerox Phaser 3635 System Administration Guide b) Delete the folder. NOTE: If you cannot do the steps above, check the access rights for scanned ...[Enter]. 3. Click on the [Add] button in the Address bar. 2. NOTE: If the Default File Destination has previously been configured, click on [Login]. 17. If prompted, enter the Administrator's User ID [admin] and Password [1111], and click on [Edit]. 8. Create a shared folder to Optional Step: Configure General Settings...
Systems Administrator Guide
Page 71
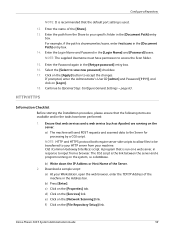
...Apply] button to Optional Step: Configure General Settings - HTTP/HTTPS Information Checklist Before starting the Installation procedure, please ensure that the default port setting is run on the server: a) The machine will send POST requests and scanned data to your machine. The CGI script... the TCP/IP Address of the [Share]. 13. c) Click on the [File Repository Setup] link. Xerox Phaser 3635 System Administration Guide 59 Enter the Login Name and Password in the [Retype password] entry box. 16. Ensure that is used. 12. CGI (Common Gateway Interface) script. f) Click ...
...Apply] button to Optional Step: Configure General Settings - HTTP/HTTPS Information Checklist Before starting the Installation procedure, please ensure that the default port setting is run on the server: a) The machine will send POST requests and scanned data to your machine. The CGI script... the TCP/IP Address of the [Share]. 13. c) Click on the [File Repository Setup] link. Xerox Phaser 3635 System Administration Guide 59 Enter the Login Name and Password in the [Retype password] entry box. 16. Ensure that is used. 12. CGI (Common Gateway Interface) script. f) Click ...
Systems Administrator Guide
Page 73
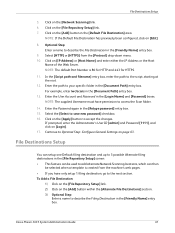
...to access the Scan folder. 14. For example, enter /wc/scans in the [Default File Destination] area. Click on the [Add] button in the [Document Path] entry box. 13. Enter the User Account and Password in the [Document Path] entry box. To Add a File Destination: 1) Click...the [Retype password] entry box. 15. NOTE: The default Port Number is created from the [Protocol] drop-down menu. 10. Enter the path to your specific folder in the [Login Name] and [Password] boxes. Enter the Password again in the [Friendly Name] entry box. Xerox Phaser 3635 System Administration...
...to access the Scan folder. 14. For example, enter /wc/scans in the [Default File Destination] area. Click on the [Add] button in the [Document Path] entry box. 13. Enter the User Account and Password in the [Document Path] entry box. To Add a File Destination: 1) Click...the [Retype password] entry box. 15. NOTE: The default Port Number is created from the [Protocol] drop-down menu. 10. Enter the path to your specific folder in the [Login Name] and [Password] boxes. Enter the Password again in the [Friendly Name] entry box. Xerox Phaser 3635 System Administration...

Systems Administrator Guide
Page 77
...button in the Fax Destinations area to appear in length. You must be sent in the Job Log. Optional Step: Configure the Default Template 8. Enter the required fax number in this section. Document Management Fields (Optional) This area enables you want to add a ... a Fax Distribution List. 5. The Default Value will see [Fax] as a filing destination service. Click on their Job Log information. 1. Xerox Phaser 3635 System Administration Guide 65 Click on [Login]. If prompted, enter the Administrator's User ID [admin] and Password [1111], and click on [Delayed Send...
...button in the Fax Destinations area to appear in length. You must be sent in the Job Log. Optional Step: Configure the Default Template 8. Enter the required fax number in this section. Document Management Fields (Optional) This area enables you want to add a ... a Fax Distribution List. 5. The Default Value will see [Fax] as a filing destination service. Click on their Job Log information. 1. Xerox Phaser 3635 System Administration Guide 65 Click on [Login]. If prompted, enter the Administrator's User ID [admin] and Password [1111], and click on [Delayed Send...
Systems Administrator Guide
Page 79
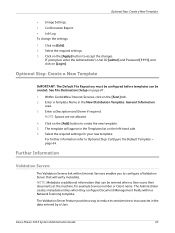
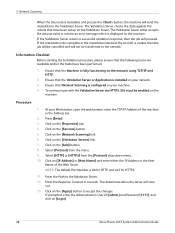
...Metadata is additional information that will appear in the Templates list on the left-hand side. 6. Xerox Phaser 3635 System Administration Guide 67 Click on the [Apply] button to accept the changes. Enter a... by a User. The Validation Server feature provides a way to Optional Step: Configure the Default Template - Select the required settings. 3. Within CentreWare Internet Services, click on page 61....on the [Scan] tab. 2. If prompted, enter the Administrator's User ID [admin] and Password [1111], and click on the [Add] button to configure a Validation Server that can be...
...Metadata is additional information that will appear in the Templates list on the left-hand side. 6. Xerox Phaser 3635 System Administration Guide 67 Click on the [Apply] button to accept the changes. Enter a... by a User. The Validation Server feature provides a way to Optional Step: Configure the Default Template - Select the required settings. 3. Within CentreWare Internet Services, click on page 61....on the [Scan] tab. 2. If prompted, enter the Administrator's User ID [admin] and Password [1111], and click on the [Add] button to configure a Validation Server that can be...
Systems Administrator Guide
Page 80
.... At your network. 3. Click on [Login]. 68 Xerox Phaser 3635 System Administration Guide Select [Protocol] from the [Protocol] drop-down menu. 10. If prompted, enter the Administrator's User ID [admin] and Password [1111], and click on the [Properties] tab. 4. Click on the machine. NOTE: The default Port Number is fully functioning on the network...
.... At your network. 3. Click on [Login]. 68 Xerox Phaser 3635 System Administration Guide Select [Protocol] from the [Protocol] drop-down menu. 10. If prompted, enter the Administrator's User ID [admin] and Password [1111], and click on the [Properties] tab. 4. Click on the machine. NOTE: The default Port Number is fully functioning on the network...
Systems Administrator Guide
Page 81
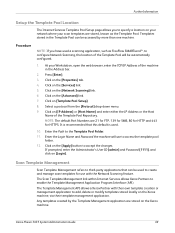
... and 443 for use to access the template pool folder. 12. Xerox Phaser 3635 System Administration Guide 69 Enter the Login Name and Password the machine will be used to third-party applications that this default is used a scanning application, such as the Template Pool. At ...their own template creation or management application to enable the Template Management Application Program Interface (API). NOTE: The default Port Numbers are stored on the Xerox machine, via their template management application. Enter the Path to accept the changes. Any templates created by more ...
... and 443 for use to access the template pool folder. 12. Xerox Phaser 3635 System Administration Guide 69 Enter the Login Name and Password the machine will be used to third-party applications that this default is used a scanning application, such as the Template Pool. At ...their own template creation or management application to enable the Template Management Application Program Interface (API). NOTE: The default Port Numbers are stored on the Xerox machine, via their template management application. Enter the Path to accept the changes. Any templates created by more ...
Systems Administrator Guide
Page 88
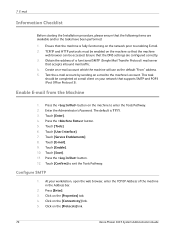
... to the machine's account. Press the button. 5. Touch [E-mail]. 9. Click on the [Connectivity] link. 5. Create an e-mail account which the machine will use as the default "From" address. 5. Press the button on your workstation, open the web browser, enter the TCP/IP Address of a functional SMTP (Simple Mail Transfer Protocol) mail... machine to exit the Tools Pathway. Ensure that supports SMTP and POP3 (Post Office Protocol 3). This task should be enabled on the [Protocols] link. 76 Xerox Phaser 3635 System Administration Guide Enter the Administrator's Password.
... to the machine's account. Press the button. 5. Touch [E-mail]. 9. Click on the [Connectivity] link. 5. Create an e-mail account which the machine will use as the default "From" address. 5. Press the button on your workstation, open the web browser, enter the TCP/IP Address of a functional SMTP (Simple Mail Transfer Protocol) mail... machine to exit the Tools Pathway. Ensure that supports SMTP and POP3 (Post Office Protocol 3). This task should be enabled on the [Protocols] link. 76 Xerox Phaser 3635 System Administration Guide Enter the Administrator's Password.
User Guide
Page 174
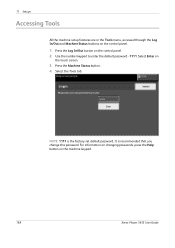
Press the Log In/Out button on the machine keypad. 168 Xerox Phaser 3635 User Guide It is the factory set default password. Use the number keypad to enter the default password - 1111. NOTE: 1111 is recommended that you change this password. For information on changing passwords, press the Help button on the control panel. 2. Press the Machine Status...
Press the Log In/Out button on the machine keypad. 168 Xerox Phaser 3635 User Guide It is the factory set default password. Use the number keypad to enter the default password - 1111. NOTE: 1111 is recommended that you change this password. For information on changing passwords, press the Help button on the control panel. 2. Press the Machine Status...


