

Systems Administrator Guide
Page 85
...) required if necessary. 9. Touch [Add]. When you are finished adding your document. Touch [Done] when you are displayed within the "Browse" window. The following extensions cannot be printed: .doc, .xls and .ppt. 1. Ensure that the [Internal Drive] option is selected. 4. Ensure that... on the right is selected on the left. 4. Touch [Add]. Continue to select and add the files you wish to scan your file(s). 8. Xerox Phaser 3635 System Administration Guide 73 Refer to retrieve and print files from the machine (stored on the machine. 1. Refer to 'Store...
...) required if necessary. 9. Touch [Add]. When you are finished adding your document. Touch [Done] when you are displayed within the "Browse" window. The following extensions cannot be printed: .doc, .xls and .ppt. 1. Ensure that the [Internal Drive] option is selected. 4. Ensure that... on the right is selected on the left. 4. Touch [Add]. Continue to select and add the files you wish to scan your file(s). 8. Xerox Phaser 3635 System Administration Guide 73 Refer to retrieve and print files from the machine (stored on the machine. 1. Refer to 'Store...
Systems Administrator Guide
Page 143
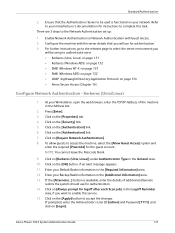
... 9. Click on page 134 • Xerox Secure Access (Chapter 16). Ensure that you want to authenticate users. • Kerberos (Unix, Linux) on page 131 • Kerberos (Windows ADS) on page 132 • SMB (Windows NT 4) on page 133 • SMB (Windows ADS) on page 132 • LDAP... to select the server environment you will use for logoff after each Scan job], in the General area. 10. Click on [Require Network Authentication]. 8. Click on the [Properties] tab. 4. Click on your network. Xerox Phaser 3635 System Administration Guide 131 Configure the machine with Guest Access. 2....
... 9. Click on page 134 • Xerox Secure Access (Chapter 16). Ensure that you want to authenticate users. • Kerberos (Unix, Linux) on page 131 • Kerberos (Windows ADS) on page 132 • SMB (Windows NT 4) on page 133 • SMB (Windows ADS) on page 132 • LDAP... to select the server environment you will use for logoff after each Scan job], in the General area. 10. Click on [Require Network Authentication]. 8. Click on the [Properties] tab. 4. Click on your network. Xerox Phaser 3635 System Administration Guide 131 Configure the machine with Guest Access. 2....

Systems Administrator Guide
Page 144
...the web browser, enter the TCP/IP Address of the machine in the Address bar. 2. Click on [Always prompt for logoff after each Scan job], in the Address bar. 2. Configure Network Authentication - Click on the [Security] link. 5. Click on the [Properties] tab.... have setup authentication correctly. Click on the [Authentication] link. 132 Xerox Phaser 3635 System Administration Guide Click on [OK]. 11. SMB (Windows NT 4) 1. Click on the [Security] link. 5. Kerberos (Windows ADS) 1. Select the [Kerberos (Windows ADS)] option as the Authentication Type. 10. If prompted, enter ...
...the web browser, enter the TCP/IP Address of the machine in the Address bar. 2. Click on [Always prompt for logoff after each Scan job], in the Address bar. 2. Configure Network Authentication - Click on the [Security] link. 5. Click on the [Properties] tab.... have setup authentication correctly. Click on the [Authentication] link. 132 Xerox Phaser 3635 System Administration Guide Click on [OK]. 11. SMB (Windows NT 4) 1. Click on the [Security] link. 5. Kerberos (Windows ADS) 1. Select the [Kerberos (Windows ADS)] option as the Authentication Type. 10. If prompted, enter ...

Systems Administrator Guide
Page 145
... Information] area. 13. SMB (Windows ADS) 1. Click on [OK]. 11. Click on the [Authentication] link. 6. Click on [Require Network Authentication]. 8. To allow it. Enter your Backup Domain information in the [Required Information] area. Xerox Phaser 3635 System Administration Guide 133 NOTE:...check that you want to access the machine, select the [Allow Guest Access] option and enter the required [Passcode] for logoff after each Scan job] option, in the Address bar. 2. Click on [Login]. 15. NOTE: You cannot leave the Passcode blank. 9. Standard Authentication...
... Information] area. 13. SMB (Windows ADS) 1. Click on [OK]. 11. Click on the [Authentication] link. 6. Click on [Require Network Authentication]. 8. To allow it. Enter your Backup Domain information in the [Required Information] area. Xerox Phaser 3635 System Administration Guide 133 NOTE:...check that you want to access the machine, select the [Allow Guest Access] option and enter the required [Passcode] for logoff after each Scan job] option, in the Address bar. 2. Click on [Login]. 15. NOTE: You cannot leave the Passcode blank. 9. Standard Authentication...

Systems Administrator Guide
Page 155
.... Ensure a job is enabled. 5. Touch a job in the Completed Jobs queue details window. 1. View the Job Overwrite Status. Immediate Image Overwrite Error If a failure occurs when ...the On Demand Image Overwrite (ODIO) on page 138 to enter the Tools Pathway. 2. Xerox Phaser 3635 System Administration Guide 143 Touch [Security Setting]. 7. Touch [Close]. View the instructions in... immediately operational and requires no further configuration by using either the E-mail or Network Scanning features. Touch [Enter]. 4. Test Immediate Image Overwrite When Immediate Image Overwrite is ...
.... Ensure a job is enabled. 5. Touch a job in the Completed Jobs queue details window. 1. View the Job Overwrite Status. Immediate Image Overwrite Error If a failure occurs when ...the On Demand Image Overwrite (ODIO) on page 138 to enter the Tools Pathway. 2. Xerox Phaser 3635 System Administration Guide 143 Touch [Security Setting]. 7. Touch [Close]. View the instructions in... immediately operational and requires no further configuration by using either the E-mail or Network Scanning features. Touch [Enter]. 4. Test Immediate Image Overwrite When Immediate Image Overwrite is ...

Systems Administrator Guide
Page 177
...Specification Supplement 2 (New JPEG). When finished with the Network Scanning feature. 1. Press [Enter]. 3. Xerox Phaser 3635 System Administration Guide 165 the document will need to send your machine). if several copies of images scanned with your selections, click the [Submit Job] button to ...the required Printing options for your print job being deleted. 9. Select the required Paper options for the Job Submission confirmation window to appear before exiting or navigating to a different screen: this prevents your document to set preferences for TIFF Color Compression...
...Specification Supplement 2 (New JPEG). When finished with the Network Scanning feature. 1. Press [Enter]. 3. Xerox Phaser 3635 System Administration Guide 165 the document will need to send your machine). if several copies of images scanned with your selections, click the [Submit Job] button to ...the required Printing options for your print job being deleted. 9. Select the required Paper options for the Job Submission confirmation window to appear before exiting or navigating to a different screen: this prevents your document to set preferences for TIFF Color Compression...

Systems Administrator Guide
Page 187
... the appropriate rights to access the directory where scans are able to log in to create a directory called xerox. 5. Type mkdir xerox to the FTP server, try creating a directory in , open your FTP server is correctly configured. Type quit to close the command prompt window. c) Enter cmd. Xerox Phaser 3635 System Administration Guide 175 For example...
... the appropriate rights to access the directory where scans are able to log in to create a directory called xerox. 5. Type mkdir xerox to the FTP server, try creating a directory in , open your FTP server is correctly configured. Type quit to close the command prompt window. c) Enter cmd. Xerox Phaser 3635 System Administration Guide 175 For example...
Systems Administrator Guide
Page 188
... upload limit may need to accommodate the desired upload limit for Network Scanning or Server Fax jobs: upload_max_filesize, default_socket_timeout, max_execution_time, max_input_time, memory_limit. 5. c:\windows\system32\LogFiles\W3SVC1 or for errors in script operations identified in the .... 4. The file may reside in the log, such as directory permissions denied, size limits exceeded, etc. 176 Xerox Phaser 3635 System Administration Guide Verify the HTTPS configuration within CentreWare Internet Services. 3. Verify the server certificate within CentreWare Internet Services...
... upload limit may need to accommodate the desired upload limit for Network Scanning or Server Fax jobs: upload_max_filesize, default_socket_timeout, max_execution_time, max_input_time, memory_limit. 5. c:\windows\system32\LogFiles\W3SVC1 or for errors in script operations identified in the .... 4. The file may reside in the log, such as directory permissions denied, size limits exceeded, etc. 176 Xerox Phaser 3635 System Administration Guide Verify the HTTPS configuration within CentreWare Internet Services. 3. Verify the server certificate within CentreWare Internet Services...

Systems Administrator Guide
Page 207
... 131, 132, 133, 134 Network Factory Default button 161 Network Images Send 118 Network Installation 13 Network Scanning add file destination 61 destination services 64 document management fields 65 field name 65 require user input 66 mask...editable 65 default value 66 field label 66 enable 56 fax destinations 65 setup file destinations 61 Network scanning scan template management 69 setup template pool location 69 NWAdmin 21 O ODIO 138 Overview 89 control panel ...29 Print Services for Unix 35 Printer Drivers install for LPR port (Windows) 37 Xerox Phaser 3635 System Administration Guide 195
... 131, 132, 133, 134 Network Factory Default button 161 Network Images Send 118 Network Installation 13 Network Scanning add file destination 61 destination services 64 document management fields 65 field name 65 require user input 66 mask...editable 65 default value 66 field label 66 enable 56 fax destinations 65 setup file destinations 61 Network scanning scan template management 69 setup template pool location 69 NWAdmin 21 O ODIO 138 Overview 89 control panel ...29 Print Services for Unix 35 Printer Drivers install for LPR port (Windows) 37 Xerox Phaser 3635 System Administration Guide 195

Systems Administrator Guide
Page 208
... Layer (HTTPS) 59, 93 Server Message Block (SMB) 58, 92 Reset User Limits 121 S Saved Settings 48 Scan Repository 56 Scan Template Management 69 Scan to E-mail 79 Secure HTTP (SSL) 151 Security 129, 155 Security @ Xerox 129 Self Signed Certificate 149 Serial number 126 Server Fax 89, 97 configure defaults 95 general 95... directly 72 Store Jobs 72 Super G3 104 Supplies Assistant 127 Support 167 System Time Out 188 System Timer Values 188 T TCP/IP 7 TCP/IP (Windows) 13 Template 67 Template Pool Location 69 Test local address book 85 196 Xerox Phaser 3635 System Administration Guide
... Layer (HTTPS) 59, 93 Server Message Block (SMB) 58, 92 Reset User Limits 121 S Saved Settings 48 Scan Repository 56 Scan Template Management 69 Scan to E-mail 79 Secure HTTP (SSL) 151 Security 129, 155 Security @ Xerox 129 Self Signed Certificate 149 Serial number 126 Server Fax 89, 97 configure defaults 95 general 95... directly 72 Store Jobs 72 Super G3 104 Supplies Assistant 127 Support 167 System Time Out 188 System Timer Values 188 T TCP/IP 7 TCP/IP (Windows) 13 Template 67 Template Pool Location 69 Test local address book 85 196 Xerox Phaser 3635 System Administration Guide

Quick Use Guide
Page 32
Press Enter and click the Scan tab. 2 In the General Information window, enter a name for your selections, click Apply. 28 quick use guide Enter a name for the scanned document and choose the format from: PDF, Multi-Page TIFF, TIFF, JPEG-JIF or XPS. Click File and/or Fax as a fax if Server ...Fax is enabled on the device. Destination Services 5 The scan ...
Press Enter and click the Scan tab. 2 In the General Information window, enter a name for your selections, click Apply. 28 quick use guide Enter a name for the scanned document and choose the format from: PDF, Multi-Page TIFF, TIFF, JPEG-JIF or XPS. Click File and/or Fax as a fax if Server ...Fax is enabled on the device. Destination Services 5 The scan ...


