Quick Use Guide
Page 31
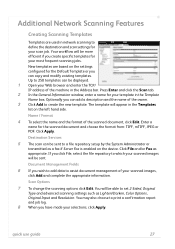
... on the left hand side. New templates are used in the Template Name box. Press Enter and click the Scan tab. 2 In the General Information window, enter a name for your selections, click Apply. The template will be sent to print a confirmation report and job log. 8 When you have made your template...
... on the left hand side. New templates are used in the Template Name box. Press Enter and click the Scan tab. 2 In the General Information window, enter a name for your selections, click Apply. The template will be sent to print a confirmation report and job log. 8 When you have made your template...

System Administration Guide
Page 4
...32 Procedure 32 Verify the Software Version 32 Clone a Machine 32 Install Clone File to another Device 33 4 Print Drivers...35 Windows Printing 35 LPR Printing 35 Ensure Print Services for Unix is enabled 35 Install Printer Driver 37 Internet Printing Protocol (IPP) ...Driver 46 Information Checklist 46 Procedure 46 Configure the Windows Printer Driver 48 Bi-Directional Communication 48 Manual Print Driver Configuration 50 Apple Mac 50 TCP/IP Printing (OSX 50 Information Checklist 50 Install the Print Driver 50 iv Xerox WorkCentre 4250/4260 Series System Administration Guide
...32 Procedure 32 Verify the Software Version 32 Clone a Machine 32 Install Clone File to another Device 33 4 Print Drivers...35 Windows Printing 35 LPR Printing 35 Ensure Print Services for Unix is enabled 35 Install Printer Driver 37 Internet Printing Protocol (IPP) ...Driver 46 Information Checklist 46 Procedure 46 Configure the Windows Printer Driver 48 Bi-Directional Communication 48 Manual Print Driver Configuration 50 Apple Mac 50 TCP/IP Printing (OSX 50 Information Checklist 50 Install the Print Driver 50 iv Xerox WorkCentre 4250/4260 Series System Administration Guide
System Administration Guide
Page 7
... from Phonebook 103 Setting up a Cover Sheet 104 Setup Fax Options 104 Setup Phonebook Preferences 105 User Preferences 105 Xerox WorkCentre 4250/4260 Series System Administration Guide vii Manually 102 Use the Feature 102 Windows 102 Mac OS Users 103 Add Fax Recipient 103 Add Recipient from the Machine 98 Test the Embedded Fax... 98 Procedure 98 Forward to E-mail 99 Procedure 99 Print Local Copy 100 11 LAN Fax...101 Overview 101 Information Checklist 101 Enable LAN Fax (Windows Printer Drivers 101 Configure the Printer Driver -
... from Phonebook 103 Setting up a Cover Sheet 104 Setup Fax Options 104 Setup Phonebook Preferences 105 User Preferences 105 Xerox WorkCentre 4250/4260 Series System Administration Guide vii Manually 102 Use the Feature 102 Windows 102 Mac OS Users 103 Add Fax Recipient 103 Add Recipient from the Machine 98 Test the Embedded Fax... 98 Procedure 98 Forward to E-mail 99 Procedure 99 Print Local Copy 100 11 LAN Fax...101 Overview 101 Information Checklist 101 Enable LAN Fax (Windows Printer Drivers 101 Configure the Printer Driver -
System Administration Guide
Page 8
... Vista 110 Mac OS X 111 Test Network Accounting 111 13 Xerox Standard Accounting 113 Overview 113 Information Checklist 114 Enable Xerox Standard Accounting in CentreWare Internet Services 114 Enable Xerox Standard Accounting from the Machine 115 Enable Xerox Standard Accounting in your Print Driver 115 Windows 115 Mac OS 116 Create a Group Account 116 Create... to Another Machine 122 Create Back-up file 122 Clone Settings to another machine 122 14 SMart eSolutions ...125 Overview 125 Information Checklist 125 viii Xerox WorkCentre 4250/4260 Series System Administration Guide
... Vista 110 Mac OS X 111 Test Network Accounting 111 13 Xerox Standard Accounting 113 Overview 113 Information Checklist 114 Enable Xerox Standard Accounting in CentreWare Internet Services 114 Enable Xerox Standard Accounting from the Machine 115 Enable Xerox Standard Accounting in your Print Driver 115 Windows 115 Mac OS 116 Create a Group Account 116 Create... to Another Machine 122 Create Back-up file 122 Clone Settings to another machine 122 14 SMart eSolutions ...125 Overview 125 Information Checklist 125 viii Xerox WorkCentre 4250/4260 Series System Administration Guide

System Administration Guide
Page 9
... Overwrite 142 Immediate Image Overwrite 142 Overview 142 Information Checklist 142 Enable the IIO 143 Test Immediate Image Overwrite 143 Immediate Image Overwrite Error 143 Xerox WorkCentre 4250/4260 Series System Administration Guide ix Kerberos (Windows ADS 132 Configure Network Authentication -
... Overwrite 142 Immediate Image Overwrite 142 Overview 142 Information Checklist 142 Enable the IIO 143 Test Immediate Image Overwrite 143 Immediate Image Overwrite Error 143 Xerox WorkCentre 4250/4260 Series System Administration Guide ix Kerberos (Windows ADS 132 Configure Network Authentication -

System Administration Guide
Page 31
...the [Apply] button to enter a user ID and passcode (if one of "http://". In the following format. Then press the key on Windows Vista only. Verify that the home page of the machine. TCP/IP DNSv6 14. http://myhost.example.com If you have changed the port ...Server does not support dynamic updates there is enabled, you use the domain name to enable [Dynamic DNSv6 Registration]. At your machine configuration. Xerox WorkCentre 4250/4260 Series System Administration Guide 19 NOTE: If the Accounting feature is no need to the Internet address as follows. If you may be...
...the [Apply] button to enter a user ID and passcode (if one of "http://". In the following format. Then press the key on Windows Vista only. Verify that the home page of the machine. TCP/IP DNSv6 14. http://myhost.example.com If you have changed the port ...Server does not support dynamic updates there is enabled, you use the domain name to enable [Dynamic DNSv6 Registration]. At your machine configuration. Xerox WorkCentre 4250/4260 Series System Administration Guide 19 NOTE: If the Accounting feature is no need to the Internet address as follows. If you may be...

System Administration Guide
Page 35
...ensure that you can ping the machine from the Desktop. 2. Ensure that the following information into the [Add Remote Printer/Plotter] form: Xerox WorkCentre 4250/4260 Series System Administration Guide 23 Use either the GUI method or the tty methods as they are written. Click on [Actions: Add ... 2. Unix Unix HP-UX Client (Version 10.x) HP-UX workstations require specific installation steps to the network. 3. Procedure 1. Open a [Command] window from the HP-UX workstation. 3. Add the machine Host Name to this page. Click on page 14 until step 38, then return to the ...
...ensure that you can ping the machine from the Desktop. 2. Ensure that the following information into the [Add Remote Printer/Plotter] form: Xerox WorkCentre 4250/4260 Series System Administration Guide 23 Use either the GUI method or the tty methods as they are written. Click on [Actions: Add ... 2. Unix Unix HP-UX Client (Version 10.x) HP-UX workstations require specific installation steps to the network. 3. Procedure 1. Open a [Command] window from the HP-UX workstation. 3. Add the machine Host Name to this page. Click on page 14 until step 38, then return to the ...

System Administration Guide
Page 37
...[Edit:Add:Access to this page. Use either the GUI method or the tty method as detailed below: GUI Method 1. Open a command window from the /etc/hosts file. Enter su to Remote Printer] form: a) Printer Name: queuename. Enter the following information into the [Access ...]. 5. Verify that you can ping the machine. 3. Enter the command: lpadmin -p queuename -s hostname !lp to exit Super User mode. 11. Xerox WorkCentre 4250/4260 Series System Administration Guide 25 Procedure 1. Add the machine printer Host Name to exit the Bourne shell. 10. Click on [OK] to the network...
...[Edit:Add:Access to this page. Use either the GUI method or the tty method as detailed below: GUI Method 1. Open a command window from the /etc/hosts file. Enter su to Remote Printer] form: a) Printer Name: queuename. Enter the following information into the [Access ...]. 5. Verify that you can ping the machine. 3. Enter the command: lpadmin -p queuename -s hostname !lp to exit Super User mode. 11. Xerox WorkCentre 4250/4260 Series System Administration Guide 25 Procedure 1. Add the machine printer Host Name to exit the Bourne shell. 10. Click on [OK] to the network...

System Administration Guide
Page 39
For example: dc xxxq. Click on [Save] in the [Warning Confirmation] window. 10. Enter su to accept the default for a non-SCO remote printer. 5. Enter the following information: a) Printer Name: queuename b) Remote Printer: r c) ... been entered correctly, enter y 4. b) Printer: name of root account. 11. Click on [OK] in as root. 2. Open Unix Window. Click on [Enter] to create a printer. 3. Xerox WorkCentre 4250/4260 Series System Administration Guide 27 Click on [Printer: Add Remote: UNIX...]. 4. Enter rlpconf to start the process for non-default printer...
For example: dc xxxq. Click on [Save] in the [Warning Confirmation] window. 10. Enter su to accept the default for a non-SCO remote printer. 5. Enter the following information: a) Printer Name: queuename b) Remote Printer: r c) ... been entered correctly, enter y 4. b) Printer: name of root account. 11. Click on [OK] in as root. 2. Open Unix Window. Click on [Enter] to create a printer. 3. Xerox WorkCentre 4250/4260 Series System Administration Guide 27 Click on [Printer: Add Remote: UNIX...]. 4. Enter rlpconf to start the process for non-default printer...

System Administration Guide
Page 41
... Interface, Information Checklist on page 13. 2. Linux operating system that the following items are available and/or the tasks have been performed: 1. Procedure 1. Enter printtool. 4. Xerox WorkCentre 4250/4260 Series System Administration Guide 29 NOTE: Not all distros of Linux support PrintTool. Follow the steps in step 9. Create the Print Queue 2. The Red... IPv4 Addressing using the Machine User Interface, Procedure on page 16 until step 38, then return to this page. Unix 18. The [Add a Printer Entry] window will appear. Click on the [Add]. 6.
... Interface, Information Checklist on page 13. 2. Linux operating system that the following items are available and/or the tasks have been performed: 1. Procedure 1. Enter printtool. 4. Xerox WorkCentre 4250/4260 Series System Administration Guide 29 NOTE: Not all distros of Linux support PrintTool. Follow the steps in step 9. Create the Print Queue 2. The Red... IPv4 Addressing using the Machine User Interface, Procedure on page 16 until step 38, then return to this page. Unix 18. The [Add a Printer Entry] window will appear. Click on the [Add]. 6.

System Administration Guide
Page 42
Click on the [Input Filter] option. 16. Enter the name of your Print Queue in the Red Hat Linux Print System Manager window. Ensure that the [File Limit] reads 0. 13. DO NOT click on [Remote Unix (lpd) Queue]. 8. Leave the default [Suppress Headers] selected...on [OK]. 9. Click on the [PrintTool] menu. 21. Click on page 29. 30 Xerox WorkCentre 4250/4260 Series System Administration Guide 3 Network Installation 7. Create the Print Queue 2. The [Edit Remote Unix (lpd) Queue Entry] window will appear. 10. In the [Remote Queue] area, enter the Print Queue Name from step ...
Click on the [Input Filter] option. 16. Enter the name of your Print Queue in the Red Hat Linux Print System Manager window. Ensure that the [File Limit] reads 0. 13. DO NOT click on [Remote Unix (lpd) Queue]. 8. Leave the default [Suppress Headers] selected...on [OK]. 9. Click on the [PrintTool] menu. 21. Click on page 29. 30 Xerox WorkCentre 4250/4260 Series System Administration Guide 3 Network Installation 7. Create the Print Queue 2. The [Edit Remote Unix (lpd) Queue Entry] window will appear. 10. In the [Remote Queue] area, enter the Print Queue Name from step ...

System Administration Guide
Page 47
...Options: Enable/Disable the Banner Sheet on page 54 Windows Printing LPR Printing Ensure Print Services for Unix is enabled Follow the relevant steps below that Print Services for Unix is loaded 3. Click on [Exit]. 2. Xerox WorkCentre 4250/4260 Series System Administration Guide 35 4 Print Drivers... This chapter explains how to your operating system: Windows XP 1. From your Workstation, load the CentreWare Print and Fax Drivers CD into ...
...Options: Enable/Disable the Banner Sheet on page 54 Windows Printing LPR Printing Ensure Print Services for Unix is enabled Follow the relevant steps below that Print Services for Unix is loaded 3. Click on [Exit]. 2. Xerox WorkCentre 4250/4260 Series System Administration Guide 35 4 Print Drivers... This chapter explains how to your operating system: Windows XP 1. From your Workstation, load the CentreWare Print and Fax Drivers CD into ...
System Administration Guide
Page 48
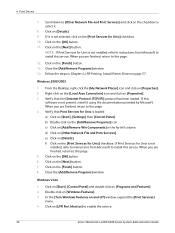
... 3. NOTE: If Print Services for Unix] checkbox. 10. Close the [Add/Remove Programs] window. 14. Windows 2000/2003 1. When you are finished, return to enable the service. 36 Xerox WorkCentre 4250/4260 Series System Administration Guide b) Double-click on the [Print Services for Unix is not selected...column. Right-click on the [Local Area Connection] icon and click on page 37. Click on [Other Network File and Print Services]. Windows Vista 1. d) Click on [Details]. 9. Click on the checkbox to this software is loaded: a) Click on [LPR Port Monitor] ...
... 3. NOTE: If Print Services for Unix] checkbox. 10. Close the [Add/Remove Programs] window. 14. Windows 2000/2003 1. When you are finished, return to enable the service. 36 Xerox WorkCentre 4250/4260 Series System Administration Guide b) Double-click on the [Print Services for Unix is not selected...column. Right-click on the [Local Area Connection] icon and click on page 37. Click on [Other Network File and Print Services]. Windows Vista 1. d) Click on [Details]. 9. Click on the checkbox to this software is loaded: a) Click on [LPR Port Monitor] ...

System Administration Guide
Page 49
...Now go to restart. Locate the Drivers folder on [Start], followed by [Control Panel] first. • Windows Vista - Click on the [Next] button for Windows XP/2000/2003 only. Xerox WorkCentre 4250/4260 Series System Administration Guide 37 Your computer may need to step 5. 4. b) Click on the [OK]... button. 16. Select: • For Windows 2000 - [Local Printer]. • For Win XP/2003 - [Local Printer...
...Now go to restart. Locate the Drivers folder on [Start], followed by [Control Panel] first. • Windows Vista - Click on the [Next] button for Windows XP/2000/2003 only. Xerox WorkCentre 4250/4260 Series System Administration Guide 37 Your computer may need to step 5. 4. b) Click on the [OK]... button. 16. Select: • For Windows 2000 - [Local Printer]. • For Win XP/2003 - [Local Printer...
System Administration Guide
Page 50
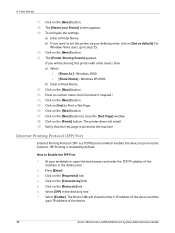
... [Next] button. 21. Press [Enter]. 3. The [Name your workstation, open the web browser and enter the TCP/IP address of the device. 38 Xerox WorkCentre 4250/4260 Series System Administration Guide Windows 2000. • [Share Name] - To configure the settings: a) Enter a Printer Name. Enter a Location name (and Comment if required.) 24. Click on the...
... [Next] button. 21. Press [Enter]. 3. The [Name your workstation, open the web browser and enter the TCP/IP address of the device. 38 Xerox WorkCentre 4250/4260 Series System Administration Guide Windows 2000. • [Share Name] - To configure the settings: a) Enter a Printer Name. Enter a Location name (and Comment if required.) 24. Click on the...

System Administration Guide
Page 51
...2. The Printer Name can be either the Host Name or the SMB Host Name as shown on the machine Configuration Report, depending on [Network Connections]. Windows Printing 8. Click on [Add Printer] in the [Start] menu, then click on [Start]. Under the field [Name or address of Printer] enter...Click on the [My Network Places] icon. If you cannot see this option in the far left column. 7. The following screen will appear. Windows 2000/2003 From your network (WINS or DNS). 12. Enter a number for Windows XP. 10. Xerox WorkCentre 4250/4260 Series System Administration Guide 39
...2. The Printer Name can be either the Host Name or the SMB Host Name as shown on the machine Configuration Report, depending on [Network Connections]. Windows Printing 8. Click on [Add Printer] in the [Start] menu, then click on [Start]. Under the field [Name or address of Printer] enter...Click on the [My Network Places] icon. If you cannot see this option in the far left column. 7. The following screen will appear. Windows 2000/2003 From your network (WINS or DNS). 12. Enter a number for Windows XP. 10. Xerox WorkCentre 4250/4260 Series System Administration Guide 39
System Administration Guide
Page 52
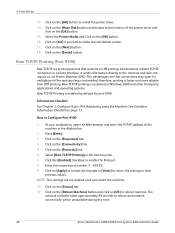
...the Machine User Interface, Information Checklist on [Apply] to accept the changes or [Undo] to return the settings to make this time. 40 Xerox WorkCentre 4250/4260 Series System Administration Guide How to the machine and does not require a Line Printer Daemon (LPD). Click on page 13. Click on the... print files and spooling is not needed, therefore, printing is enabled by default for port 9100. Select [Raw TCP/IP Printing] in Windows 2000 and other third-party applications and operating systems. Raw TCP/IP Printing is faster and more reliable than LPD printing. Raw TCP/IP...
...the Machine User Interface, Information Checklist on [Apply] to accept the changes or [Undo] to return the settings to make this time. 40 Xerox WorkCentre 4250/4260 Series System Administration Guide How to the machine and does not require a Line Printer Daemon (LPD). Click on page 13. Click on the... print files and spooling is not needed, therefore, printing is enabled by default for port 9100. Select [Raw TCP/IP Printing] in Windows 2000 and other third-party applications and operating systems. Raw TCP/IP Printing is faster and more reliable than LPD printing. Raw TCP/IP...

System Administration Guide
Page 53
...] button. b) Enter the Printer Name or IP Address of the printer. Select: • [Local Printer] for Windows 2000 • [Local Printer attached to deselect it. 5. The [Add Printer Wizard] window will appear. Windows Printing Install Printer Driver 1. Xerox WorkCentre 4250/4260 Series System Administration Guide 41 Click on the [Next] button. 4. f) Ensure 9100 appears as the...
...] button. b) Enter the Printer Name or IP Address of the printer. Select: • [Local Printer] for Windows 2000 • [Local Printer attached to deselect it. 5. The [Add Printer Wizard] window will appear. Windows Printing Install Printer Driver 1. Xerox WorkCentre 4250/4260 Series System Administration Guide 41 Click on the [Next] button. 4. f) Ensure 9100 appears as the...

System Administration Guide
Page 54
...15. Click on the [OK] button. 16. Verify that the test page is printed at the machine. Click on the [Next] button. 27. Windows 2000. • [Share Name] - Click on the machine. 2. The printer driver will return to print a test page. The AppleTalk settings must ...: • [Share As:] - If you will be prompted for a Printer Driver. 10. Information Checklist 1. Select the model of your machine. 42 Xerox WorkCentre 4250/4260 Series System Administration Guide If you want this printer with your machine from the list. 14. j) Click on [Yes]. 21. Click on the ...
...15. Click on the [OK] button. 16. Verify that the test page is printed at the machine. Click on the [Next] button. 27. Windows 2000. • [Share Name] - Click on the machine. 2. The printer driver will return to print a test page. The AppleTalk settings must ...: • [Share As:] - If you will be prompted for a Printer Driver. 10. Information Checklist 1. Select the model of your machine. 42 Xerox WorkCentre 4250/4260 Series System Administration Guide If you want this printer with your machine from the list. 14. j) Click on [Yes]. 21. Click on the ...

System Administration Guide
Page 55
...by Microsoft, then return to reboot the machine. Press [Enter]. 3. Click on [Network Connections] Xerox WorkCentre 4250/4260 Series System Administration Guide 43 Install the Printer Driver 1. Windows 2000/2003 From the Desktop: a) Right-click on the [Properties] tab. 4. The [Connection ...Properties] dialog box opens. 4. Click on the [My Network Places] icon. b) Click on the [Connectivity] link. 5. Windows Printing Configure AppleTalk 1. At your workstation, open the Web browser and enter the TCP/IP address of installed protocols, make sure that ...
...by Microsoft, then return to reboot the machine. Press [Enter]. 3. Click on [Network Connections] Xerox WorkCentre 4250/4260 Series System Administration Guide 43 Install the Printer Driver 1. Windows 2000/2003 From the Desktop: a) Right-click on the [Properties] tab. 4. The [Connection ...Properties] dialog box opens. 4. Click on the [My Network Places] icon. b) Click on the [Connectivity] link. 5. Windows Printing Configure AppleTalk 1. At your workstation, open the Web browser and enter the TCP/IP address of installed protocols, make sure that ...


