
Quick Use Guide
Page 38
... Jam Area • Ensure that all the documents from the paper path. The illustration below shows the document feeder jam clearance areas. Finisher Area Jam Fuser Area Document jams 1b 1a 1c The display will indicate when a document jam has occurred. • Follow the instructions on the display to clear the...
... Jam Area • Ensure that all the documents from the paper path. The illustration below shows the document feeder jam clearance areas. Finisher Area Jam Fuser Area Document jams 1b 1a 1c The display will indicate when a document jam has occurred. • Follow the instructions on the display to clear the...
System Administration Guide
Page 174
... skill level needed to fix this problem. Xerox Support needed to fix this problem. • No intervention required - The Status screen may show one of the machine in the Address bar. 2. The levels are toner cartridges and fuser cartridges. 1. System Administrator needed to fix ... CD2 delivered with your Workstation, open the web browser, enter the TCP/IP Address of the following information is getting low). 162 Xerox WorkCentre 4250/4260 Series System Administration Guide Click on the [Alerts] link. The following options: • Ready. • Reorder (Supply...
... skill level needed to fix this problem. Xerox Support needed to fix this problem. • No intervention required - The Status screen may show one of the machine in the Address bar. 2. The levels are toner cartridges and fuser cartridges. 1. System Administrator needed to fix ... CD2 delivered with your Workstation, open the web browser, enter the TCP/IP Address of the following information is getting low). 162 Xerox WorkCentre 4250/4260 Series System Administration Guide Click on the [Alerts] link. The following options: • Ready. • Reorder (Supply...

User Guide
Page 16
...use a ground adapter plug to connect the equipment to conserve power when the machine is not specifically described in the fuser area are no parts behind these safety guidelines at all times: Do These • Always follow all warnings and instructions... equipment. • Always exercise care when moving or relocating equipment. Operational Safety Information Your Xerox equipment and supplies have been designed and tested to prevent overheating. 8 Xerox WorkCentre 4250/4260 User Guide They are fastened with established environmental standards. 1 Welcome 4. Do not...
...use a ground adapter plug to connect the equipment to conserve power when the machine is not specifically described in the fuser area are no parts behind these safety guidelines at all times: Do These • Always follow all warnings and instructions... equipment. • Always exercise care when moving or relocating equipment. Operational Safety Information Your Xerox equipment and supplies have been designed and tested to prevent overheating. 8 Xerox WorkCentre 4250/4260 User Guide They are fastened with established environmental standards. 1 Welcome 4. Do not...
User Guide
Page 19
...an open flame. • Cartridges: When handling cartridges, for laser product set by the following Agency using the Safety standards listed. Agency Standard Underwriters Laboratories Inc Intertek ETL SEMKO UL60950-1 1st (2003) (USA/Canada) IEC60950-1 Edition 1 (2001) Xerox WorkCentre 4250/4260 User Guide 11 For Consumables • Store all ... safe limits. 1 Welcome Standard: UL60950-1, 2003 Edition. In other than air and is in accordance with performance standards for example ink, fuser, etc., avoid skin or eye contact. This can cause irritation and inflammation.
...an open flame. • Cartridges: When handling cartridges, for laser product set by the following Agency using the Safety standards listed. Agency Standard Underwriters Laboratories Inc Intertek ETL SEMKO UL60950-1 1st (2003) (USA/Canada) IEC60950-1 Edition 1 (2001) Xerox WorkCentre 4250/4260 User Guide 11 For Consumables • Store all ... safe limits. 1 Welcome Standard: UL60950-1, 2003 Edition. In other than air and is in accordance with performance standards for example ink, fuser, etc., avoid skin or eye contact. This can cause irritation and inflammation.
User Guide
Page 42
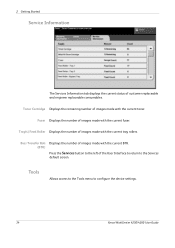
.... Tools Allows access to the Tools menu to the Services default screen. Fuser Displays the number of the User Interface to return to configure the device settings. 34 Xerox WorkCentre 4250/4260 User Guide 2 Getting Started Service Information The Services Information tab ...displays the current status of images made with the current fuser. Toner Cartridge Displays the remaining number of images made ...
.... Tools Allows access to the Tools menu to the Services default screen. Fuser Displays the number of the User Interface to return to configure the device settings. 34 Xerox WorkCentre 4250/4260 User Guide 2 Getting Started Service Information The Services Information tab ...displays the current status of images made with the current fuser. Toner Cartridge Displays the remaining number of images made ...
User Guide
Page 173
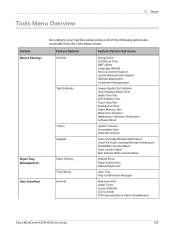
...General Tests & Resets Timers Supplies Paper Setting Tray Setting General Energy Saver Set Date & Time GMT Offset Language Default Xerox Customer Support System Administrator Reports Altitude Adjustment Contention Management Image Quality Test Patterns User Interface Button Test Audio Tone Test LED...Timeout Incomplete Scan Held Job Timeout Toner Cartridge Reorder Notification Smart Kit Drum Cartridge Reorder Notification Feed Rollers Counter Reset Fuser Counter Reset Bias Transfer Roller Counter Reset Default Stock Paper Substitution Default Paper Size Auto Tray Tray Confirmation Message ...
...General Tests & Resets Timers Supplies Paper Setting Tray Setting General Energy Saver Set Date & Time GMT Offset Language Default Xerox Customer Support System Administrator Reports Altitude Adjustment Contention Management Image Quality Test Patterns User Interface Button Test Audio Tone Test LED...Timeout Incomplete Scan Held Job Timeout Toner Cartridge Reorder Notification Smart Kit Drum Cartridge Reorder Notification Feed Rollers Counter Reset Fuser Counter Reset Bias Transfer Roller Counter Reset Default Stock Paper Substitution Default Paper Size Auto Tray Tray Confirmation Message ...

User Guide
Page 191
On replacement, select the Supplies tab and use the Counter Reset buttons to reset the counters to zero. Xerox WorkCentre 4250/4260 User Guide 183 These include: • Fuser Counter • Bias Transfer Roller Counter • Feed Rollers Counter • Document Feeder Friction Pad Counter At the end of their life expectancy. 11 Setups Counter Resets Other replaceable units within the machine also track the number of images made as a measure of life, these units continue running without re-order notification messages.
On replacement, select the Supplies tab and use the Counter Reset buttons to reset the counters to zero. Xerox WorkCentre 4250/4260 User Guide 183 These include: • Fuser Counter • Bias Transfer Roller Counter • Feed Rollers Counter • Document Feeder Friction Pad Counter At the end of their life expectancy. 11 Setups Counter Resets Other replaceable units within the machine also track the number of images made as a measure of life, these units continue running without re-order notification messages.

User Guide
Page 222
... 1a 1c 4. Open the Finisher cover. 2. Press lever 1c down , slide the finisher unit to its original position and close the finisher door. 214 Xerox WorkCentre 4250/4260 User Guide Please use caution when removing paper jams from this area and avoid touching any jammed paper. Finisher Area Jams 1. If no... jammed paper is found, proceed with the following steps. 3. Lower handles 1a and 1b and remove any metallic surfaces 2. Paper jam area Fuser area WARNING: The metallic surfaces in the area. Return the finisher to the left and remove any jammed paper in the...
... 1a 1c 4. Open the Finisher cover. 2. Press lever 1c down , slide the finisher unit to its original position and close the finisher door. 214 Xerox WorkCentre 4250/4260 User Guide Please use caution when removing paper jams from this area and avoid touching any jammed paper. Finisher Area Jams 1. If no... jammed paper is found, proceed with the following steps. 3. Lower handles 1a and 1b and remove any metallic surfaces 2. Paper jam area Fuser area WARNING: The metallic surfaces in the area. Return the finisher to the left and remove any jammed paper in the...


