
User Guide
Page 3
...Printer Configurations 1-4 Standard Features 1-4 Available Configurations 1-5 Options 1-6 Upgrades 1-6 Control Panel 1-7 Control Panel Features 1-7 Control Panel Layout 1-8 Menu Map 1-8 Information Pages 1-8 Sample Pages 1-9 Power Saver Settings 1-9 More Information 1-10 Resources 1-10 Xerox...Printer's IP Address 2-5 Dynamic Methods of Setting the Printer's IP Address 2-6 Manually Setting the Printer's IP Address 2-7 Installing the Printer Drivers 2-9 Available Drivers 2-9 Windows 2000 or Later 2-10 Macintosh OS X, Version 10.3 and Higher 2-10 Phaser® 4510 Laser Printer...
...Printer Configurations 1-4 Standard Features 1-4 Available Configurations 1-5 Options 1-6 Upgrades 1-6 Control Panel 1-7 Control Panel Features 1-7 Control Panel Layout 1-8 Menu Map 1-8 Information Pages 1-8 Sample Pages 1-9 Power Saver Settings 1-9 More Information 1-10 Resources 1-10 Xerox...Printer's IP Address 2-5 Dynamic Methods of Setting the Printer's IP Address 2-6 Manually Setting the Printer's IP Address 2-7 Installing the Printer Drivers 2-9 Available Drivers 2-9 Windows 2000 or Later 2-10 Macintosh OS X, Version 10.3 and Higher 2-10 Phaser® 4510 Laser Printer...
User Guide
Page 15
... 1. Using CentreWare IS: 1. Select the new time from the printer driver. Control Panel 1. Note: You can change the default power saver time on the left nagivation panel, then click Printer Defaults. 5. Enter the printer's IP address in the browser's Address field. 3. Select Configuration ...On the control panel, select Printer Setup > Printer Controls, then press the OK button. 2. If Power Saver is On. Press the OK button. Select the General folder on the control panel or through CentreWare IS. Click the Save Changes button. Phaser® 4510 Laser Printer 1-9
... 1. Using CentreWare IS: 1. Select the new time from the printer driver. Control Panel 1. Note: You can change the default power saver time on the left nagivation panel, then click Printer Defaults. 5. Enter the printer's IP address in the browser's Address field. 3. Select Configuration ...On the control panel, select Printer Setup > Printer Controls, then press the OK button. 2. If Power Saver is On. Press the OK button. Select the General folder on the control panel or through CentreWare IS. Click the Save Changes button. Phaser® 4510 Laser Printer 1-9

User Guide
Page 17
... Mac OS X dock. Note: If you have an Internet connection to frequently asked questions ■ Default printer driver settings (Windows only) To start the Xerox Support Centre utility: 1. Phaser® 4510 Laser Printer 1-11 It provides a central location for Windows printers or is not available. You must have a USB or parallel connection, some of the following information...
... Mac OS X dock. Note: If you have an Internet connection to frequently asked questions ■ Default printer driver settings (Windows only) To start the Xerox Support Centre utility: 1. Phaser® 4510 Laser Printer 1-11 It provides a central location for Windows printers or is not available. You must have a USB or parallel connection, some of the following information...

User Guide
Page 18
Network Basics This chapter includes: ■ Overview of Network Setup and Configuration on page 2-2 ■ Choosing a Connection Method on page 2-3 ■ Configuring the Network Address on page 2-5 ■ Installing the Printer Drivers on page 2-9 ■ IPv6 on page 2-14 This chapter provides basic information about setting up and connecting to your printer. See also: Advanced Features Guide at www.xerox.com/office/4510support Phaser® 4510 Laser Printer 2-1
Network Basics This chapter includes: ■ Overview of Network Setup and Configuration on page 2-2 ■ Choosing a Connection Method on page 2-3 ■ Configuring the Network Address on page 2-5 ■ Installing the Printer Drivers on page 2-9 ■ IPv6 on page 2-14 This chapter provides basic information about setting up and connecting to your printer. See also: Advanced Features Guide at www.xerox.com/office/4510support Phaser® 4510 Laser Printer 2-1

User Guide
Page 19
...xerox.com/office/4510support Phaser® 4510 Laser Printer 2-2 Turn on the control panel. 5. For information on driver installation, see the section in this chapter for referencing network settings. 4. Install the driver software on the control panel. ■ Macintosh systems: Manually set the printer's IP address if the printer... keep if for the specific operating system you can also manually set the printer's IP address on the computer from www.xerox.com/drivers. You can download the latest driver from the Software and Documentation CD-ROM. Note: If the Software and ...
...xerox.com/office/4510support Phaser® 4510 Laser Printer 2-2 Turn on the control panel. 5. For information on driver installation, see the section in this chapter for referencing network settings. 4. Install the driver software on the control panel. ■ Macintosh systems: Manually set the printer's IP address if the printer... keep if for the specific operating system you can also manually set the printer's IP address on the computer from www.xerox.com/drivers. You can download the latest driver from the Software and Documentation CD-ROM. Note: If the Software and ...
User Guide
Page 20
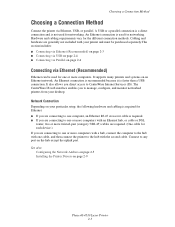
...Ethernet, USB, or parallel. See also: Configuring the Network Address on page 2-5 Installing the Printer Drivers on an Ethernet network. Choosing a Connection Method Choosing a Connection Method Connect the printer via Ethernet (Recommended) Ethernet can be used for one or more computers with a hub, ...web interface enables you are connecting to one or more computers with the second cable. It supports many printers and systems on page 2-9 Phaser® 4510 Laser Printer 2-3 Network Connection Depending on the hub except the uplink port. It also allows you are connecting to...
...Ethernet, USB, or parallel. See also: Configuring the Network Address on page 2-5 Installing the Printer Drivers on an Ethernet network. Choosing a Connection Method Choosing a Connection Method Connect the printer via Ethernet (Recommended) Ethernet can be used for one or more computers with a hub, ...web interface enables you are connecting to one or more computers with the second cable. It supports many printers and systems on page 2-9 Phaser® 4510 Laser Printer 2-3 Network Connection Depending on the hub except the uplink port. It also allows you are connecting to...
User Guide
Page 21
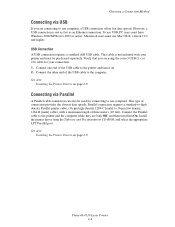
... one computer, a USB connection offers fast data speeds. This type of three meters (10 feet). See also: Installing the Printer Drivers on page 2-9 Connecting via USB If you are both Off, and then turn it on. 2. This cable is not as... 1. Connect one computer. Connect the Parallel cable to the printer and turn them On. See also: Installing the Printer Drivers on page 2-9 Phaser® 4510 Laser Printer 2-4 USB Connection A USB connection requires a standard A/B USB cable. Install the printer driver from the Software and Documentation CD-ROM, and select the ...
... one computer, a USB connection offers fast data speeds. This type of three meters (10 feet). See also: Installing the Printer Drivers on page 2-9 Connecting via USB If you are both Off, and then turn it on. 2. This cable is not as... 1. Connect one computer. Connect the Parallel cable to the printer and turn them On. See also: Installing the Printer Drivers on page 2-9 Phaser® 4510 Laser Printer 2-4 USB Connection A USB connection requires a standard A/B USB cable. Install the printer driver from the Software and Documentation CD-ROM, and select the ...
User Guide
Page 26
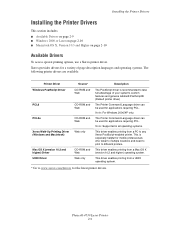
... different printers. The Printer Command Language driver can be used for the latest printer drivers. Note: For Windows 2000/XP only. Phaser® 4510 Laser Printer 2-9 This is recommended to any Xerox PostScript-enabled printer. This driver enables printing from a PC to take full advantage of page description languages and operating systems. The following printer drivers are available: Printer Driver Windows PostScript Driver PCL6 PCL5e Xerox Walk...
... different printers. The Printer Command Language driver can be used for the latest printer drivers. Note: For Windows 2000/XP only. Phaser® 4510 Laser Printer 2-9 This is recommended to any Xerox PostScript-enabled printer. This driver enables printing from a PC to take full advantage of page description languages and operating systems. The following printer drivers are available: Printer Driver Windows PostScript Driver PCL6 PCL5e Xerox Walk...
User Guide
Page 27
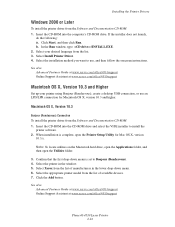
... Guide at www.xerox.com/office/4510support Online Support Assistant at www.xerox.com/office/4510support Phaser® 4510 Laser Printer 2-10 Note: To locate utilities on the Macintosh hard drive, open the Applications folder, and then open the Printer Setup Utility for Macintosh... 10.3 Bonjour (Rendezvous) Connection To install the printer driver from the Software and Documentation CD-ROM: 1. Installing the Printer Drivers Windows 2000 or Later To install the printer driver from the Software and Documentation CD-ROM: 1. Select Xerox from the list. 3. Select the installation method you...
... Guide at www.xerox.com/office/4510support Online Support Assistant at www.xerox.com/office/4510support Phaser® 4510 Laser Printer 2-10 Note: To locate utilities on the Macintosh hard drive, open the Applications folder, and then open the Printer Setup Utility for Macintosh... 10.3 Bonjour (Rendezvous) Connection To install the printer driver from the Software and Documentation CD-ROM: 1. Installing the Printer Drivers Windows 2000 or Later To install the printer driver from the Software and Documentation CD-ROM: 1. Select Xerox from the list. 3. Select the installation method you...

User Guide
Page 28
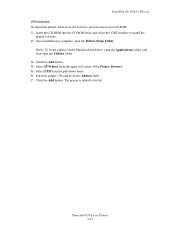
... the drop-down menu. 6. Select Xerox from the first pull-down menu, and then select the corresponding PPD file. 9. Click the Add button. 3. Phaser® 4510 Laser Printer 2-11 Select IP Printing from the Printer Model pull-down menu. 5. Click the Add button. Installing the Printer Drivers USB Connection To install the printer driver from the Software and Documentation...
... the drop-down menu. 6. Select Xerox from the first pull-down menu, and then select the corresponding PPD file. 9. Click the Add button. 3. Phaser® 4510 Laser Printer 2-11 Select IP Printing from the Printer Model pull-down menu. 5. Click the Add button. Installing the Printer Drivers USB Connection To install the printer driver from the Software and Documentation...
User Guide
Page 29
... Software and Documentation CD-ROM: 1. USB Connection To install the printer driver from the Print Using drop-down list, go to Step 6. 6. Click the Add button. 4. Phaser® 4510 Laser Printer 2-12 Select Xerox from the list of available printers. 8. Select the appropriate printer from the list of available printers. 8. Insert the CD-ROM into the CD-ROM drive...
... Software and Documentation CD-ROM: 1. USB Connection To install the printer driver from the Print Using drop-down list, go to Step 6. 6. Click the Add button. 4. Phaser® 4510 Laser Printer 2-12 Select Xerox from the list of available printers. 8. Select the appropriate printer from the list of available printers. 8. Insert the CD-ROM into the CD-ROM drive...
User Guide
Page 30
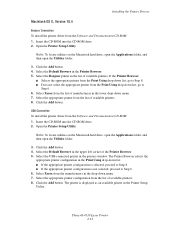
... Applications folder, and then open the Printer Setup Utility. Click the Add button. Enter the printer's IP address in the Address field. 7. Phaser® 4510 Laser Printer 2-13 The printer is complete, open the Utilities folder. 3. Select IP Printer from the pull-down menu. 6. Insert...the list. Select LPD from the upper left corner of the Printer Browser. 5. Once installation is added to install the printer software. 2. Click the Add button. 4. Installing the Printer Drivers LPD Connection To install the printer driver from the Software and Documentation CD-ROM: 1.
... Applications folder, and then open the Printer Setup Utility. Click the Add button. Enter the printer's IP address in the Address field. 7. Phaser® 4510 Laser Printer 2-13 The printer is complete, open the Utilities folder. 3. Select IP Printer from the pull-down menu. 6. Insert...the list. Select LPD from the upper left corner of the Printer Browser. 5. Once installation is added to install the printer software. 2. Click the Add button. 4. Installing the Printer Drivers LPD Connection To install the printer driver from the Software and Documentation CD-ROM: 1.
User Guide
Page 38
... size or change it as required. 4. See also: Loading Paper on page 3-7 Selecting Printing Options on page 3-18 Printing on Specialty Media on page 3-25 Phaser® 4510 Laser Printer 3-2 Load paper in the printer driver. 5. Overview of Basic Steps Overview of Basic Steps 1. Adjust the width and length guides to the...
... size or change it as required. 4. See also: Loading Paper on page 3-7 Selecting Printing Options on page 3-18 Printing on Specialty Media on page 3-25 Phaser® 4510 Laser Printer 3-2 Load paper in the printer driver. 5. Overview of Basic Steps Overview of Basic Steps 1. Adjust the width and length guides to the...

User Guide
Page 55
...the desired document or graphic open the printer driver. 3. See the following table for a particular job, change the driver settings before printing that job. 1. Select the Phaser 4510 printer and click its Properties button to open in the driver before sending the job to other ...Help button for a particular graphic, select this setting in your selections. 5. Selecting Printing Options 3. Make selections from the driver tabs. Phaser® 4510 Laser Printer 3-19 From the pop-up menu, select Printing Preferences or Properties. 4. Select Saved Settings at the bottom of the ...
...the desired document or graphic open the printer driver. 3. See the following table for a particular job, change the driver settings before printing that job. 1. Select the Phaser 4510 printer and click its Properties button to open in the driver before sending the job to other ...Help button for a particular graphic, select this setting in your selections. 5. Selecting Printing Options 3. Make selections from the driver tabs. Phaser® 4510 Laser Printer 3-19 From the pop-up menu, select Printing Preferences or Properties. 4. Select Saved Settings at the bottom of the ...

User Guide
Page 56
Phaser® 4510 Laser Printer 3-20 You can either go to the website at www.xerox.com/drivers to download the latest driver, or click the Help button on the Print menu screen to save each with its own distinctive name and printer settings. Click Print to the printer. 1. Select the ...the available printing options. Selecting Printing Options Printing Options for a particular job, change the driver settings before sending the job to print the job. To print jobs using specific printer settings, click the applicable saved preset in the table above, you can create multiple ...
Phaser® 4510 Laser Printer 3-20 You can either go to the website at www.xerox.com/drivers to download the latest driver, or click the Help button on the Print menu screen to save each with its own distinctive name and printer settings. Click Print to the printer. 1. Select the ...the available printing options. Selecting Printing Options Printing Options for a particular job, change the driver settings before sending the job to print the job. To print jobs using specific printer settings, click the applicable saved preset in the table above, you can create multiple ...
User Guide
Page 57
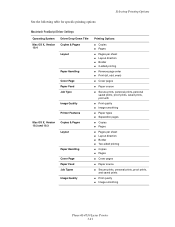
Selecting Printing Options See the following table for specific printing options: Macintosh PostScript Driver Settings Operating System Mac OS X, Version 10.4 Driver Drop-Down Title Copies & Pages Layout Paper Handling Cover Page Paper Feed Job Type Image Quality Printer Features Mac OS X, Version 10.2 and 10.3 Copies & Pages Layout Paper Handling Cover Page Paper...; Copies ■ Pages ■ Cover pages ■ Paper source ■ Secure prints, personal prints, proof prints, and saved prints ■ Print quality ■ Image smoothing Phaser® 4510 Laser Printer 3-21
Selecting Printing Options See the following table for specific printing options: Macintosh PostScript Driver Settings Operating System Mac OS X, Version 10.4 Driver Drop-Down Title Copies & Pages Layout Paper Handling Cover Page Paper Feed Job Type Image Quality Printer Features Mac OS X, Version 10.2 and 10.3 Copies & Pages Layout Paper Handling Cover Page Paper...; Copies ■ Pages ■ Cover pages ■ Paper source ■ Secure prints, personal prints, proof prints, and saved prints ■ Print quality ■ Image smoothing Phaser® 4510 Laser Printer 3-21
User Guide
Page 60
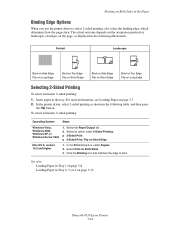
...Top Edge Flip on Short Edge Bind on Side Edge Flip on Short Edge Bind on Top Edge Flip on Both Sides. 3. In the printer driver, select 2-sided printing as displayed in the following illustrations. Printing on page 3-8 Loading Paper in the tray. Click the Binding icon that... 2. The actual outcome depends on the orientation (portrait or landscape) of the Paper Binding Edge Options When you use the printer driver to bind. See also: Loading Paper in Tray 1 on Both Sides of images on page 3-12 Phaser® 4510 Laser Printer 3-24 In the Print dialog box, select Duplex. 2.
...Top Edge Flip on Short Edge Bind on Side Edge Flip on Short Edge Bind on Top Edge Flip on Both Sides. 3. In the printer driver, select 2-sided printing as displayed in the following illustrations. Printing on page 3-8 Loading Paper in the tray. Click the Binding icon that... 2. The actual outcome depends on the orientation (portrait or landscape) of the Paper Binding Edge Options When you use the printer driver to bind. See also: Loading Paper in Tray 1 on Both Sides of images on page 3-12 Phaser® 4510 Laser Printer 3-24 In the Print dialog box, select Duplex. 2.
User Guide
Page 64
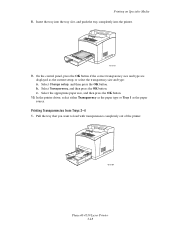
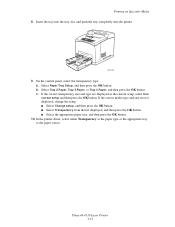
... want to load with transparencies completely out of the printer. 4510-089 Phaser® 4510 Laser Printer 3-28 Select Change setup, and then press the OK button. Select the appropriate paper size, and then press the OK button. 10. Printing on Specialty Media 8. In the printer driver, select either Transparency as the paper type or Tray... correct transparency size and type are displayed as the paper source. c. Insert the tray into the tray slot, and push the tray completely into the printer. 4510-101 9. Select Transparency, and then press the OK button.
... want to load with transparencies completely out of the printer. 4510-089 Phaser® 4510 Laser Printer 3-28 Select Change setup, and then press the OK button. Select the appropriate paper size, and then press the OK button. 10. Printing on Specialty Media 8. In the printer driver, select either Transparency as the paper type or Tray... correct transparency size and type are displayed as the paper source. c. Insert the tray into the tray slot, and push the tray completely into the printer. 4510-101 9. Select Transparency, and then press the OK button.
User Guide
Page 67
...printer driver, select either Transparency as the paper type or the appropriate tray as the current setup, select Use current setup and then press the OK button. Printing on Specialty Media 8. Select Paper Tray Setup, and then press the OK button. c. On the control panel, select the transparency type: a. Phaser® 4510 Laser Printer... 3-31 Insert the tray into the tray slot, and push the tray completely into the printer. 4510-102 9.
...printer driver, select either Transparency as the paper type or the appropriate tray as the current setup, select Use current setup and then press the OK button. Printing on Specialty Media 8. Select Paper Tray Setup, and then press the OK button. c. On the control panel, select the transparency type: a. Phaser® 4510 Laser Printer... 3-31 Insert the tray into the tray slot, and push the tray completely into the printer. 4510-102 9.
User Guide
Page 70
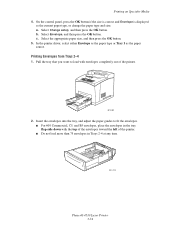
...fit the envelopes. ■ For #10 Commercial, C5, and B5 envelopes, place the envelopes in Trays 2-4 at any time. 4510-108 Phaser® 4510 Laser Printer 3-34 b. In the printer driver, select either Envelope as the paper type or Tray 1 as the current paper type, or change the paper type and size: a. Select Envelope...and then press the OK button. Insert the envelopes into the tray, and adjust the paper guides to load with envelopes completely out of the printer. ■ Do not load more than 75 envelopes in the tray flap-side down with the top of the envelopes toward the left of ...
...fit the envelopes. ■ For #10 Commercial, C5, and B5 envelopes, place the envelopes in Trays 2-4 at any time. 4510-108 Phaser® 4510 Laser Printer 3-34 b. In the printer driver, select either Envelope as the paper type or Tray 1 as the current paper type, or change the paper type and size: a. Select Envelope...and then press the OK button. Insert the envelopes into the tray, and adjust the paper guides to load with envelopes completely out of the printer. ■ Do not load more than 75 envelopes in the tray flap-side down with the top of the envelopes toward the left of ...


