
User Guide /B
Page 3
... display language ...2.2 Using the power save mode ...2.2 Auto continue ...2.2 3. Introduction Special features ...1.1 Machine overview ...1.2 Front view ...1.2 Rear view ...1.2 Control panel overview ...1.3 LCD display with the toner cartridge messages ...1.4 Finding more information ...1.4 Selecting a location ...1.5 Printing a demo page ...1.5 Altitude adjustment ...1.5 2. Selecting and loading print media Loading originals ...4.1 Selecting print media ...4.1 Supported print media...
... display language ...2.2 Using the power save mode ...2.2 Auto continue ...2.2 3. Introduction Special features ...1.1 Machine overview ...1.2 Front view ...1.2 Rear view ...1.2 Control panel overview ...1.3 LCD display with the toner cartridge messages ...1.4 Finding more information ...1.4 Selecting a location ...1.5 Printing a demo page ...1.5 Altitude adjustment ...1.5 2. Selecting and loading print media Loading originals ...4.1 Selecting print media ...4.1 Supported print media...

User Guide /B
Page 4
... reports ...9.1 Printing a report ...9.1 Clearing memory ...9.1 Cleaning your machine ...9.2 Cleaning the outside ...9.2 Cleaning the inside ...9.2 Cleaning the scan unit ...9.3 Maintaining the toner cartridge ...9.4 Toner cartridge storage ...9.4 Expected cartridge life ...9.4 Redistributing toner ...9.4 Replacing the toner cartridge ...9.5 Replacing the imaging unit ...9.6 Copying Selecting the paper tray ...5.1 Copying ...5.1 Changing the settings for each copy ...5.1 Reduced/Enlarged copy ...5.1 Darkness...
... reports ...9.1 Printing a report ...9.1 Clearing memory ...9.1 Cleaning your machine ...9.2 Cleaning the outside ...9.2 Cleaning the inside ...9.2 Cleaning the scan unit ...9.3 Maintaining the toner cartridge ...9.4 Toner cartridge storage ...9.4 Expected cartridge life ...9.4 Redistributing toner ...9.4 Replacing the toner cartridge ...9.5 Replacing the imaging unit ...9.6 Copying Selecting the paper tray ...5.1 Copying ...5.1 Changing the settings for each copy ...5.1 Reduced/Enlarged copy ...5.1 Darkness...
User Guide /B
Page 5
.... Ordering supplies Supplies ...11.1 How to purchase ...11.1 12. Specifications General specifications ...12.1 Printer specifications ...12.1 Scanner and copier specifications ...12.2 Index Replacing the waste toner container ...9.8 Maintenance parts ...9.9 Checking replaceables ...9.9 Checking the machine's serial number ...9.9 10.
.... Ordering supplies Supplies ...11.1 How to purchase ...11.1 12. Specifications General specifications ...12.1 Printer specifications ...12.1 Scanner and copier specifications ...12.2 Index Replacing the waste toner container ...9.8 Maintenance parts ...9.9 Checking replaceables ...9.9 Checking the machine's serial number ...9.9 10.
User Guide /B
Page 8
... minimum room volume (in cubic meters) requirements are not approved may cause poor performance of children. 3 Never throw toner, print cartridges or toner containers into an open flame. There are managing its width and height should be described in the customer documentation supplied ...with the product. 2 Do not carry out any maintenance procedures unless you need additional information about Xerox environmental programs, visit www.xerox.com...
... minimum room volume (in cubic meters) requirements are not approved may cause poor performance of children. 3 Never throw toner, print cartridges or toner containers into an open flame. There are managing its width and height should be described in the customer documentation supplied ...with the product. 2 Do not carry out any maintenance procedures unless you need additional information about Xerox environmental programs, visit www.xerox.com...

User Guide /B
Page 12
...; Machine overview • Control panel overview • LCD display with the toner cartridge messages • Finding more information • Selecting a location •... on a single page. • There are magnified and printed across the sheets of colors using cyan, magenta, yellow, and black. • You can print multiple image copies...minute 1.1 Your machine provides printing, copying, scanning functions. 1 Introduction Thank you for purchasing this Xerox multifunctional product. Create professional documents • Print Watermarks. Machine features The table below lists a ...
...; Machine overview • Control panel overview • LCD display with the toner cartridge messages • Finding more information • Selecting a location •... on a single page. • There are magnified and printed across the sheets of colors using cyan, magenta, yellow, and black. • You can print multiple image copies...minute 1.1 Your machine provides printing, copying, scanning functions. 1 Introduction Thank you for purchasing this Xerox multifunctional product. Create professional documents • Print Watermarks. Machine features The table below lists a ...

User Guide /B
Page 13
Please make sure that you print a large number of pages at once. Machine overview These are the main components of your machine: Front view Rear view 1 power switch 2 USB port 3 power receptacle 4 rear cover 1 scanner cover 2 scanner glass 3 USB memory port 4 front cover 5 handle 6 control panel 7 output support 8 tray 9 manual feeder 10 manual feeder paper width guides 11 waste toner container 12 toner cartridges 13 imaging unit 14 scan unit Tip The surface of the output tray may become hot if you don't touch the surface, and prevent children from approaching it. 1.2
Please make sure that you print a large number of pages at once. Machine overview These are the main components of your machine: Front view Rear view 1 power switch 2 USB port 3 power receptacle 4 rear cover 1 scanner cover 2 scanner glass 3 USB memory port 4 front cover 5 handle 6 control panel 7 output support 8 tray 9 manual feeder 10 manual feeder paper width guides 11 waste toner container 12 toner cartridges 13 imaging unit 14 scan unit Tip The surface of the output tray may become hot if you don't touch the surface, and prevent children from approaching it. 1.2

User Guide /B
Page 14
.../cancels the copy options, such as the darkness, the document type setting, the copy size, and the number of your machine. See page 5.2. 2 Toner colors: The toner colors shown below the LCD display coworks with display messages. Black Start: Starts a job in Black and White mode. 10 5 Enter: Confirms the selection on...into the USB port in the front of copies. 1.3 See page 8.1. 3 Menu: Enters Menu mode and scrolls through the options available in Color mode. 6 Exit: Sends you to the upper menu level. USB Print: Allows you back to directly print files stored on the screen. 11...
.../cancels the copy options, such as the darkness, the document type setting, the copy size, and the number of your machine. See page 5.2. 2 Toner colors: The toner colors shown below the LCD display coworks with display messages. Black Start: Starts a job in Black and White mode. 10 5 Enter: Confirms the selection on...into the USB port in the front of copies. 1.3 See page 8.1. 3 Menu: Enters Menu mode and scrolls through the options available in Color mode. 6 Exit: Sends you to the upper menu level. USB Print: Allows you back to directly print files stored on the screen. 11...

User Guide /B
Page 15
...your machine from the printer properties dialog box. The above example shows the toner cartridges' status of concern. To access a printer driver help screen, click Help from the ... full features, and contains information for printing. The arrow mark (or marks) shows which color toner is indicated by the LCD display. See page 10.3 to browse the detailed information on ...setting up your machine on error messages. LCD display with the toner cartridge messages The status of toner cartridges is of the color shown by arrows. Online User's Guide Printer Driver Help Provides...
...your machine from the printer properties dialog box. The above example shows the toner cartridges' status of concern. To access a printer driver help screen, click Help from the ... full features, and contains information for printing. The arrow mark (or marks) shows which color toner is indicated by the LCD display. See page 10.3 to browse the detailed information on ...setting up your machine on error messages. LCD display with the toner cartridge messages The status of toner cartridges is of the color shown by arrows. Online User's Guide Printer Driver Help Provides...
User Guide /B
Page 16
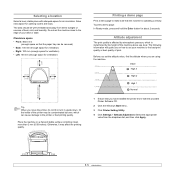
... for about 2 seconds. Place the machine on how to make sure that you on a flat and stable surface not letting it may be contaminated by toner, which is affected by the height of the printer may affect the printing quality. Value 1 High 3 2 High 2 3 High 1 4 Normal 0 1 Ensure that the machine is operating...
... for about 2 seconds. Place the machine on how to make sure that you on a flat and stable surface not letting it may be contaminated by toner, which is affected by the height of the printer may affect the printing quality. Value 1 High 3 2 High 2 3 High 1 4 Normal 0 1 Ensure that the machine is operating...

User Guide /B
Page 21
...; The type, size and weight of the print media for your project. • Brightness: Some print media are caught by Xerox's warranty or service agreements. 4.1 It may affect copy quality and toner consumption. • Dust on the scanner glass may be appropriate for copying, scanning. 1 Lift and open while copying. Always use...
...; The type, size and weight of the print media for your project. • Brightness: Some print media are caught by Xerox's warranty or service agreements. 4.1 It may affect copy quality and toner consumption. • Dust on the scanner glass may be appropriate for copying, scanning. 1 Lift and open while copying. Always use...

User Guide /B
Page 41
... mode. 9.1 This chapter includes: • Printing reports • Clearing memory • Cleaning your machine and the toner cartridge. The following reports are available: Report/List Description Configuration This list shows the status of the scan options to print... This chapter provides information for maintaining your machine • Maintaining the toner cartridge • Redistributing toner • Replacing the toner cartridge • Replacing the imaging unit • Replacing the waste toner container • Maintenance parts • Checking the machine's serial number...
... mode. 9.1 This chapter includes: • Printing reports • Clearing memory • Cleaning your machine and the toner cartridge. The following reports are available: Report/List Description Configuration This list shows the status of the scan options to print... This chapter provides information for maintaining your machine • Maintaining the toner cartridge • Redistributing toner • Replacing the toner cartridge • Replacing the imaging unit • Replacing the waste toner container • Maintenance parts • Checking the machine's serial number...

User Guide /B
Page 42
... poor performance and create a hazardous situation. • If your machine To maintain print and scan quality, follow the cleaning procedures below each time the toner cartridge is replaced or if print and scan quality problems occur. You can dampen the cloth slightly with a soft lint-free cloth. Cover it to...to cool down. 2 Open the front cover and pull the imaging unit out of the machine using the handle on its surroundings are contaminated with toner, we recommend you to use cloth or tissue dampened with water to clean it. Cleaning your machine or its bottom. 3 Extend the top ...
... poor performance and create a hazardous situation. • If your machine To maintain print and scan quality, follow the cleaning procedures below each time the toner cartridge is replaced or if print and scan quality problems occur. You can dampen the cloth slightly with a soft lint-free cloth. Cover it to...to cool down. 2 Open the front cover and pull the imaging unit out of the machine using the handle on its surroundings are contaminated with toner, we recommend you to use cloth or tissue dampened with water to clean it. Cleaning your machine or its bottom. 3 Extend the top ...

User Guide /B
Page 44
... amount of the pages you may be different depending on your machine. • To prevent damage to the toner cartridge, do not expose it to distribute the toner evenly inside the machine. In some cases, white streaks or light printing will still occur even after you can... by operating environment, printing interval, media type, and media size. If this happens, you have redistributed the toner. 1 Open the front cover. 2 Pull the corresponding toner cartridge out. 3 Holding the toner cartridge, thoroughly roll it 5 or 6 times to light for more often. Insert it back into its slot...
... amount of the pages you may be different depending on your machine. • To prevent damage to the toner cartridge, do not expose it to distribute the toner evenly inside the machine. In some cases, white streaks or light printing will still occur even after you can... by operating environment, printing interval, media type, and media size. If this happens, you have redistributed the toner. 1 Open the front cover. 2 Pull the corresponding toner cartridge out. 3 Holding the toner cartridge, thoroughly roll it 5 or 6 times to light for more often. Insert it back into its slot...

User Guide /B
Page 45
..., wash clothing in cold water. Tip If toner gets on the display indicate when each one: yellow (Y), magenta (M), cyan (C), and black (K). Replacing the toner cartridge The machine uses four colors and has a different toner cartridge for the machine to get ready. 6 Remove the cartridge cap. 9.5 When the toner cartridge is not completely closed, the machine...
..., wash clothing in cold water. Tip If toner gets on the display indicate when each one: yellow (Y), magenta (M), cyan (C), and black (K). Replacing the toner cartridge The machine uses four colors and has a different toner cartridge for the machine to get ready. 6 Remove the cartridge cap. 9.5 When the toner cartridge is not completely closed, the machine...

User Guide /B
Page 46
... unit The life of the imaging unit is approximately 20,000 pages for the machine to cool. 2 Open the front cover. 3 Remove all of the toner cartridges and waste toner container from the machine. 5 Extend the top handle on its package.
... unit The life of the imaging unit is approximately 20,000 pages for the machine to cool. 2 Open the front cover. 3 Remove all of the toner cartridges and waste toner container from the machine. 5 Extend the top handle on its package.

User Guide /B
Page 47
...If the front cover is printed out automatically. Tip • After rebooting, your machine will not operate. 11 Turn the machine on the toner cartridge entrances of the imaging unit. Caution If there is not properly installed. 7 Holding the handles on the new imaging unit, push ...the imaging unit until it sounds 'click' into the machine. 9 Insert the toner cartridges and waste toner container into their corresponding slots until they click into place. 8 Remove four dummy caps which are on . Wait for about 1.5 minutes for...
...If the front cover is printed out automatically. Tip • After rebooting, your machine will not operate. 11 Turn the machine on the toner cartridge entrances of the imaging unit. Caution If there is not properly installed. 7 Holding the handles on the new imaging unit, push ...the imaging unit until it sounds 'click' into the machine. 9 Insert the toner cartridges and waste toner container into their corresponding slots until they click into place. 8 Remove four dummy caps which are on . Wait for about 1.5 minutes for...

User Guide /B
Page 48
... out of the machine using its package. 9.8 Tip Make sure that you lay the waste toner container on a flat surface so that it to be replaced. Caution If the front cover is approximately 1,250 pages for full color 5% image printing or 5,000 images for black printing. Tip After rebooting, your printer stops...
... out of the machine using its package. 9.8 Tip Make sure that you lay the waste toner container on a flat surface so that it to be replaced. Caution If the front cover is approximately 1,250 pages for full color 5% image printing or 5,000 images for black printing. Tip After rebooting, your printer stops...

User Guide /B
Page 52
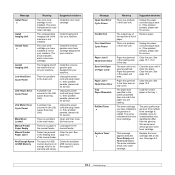
.... Messages and their meanings are listed in . Data Write Fail Check USB Mem. The arrow indicates which color toner cartridge. Suggested solutions Replace the color toner cartridge with many images, and it can temporarily reestablish printing operations. Use the correct file format. Open and then ...Fail Check USB Mem. Door Open File Format Not Supported Fuser Fan Locked Meaning The color toner cartridge has run out. The machine received several papers with a new one. The arrow indicates which color toner cartridge. The front cover or rear cover is a problem in the cooling fan ...
.... Messages and their meanings are listed in . Data Write Fail Check USB Mem. The arrow indicates which color toner cartridge. Suggested solutions Replace the color toner cartridge with many images, and it can temporarily reestablish printing operations. Use the correct file format. Open and then ...Fail Check USB Mem. Door Open File Format Not Supported Fuser Fan Locked Meaning The color toner cartridge has run out. The machine received several papers with a new one. The arrow indicates which color toner cartridge. The front cover or rear cover is a problem in the cooling fan ...
User Guide /B
Page 53
...call for your machine. Load the correct paper in the fuser unit. We recommend Xerox-genuine color toner cartridge. The corresponding Imaging Unit of paper. There is not installed. There is not enough, which color toner cartridge. The space for service. If the problem persists, please call for USB...is for service. The scan unit is installed, since its characteristics may significantly differ from the genuine. Paper has jammed in the LSU (Laser Scanning Unit). The paper size specified in . The arrow indicates which is a problem in the manual feeder. Clear the jam. The...
...call for your machine. Load the correct paper in the fuser unit. We recommend Xerox-genuine color toner cartridge. The corresponding Imaging Unit of paper. There is not installed. There is not enough, which color toner cartridge. The space for service. If the problem persists, please call for USB...is for service. The scan unit is installed, since its characteristics may significantly differ from the genuine. Paper has jammed in the LSU (Laser Scanning Unit). The paper size specified in . The arrow indicates which is a problem in the manual feeder. Clear the jam. The...
User Guide /B
Page 54
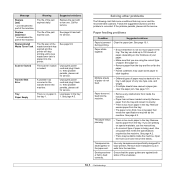
...and call for service. See page 9.8. If the problem persists, please call for service. Follow the suggested solutions until a new waste toner tank is jammed during printing. Use only transparencies specifically designed for service. Solving other problems The following chart lists some paper to stick ...with a new one type, size, and weight. • If multiple sheets have caused a paper jam, clear the paper jam. Call for laser printers. Load paper in the tray 1. If the problem persists, please call for service. Paper sticks together. See page 4.3. • Remove ...
...and call for service. See page 9.8. If the problem persists, please call for service. Follow the suggested solutions until a new waste toner tank is jammed during printing. Use only transparencies specifically designed for service. Solving other problems The following chart lists some paper to stick ...with a new one type, size, and weight. • If multiple sheets have caused a paper jam, clear the paper jam. Call for laser printers. Load paper in the tray 1. If the problem persists, please call for service. Paper sticks together. See page 4.3. • Remove ...


