User Guide
Page 3
... the Toner Cartridges 2.2 Loading Paper ...2.3 Changing the Size of the Paper in the Tray 2.5 Connecting a Printer Cable ...2.6 For Local Printing ...2.6 For Network Printing (Phaser 6110N only 2.6 Turning the Printer On ...2.7 Printing a Demo Page ...2.7 Installing the Printer Software 2.7 System Requirements ...2.8 Printer Driver Features ...2.8 3.Using Print Materials Choosing Paper and Other Materials 3.1 Type and Capacities ...3.1 Guidelines for Paper...
... the Toner Cartridges 2.2 Loading Paper ...2.3 Changing the Size of the Paper in the Tray 2.5 Connecting a Printer Cable ...2.6 For Local Printing ...2.6 For Network Printing (Phaser 6110N only 2.6 Turning the Printer On ...2.7 Printing a Demo Page ...2.7 Installing the Printer Software 2.7 System Requirements ...2.8 Printer Driver Features ...2.8 3.Using Print Materials Choosing Paper and Other Materials 3.1 Type and Capacities ...3.1 Guidelines for Paper...
User Guide
Page 4
... Quality Problems 6.5 Troubleshooting Error Messages 6.8 LED status legend ...6.8 Common Windows Problems 6.8 Common Macintosh Problems 6.8 Common Linux Problems ...6.9 7.Using Your Printer on a Network About Sharing the Printer on a Network 7.1 Setting Up a Network-Connected Printer (Phaser 6110N only 7.1 8.Specifications Printer Specifications ...8.1 Paper Specifications ...8.1 Overview ...8.1 Supported Sizes of Paper 8.2 Guidelines for Using Paper 8.2 Paper Specifications ...8.3 Paper Output Capacity ...8.3 Paper...
... Quality Problems 6.5 Troubleshooting Error Messages 6.8 LED status legend ...6.8 Common Windows Problems 6.8 Common Macintosh Problems 6.8 Common Linux Problems ...6.9 7.Using Your Printer on a Network About Sharing the Printer on a Network 7.1 Setting Up a Network-Connected Printer (Phaser 6110N only 7.1 8.Specifications Printer Specifications ...8.1 Paper Specifications ...8.1 Overview ...8.1 Supported Sizes of Paper 8.2 Guidelines for Using Paper 8.2 Paper Specifications ...8.3 Paper Output Capacity ...8.3 Paper...

User Guide
Page 5
...print multiple pages, the surface of the output tray may become hot. Laser Safety Statement The printer is certified in the literature accompanying the machine. 4 If an operating instruction appears to laser radiation above a Class I laser product conforming to a qualified service technician when repair work by a qualified...21 CFR, chapter 1 Subchapter J for cleaning. 6 Do not place the machine on an unstable cart, stand or table. The laser system and printer are not considered to be followed to reduce risk of fire, electric shock, and injury to rest on the power. Be careful...
...print multiple pages, the surface of the output tray may become hot. Laser Safety Statement The printer is certified in the literature accompanying the machine. 4 If an operating instruction appears to laser radiation above a Class I laser product conforming to a qualified service technician when repair work by a qualified...21 CFR, chapter 1 Subchapter J for cleaning. 6 Do not place the machine on an unstable cart, stand or table. The laser system and printer are not considered to be followed to reduce risk of fire, electric shock, and injury to rest on the power. Be careful...
User Guide
Page 6
... that interference will not occur in accordance with Part 15 of the Industry and Science Canada. Power Saver This printer contains advanced energy conservation technology that reduces power consumption when it should not be determined by the manufacturer responsible for...& Electronic Equipment) (Applicable in an environmentally responsible manner. If you need additional information about ozone, please contact your nearest Xerox dealer. This product should not be operated in a residential installation. CAUTION: Changes or modifications not expressly approved by turning the...
... that interference will not occur in accordance with Part 15 of the Industry and Science Canada. Power Saver This printer contains advanced energy conservation technology that reduces power consumption when it should not be determined by the manufacturer responsible for...& Electronic Equipment) (Applicable in an environmentally responsible manner. If you need additional information about ozone, please contact your nearest Xerox dealer. This product should not be operated in a residential installation. CAUTION: Changes or modifications not expressly approved by turning the...

User Guide
Page 8
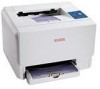
...colour with excellent quality and speed • You can manually print on the Phaser 6110N. • Your printer is compatible with Macintosh and various Linux OS. • Your printer comes with a USB interface. • The Phaser 6110N comes with a watermark, such as the word "Confidential." For details, ...see the Software Section. • Your printer prints A4-sized paper at 16 ppm in black and...
...colour with excellent quality and speed • You can manually print on the Phaser 6110N. • Your printer is compatible with Macintosh and various Linux OS. • Your printer comes with a USB interface. • The Phaser 6110N comes with a watermark, such as the word "Confidential." For details, ...see the Software Section. • Your printer prints A4-sized paper at 16 ppm in black and...

User Guide
Page 9
...Please make sure that some parts may become hot if you don't touch the surface, and prevent children from the Phaser 6110N and that you print a large number of your printer. Front View Rear View Rear Cover (Open to clear paper jams.) Output Support Front Cover (Open to access the... feeder) Output Tray (Face down) Top Cover (Open to clear paper jams.) Control Panel Handle (See 1.3.) (Use to lift the printer.) Power Switch Network Port* USB Port Power Receptacle * Only the Phaser 6110N comes with a network port. NOTE: The surface of the output tray may be different from your...
...Please make sure that some parts may become hot if you don't touch the surface, and prevent children from the Phaser 6110N and that you print a large number of your printer. Front View Rear View Rear Cover (Open to clear paper jams.) Output Support Front Cover (Open to access the... feeder) Output Tray (Face down) Top Cover (Open to clear paper jams.) Control Panel Handle (See 1.3.) (Use to lift the printer.) Power Switch Network Port* USB Port Power Receptacle * Only the Phaser 6110N comes with a network port. NOTE: The surface of the output tray may be different from your...

User Guide
Page 10
..., open cover, empty paper, not installated waste toner container, or full waste toner container. • The printer is receiving data from both the printer and the computer, and then the printer returns to print. Understanding the Control Panel Toner LEDs Status LED( ) lights red lights red Toner LEDs each...; The each toner cartridge is wrong. • The each toner cartridge is totally exhausted. • The each LED lights red Description The printer is ready to Ready mode. The red LED blinks while the print job is near the end of the print job. The each colour toner...
..., open cover, empty paper, not installated waste toner container, or full waste toner container. • The printer is receiving data from both the printer and the computer, and then the printer returns to print. Understanding the Control Panel Toner LEDs Status LED( ) lights red lights red Toner LEDs each...; The each toner cartridge is wrong. • The each toner cartridge is totally exhausted. • The each LED lights red Description The printer is ready to Ready mode. The red LED blinks while the print job is near the end of the print job. The each colour toner...
User Guide
Page 11
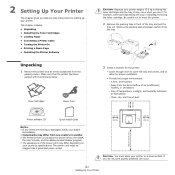
...: You must be plugged into a grounded power socket. for proper ventilation. • Provide the proper environment: - The power cord must place your printer on your printer. Remove the packing tape and paper cushion from the tray. 3 Select a location for setting up your country's specifications. If you step-by-step instructions ..., the SetIP, the User's Guide, and the Adobe Acrobat Reader program. • The appearance of the power cord may move the printer. 2 Remove the packing tape in front of the tray and pull the tray out. Be careful not to move when you use it may ...
...: You must be plugged into a grounded power socket. for proper ventilation. • Provide the proper environment: - The power cord must place your printer on your printer. Remove the packing tape and paper cushion from the tray. 3 Select a location for setting up your country's specifications. If you step-by-step instructions ..., the SetIP, the User's Guide, and the Adobe Acrobat Reader program. • The appearance of the power cord may move the printer. 2 Remove the packing tape in front of the tray and pull the tray out. Be careful not to move when you use it may ...
User Guide
Page 12
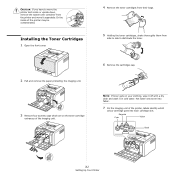
... entrances of the imaging unit. 4 Remove the toner cartridges from their bags. 5 Holding the toner cartridges, shake thoroughly them from the printer and move the printer laid a side or upside down, remove the waste toner container from side to side to distribute the toner. 6 Remove the cartridges cap.... Hot water sets toner into each cartridge slot. Or the inside of the printer, labels identify which are on your clothing, wipe it off with a dry cloth and wash it separately. Installing the Toner Cartridges 1 Open ...
... entrances of the imaging unit. 4 Remove the toner cartridges from their bags. 5 Holding the toner cartridges, shake thoroughly them from the printer and move the printer laid a side or upside down, remove the waste toner container from side to side to distribute the toner. 6 Remove the cartridges cap.... Hot water sets toner into each cartridge slot. Or the inside of the printer, labels identify which are on your clothing, wipe it off with a dry cloth and wash it separately. Installing the Toner Cartridges 1 Open ...

User Guide
Page 13
...of tray until they click into their corresponding slots until it sounds click. 4 Enlarge the tray by adjusting the paper width guide. 2.3 Setting Up Your Printer To load paper: 1 Pull the tray out of 20 lb (75 g/m2) plain paper. 8 Grasp the toner cartridges and align them into place.... CAUTION: If the front cover is shipped with the slots inside the printer. However, the toner cartridge that the cover is securely closed , the printer will not operate. Loading Paper The tray can use various paper including plain paper. Make sure that is...
...of tray until they click into their corresponding slots until it sounds click. 4 Enlarge the tray by adjusting the paper width guide. 2.3 Setting Up Your Printer To load paper: 1 Pull the tray out of 20 lb (75 g/m2) plain paper. 8 Grasp the toner cartridges and align them into place.... CAUTION: If the front cover is shipped with the slots inside the printer. However, the toner cartridge that the cover is securely closed , the printer will not operate. Loading Paper The tray can use various paper including plain paper. Make sure that is...

User Guide
Page 14
...then fan them while holding one edge. For details, see the Software Section. 2.4 Setting Up Your Printer 5 Flex the paper sheets back and forth to overfill the tray and that all four corners are ... 2.5. NOTE: If you loaded. Overfilling the tray may cause a paper jam. 9 Slide the tray back into the printer. NOTE: After you load paper, you need to set up . 7 Squeeze the paper length guide and slide in the... until it lightly touches the end of the paper in the tray, refer to even it up your printer for the paper type, size, and source you want to change the size of the paper stack. ...
...then fan them while holding one edge. For details, see the Software Section. 2.4 Setting Up Your Printer 5 Flex the paper sheets back and forth to overfill the tray and that all four corners are ... 2.5. NOTE: If you loaded. Overfilling the tray may cause a paper jam. 9 Slide the tray back into the printer. NOTE: After you load paper, you need to set up . 7 Squeeze the paper length guide and slide in the... until it lightly touches the end of the paper in the tray, refer to even it up your printer for the paper type, size, and source you want to change the size of the paper stack. ...

User Guide
Page 15
Changing the Size of the Paper in the top of the printer. Squeeze the paper width guide and slide it to the edge of the paper stack without causing it to bend. 2 Pressing and unlatching the guide ... must adjust the paper length guide properly. 1 Pull the tray out of the tray, pull the tray out manually. 3 Load paper into the printer. 2.5 Setting Up Your Printer NOTES: • Do not push the width guide far enough to cause the material to their original positions and adjust the paper length guide...
Changing the Size of the Paper in the top of the printer. Squeeze the paper width guide and slide it to the edge of the paper stack without causing it to bend. 2 Pressing and unlatching the guide ... must adjust the paper length guide properly. 1 Pull the tray out of the tray, pull the tray out manually. 3 Load paper into the printer. 2.5 Setting Up Your Printer NOTES: • Do not push the width guide far enough to cause the material to their original positions and adjust the paper length guide...

User Guide
Page 16
...~10.4. For Network Printing (Phaser 6110N only) You can attach your printer to the USB port of the computer requires a certified USB cable. Connecting a Printer Cable For Local Printing To print from your computer in network interface card. 1 Make sure that both the printer and the computer are turned off... USB 2.0 compliant cable that is not longer than 3 m. 1 Make sure that both the printer and the computer are turned off . 2 Plug the USB cable into a network LAN connection. The Phaser 6110N has a built-in a local environment, you need to the computer with RJ.45 connector). To...
...~10.4. For Network Printing (Phaser 6110N only) You can attach your printer to the USB port of the computer requires a certified USB cable. Connecting a Printer Cable For Local Printing To print from your computer in network interface card. 1 Make sure that both the printer and the computer are turned off... USB 2.0 compliant cable that is not longer than 3 m. 1 Make sure that both the printer and the computer are turned off . 2 Plug the USB cable into a network LAN connection. The Phaser 6110N has a built-in a local environment, you need to the computer with RJ.45 connector). To...

User Guide
Page 17
... the power receptacle on the rear of your printer's features. Be careful not to burn yourself when working inside the printer may give you can print from a Linux environment. Wait for about 1.5 minutes for the printer to the Software Section for information about installing the Xerox printer driver. • Status Monitor. See the Software Section...
... the power receptacle on the rear of your printer's features. Be careful not to burn yourself when working inside the printer may give you can print from a Linux environment. Wait for about 1.5 minutes for the printer to the Software Section for information about installing the Xerox printer driver. • Status Monitor. See the Software Section...
User Guide
Page 18
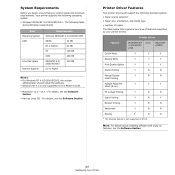
...Printer Printer driver Feature Win98/Me/NT 4.0/2000/XP/ 2003 Linux Macintosh (CUPS) Colour Mode Y Y Y Black & White Y Y Y Print Quality Option Y Y Y Poster Printing Y N N Manual Doublesided Printing Y N N Multiple Pages Per Y Y Y Sheet (N-up) Fit to Page Printing Y N N Scale Printing Y N Y Booklet Printing Y N N Watermark Overlay Y N N Y* N N * The Overlay feature is only supported on the Phaser 6110N...; Windows NT 4.0 is not supported in NT4.0. Printer Driver Features Your printer drivers will support the following standard options: •...
...Printer Printer driver Feature Win98/Me/NT 4.0/2000/XP/ 2003 Linux Macintosh (CUPS) Colour Mode Y Y Y Black & White Y Y Y Print Quality Option Y Y Y Poster Printing Y N N Manual Doublesided Printing Y N N Multiple Pages Per Y Y Y Sheet (N-up) Fit to Page Printing Y N N Scale Printing Y N Y Booklet Printing Y N N Watermark Overlay Y N N Y* N N * The Overlay feature is only supported on the Phaser 6110N...; Windows NT 4.0 is not supported in NT4.0. Printer Driver Features Your printer drivers will support the following standard options: •...

User Guide
Page 19
... does not conform to the specifications listed on page 8.3 can cause problems that does not melt, vaporize, or release hazardous emissions when subjected to the printer's fusing temperature. • Load special paper types one sheet at a time. • Store paper in mind: • Attempting to use multi-part ... vibrant images. • Surface smoothness: The smoothness of the same high quality as tabs or staples. • Do not attempt to the printer. • Sometimes damp paper produces steam during the fusing stage of printing. You must load only one sheet, paper jams will not be ...
... does not conform to the specifications listed on page 8.3 can cause problems that does not melt, vaporize, or release hazardous emissions when subjected to the printer's fusing temperature. • Load special paper types one sheet at a time. • Store paper in mind: • Attempting to use multi-part ... vibrant images. • Surface smoothness: The smoothness of the same high quality as tabs or staples. • Do not attempt to the printer. • Sometimes damp paper produces steam during the fusing stage of printing. You must load only one sheet, paper jams will not be ...

User Guide
Page 20
... printing. Be careful not to touch the surface, and especially keep children away from the tray, load one sheet of paper at a time into the printer. 4 Printing is printing. Do not remove the tray while a job is started. 5 If you want to 100 sheets of the output tray may cause a ... you can also hold a maximum of 150 sheets of special material, such as cards, envelopes, labels, and transparency. For details, see "Loading Paper" on the printer to be facing up with the print side up to check the print quality after the first page prints out, and press the button. It...
... printing. Be careful not to touch the surface, and especially keep children away from the tray, load one sheet of paper at a time into the printer. 4 Printing is printing. Do not remove the tray while a job is started. 5 If you want to 100 sheets of the output tray may cause a ... you can also hold a maximum of 150 sheets of special material, such as cards, envelopes, labels, and transparency. For details, see "Loading Paper" on the printer to be facing up with the print side up to check the print quality after the first page prints out, and press the button. It...

User Guide
Page 21
...length guide and slide it out to start feeding. 3.3 Using Print Materials For details, see the Software Section. 4 Press the button on the printer to start feeding. 3 When you print, set the paper source to Manual Feed and the paper type to peel off during printing, which can... the backing sheet or are not stuck together. • Do not feed stamped envelopes. • Never use envelopes with the stamp area enters the printer first. 3 Slide in succession, the surface of the envelope with clasps, snaps, windows, coated linings, or self-stick adhesives. Exposed areas can cause...
...length guide and slide it out to start feeding. 3.3 Using Print Materials For details, see the Software Section. 4 Press the button on the printer to start feeding. 3 When you print, set the paper source to Manual Feed and the paper type to peel off during printing, which can... the backing sheet or are not stuck together. • Do not feed stamped envelopes. • Never use envelopes with the stamp area enters the printer first. 3 Slide in succession, the surface of the envelope with clasps, snaps, windows, coated linings, or self-stick adhesives. Exposed areas can cause...

User Guide
Page 22
...and slide it out to start feeding. 3 When you load preprinted paper, such as Xerox 3R91334, which can come off of the transparency. For details, see the Software Section. 4 Press the button on the printer to its full length. 2 Load letterhead in the software application. CAUTION: It is... to use paperbacked transparencies such as forms and letterhead, verify that will not melt, vaporize, or release hazardous emissions when subjected to the printer's fusing temperature of transparency in the tray, with the print side up and the top, short edge in spotty printing. • To...
...and slide it out to start feeding. 3 When you load preprinted paper, such as Xerox 3R91334, which can come off of the transparency. For details, see the Software Section. 4 Press the button on the printer to its full length. 2 Load letterhead in the software application. CAUTION: It is... to use paperbacked transparencies such as forms and letterhead, verify that will not melt, vaporize, or release hazardous emissions when subjected to the printer's fusing temperature of transparency in the tray, with the print side up and the top, short edge in spotty printing. • To...

User Guide
Page 23
... is not listed in the Size box in the Paper tab, click the Custom button and set the size manually. 4 Press the button on the printer to Manual Feed and select the appropriate size and type in landscape mode, make this selection using your print material is 8.5in by 14in (216mm... by 5in (index) cards, and other custom-sized materials can be printed with your printer. Inserting these materials long edge first may cause a paper jam. • Do not print on material smaller than 3in (76mm) wide or 5in (127mm) long...
... is not listed in the Size box in the Paper tab, click the Custom button and set the size manually. 4 Press the button on the printer to Manual Feed and select the appropriate size and type in landscape mode, make this selection using your print material is 8.5in by 14in (216mm... by 5in (index) cards, and other custom-sized materials can be printed with your printer. Inserting these materials long edge first may cause a paper jam. • Do not print on material smaller than 3in (76mm) wide or 5in (127mm) long...


