
Troubleshooting Guide
Page 2
... LZW licensed under the copyright laws of Apple Computer, Inc. PANTONE® Colors generated by the Phaser 7300 Color Printer are only obtainable on the screen such as styles, templates, icons, screen displays, looks, etc. Use current PANTONE Color Reference Manuals for energy efficiency. XEROX®, The Document Company®, the stylized X, CentreWare®, DocuPrint®...
... LZW licensed under the copyright laws of Apple Computer, Inc. PANTONE® Colors generated by the Phaser 7300 Color Printer are only obtainable on the screen such as styles, templates, icons, screen displays, looks, etc. Use current PANTONE Color Reference Manuals for energy efficiency. XEROX®, The Document Company®, the stylized X, CentreWare®, DocuPrint®...

Troubleshooting Guide
Page 4
... Xerox Corporation. Select Menus on the front panel and press the OK key. All Rights Reserved. 1 Accessing printable pages Access these pages at the bottom of the page. Print these pages from the Printable Pages Menu: 1. 2. Select Print Menu Map and press the OK key. Phaser® 7300 Color Printer... Resources A large amount of information is stored in your printer as Help Guide) using the Down Arrow or Up Arrow key and press the OK key. Scroll to...
... Xerox Corporation. Select Menus on the front panel and press the OK key. All Rights Reserved. 1 Accessing printable pages Access these pages at the bottom of the page. Print these pages from the Printable Pages Menu: 1. 2. Select Print Menu Map and press the OK key. Phaser® 7300 Color Printer... Resources A large amount of information is stored in your printer as Help Guide) using the Down Arrow or Up Arrow key and press the OK key. Scroll to...

Troubleshooting Guide
Page 5
.... The IP address is the same troubleshooting knowledge base used by Xerox Customer Support. www.xerox.com/officeprinting/infoSMART Interactive Documentation CD-ROM Detailed printer information in a web browser (xxx.xxx.xxx.xxx). PHASER 7300 COLOR PRINTER Help Guide ® Resources CentreWare® Internet Services (IS) Printer management tool that helps System Administrators: • Configure and manage...
.... The IP address is the same troubleshooting knowledge base used by Xerox Customer Support. www.xerox.com/officeprinting/infoSMART Interactive Documentation CD-ROM Detailed printer information in a web browser (xxx.xxx.xxx.xxx). PHASER 7300 COLOR PRINTER Help Guide ® Resources CentreWare® Internet Services (IS) Printer management tool that helps System Administrators: • Configure and manage...

Troubleshooting Guide
Page 8
... Menu using the Down Arrow or Up Arrow key and press the OK key. Copyright © 2002 Xerox Corporation. Phaser® 7300 Color Printer Calibration A large amount of information is stored in your printer as Color Calibration Tutorial or Calibrate Margins) using the Down Arrow or Up Arrow key and press the OK key.... For a complete list of the printable page for this topic. 7300-58 All the printable pages have this format, with color bars at the top and at the printer's front panel. Select Menus on the front panel and press the OK key. The following pages are samples of printable pages...
... Menu using the Down Arrow or Up Arrow key and press the OK key. Copyright © 2002 Xerox Corporation. Phaser® 7300 Color Printer Calibration A large amount of information is stored in your printer as Color Calibration Tutorial or Calibrate Margins) using the Down Arrow or Up Arrow key and press the OK key.... For a complete list of the printable page for this topic. 7300-58 All the printable pages have this format, with color bars at the top and at the printer's front panel. Select Menus on the front panel and press the OK key. The following pages are samples of printable pages...

Troubleshooting Guide
Page 9
... right) contains a large cluster of its surrounding hexagonal gray ring. For example, if cyan is needed, continue with the Balance Colors procedure. Follow the steps on the page. 2. PHASER 7300 COLOR PRINTER Color Calibration Tutorial ® Overview Color calibration procedures adjust the printer for optimal color output. There are replaced. If a finer adjustment of 1 Procedure: 1. Select Lighten/Darken...
... right) contains a large cluster of its surrounding hexagonal gray ring. For example, if cyan is needed, continue with the Balance Colors procedure. Follow the steps on the page. 2. PHASER 7300 COLOR PRINTER Color Calibration Tutorial ® Overview Color calibration procedures adjust the printer for optimal color output. There are replaced. If a finer adjustment of 1 Procedure: 1. Select Lighten/Darken...

Troubleshooting Guide
Page 10
...the following: Accept Changes and Continue: Saves the new value, prints the Color Reference Page and proceeds to select that appears to the Main Menu without saving the adjustment. PHASER 7300 COLOR PRINTER Light Color Balance Step 1. Use the Up Arrow and Down Arrow keys to the ...Dark Color Balance adjustment. The color balance is set properly when Circle 0 most closely matches some portion of ...
...the following: Accept Changes and Continue: Saves the new value, prints the Color Reference Page and proceeds to select that appears to the Main Menu without saving the adjustment. PHASER 7300 COLOR PRINTER Light Color Balance Step 1. Use the Up Arrow and Down Arrow keys to the ...Dark Color Balance adjustment. The color balance is set properly when Circle 0 most closely matches some portion of ...

Troubleshooting Guide
Page 11
... Page and proceeds to blend with some portion of the surrounding gray. Accept Changes and Exit: Saves the new value, prints the Color Reference Page and returns to the Main Menu without saving the adjustment. More Yellow 40 39 ® 41 42 22 38 37 23 21 More ... 30 32 47 31 50 48 49 More Blue Step 2. If it does not, repeat Step 1. Discard Changes and Exit: Returns to the Main Menu. PHASER 7300 COLOR PRINTER Dark Color Balance Step 1. Step 3. Use the Up Arrow and Down Arrow keys to select that appears to the Calibrate...
... Page and proceeds to blend with some portion of the surrounding gray. Accept Changes and Exit: Saves the new value, prints the Color Reference Page and returns to the Main Menu without saving the adjustment. More Yellow 40 39 ® 41 42 22 38 37 23 21 More ... 30 32 47 31 50 48 49 More Blue Step 2. If it does not, repeat Step 1. Discard Changes and Exit: Returns to the Main Menu. PHASER 7300 COLOR PRINTER Dark Color Balance Step 1. Step 3. Use the Up Arrow and Down Arrow keys to select that appears to the Calibrate...

Troubleshooting Guide
Page 12
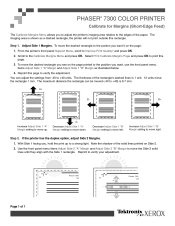
...the rectangle 1 mm. Increase Adjust Side 1 "A" Margin setting to move right. Phaser 7300 Cal Phaser 7300 B - + Cal A - B+ Phaser 7700 Color Printer Phaser 7700 Color Printer Calibrate Margins Phaser 7700 Color Printer Calibrate Margins Phaser 7700 Color Printer Calibrate Margins Calibrate Margins A- Use the front panel menu items Adjust Side 2 "A"...adjustment. ® You can be moved (-40 to verify your adjustment. the printer will not print outside this rectangle. PHASER 7300 COLOR PRINTER Calibrate for Margins (Long-Edge Feed) The Calibrate Margins Menu allows you want it on...
...the rectangle 1 mm. Increase Adjust Side 1 "A" Margin setting to move right. Phaser 7300 Cal Phaser 7300 B - + Cal A - B+ Phaser 7700 Color Printer Phaser 7700 Color Printer Calibrate Margins Phaser 7700 Color Printer Calibrate Margins Phaser 7700 Color Printer Calibrate Margins Calibrate Margins A- Use the front panel menu items Adjust Side 2 "A"...adjustment. ® You can be moved (-40 to verify your adjustment. the printer will not print outside this rectangle. PHASER 7300 COLOR PRINTER Calibrate for Margins (Long-Edge Feed) The Calibrate Margins Menu allows you want it on...
Troubleshooting Guide
Page 13
... moved (-40 to move the rectangle 1 mm. With Side 1 facing you, hold the print up . Scroll to print this rectangle. A+ Phaser 7700 Color Printer Phaser 7700 Color Printer Calibrate Margins Calibrate Margins Phaser 7700 Color Printer Calibrate Margins Phaser 7700 Color Printer Calibrate Margins ® B- Use the front panel menu items Adjust Side 2 "A" Margin and Adjust Side 2 "B" Margin to +40) is 6.7 mm...
... moved (-40 to move the rectangle 1 mm. With Side 1 facing you, hold the print up . Scroll to print this rectangle. A+ Phaser 7700 Color Printer Phaser 7700 Color Printer Calibrate Margins Calibrate Margins Phaser 7700 Color Printer Calibrate Margins Phaser 7700 Color Printer Calibrate Margins ® B- Use the front panel menu items Adjust Side 2 "A" Margin and Adjust Side 2 "B" Margin to +40) is 6.7 mm...

Troubleshooting Guide
Page 14
...; 2002 Xerox Corporation. Print these pages from the Printable Pages Menu: 1. 2. Accessing printable pages Access these pages at the bottom of the printable page for this topic. 7300-58 All the printable pages have this format, with color bars at the top and at the printer's front panel...samples of the page. Menu Map For a complete list of information is stored in your printer as Diagnosing Print Quality) using the Down Arrow or Up Arrow key and press the OK key. Phaser® 7300 Color Printer Diagnosing Print Quality A large amount of printable pages, print the Menu Map: 1. 2.
...; 2002 Xerox Corporation. Print these pages from the Printable Pages Menu: 1. 2. Accessing printable pages Access these pages at the bottom of the printable page for this topic. 7300-58 All the printable pages have this format, with color bars at the top and at the printer's front panel...samples of the page. Menu Map For a complete list of information is stored in your printer as Diagnosing Print Quality) using the Down Arrow or Up Arrow key and press the OK key. Phaser® 7300 Color Printer Diagnosing Print Quality A large amount of printable pages, print the Menu Map: 1. 2.

Troubleshooting Guide
Page 15
PHASER 7300 COLOR PRINTER Diagnosing Print Quality Review the five test pages printed with this page: The pages consist of 3 Use the information below are for the problem color. The images shown are rotated 90 degrees. Clean the four LED bars (a) using the cleaning pad supplied with ... persists after cleaning the LED bars, do the following: a. b. With the Imaging Unit in All Colors 1. Open the top cover. Check the toner for reference only. d. From the printer's front panel Support Menu select Improve Print Quality?, then select Print-Quality Tips Page and press OK....
PHASER 7300 COLOR PRINTER Diagnosing Print Quality Review the five test pages printed with this page: The pages consist of 3 Use the information below are for the problem color. The images shown are rotated 90 degrees. Clean the four LED bars (a) using the cleaning pad supplied with ... persists after cleaning the LED bars, do the following: a. b. With the Imaging Unit in All Colors 1. Open the top cover. Check the toner for reference only. d. From the printer's front panel Support Menu select Improve Print Quality?, then select Print-Quality Tips Page and press OK....

Troubleshooting Guide
Page 18
... the frequency of paper and transparency jams, use only Xerox Phaser paper, Xerox Phaser labels, and Xerox Phaser 35 transparencies. see page 11. For proper paper-loading instructions, see the Loading Trays section in the Trays and Paper Guide on the Interactive Documentation CD-ROM. Phaser® 7300 Color Printer Paper Jams In addition to information on preventing jams...
... the frequency of paper and transparency jams, use only Xerox Phaser paper, Xerox Phaser labels, and Xerox Phaser 35 transparencies. see page 11. For proper paper-loading instructions, see the Loading Trays section in the Trays and Paper Guide on the Interactive Documentation CD-ROM. Phaser® 7300 Color Printer Paper Jams In addition to information on preventing jams...

Troubleshooting Guide
Page 19
... jams. Some components behind the right door may be hot. Paper Jams What causes a paper jam? The paper is loaded above the tray's fill line. Phaser® 7300 Color Printer 5 The paper is moist, bent, or folded. Paper jams occur most often under these steps to the labels inside the...
... jams. Some components behind the right door may be hot. Paper Jams What causes a paper jam? The paper is loaded above the tray's fill line. Phaser® 7300 Color Printer 5 The paper is moist, bent, or folded. Paper jams occur most often under these steps to the labels inside the...

Troubleshooting Guide
Page 20
Remove any jammed paper or transparencies. 7300-57 3. Jam at the duplex unit Follow these steps to firmly pull the duplex unit out of the printer. Use the green handle to clear the jam. Flip down the center front plate on the printer to access the green handle to support the duplex unit. 7300-02 Phaser® 7300 Color Printer 6 This also opens Tray 1 underneath to the duplex unit. Paper Jams 2. Refer to the labels inside the printer for jam-clearing instructions. 1. Open the duplex unit: a. Close the right door. b.
Remove any jammed paper or transparencies. 7300-57 3. Jam at the duplex unit Follow these steps to firmly pull the duplex unit out of the printer. Use the green handle to clear the jam. Flip down the center front plate on the printer to access the green handle to support the duplex unit. 7300-02 Phaser® 7300 Color Printer 6 This also opens Tray 1 underneath to the duplex unit. Paper Jams 2. Refer to the labels inside the printer for jam-clearing instructions. 1. Open the duplex unit: a. Close the right door. b.

Troubleshooting Guide
Page 21
Lift the lid of the duplex unit. Remove the jammed paper from the Multi-Purpose Tray on the Interactive Documentation CD-ROM. Phaser® 7300 Color Printer 7 Use both hands to push the duplex unit (and Tray 1) back into the printer. If needed, load paper in the Trays and Paper Guide on the right side of the printer. 7300-03 2. Paper Jams 2. Remove the jammed paper. Replace the lid of the duplex unit. 7300-56 3. 4. 5. For more information, see the Loading Trays section in the Multi-Purpose Tray. Jam at the Multi-Purpose Tray 1.
Lift the lid of the duplex unit. Remove the jammed paper from the Multi-Purpose Tray on the Interactive Documentation CD-ROM. Phaser® 7300 Color Printer 7 Use both hands to push the duplex unit (and Tray 1) back into the printer. If needed, load paper in the Trays and Paper Guide on the right side of the printer. 7300-03 2. Paper Jams 2. Remove the jammed paper. Replace the lid of the duplex unit. 7300-56 3. 4. 5. For more information, see the Loading Trays section in the Multi-Purpose Tray. Jam at the Multi-Purpose Tray 1.

Troubleshooting Guide
Page 22
Use the latch on the right side of the printer to the labels inside the printer for jam-clearing instructions. 1. Lift out each toner cartridge/imaging unit assembly. 7300-05 Phaser® 7300 Color Printer 8 Refer to open the top cover. Caution Avoid touching or handling the LED bars. 7300-04 2. Paper Jams Jam at the top cover Follow these steps to clear the jam.
Use the latch on the right side of the printer to the labels inside the printer for jam-clearing instructions. 1. Lift out each toner cartridge/imaging unit assembly. 7300-05 Phaser® 7300 Color Printer 8 Refer to open the top cover. Caution Avoid touching or handling the LED bars. 7300-04 2. Paper Jams Jam at the top cover Follow these steps to clear the jam.

Troubleshooting Guide
Page 23
Caution Be careful not to light for more than 10 minutes as this might damage them. 7300-06 4. Do not touch the green film on a flat surface. If there is paper jammed in . Avoid exposing the toner cartridge/imaging unit assemblies to place the assembly on the edge of the table or an uneven surface. Place each toner cartridge/imaging unit assembly on the imaging units since this might damage the film. Paper Jams 3. Cover the imaging units with dark paper or the bags they came in the transfer unit area, remove it. 7300-08 Phaser® 7300 Color Printer 9
Caution Be careful not to light for more than 10 minutes as this might damage them. 7300-06 4. Do not touch the green film on a flat surface. If there is paper jammed in . Avoid exposing the toner cartridge/imaging unit assemblies to place the assembly on the edge of the table or an uneven surface. Place each toner cartridge/imaging unit assembly on the imaging units since this might damage the film. Paper Jams 3. Cover the imaging units with dark paper or the bags they came in the transfer unit area, remove it. 7300-08 Phaser® 7300 Color Printer 9

Troubleshooting Guide
Page 24
Rotate the release levers on the fuser and pull out the paper. 7300-91 6. Reseat the fuser. 7300-92 Warning To avoid possible injury, do not touch the printer's fuser rollers; Replace each toner cartridge/imaging unit assembly in the fuser area, remove the fuser for its color. 7300-10 Phaser® 7300 Color Printer 10 If there is paper jammed in the correct location for better access to the jammed paper. Paper Jams 5. they may be hot. 7.
Rotate the release levers on the fuser and pull out the paper. 7300-91 6. Reseat the fuser. 7300-92 Warning To avoid possible injury, do not touch the printer's fuser rollers; Replace each toner cartridge/imaging unit assembly in the fuser area, remove the fuser for its color. 7300-10 Phaser® 7300 Color Printer 10 If there is paper jammed in the correct location for better access to the jammed paper. Paper Jams 5. they may be hot. 7.

Troubleshooting Guide
Page 25
Slowly lower the top cover into place. 7300-11 Jam at the tray Follow these steps to the labels inside the printer for jam-clearing instructions. 1. Refer to clear the jam. On the right side of the printer, open the door specified on the front panel. 7300-01 Warning Be careful when clearing jams. Some components behind the right door may be hot. Paper Jams 8. Phaser® 7300 Color Printer 11
Slowly lower the top cover into place. 7300-11 Jam at the tray Follow these steps to the labels inside the printer for jam-clearing instructions. 1. Refer to clear the jam. On the right side of the printer, open the door specified on the front panel. 7300-01 Warning Be careful when clearing jams. Some components behind the right door may be hot. Paper Jams 8. Phaser® 7300 Color Printer 11

Troubleshooting Guide
Page 26
Close the door that the paper guides are set flush against the paper. Remove any jammed paper. 7300-57 3. 4. Phaser® 7300 Color Printer 12 Make sure that the paper is located correctly in Step 1. Paper Jams 2. Remove any jammed paper. Push the tray back into the printer. Note Even if you opened in the tray and that you don't find any jammed paper, following these steps clears the error and the printer should resume printing. Pull out the tray specified on the front panel. 7300-13 5. 6. 7.
Close the door that the paper guides are set flush against the paper. Remove any jammed paper. 7300-57 3. 4. Phaser® 7300 Color Printer 12 Make sure that the paper is located correctly in Step 1. Paper Jams 2. Remove any jammed paper. Push the tray back into the printer. Note Even if you opened in the tray and that you don't find any jammed paper, following these steps clears the error and the printer should resume printing. Pull out the tray specified on the front panel. 7300-13 5. 6. 7.


