
Troubleshooting Guide
Page 5
... used by Xerox Customer Support. Information includes printer setup, networking, loading trays/paper, driver and printer features, troubleshooting, and support. Select the Technical Support link to help . Provides solutions for printer problems. • Monitor printer and consumable status. • Hotlink to software updates and Technical Support. Select Support. To launch CentreWare IS, enter your Phaser printer driver properties, select...
... used by Xerox Customer Support. Information includes printer setup, networking, loading trays/paper, driver and printer features, troubleshooting, and support. Select the Technical Support link to help . Provides solutions for printer problems. • Monitor printer and consumable status. • Hotlink to software updates and Technical Support. Select Support. To launch CentreWare IS, enter your Phaser printer driver properties, select...

Troubleshooting Guide
Page 19
...A Follow these conditions: I I I I I I I An incorrect paper type was selected in the printer driver. The tray's side and rear guides are not adjusted properly for jam-clearing instructions. 1. Phaser® 7300 Color Printer 5 The paper is loaded above the tray's fill line. paper is moist, bent, or folded. Open... the door labeled A on the right side of the printer. 7300-01 Warning Be careful when clearing ...
...A Follow these conditions: I I I I I I I An incorrect paper type was selected in the printer driver. The tray's side and rear guides are not adjusted properly for jam-clearing instructions. 1. Phaser® 7300 Color Printer 5 The paper is loaded above the tray's fill line. paper is moist, bent, or folded. Open... the door labeled A on the right side of the printer. 7300-01 Warning Be careful when clearing ...

Trays and Paper Guide
Page 17
...paper), envelopes, or labels for automatic 2-sided printing. Phaser® 7300 Color Printer Specialty Printing This section covers: I Transparencies - I ...Manual 2-sided printing - For a list of 75-105 g/m2 (20 - 28 lb. Caution You MUST set the paper type and size in .). bond). Copyright © 2002 Xerox Corporation. see page 24. If you fail to ensure that can damage the printer's fuser. I The printer...Labels - Caution DO NOT use the printer driver to the table on the page: Portrait...
...paper), envelopes, or labels for automatic 2-sided printing. Phaser® 7300 Color Printer Specialty Printing This section covers: I Transparencies - I ...Manual 2-sided printing - For a list of 75-105 g/m2 (20 - 28 lb. Caution You MUST set the paper type and size in .). bond). Copyright © 2002 Xerox Corporation. see page 24. If you fail to ensure that can damage the printer's fuser. I The printer...Labels - Caution DO NOT use the printer driver to the table on the page: Portrait...

Trays and Paper Guide
Page 18
...)5-4 %! PHASER 7300 7300-85 7300-86 2. I Place the side to be towards the back of the tray. I Use for the following sizes: Legal, Tabloid (11 x 17 in.), Tabloid Extra (12 x 18 in the printer drivers. 3. I Select the tray containing the paper. In the printer driver: I Prepunched holes should be printed with the odd-number... 14 for instructions and the wording used in .), Executive, US Folio, A3, SRA3, A5, A6, and B4 JIS. For more information, refer to the printer. Phaser® 7300 Color Printer 13 Insert a stack of the page on the Interactive Documentation CD-ROM.
...)5-4 %! PHASER 7300 7300-85 7300-86 2. I Place the side to be towards the back of the tray. I Use for the following sizes: Legal, Tabloid (11 x 17 in.), Tabloid Extra (12 x 18 in the printer drivers. 3. I Select the tray containing the paper. In the printer driver: I Prepunched holes should be printed with the odd-number... 14 for instructions and the wording used in .), Executive, US Folio, A3, SRA3, A5, A6, and B4 JIS. For more information, refer to the printer. Phaser® 7300 Color Printer 13 Insert a stack of the page on the Interactive Documentation CD-ROM.
Trays and Paper Guide
Page 19
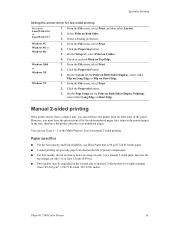
... weights ranging from 105-203 g/m2 (>28-75 lb. However, you can still have the printer print the even-numbered pages. I Print quality may be degraded on both sides of a manual... paper. Click the Properties button. 3. Manual 2-sided printing If the printer doesn't have a duplex unit, you must have the printer print all of the odd-numbered pages first, reinsert the printed pages ... 12 mm (0.48 in the tray, then have the printer print on the second side of printer components. Specialty Printing Setting the printer driver for manual 2-sided printing. You can shorten the life of...
... weights ranging from 105-203 g/m2 (>28-75 lb. However, you can still have the printer print the even-numbered pages. I Print quality may be degraded on both sides of a manual... paper. Click the Properties button. 3. Manual 2-sided printing If the printer doesn't have a duplex unit, you must have the printer print all of the odd-numbered pages first, reinsert the printed pages ... 12 mm (0.48 in the tray, then have the printer print on the second side of printer components. Specialty Printing Setting the printer driver for manual 2-sided printing. You can shorten the life of...
Trays and Paper Guide
Page 20
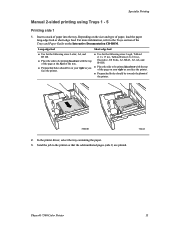
..., and B4 JIS. I Prepunched holes should be on the size and type of the Trays and Paper Guide on your right as you face the printer. In the printer driver, select the tray containing the paper. 3. For more information, refer to be printed facedown with the top of the... the Trays section of paper, load the paper long-edge feed or short-edge feed. Insert a stack of the tray. I Place the side to the printer so that the odd-numbered pages (side 1) are printed. 7300-39 Phaser® 7300 Color Printer 15
..., and B4 JIS. I Prepunched holes should be on the size and type of the Trays and Paper Guide on your right as you face the printer. In the printer driver, select the tray containing the paper. 3. For more information, refer to be printed facedown with the top of the... the Trays section of paper, load the paper long-edge feed or short-edge feed. Insert a stack of the tray. I Place the side to the printer so that the odd-numbered pages (side 1) are printed. 7300-39 Phaser® 7300 Color Printer 15

Trays and Paper Guide
Page 21
... printed side 1 faceup with the top of the page at the back of the tray; (the side to the printer so that the even-numbered pages (side 2) are printed. 7300-45 Phaser® 7300 Color Printer 16 Long-edge feed Short-edge feed I Prepunched holes should be on your left as you face the... 1 faceup with side 1 into the tray. I Prepunched holes should be at the back of the tray. 20)5-4 %! 7300-44 2. Specialty Printing Printing side 2 1. In the printer driver, select the tray containing the paper. 3.
... printed side 1 faceup with the top of the page at the back of the tray; (the side to the printer so that the even-numbered pages (side 2) are printed. 7300-45 Phaser® 7300 Color Printer 16 Long-edge feed Short-edge feed I Prepunched holes should be on your left as you face the... 1 faceup with side 1 into the tray. I Prepunched holes should be at the back of the tray. 20)5-4 %! 7300-44 2. Specialty Printing Printing side 2 1. In the printer driver, select the tray containing the paper. 3.
Trays and Paper Guide
Page 22
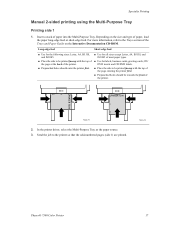
...the following sizes: Letter, A4, B5 JIS, and ISO B5. I Prepunched holes should enter the printer first. Long-edge feed Short-edge feed I Place the side to the Trays section of the printer. I Use for labels, business cards, greeting cards, CD/ DVD inserts and CD/DVD labels. Send...Letter, A4, B5 JIS, and ISO B5 of the page entering the printer first. I Place the side to the printer so that the odd-numbered pages (side 1) are printed. 7300-72 Phaser® 7300 Color Printer 17 In the printer driver, select the Multi-Purpose Tray as the paper source. 3. Insert a stack...
...the following sizes: Letter, A4, B5 JIS, and ISO B5. I Prepunched holes should enter the printer first. Long-edge feed Short-edge feed I Place the side to the Trays section of the printer. I Use for labels, business cards, greeting cards, CD/ DVD inserts and CD/DVD labels. Send...Letter, A4, B5 JIS, and ISO B5 of the page entering the printer first. I Place the side to the printer so that the odd-numbered pages (side 1) are printed. 7300-72 Phaser® 7300 Color Printer 17 In the printer driver, select the Multi-Purpose Tray as the paper source. 3. Insert a stack...

Trays and Paper Guide
Page 23
...is faceup). I Place the printed side 1 facedown with the top of the page at the back of the printer. Send the job to be printed is faceup). Phaser® 7300 Color Printer 18 Depending on your right as the paper source. 3. I Place the printed side 1 facedown with side 1... into the Multi-Purpose Tray. PHASER 2135 PHASER 2135 PHASER 7300 PHASER 7300 7300-46 7300-47 2. I Prepunched holes should toward the back of the tray; (the side to the printer so that the even-numbered pages (side 2) are printed. In the printer driver, select the Multi-Purpose Tray as ...
...is faceup). I Place the printed side 1 facedown with the top of the page at the back of the printer. Send the job to be printed is faceup). Phaser® 7300 Color Printer 18 Depending on your right as the paper source. 3. I Place the printed side 1 facedown with side 1... into the Multi-Purpose Tray. PHASER 2135 PHASER 2135 PHASER 7300 PHASER 7300 7300-46 7300-47 2. I Prepunched holes should toward the back of the tray; (the side to the printer so that the even-numbered pages (side 2) are printed. In the printer driver, select the Multi-Purpose Tray as ...

Trays and Paper Guide
Page 25
Insert the transparencies long-edge feed into the tray. For more information, refer to Change, then press the OK key. PHASER 7300 7300-35 2. MAX 1 2 MAX 7300-81 3. b. Do not load transparencies above the transparency fill line (2), because it may cause a ...and press the OK key to confirm or change the selected paper type: a. Phaser® 7300 Color Printer 20 When the front panel prompts you to save your selection. 4. Specialty Printing Printing transparencies from Tray 1 1. In the printer driver, either select Tray 1 as the paper source or select Transparencies as the ...
Insert the transparencies long-edge feed into the tray. For more information, refer to Change, then press the OK key. PHASER 7300 7300-35 2. MAX 1 2 MAX 7300-81 3. b. Do not load transparencies above the transparency fill line (2), because it may cause a ...and press the OK key to confirm or change the selected paper type: a. Phaser® 7300 Color Printer 20 When the front panel prompts you to save your selection. 4. Specialty Printing Printing transparencies from Tray 1 1. In the printer driver, either select Tray 1 as the paper source or select Transparencies as the ...

Trays and Paper Guide
Page 26
For more information, refer to confirm or change the selected paper type and size: a. b. In the printer driver, either select Multi-Purpose Tray as the paper source or select Transparencies as the paper type. Phaser® 7300 Color Printer 21 Specialty Printing Printing transparencies from the Multi-Purpose Tray 1. Scroll to Transparency and press the OK...
For more information, refer to confirm or change the selected paper type and size: a. b. In the printer driver, either select Multi-Purpose Tray as the paper source or select Transparencies as the paper type. Phaser® 7300 Color Printer 21 Specialty Printing Printing transparencies from the Multi-Purpose Tray 1. Scroll to Transparency and press the OK...

Trays and Paper Guide
Page 28
... save your selection. When the front panel prompts you to confirm or change the selected paper type and size: a. Open the Left Side Output Tray. 4. Phaser® 7300 Color Printer 23 b. In the printer driver, either select Multi-Purpose Tray as the paper source or select Envelopes as the paper type. 5.
... save your selection. When the front panel prompts you to confirm or change the selected paper type and size: a. Open the Left Side Output Tray. 4. Phaser® 7300 Color Printer 23 b. In the printer driver, either select Multi-Purpose Tray as the paper source or select Envelopes as the paper type. 5.

Trays and Paper Guide
Page 30
When the front panel prompts you to Change, then press the OK key. c. Phaser® 7300 Color Printer 25 b. Specialty Printing 2. Insert the sheets short-edge feed into the Multi-Purpose Tray. Place the side to save your selection. In the printer driver, either select Multi-Purpose Tray as the paper source or select the paper... the selected paper type and size: a. Scroll to the correct size and press the OK key to the Trays section of the sheet entering the printer first. For more information, refer to save your selection. 4.
When the front panel prompts you to Change, then press the OK key. c. Phaser® 7300 Color Printer 25 b. Specialty Printing 2. Insert the sheets short-edge feed into the Multi-Purpose Tray. Place the side to save your selection. In the printer driver, either select Multi-Purpose Tray as the paper source or select the paper... the selected paper type and size: a. Scroll to the correct size and press the OK key to the Trays section of the sheet entering the printer first. For more information, refer to save your selection. 4.
Trays and Paper Guide
Page 31
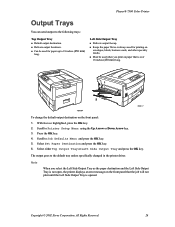
...printing on the front panel: 1. Scroll to the default tray unless specifically changed in the printer driver. Copyright © 2002 Xerox Corporation. I Delivers output facedown. Press the OK key. 4. Phaser® 7300 Color Printer Output Trays You can send output to the following trays: Top Output Tray I Delivers output...used when you select the Left Side Output Tray as the paper destination and the Left Side Output Tray is not open, the printer displays an error message on the front panel that is opened. With Menus highlighted, press the OK key. 2. Select either Top ...
...printing on the front panel: 1. Scroll to the default tray unless specifically changed in the printer driver. Copyright © 2002 Xerox Corporation. I Delivers output facedown. Press the OK key. 4. Phaser® 7300 Color Printer Output Trays You can send output to the following trays: Top Output Tray I Delivers output...used when you select the Left Side Output Tray as the paper destination and the Left Side Output Tray is not open, the printer displays an error message on the front panel that is opened. With Menus highlighted, press the OK key. 2. Select either Top ...

Trays and Paper Guide
Page 32
...tray. Scroll to Printer Setup Menu using the Up Arrow or Down Arrow key and press OK. 3. Select either On or Off by approximately 24 mm (.8 in.) in your printer driver, this overrides the front panel setting for your print jobs. Phaser® 7300 Color Printer 27 You must ...have a hard drive to have the printer offset collated sets. Output Trays Offsetting output When you send output to ...
...tray. Scroll to Printer Setup Menu using the Up Arrow or Down Arrow key and press OK. 3. Select either On or Off by approximately 24 mm (.8 in.) in your printer driver, this overrides the front panel setting for your print jobs. Phaser® 7300 Color Printer 27 You must ...have a hard drive to have the printer offset collated sets. Output Trays Offsetting output When you send output to ...
Trays and Paper Guide
Page 33
...Numerics 2-sided printing automatic 12 driver selections 14 manual 14 A...-Purpose Tray 11 loading in tray 9 menu selections 10 range of sizes supported 8 D driver selections for 2-sided printing 14 duplex unit 12 E envelopes loading in Multi-Purpose Tray 7,...6 in tray 3 long-edge feed in tray 5 M manual 2-sided printing 14 N non-Phaser-35 Series Transparencies 19 O offsetting output 27 output offset 27 output trays 26 P paper loading ...3 paper types automatic 2-sided printing 12 part numbers transparencies 19 Phaser 35-Series Transparencies 19 S short-edge feed in tray 5 size range automatic 2-sided printing...
...Numerics 2-sided printing automatic 12 driver selections 14 manual 14 A...-Purpose Tray 11 loading in tray 9 menu selections 10 range of sizes supported 8 D driver selections for 2-sided printing 14 duplex unit 12 E envelopes loading in Multi-Purpose Tray 7,...6 in tray 3 long-edge feed in tray 5 M manual 2-sided printing 14 N non-Phaser-35 Series Transparencies 19 O offsetting output 27 output offset 27 output trays 26 P paper loading ...3 paper types automatic 2-sided printing 12 part numbers transparencies 19 Phaser 35-Series Transparencies 19 S short-edge feed in tray 5 size range automatic 2-sided printing...
Trays and Paper Guide
Page 34
T Top Output Tray 26 transparencies 19 loading in Multi-Purpose Tray 7, 21 loading in Tray 1 20 transparencies in tray 5 transparency part numbers 19 tray sensors turning on 10 trays loading 2 two-sided printing driver selections 14 manual 14 W weight range automatic 2-sided printing 12 width guide in tray 3 X X dimension of custom size paper 8 Y Y dimension of custom size paper 8 Index Phaser® 7300 Color Printer 29
T Top Output Tray 26 transparencies 19 loading in Multi-Purpose Tray 7, 21 loading in Tray 1 20 transparencies in tray 5 transparency part numbers 19 tray sensors turning on 10 trays loading 2 two-sided printing driver selections 14 manual 14 W weight range automatic 2-sided printing 12 width guide in tray 3 X X dimension of custom size paper 8 Y Y dimension of custom size paper 8 Index Phaser® 7300 Color Printer 29
Service Manual
Page 20
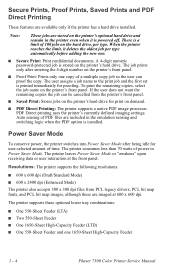
Note: These jobs are stored on the printer's front panel. ■ Proof Print: Prints only one copy of a multiple copy job so the user can be cancelled from PCL legacy drivers, PCL bit map fonts, and PCL bit map images, although these optional lower tray ... type automatically before adding the new one 1650-Sheet High-Capacity Feeder 1 - 4 Phaser 7300 Color Printer Service Manual A 4-digit numeric password-protected job is a limit of 100 jobs on the printer's hard drive. Resolutions: The printer supports the following resolutions: ■ 600 x 600 dpi (Draft/Standard Mode) ...
Note: These jobs are stored on the printer's front panel. ■ Proof Print: Prints only one copy of a multiple copy job so the user can be cancelled from PCL legacy drivers, PCL bit map fonts, and PCL bit map images, although these optional lower tray ... type automatically before adding the new one 1650-Sheet High-Capacity Feeder 1 - 4 Phaser 7300 Color Printer Service Manual A 4-digit numeric password-protected job is a limit of 100 jobs on the printer's hard drive. Resolutions: The printer supports the following resolutions: ■ 600 x 600 dpi (Draft/Standard Mode) ...
Service Manual
Page 62
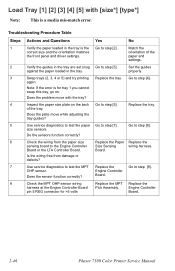
... snug Go to step [6]. properly. 3 Swap trays (2, 3, 4 or 5) and try printing Replace the tray. of the the front panel and driver settings. size sensors. Troubleshooting Procedure Table Steps Actions and Questions Yes No 1 Verify the paper loaded in the tray. Do the sensors function correctly?...the MPT Replace the harness at the Engine Controller Board Pick Assembly. Note: If the error is for +5 volts Board. 2-46 Phaser 7300 Color Printer Service Manual Engine Controller pin 5 REG connector for tray 1 you cannot swap this tray, go on the back Go to the ...
... snug Go to step [6]. properly. 3 Swap trays (2, 3, 4 or 5) and try printing Replace the tray. of the the front panel and driver settings. size sensors. Troubleshooting Procedure Table Steps Actions and Questions Yes No 1 Verify the paper loaded in the tray. Do the sensors function correctly?...the MPT Replace the harness at the Engine Controller Board Pick Assembly. Note: If the error is for +5 volts Board. 2-46 Phaser 7300 Color Printer Service Manual Engine Controller pin 5 REG connector for tray 1 you cannot swap this tray, go on the back Go to the ...

Service Manual
Page 92
...snug against the media. Fan the media and reload into the tray. 4. Use service diagnostics to verify the printer is visible. Check the rollers for excessive wear or damaged. For larger size media, use the additional guides ...-free wipe if debris is properly installed in the tray and that the media settings at the front panel and the driver settings match the media loaded in the tray. 3. Make sure that the media is visible. If the problem occurs in...tray for and remove any debris or obstructions in the tray. d. Replace the tray. 3-76 Phaser 7300 Color Printer Service Manual
...snug against the media. Fan the media and reload into the tray. 4. Use service diagnostics to verify the printer is visible. Check the rollers for excessive wear or damaged. For larger size media, use the additional guides ...-free wipe if debris is properly installed in the tray and that the media settings at the front panel and the driver settings match the media loaded in the tray. 3. Make sure that the media is visible. If the problem occurs in...tray for and remove any debris or obstructions in the tray. d. Replace the tray. 3-76 Phaser 7300 Color Printer Service Manual


