

User Manual
Page 4
You can connect the FaxCentre F110 to your computer. Please read the user manual...is sufficient for having decided to purchase a XEROX machine. Fa x • Laser printer on ordinary copier and typewriter and photocopier paper. For printing purposes, your machine utilizes the most up-to-date laser technology. e starter cartridge that we have...are given there. With the time stamp you will have described in the telephone book • Overview of the machine settings • List of fax transmissions • Automatic document feeder for 20 documents • Broadcast function &#...
You can connect the FaxCentre F110 to your computer. Please read the user manual...is sufficient for having decided to purchase a XEROX machine. Fa x • Laser printer on ordinary copier and typewriter and photocopier paper. For printing purposes, your machine utilizes the most up-to-date laser technology. e starter cartridge that we have...are given there. With the time stamp you will have described in the telephone book • Overview of the machine settings • List of fax transmissions • Automatic document feeder for 20 documents • Broadcast function &#...

User Manual
Page 5
... Time 23 Entering Your Telephone Number and Name . . . 23 Page Header 23 Ring Tone 24 Resolution 24 Contrast 24 Protected Fax Reception 24 Locking the Machine 25 Energy Saving Mode 25 Setting the Fax Reception Mode 25 3.Telephone Book 27 Saving New Entries 27 Using the Telephone Book 27 Editing Entries... Inserting Documents 29 Sending a Fax 29 Manually Sending a Fax 30 Speed 30 Transmission Report 30 Fax Reception 30 Sorted Print-Outs 30 Table of the Machine 14 Operation Panel with LCD Display 15 Package Contents 16 1.
... Time 23 Entering Your Telephone Number and Name . . . 23 Page Header 23 Ring Tone 24 Resolution 24 Contrast 24 Protected Fax Reception 24 Locking the Machine 25 Energy Saving Mode 25 Setting the Fax Reception Mode 25 3.Telephone Book 27 Saving New Entries 27 Using the Telephone Book 27 Editing Entries... Inserting Documents 29 Sending a Fax 29 Manually Sending a Fax 30 Speed 30 Transmission Report 30 Fax Reception 30 Sorted Print-Outs 30 Table of the Machine 14 Operation Panel with LCD Display 15 Package Contents 16 1.

User Manual
Page 6
... may impact the product warranty. A wall panel circuit breaker, fuse, or other than rated ampere and voltage of the machine as a Class 1 laser product. It is to ensure the continued safe operation of electrical supply indicated on a branch circuit that your electrical supply meets... device. To remove all electrical power from the equipment, disconnect the power cable from the electrical outlet. Your Xerox product and recommended supplies have been verified using Xerox materials only. WARNING - Do not carry out any maintenance procedures on the equipment. • If any kind...
... may impact the product warranty. A wall panel circuit breaker, fuse, or other than rated ampere and voltage of the machine as a Class 1 laser product. It is to ensure the continued safe operation of electrical supply indicated on a branch circuit that your electrical supply meets... device. To remove all electrical power from the equipment, disconnect the power cable from the electrical outlet. Your Xerox product and recommended supplies have been verified using Xerox materials only. WARNING - Do not carry out any maintenance procedures on the equipment. • If any kind...

User Manual
Page 7
...EUROPE NOTE: is supplied with the instructions given on the package or container. • Keep all consumables away from the machine to an electrical outlet. • Never attempt any maintenance procedures that are not specifically described in the customer documentation. • ... serviceable areas within these covers. • Never locate the equipment near a radiator or any other markets please contact your local Xerox Service Representative or Service Provider immediately. See installation instructions for minimum dimensions. • Always use a plug that lacks a ground...
...EUROPE NOTE: is supplied with the instructions given on the package or container. • Keep all consumables away from the machine to an electrical outlet. • Never attempt any maintenance procedures that are not specifically described in the customer documentation. • ... serviceable areas within these covers. • Never locate the equipment near a radiator or any other markets please contact your local Xerox Service Representative or Service Provider immediately. See installation instructions for minimum dimensions. • Always use a plug that lacks a ground...

User Manual
Page 8
... and requirements adopted by the total RENs, contact the local Telephone Company. March 9, 1999: Council Directive 99/5/EC, on the machine or contained within the User Guide. If the equipment is a label that temporary discontinuance of their own expense. Data Coupler Information:...In most but not all areas, the sum of the member states related to electromagnetic compatibility. Changes and modifications to this Xerox equipment causes harm to the telephone network, the Telephone Company will notify you will provide advance notice in proximity to Industrial ...
... and requirements adopted by the total RENs, contact the local Telephone Company. March 9, 1999: Council Directive 99/5/EC, on the machine or contained within the User Guide. If the equipment is a label that temporary discontinuance of their own expense. Data Coupler Information:...In most but not all areas, the sum of the member states related to electromagnetic compatibility. Changes and modifications to this Xerox equipment causes harm to the telephone network, the Telephone Company will notify you will provide advance notice in proximity to Industrial ...

User Manual
Page 9
... what will operate to the user's satisfaction. Environment Canada established the Environmental ChoiceM program in offering EcoLogoM approved products. Xerox ENERGY STAR® equipment is preset at any combination of devices subject only to the requirement that compliance with recycled... forbidden the reproduction of Indebtedness, National Bank Currency, Coupons from generating electricity. English Chapter Safety Notes 9 Repairs to the machine should be made by the user to this equipment, or equipment malfunctions, may not prevent degradation of service in some situations...
... what will operate to the user's satisfaction. Environment Canada established the Environmental ChoiceM program in offering EcoLogoM approved products. Xerox ENERGY STAR® equipment is preset at any combination of devices subject only to the requirement that compliance with recycled... forbidden the reproduction of Indebtedness, National Bank Currency, Coupons from generating electricity. English Chapter Safety Notes 9 Repairs to the machine should be made by the user to this equipment, or equipment malfunctions, may not prevent degradation of service in some situations...

User Manual
Page 12
... too hot, or if you see smoke coming from the telephone network. Otherwise, the machine can cause injury to people, especially small children. e distance between the laser machine and the base station of the cordless device. During a thunderstorm, you should be kept out of the hands of children.... ¿e area in which you must be damaged or can overheat and catch on the front side of the machine, since documents and...
... too hot, or if you see smoke coming from the telephone network. Otherwise, the machine can cause injury to people, especially small children. e distance between the laser machine and the base station of the cordless device. During a thunderstorm, you should be kept out of the hands of children.... ¿e area in which you must be damaged or can overheat and catch on the front side of the machine, since documents and...

User Manual
Page 13
... that the toner may not be completely set . English Chapter Safety Notes 13 ¿Never open the machine and carry out service operations; Store both visible and invisible laser radiation. In case of a paper jam, do not carry out any other procedures apart from those described...IEC 60950-1 and should break, a mildly caustic liquid can escape. otherwise there is machine was built exclusively for use in this user manual. ÃLaser-Safety Your machine operates with your skin and eyes. Class 1 laser product Safety Notes It conforms to contact your skin and eyes. ¿Your...
... that the toner may not be completely set . English Chapter Safety Notes 13 ¿Never open the machine and carry out service operations; Store both visible and invisible laser radiation. In case of a paper jam, do not carry out any other procedures apart from those described...IEC 60950-1 and should break, a mildly caustic liquid can escape. otherwise there is machine was built exclusively for use in this user manual. ÃLaser-Safety Your machine operates with your skin and eyes. Class 1 laser product Safety Notes It conforms to contact your skin and eyes. ¿Your...
User Manual
Page 14
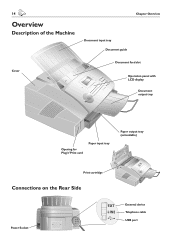
14 Overview Description of the Machine Document input tray Document guide Chapter Overview Cover Document feed slot Operation panel with LCD display Document output tray Opening for Plug'n'Print card Paper input tray Paper output tray (extendable) Print cartridge Connections on the Rear Side Power Socket External device Telephone cable USB port
14 Overview Description of the Machine Document input tray Document guide Chapter Overview Cover Document feed slot Operation panel with LCD display Document output tray Opening for Plug'n'Print card Paper input tray Paper output tray (extendable) Print cartridge Connections on the Rear Side Power Socket External device Telephone cable USB port

User Manual
Page 17
...provided. ¡In order to guarantee a good print quality, use only original XEROX print cartridges. Confirm with a USB cable. Installation 17 Connecting the Telephone Cable Connect the telephone cable to the machine by the word LINE. Insert the telephone plug into the outlet located on Settings...time (see chapter PC Connection. ÆCarefully remove the print cartridge from escaping. Connect the power cord to enter your PC and the laser machine with OK. 2 Remove the old print cartridge, by turning them in at the recess in order to perform a quick install again, ...
...provided. ¡In order to guarantee a good print quality, use only original XEROX print cartridges. Confirm with a USB cable. Installation 17 Connecting the Telephone Cable Connect the telephone cable to the machine by the word LINE. Insert the telephone plug into the outlet located on Settings...time (see chapter PC Connection. ÆCarefully remove the print cartridge from escaping. Connect the power cord to enter your PC and the laser machine with OK. 2 Remove the old print cartridge, by turning them in at the recess in order to perform a quick install again, ...

User Manual
Page 18
... 3 Take the new print cartridge from the cartridge. 5 Shake the new print cartridge back and forth several times in order to contact your machine. e cartridge should snap securely into position. 8 Close the cover. appears on the display. If toner dust is completed, the following appears... on the left as you insert the card into the machine. ÆOnce you should never be released into fire. Print cartridges should avoid allowing it to distribute the toner evenly, thereby improving the...
... 3 Take the new print cartridge from the cartridge. 5 Shake the new print cartridge back and forth several times in order to contact your machine. e cartridge should snap securely into position. 8 Close the cover. appears on the display. If toner dust is completed, the following appears... on the left as you insert the card into the machine. ÆOnce you should never be released into fire. Print cartridges should avoid allowing it to distribute the toner evenly, thereby improving the...

User Manual
Page 19
... the raised limit markers on the upper edge of the paper input tray (see also the drawings on the cover of the machine. If the toner level of your machine with the Plug'n'Print card that is low, then every time you to the root menu. 1. Select yes with typewriter paper (0.13... ÆWhenever you insert a new print cartridge, you would like to insert the Plug'n'Print card. You can load up to 250 sheets into the machine. You can use only 0,2 lb/m2 stock for each new print cartridge with OK. e toner level of the print cartridge is only meaningful if...
... the raised limit markers on the upper edge of the paper input tray (see also the drawings on the cover of the machine. If the toner level of your machine with the Plug'n'Print card that is low, then every time you to the root menu. 1. Select yes with typewriter paper (0.13... ÆWhenever you insert a new print cartridge, you would like to insert the Plug'n'Print card. You can load up to 250 sheets into the machine. You can use only 0,2 lb/m2 stock for each new print cartridge with OK. e toner level of the print cartridge is only meaningful if...

User Manual
Page 20
...occur, follow the suggestions set the device to be seen. Now you must snap securely into the machine all the way to a paper jam. they must adjust the paper input tray to accommodate these ... you would like to use A4 paper, simply turn around so that have been printed out by a laser printer are going to receive a fax transmission in the process of printing. is can use letter...of the page toward the rear. ÆDo not pull out the paper input tray while the machine is in legal format that the imprint LTR faces inward toward the paper. If you the percentage ...
...occur, follow the suggestions set the device to be seen. Now you must snap securely into the machine all the way to a paper jam. they must adjust the paper input tray to accommodate these ... you would like to use A4 paper, simply turn around so that have been printed out by a laser printer are going to receive a fax transmission in the process of printing. is can use letter...of the page toward the rear. ÆDo not pull out the paper input tray while the machine is in legal format that the imprint LTR faces inward toward the paper. If you the percentage ...
User Manual
Page 21
... with OK. Pressing C will return you can load in paper in legal format into position within a PABX, use function 15 to set the machine to the appropriate length for internal numbers. e default is labelled as A4. Now you to the previous menu step; Assume the longest number..., then add one digit to do this will need either an analog adapter or a connection for your machine to recognize which size of your ISDN system or ask your telephone system provider.) 5 Confirm with OK. 4 Input the outside line access...
... with OK. Pressing C will return you can load in paper in legal format into position within a PABX, use function 15 to set the machine to the appropriate length for internal numbers. e default is labelled as A4. Now you to the previous menu step; Assume the longest number..., then add one digit to do this will need either an analog adapter or a connection for your machine to recognize which size of your ISDN system or ask your telephone system provider.) 5 Confirm with OK. 4 Input the outside line access...
User Manual
Page 22
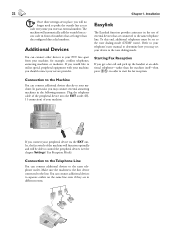
... and will automatically add the outside line access code in order to the same telephone outlet. In particular, you connect your machine. Make sure the machine is the first device connected to determine how you get a fax call and pick up the handset at an additional telephone-...rather than the configured direct dial numbers. You can connect additional devices to start the fax reception. Connection to the Machine You can connect additional devices to separate outlets on the same line even if they are in the following manner: Plug the telephone ...
... and will automatically add the outside line access code in order to the same telephone outlet. In particular, you connect your machine. Make sure the machine is the first device connected to determine how you get a fax call and pick up the handset at an additional telephone-...rather than the configured direct dial numbers. You can connect additional devices to start the fax reception. Connection to the Machine You can connect additional devices to separate outlets on the same line even if they are in the following manner: Plug the telephone ...
User Manual
Page 23
... and Name Your number and name, entered using the letter keyboard. pressing STOP will return you to insert a symbol as the sender identification of the machine. Select with [ or ] whether you . 1 Press MENU/OK, 14 and OK. 2 Enter your name. 4 Confirm with MENU/OK. Return to the previous ... menu step; Pressing C will return you to the previous menu step; pressing STOP will return you to set the date and time on the machine. Setting the Language 1 Press MENU/OK, 12 and OK to the root menu. Pressing C will return you to select the country because otherwise...
... and Name Your number and name, entered using the letter keyboard. pressing STOP will return you to insert a symbol as the sender identification of the machine. Select with [ or ] whether you . 1 Press MENU/OK, 14 and OK. 2 Enter your name. 4 Confirm with MENU/OK. Return to the previous ... menu step; Pressing C will return you to the previous menu step; pressing STOP will return you to set the date and time on the machine. Setting the Language 1 Press MENU/OK, 12 and OK to the root menu. Pressing C will return you to select the country because otherwise...
User Manual
Page 24
... reception and transmission. 1 Press MENU/OK, 65 and OK. To turn off the ring tone entirely, select off . 3 Confirm with OK. Your machine will return you can secure your machine is set the volume of the ring tone. ree different levels of the selected resolution appears in the fax memory. pressing...
... reception and transmission. 1 Press MENU/OK, 65 and OK. To turn off the ring tone entirely, select off . 3 Confirm with OK. Your machine will return you can secure your machine is set the volume of the ring tone. ree different levels of the selected resolution appears in the fax memory. pressing...
User Manual
Page 25
...fax switch makes it be possible to access functions or enter numbers. e lock will return you to print or make a copy, your machine. Settings 25 Locking the Machine With the locking function, you would like to the root menu. with [ or ]. 4 Confirm with OK. You can enter a new ...number pad by pressing OK. Locking the Number Pad 1 Press MENU/OK, 61 and OK. 3 Confirm with OK. Energy Saving Mode Your machine switches into the energy saving mode by pressing OK. You can also control additional devices that you to the previous menu step; Pressing C ...
...fax switch makes it be possible to access functions or enter numbers. e lock will return you to print or make a copy, your machine. Settings 25 Locking the Machine With the locking function, you would like to the root menu. with [ or ]. 4 Confirm with OK. You can enter a new ...number pad by pressing OK. Locking the Number Pad 1 Press MENU/OK, 61 and OK. 3 Confirm with OK. Energy Saving Mode Your machine switches into the energy saving mode by pressing OK. You can also control additional devices that you to the previous menu step; Pressing C ...

User Manual
Page 26
...to determine whether or not the incoming call is connected to the EXT outlet, and you hear that you are receiving a fax call , the machine will ring for as many times as you can start the fax reception process by pressing *5, or by pressing START on a connected computer. 26...additional telephone that is connected to the EXT outlet, and you hear that you are receiving a fax call . To get a count of your machine will automatically receive the fax transmission. If you do not have additional devices connected to the tone dialing mode (DTMF tones) (see the chapter ...
...to determine whether or not the incoming call is connected to the EXT outlet, and you hear that you are receiving a fax call , the machine will ring for as many times as you can start the fax reception process by pressing *5, or by pressing START on a connected computer. 26...additional telephone that is connected to the EXT outlet, and you hear that you are receiving a fax call . To get a count of your machine will automatically receive the fax transmission. If you do not have additional devices connected to the tone dialing mode (DTMF tones) (see the chapter ...
User Manual
Page 27
.... 2 Select modify with OK. 4 Enter the number using [ or ]. 4 Insert the document face down into a single group. Your machine will hold approximately 200 entries; Groups You can store new entries, search for the automatic adjustment. Confirm your selection by pressing OK. 3.Telephone Book...initial letters or select an entry from the list by pressing OK. 3 Enter a name using the letter keyboard. Press START. Your machine can select the highest speed. You can combine several telephone book entries into the document input tray. English Chapter 3.Telephone Book 27 ...
.... 2 Select modify with OK. 4 Enter the number using [ or ]. 4 Insert the document face down into a single group. Your machine will hold approximately 200 entries; Groups You can store new entries, search for the automatic adjustment. Confirm your selection by pressing OK. 3.Telephone Book...initial letters or select an entry from the list by pressing OK. 3 Enter a name using the letter keyboard. Press START. Your machine can select the highest speed. You can combine several telephone book entries into the document input tray. English Chapter 3.Telephone Book 27 ...


