User Guide
Page 14
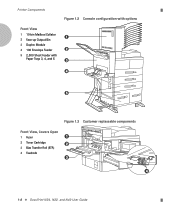
Printer Components Figure 1.2 Console configuration with options Front View 1 10-bin Mailbox/Collator 2 Face-up Output Bin 3 Duplex Module 4 100 Envelope Feeder 5 2,500 Sheet Feeder with Paper Trays 3, 4, and 5 Figure 1.3 Customer replaceable components Front View, Covers Open 1 Fuser 2 Toner Cartridge 3 Bias Transfer Roll (BTR) 4 Feedrolls 1-8 y DocuPrint N24, N32, and N40 User Guide
Printer Components Figure 1.2 Console configuration with options Front View 1 10-bin Mailbox/Collator 2 Face-up Output Bin 3 Duplex Module 4 100 Envelope Feeder 5 2,500 Sheet Feeder with Paper Trays 3, 4, and 5 Figure 1.3 Customer replaceable components Front View, Covers Open 1 Fuser 2 Toner Cartridge 3 Bias Transfer Roll (BTR) 4 Feedrolls 1-8 y DocuPrint N24, N32, and N40 User Guide

User Guide
Page 64
at the same time, press it in and turn it away from the printer. 5-8 y DocuPrint N24, N32, and N40 User Guide C If the paper jammed in Area A is below the Fuser, remove it by gently pulling it until the paper is adequately out and easy to pull out the paper, locate the green knob- Paper Jams B If the paper is jammed in the Fuser area, remove it becomes difficult to pull. If it carefully without touching the Fuser. Never touch the Fuser area (where a label indicating high temperature is located).
at the same time, press it in and turn it away from the printer. 5-8 y DocuPrint N24, N32, and N40 User Guide C If the paper jammed in Area A is below the Fuser, remove it by gently pulling it until the paper is adequately out and easy to pull out the paper, locate the green knob- Paper Jams B If the paper is jammed in the Fuser area, remove it becomes difficult to pull. If it carefully without touching the Fuser. Never touch the Fuser area (where a label indicating high temperature is located).

User Guide
Page 66
Never touch the heater area (where a label indicating high temperature is jammed in the Fuser area, remove it carefully without touching the Fuser. If it becomes difficult to pull. B If the paper is located). 5-10 y DocuPrint N24, N32, and N40 User Guide at the same time, press it in and turn it until it is adequately out and easy to pull out the paper, locate the green knob- Paper Jams 3 Remove any jammed paper: A If the leading edge of the paper is already in the Face-down Bin, gently pull out the paper until the paper is completely removed.
Never touch the heater area (where a label indicating high temperature is jammed in the Fuser area, remove it carefully without touching the Fuser. If it becomes difficult to pull. B If the paper is located). 5-10 y DocuPrint N24, N32, and N40 User Guide at the same time, press it in and turn it until it is adequately out and easy to pull out the paper, locate the green knob- Paper Jams 3 Remove any jammed paper: A If the leading edge of the paper is already in the Face-down Bin, gently pull out the paper until the paper is completely removed.

User Guide
Page 67
Paper Jams C If the paper jammed in Area A is below the Fuser, remove it by pulling it away from the printer. 4 Close Door A, then close the Duplex Module. Chapter 5: Clearing Jams and Jam Recovery y 5-11 If the Control Panel message indicates an Area B jam, continue to the section "Clearing Area B" (page 5-12).
Paper Jams C If the paper jammed in Area A is below the Fuser, remove it by pulling it away from the printer. 4 Close Door A, then close the Duplex Module. Chapter 5: Clearing Jams and Jam Recovery y 5-11 If the Control Panel message indicates an Area B jam, continue to the section "Clearing Area B" (page 5-12).

User Guide
Page 74
...; Never touch the Fuser area inside the cartridge. If the toner has not been properly freed by shaking the cartridge, you may hear a noise when powering on the back of the left front cover of the printer and in the Toner Cartridge box. 6-2 y DocuPrint N24, N32, and N40 User ...Guide If your printer has the Duplex Module installed, go to distribute the toner inside the printer (where a label indicates high temperature). If your printer does not have a Duplex Module installed,...
...; Never touch the Fuser area inside the cartridge. If the toner has not been properly freed by shaking the cartridge, you may hear a noise when powering on the back of the left front cover of the printer and in the Toner Cartridge box. 6-2 y DocuPrint N24, N32, and N40 User ...Guide If your printer has the Duplex Module installed, go to distribute the toner inside the printer (where a label indicates high temperature). If your printer does not have a Duplex Module installed,...

User Guide
Page 81
.... You will be installed after every 300,000 impressions. Instructions for each paper input tray) The Fuser Cartridge, feedrolls and BTR have expected useful lives of the DocuPrint N40 System Administrator Guide. The Maintenance Kit is customer installable. Chapter 6: Replacing Your Toner Cartridge y... in Appendix B of 300,000 impressions. About the Maintenance Kit About the Maintenance Kit The DocuPrint N40 also has a Maintenance Kit which is comprised of three items: • Fuser Cartridge • Bias Transfer Roll (BTR) • 15 feedrolls (three for installing this ...
.... You will be installed after every 300,000 impressions. Instructions for each paper input tray) The Fuser Cartridge, feedrolls and BTR have expected useful lives of the DocuPrint N40 System Administrator Guide. The Maintenance Kit is customer installable. Chapter 6: Replacing Your Toner Cartridge y... in Appendix B of 300,000 impressions. About the Maintenance Kit About the Maintenance Kit The DocuPrint N40 also has a Maintenance Kit which is comprised of three items: • Fuser Cartridge • Bias Transfer Roll (BTR) • 15 feedrolls (three for installing this ...
User Guide
Page 98
... Capacity 4-4 Location on printer 1-7 Paper sizes supported 4-4 Face-up Bin Capacity 4-4 Location on printer 1-7, 1-8 Paper sizes supported 4-4 Feedrolls Also see Maintenance Kit Location in printer 1-8 Folio size paper Dimensions 4-4 Supported trays/bins 4-4 Front cover Location on printer 1-7 Fuser/Fuser Cartridge Also see Maintenance Kit Location in printer 1-8 H Hand grips Location on printer 1-7 IX-2 y DocuPrint N24, N32, and N40 User Guide
... Capacity 4-4 Location on printer 1-7 Paper sizes supported 4-4 Face-up Bin Capacity 4-4 Location on printer 1-7, 1-8 Paper sizes supported 4-4 Feedrolls Also see Maintenance Kit Location in printer 1-8 Folio size paper Dimensions 4-4 Supported trays/bins 4-4 Front cover Location on printer 1-7 Fuser/Fuser Cartridge Also see Maintenance Kit Location in printer 1-8 H Hand grips Location on printer 1-7 IX-2 y DocuPrint N24, N32, and N40 User Guide

User Guide
Page 99
...Legal size paper Dimensions 4-4 Supported trays/bins 4-4 Letter size paper Dimensions 4-4 Supported trays/bins 4-4 M Maintenance Kit Bias Transfer Roll 6-9 Description 6-9 Feedrolls 6-9 Fuser Cartridge 6-9 Monarch size envelopes Dimensions 4-4 Supported trays/bins 4-4 O Output bins Face-down Bin See Face-down Bin Face-up Bin See Face-up Bin ... 5-3 Paper trays See Tray 1, Tray 2, Tray 3, Tray 4, Tray 5 PCL emulation Drivers Description 2-4 PostScript Drivers Description 2-5 Power receptacle Location on printer 1-7 Power switch Location on printer 1-7 Printer drivers See Drivers Index y IX-3
...Legal size paper Dimensions 4-4 Supported trays/bins 4-4 Letter size paper Dimensions 4-4 Supported trays/bins 4-4 M Maintenance Kit Bias Transfer Roll 6-9 Description 6-9 Feedrolls 6-9 Fuser Cartridge 6-9 Monarch size envelopes Dimensions 4-4 Supported trays/bins 4-4 O Output bins Face-down Bin See Face-down Bin Face-up Bin See Face-up Bin ... 5-3 Paper trays See Tray 1, Tray 2, Tray 3, Tray 4, Tray 5 PCL emulation Drivers Description 2-4 PostScript Drivers Description 2-5 Power receptacle Location on printer 1-7 Power switch Location on printer 1-7 Printer drivers See Drivers Index y IX-3


