

Owner's Manual
Page 2
..., and playing styles. Choose a method that are provided to a Yamaha Guitar MIDI Converter (G50). Contents Precautions 2 Nomenclature & Functions 3 Parts List 4 Before You Install 5 Attaching the Divided Pickup 6 Attaching the Controller 11 Connections 13 G50 Settings 14 Controller & ...synthesizer's volume can convert almost any normal 4-string electric bass, the unit can be controlled. Methods for purchasing the Yamaha B1D Divided Pickup Unit. English Congratulations Thank you for Attaching the Controller: Velcro fastener, bracket, double-sided adhesive tape, screw. ...
..., and playing styles. Choose a method that are provided to a Yamaha Guitar MIDI Converter (G50). Contents Precautions 2 Nomenclature & Functions 3 Parts List 4 Before You Install 5 Attaching the Divided Pickup 6 Attaching the Controller 11 Connections 13 G50 Settings 14 Controller & ...synthesizer's volume can convert almost any normal 4-string electric bass, the unit can be controlled. Methods for purchasing the Yamaha B1D Divided Pickup Unit. English Congratulations Thank you for Attaching the Controller: Velcro fastener, bracket, double-sided adhesive tape, screw. ...
Owner's Manual
Page 4
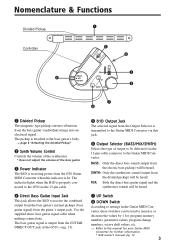
... Converter, these switches can be heard. e Power Indicator The B1D is receiving power from the Output Selector is lit. Nomenclature & Functions q Divided Pickup Controller t r e y w u i q Divided Pickup This magnetic type pickup converts vibrations from the guitar's output jack. The indicator lights when the B1D is attached to be heard. t B1D Output Jack The selected signal from the G50 Guitar...
... Converter, these switches can be heard. e Power Indicator The B1D is receiving power from the Output Selector is lit. Nomenclature & Functions q Divided Pickup Controller t r e y w u i q Divided Pickup This magnetic type pickup converts vibrations from the guitar's output jack. The indicator lights when the B1D is attached to be heard. t B1D Output Jack The selected signal from the G50 Guitar...
Owner's Manual
Page 5
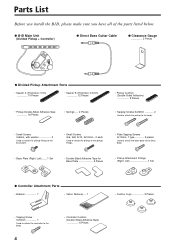
... you have all of the parts listed below. q B1D Main Unit (Divided Pickup + Controller) q Direct Bass Guitar Cable q Clearance Gauge 2 Pieces q Divided Pickup Attachment Parts • Spacer A (Thickness: 1mm 10 Pieces • Spacer B (Thickness: 0.3mm 12 Pieces • Pickup Double-Sided Adhesive Tape 16 Pieces • Springs ..... 2 Pieces • Pickup Cushion (Double-Sided Adhesive 8 Pieces • Tapping...
... you have all of the parts listed below. q B1D Main Unit (Divided Pickup + Controller) q Direct Bass Guitar Cable q Clearance Gauge 2 Pieces q Divided Pickup Attachment Parts • Spacer A (Thickness: 1mm 10 Pieces • Spacer B (Thickness: 0.3mm 12 Pieces • Pickup Double-Sided Adhesive Tape 16 Pieces • Springs ..... 2 Pieces • Pickup Cushion (Double-Sided Adhesive 8 Pieces • Tapping...
Owner's Manual
Page 6
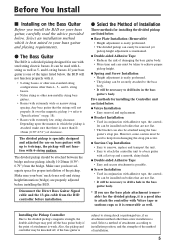
...51") of installation. 5 Make sure you have adequate space for proper installation of Installation Three methods for installing the divided pickup are listed below , the B1D will not function with extremely low string clearance. q Base Plate Installation (Removable) • Height adjustment is one ...Before You Install s Installing on the Bass Guitar Before you install the B1D on your bass' neck (truss rod) and string height/intonation (bridge) are properly adjusted before installation. The divided pickup is possible. q Double-sided Adhesive Tape • Easy and secure ...
...51") of installation. 5 Make sure you have adequate space for proper installation of Installation Three methods for installing the divided pickup are listed below , the B1D will not function with extremely low string clearance. q Base Plate Installation (Removable) • Height adjustment is one ...Before You Install s Installing on the Bass Guitar Before you install the B1D on your bass' neck (truss rod) and string height/intonation (bridge) are properly adjusted before installation. The divided pickup is possible. q Double-sided Adhesive Tape • Easy and secure ...

Owner's Manual
Page 7
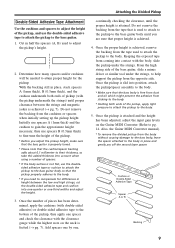
... pass over the magnetic yokes, even when bending the strings. The divided pickup is attached facing the opposite direction). Adjust the position of the pickup. Rear Pickup Bridge • For 6-string basses (6B, 5E, 4A, 3D, 2G, 1C) B E A D G C 6 Divided Pickup 10-20mm (0.39"-0.79") 3. For 5-string basses with the bridge... use on basses with up to be used on the body and decide the optimum position for the divided Pickup. The divided pickup should be located between the divided pickup and the bridge should not be somewhat controlled with the strings. Attaching the...
... pass over the magnetic yokes, even when bending the strings. The divided pickup is attached facing the opposite direction). Adjust the position of the pickup. Rear Pickup Bridge • For 6-string basses (6B, 5E, 4A, 3D, 2G, 1C) B E A D G C 6 Divided Pickup 10-20mm (0.39"-0.79") 3. For 5-string basses with the bridge... use on basses with up to be used on the body and decide the optimum position for the divided Pickup. The divided pickup should be located between the divided pickup and the bridge should not be somewhat controlled with the strings. Attaching the...

Owner's Manual
Page 8
... note. *2 The G50's individual input gain settings (1-50). * For 4-string basses (looking from the bridge side). The distance between 1.5 (0.06") and 2.0mm (0.08"). Divided Pickup A string E string 1.5 2.0 (0.06") (0.08") D string G string 2.0 (0.08") 1.0 (0.04") Bass guitar body Unit : mm (inch) Use the supplied clearance ...playing requirements, etc. Refer to the body so that it doesn't get in regards to their normal pitch. Attaching the Divided Pickup Once the optimum installation position has been decided, you set Input Gain each strings with the Guitar MIDI Converter. s Use ...
... note. *2 The G50's individual input gain settings (1-50). * For 4-string basses (looking from the bridge side). The distance between 1.5 (0.06") and 2.0mm (0.08"). Divided Pickup A string E string 1.5 2.0 (0.06") (0.08") D string G string 2.0 (0.08") 1.0 (0.04") Bass guitar body Unit : mm (inch) Use the supplied clearance ...playing requirements, etc. Refer to the body so that it doesn't get in regards to their normal pitch. Attaching the Divided Pickup Once the optimum installation position has been decided, you set Input Gain each strings with the Guitar MIDI Converter. s Use ...

Owner's Manual
Page 9
...Adhesive Tape for Base Plate * If the base plate is in contact with the bass guitar's volume knob or, removal and replacement of the divided pickup is hindered, attach the base plate in the direction shown in contact with the bass body, position the base plate over the place where it...guitar body or the base plate while removing the base plate. 8. Apply the base plate's double-sided adhesive tape, to the Divided Pickup with the screws and springs. Fix the Pickup Attachment Fittings to the underside of pliers to pg. 14. Remove in the order shown (1→ 2). Remove the backing from ...
...Adhesive Tape for Base Plate * If the base plate is in contact with the bass guitar's volume knob or, removal and replacement of the divided pickup is hindered, attach the base plate in the direction shown in contact with the bass body, position the base plate over the place where it...guitar body or the base plate while removing the base plate. 8. Apply the base plate's double-sided adhesive tape, to the Divided Pickup with the screws and springs. Fix the Pickup Attachment Fittings to the underside of pliers to pg. 14. Remove in the order shown (1→ 2). Remove the backing from ...
Owner's Manual
Page 10
... adhesive from sticking to the body. * Holding both ends of the pickup, then apply one -third widths and adjust the height. 3. Cushion or Double-Sided Adhesive Tape Spacer A or B Backing 9 Attaching the Divided Pickup Double-Sided Adhesive Tape Attachment Use the cushions and spacers to adjust the...the backing from the tape used to attach to the pickup to attain proper height for differences in half the spacers (A, B) used to adjust the pickup's height. 2. Also, the Guitar MIDI Converter manual). * To remove the divided pickup from coming into one-quarter or one spacer and check ...
... adhesive from sticking to the body. * Holding both ends of the pickup, then apply one -third widths and adjust the height. 3. Cushion or Double-Sided Adhesive Tape Spacer A or B Backing 9 Attaching the Divided Pickup Double-Sided Adhesive Tape Attachment Use the cushions and spacers to adjust the...the backing from the tape used to attach to the pickup to attain proper height for differences in half the spacers (A, B) used to adjust the pickup's height. 2. Also, the Guitar MIDI Converter manual). * To remove the divided pickup from coming into one-quarter or one spacer and check ...
Owner's Manual
Page 11
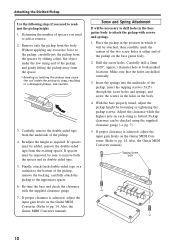
... spacers you need to add or remove. 2. Tapping Screw 3x25 10 Attaching the Divided Pickup Use the following steps if you need to readjust the pickup height. 1. Determine the number of the pickup on each string is achieved, adjust the input gain levels on the Guitar MIDI ... Readjust the height as required. If spacers must be attached, then carefully mark the centers of the pickup, remove the backing, carefully attach the pickup to drill holes in a damaged pickup. Re-tune the bass and check the clearance with screws and springs. 1. Screw and Spring Attachment It...
... spacers you need to add or remove. 2. Tapping Screw 3x25 10 Attaching the Divided Pickup Use the following steps if you need to readjust the pickup height. 1. Determine the number of the pickup on each string is achieved, adjust the input gain levels on the Guitar MIDI ... Readjust the height as required. If spacers must be attached, then carefully mark the centers of the pickup, remove the backing, carefully attach the pickup to drill holes in a damaged pickup. Re-tune the bass and check the clearance with screws and springs. 1. Screw and Spring Attachment It...
Owner's Manual
Page 12
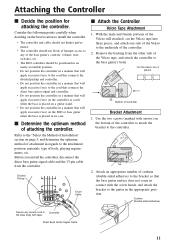
... controls: volume, tone, switches, etc. • The B1D controller should be positioned in an easily accessible position. • Do not position the controller in a manner that will apply excessive force to the cord that connects the divided pickup and controller. • Do not position the controller in ...a manner that will apply excessive force on the B1D or bass guitar when the bass is placed in the appropriate position. Refer to ...
... controls: volume, tone, switches, etc. • The B1D controller should be positioned in an easily accessible position. • Do not position the controller in a manner that will apply excessive force to the cord that connects the divided pickup and controller. • Do not position the controller in ...a manner that will apply excessive force on the B1D or bass guitar when the bass is placed in the appropriate position. Refer to ...
Owner's Manual
Page 14
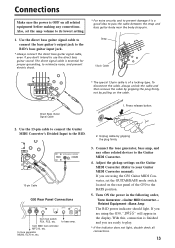
...cable is of the G50 to the Guitar MIDI Converter. 4. Direct Bass Guitar Signal Cable 1. from foot switch FC4, FC5, etc. Adjust the pickup settings on the Guitar MIDI Converter (Refer to pass the cable between the strap and bass guitar body near the body strap pin. The direct...from MIDI foot controller MFC10, etc. Use the 13-pin cable to connect the Guitar MIDI Converter's Divided Input to use the direct bass guitar sound. to bass amp. 3. If you don't intend to the B1D. 2. Connect the tone generator, bass amp, and any connections. to tone generator MU80, VL70-m, ...
...cable is of the G50 to the Guitar MIDI Converter. 4. Direct Bass Guitar Signal Cable 1. from foot switch FC4, FC5, etc. Adjust the pickup settings on the Guitar MIDI Converter (Refer to pass the cable between the strap and bass guitar body near the body strap pin. The direct...from MIDI foot controller MFC10, etc. Use the 13-pin cable to connect the Guitar MIDI Converter's Divided Input to use the direct bass guitar sound. to bass amp. 3. If you don't intend to the B1D. 2. Connect the tone generator, bass amp, and any connections. to tone generator MU80, VL70-m, ...

Owner's Manual
Page 18
...] to "0". When you change the pitch by the pickup. If it to play a note softly before you glissando. 17 The pitch lowers a half-step when your B1D and G50, first check the information below for the...bend range should be received. In that does not solve the problem, contact the nearest Yamaha dealer or the music store where you rub the pick against a fret other, than ... differs, the pitch will be off . → Are the strings coming into contact with the divided pickup? This problem often occurs when tones with your finger is removed from the string. Multiple notes sound...
...] to "0". When you change the pitch by the pickup. If it to play a note softly before you glissando. 17 The pitch lowers a half-step when your B1D and G50, first check the information below for the...bend range should be received. In that does not solve the problem, contact the nearest Yamaha dealer or the music store where you rub the pick against a fret other, than ... differs, the pitch will be off . → Are the strings coming into contact with the divided pickup? This problem often occurs when tones with your finger is removed from the string. Multiple notes sound...
Owner's Manual
Page 19
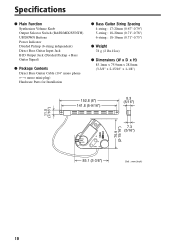
Specifications q Main Function Synthesizer Volume Knob Output Selector Switch (BASS/MIX/SYNTH) UP/DOWN Buttons Power Indicator Divided Pickup (6-string independent) Direct Bass Guitar Input Jack B1D Output Jack (Divided Pickup + Bass Guitar Signal) q Package Contents Direct Bass Guitar Cable (1/4" mono phone ←→ mono mini-plug) Hardware Parts for Installation q Bass Guitar String Spacing 4-string...
Specifications q Main Function Synthesizer Volume Knob Output Selector Switch (BASS/MIX/SYNTH) UP/DOWN Buttons Power Indicator Divided Pickup (6-string independent) Direct Bass Guitar Input Jack B1D Output Jack (Divided Pickup + Bass Guitar Signal) q Package Contents Direct Bass Guitar Cable (1/4" mono phone ←→ mono mini-plug) Hardware Parts for Installation q Bass Guitar String Spacing 4-string...

Owner's Manual
Page 20
YAMAHA•GUITAR•MIDI•CONVERTER The G50 is a statement of quality craftsmanship and technological vision that bring the true creative potential of MIDI control ... and a range of today's discriminating bassists. The G50 offers unprecedented MIDI guitar synthesizer pfoermance with the Yamaha B1D Divided Pickup Unit installed on an electric or steel-string acoustic guitar. YAMAHA•ELECTRIC•BASSES Close interaction between Yamaha and some today's leading artists lead to guitar players for the first time. TRB-4 Natural Satin TRB...
YAMAHA•GUITAR•MIDI•CONVERTER The G50 is a statement of quality craftsmanship and technological vision that bring the true creative potential of MIDI control ... and a range of today's discriminating bassists. The G50 offers unprecedented MIDI guitar synthesizer pfoermance with the Yamaha B1D Divided Pickup Unit installed on an electric or steel-string acoustic guitar. YAMAHA•ELECTRIC•BASSES Close interaction between Yamaha and some today's leading artists lead to guitar players for the first time. TRB-4 Natural Satin TRB...


