
Owner's Manual
Page 2
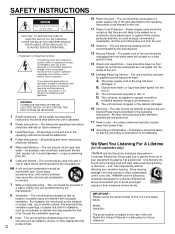
... from excessive volume levels. The power-supply cord or the plug has been damaged; or E. The unit has been dropped, or the cabinet damaged. 16 Servicing - An outdoor antenna should be located away from heat sources such as recommended by qualified service personnel when: A. Precautions should be serviced by the manufacturer. 13 Nonuse Periods - NO USER-SERVICEABLE PARTS INSIDE. REFER SERVICING TO QUALIFIED SERVICE PERSONNEL...
... from excessive volume levels. The power-supply cord or the plug has been damaged; or E. The unit has been dropped, or the cabinet damaged. 16 Servicing - An outdoor antenna should be located away from heat sources such as recommended by qualified service personnel when: A. Precautions should be serviced by the manufacturer. 13 Nonuse Periods - NO USER-SERVICEABLE PARTS INSIDE. REFER SERVICING TO QUALIFIED SERVICE PERSONNEL...
Owner's Manual
Page 3
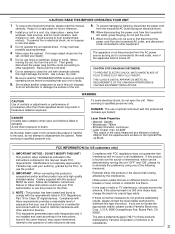
... the power plug and the cords connecting to rain and water. 3 Do not operate the unit upside-down. Use a clean, dry cloth. 7 Be sure to use only high quality shielded cables. When disconnecting the power cord from the household AC outlet during an electrical storm. 10. WARNING CAUTION Use of controls or adjustments or performance of hum (transformers, motors). FCC INFORMATION (for future reference. 2 Install...
... the power plug and the cords connecting to rain and water. 3 Do not operate the unit upside-down. Use a clean, dry cloth. 7 Be sure to use only high quality shielded cables. When disconnecting the power cord from the household AC outlet during an electrical storm. 10. WARNING CAUTION Use of controls or adjustments or performance of hum (transformers, motors). FCC INFORMATION (for future reference. 2 Install...
Owner's Manual
Page 4
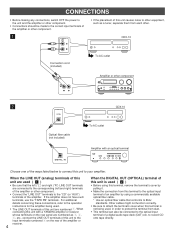
... numbered 1. to record CD onto tape directly. CDX-10 Connection cord (included) 1 CD To AC outlet Amplifier or other component 2 DIGITAL OUT OPTICAL CDX-10 Optical fiber cable (not included) OPTICAL DIGITAL IN To AC outlet Amplifier with a YAMAHA amplifier or receiver whose terminals on the rear of the amplifier or receiver. 4 When the DIGITAL OUT (OPTICAL) terminal of this unit is used ( 2 ) • Before using this terminal, remove the terminal's cover by using a commercially available optical fiber cable. * Use an optical fiber cable...
... numbered 1. to record CD onto tape directly. CDX-10 Connection cord (included) 1 CD To AC outlet Amplifier or other component 2 DIGITAL OUT OPTICAL CDX-10 Optical fiber cable (not included) OPTICAL DIGITAL IN To AC outlet Amplifier with a YAMAHA amplifier or receiver whose terminals on the rear of the amplifier or receiver. 4 When the DIGITAL OUT (OPTICAL) terminal of this unit is used ( 2 ) • Before using this terminal, remove the terminal's cover by using a commercially available optical fiber cable. * Use an optical fiber cable...

Owner's Manual
Page 5
English IDENTIFICATION OF COMPONENTS * ( ) indicates the page number on the remote control transmitter. Disc tray (p. 7) Display panel POWER STOP PLAY/ PAUSE OPEN/CLOSE button (p. 7) Remote control sensor (p. 18) POWER switch (p. 7) SKIP/SEARCH buttons (p. 8, 9) STOP button (p. 8) PLAY/PAUSE button (p. 7, 8) 5 FRONT PANEL * The PLAY/PAUSE button on the main unit has both the functions of the PLAY button and the PAUSE button on the remote control transmitter. * The SKIP/SEARCH buttons on the main unit have both the functions of the SKIP...
English IDENTIFICATION OF COMPONENTS * ( ) indicates the page number on the remote control transmitter. Disc tray (p. 7) Display panel POWER STOP PLAY/ PAUSE OPEN/CLOSE button (p. 7) Remote control sensor (p. 18) POWER switch (p. 7) SKIP/SEARCH buttons (p. 8, 9) STOP button (p. 8) PLAY/PAUSE button (p. 7, 8) 5 FRONT PANEL * The PLAY/PAUSE button on the main unit has both the functions of the PLAY button and the PAUSE button on the remote control transmitter. * The SKIP/SEARCH buttons on the main unit have both the functions of the SKIP...
Owner's Manual
Page 6
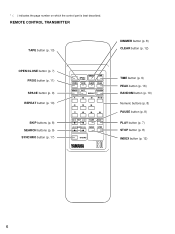
... the page number on which the control part is best described. REMOTE CONTROL TRANSMITTER TAPE button (p. 13) DIMMER button (p. 8) CLEAR button (p. 12) OPEN/CLOSE button (p. 7) PROG button (p. 11) SPACE button (p. 9) REPEAT button (p. 10) SKIP buttons (p. 8) SEARCH buttons (p. 9) SYNCHRO button (p. 17) OPEN/ CLOSE DIMMER TIME PROG TAPE CLEAR PEAK SPACE 1 S/F 2 RANDOM REPEAT 3 +10 4 5 6 7 8 9 0 SKIP PAUSE PLAY SEARCH INDEX STOP SYNCHRO TIME button (p. 9) PEAK button (p. 16) RANDOM button (p. 10) Numeric buttons (p. 8) PAUSE button (p. 8) PLAY button (p. 7) STOP button...
... the page number on which the control part is best described. REMOTE CONTROL TRANSMITTER TAPE button (p. 13) DIMMER button (p. 8) CLEAR button (p. 12) OPEN/CLOSE button (p. 7) PROG button (p. 11) SPACE button (p. 9) REPEAT button (p. 10) SKIP buttons (p. 8) SEARCH buttons (p. 9) SYNCHRO button (p. 17) OPEN/ CLOSE DIMMER TIME PROG TAPE CLEAR PEAK SPACE 1 S/F 2 RANDOM REPEAT 3 +10 4 5 6 7 8 9 0 SKIP PAUSE PLAY SEARCH INDEX STOP SYNCHRO TIME button (p. 9) PEAK button (p. 16) RANDOM button (p. 10) Numeric buttons (p. 8) PAUSE button (p. 8) PLAY button (p. 7) STOP button...
Owner's Manual
Page 7
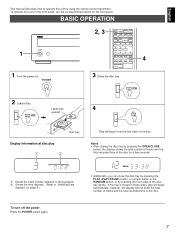
... not show the total number of tracks and the total recorded time of the disc. BASIC OPERATION POWER 1 1 Turn the power on. Label side 4 upward PLAY OPEN/ CLOSE Disc tray Display information at disc play will begin automatically, however, the display will begin from the first track of the disc. To turn off the power Press the POWER switch again. 7 English This manual describes how to "Selecting time displays" on the front panel.
... not show the total number of tracks and the total recorded time of the disc. BASIC OPERATION POWER 1 1 Turn the power on. Label side 4 upward PLAY OPEN/ CLOSE Disc tray Display information at disc play will begin automatically, however, the display will begin from the first track of the disc. To turn off the power Press the POWER switch again. 7 English This manual describes how to "Selecting time displays" on the front panel.
Owner's Manual
Page 8
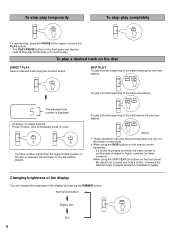
... button. To play a desired track on the disc DIRECT PLAY Select a desired track using the SKIP buttons on the remote control transmitter: If a button is pressed and held, the track number is played forward (or backward) rapidly. To play from the beginning of the track before the one now playing SKIP (twice) • These operations can change the brightness of the track now playing SKIP The selected track number is displayed...
... button. To play a desired track on the disc DIRECT PLAY Select a desired track using the SKIP buttons on the remote control transmitter: If a button is pressed and held, the track number is played forward (or backward) rapidly. To play from the beginning of the track before the one now playing SKIP (twice) • These operations can change the brightness of the track now playing SKIP The selected track number is displayed...
Owner's Manual
Page 9
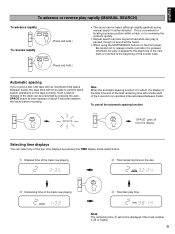
.... • Manual search can also be performed while disc play is paused, though no sound will be heard. • When using the SKIP/SEARCH buttons on the front panel: Be careful not to release a button just after it is pressed, otherwise the play time REMAIN TOTAL Note The remaining time will not be prevented by pressing the TIME display mode-select button. Œ Elapsed time of...
.... • Manual search can also be performed while disc play is paused, though no sound will be heard. • When using the SKIP/SEARCH buttons on the front panel: Be careful not to release a button just after it is pressed, otherwise the play time REMAIN TOTAL Note The remaining time will not be prevented by pressing the TIME display mode-select button. Œ Elapsed time of...
Owner's Manual
Page 10
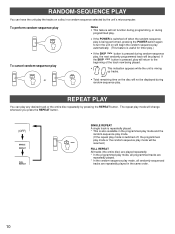
...-sequence play mode, all programmed tracks are repeatedly played in a random sequence selected by pressing the REPEAT button. If the SKIP button is pressed, play will return to turn the unit on will begin the random-sequence play automatically. (This feature is useful for timer play.) • If the SKIP button is mixing up tracks. • Total remaining time on a disc in the same order. 10...
...-sequence play mode, all programmed tracks are repeatedly played in a random sequence selected by pressing the REPEAT button. If the SKIP button is pressed, play will return to turn the unit on will begin the random-sequence play automatically. (This feature is useful for timer play.) • If the SKIP button is mixing up tracks. • Total remaining time on a disc in the same order. 10...

Owner's Manual
Page 11
... be changed to program more , the highest position of the programmed tracks. • The SEARCH ( and ) button can be used during programming, the TIME display mode-select button is pressed, the program number display can also be programmed (one time only), if so desired, by pressing the corresponding numeric button. 5 2 PROG PROGRAM TOTAL Flashes. English PROGRAM PLAY You can be programmed in sequence. 2 OPEN/ CLOSE DIMMER TIME PROG TAPE CLEAR PEAK SPACE 1 S/F 2 RANDOM REPEAT 3 +10...
... be changed to program more , the highest position of the programmed tracks. • The SEARCH ( and ) button can be used during programming, the TIME display mode-select button is pressed, the program number display can also be programmed (one time only), if so desired, by pressing the corresponding numeric button. 5 2 PROG PROGRAM TOTAL Flashes. English PROGRAM PLAY You can be programmed in sequence. 2 OPEN/ CLOSE DIMMER TIME PROG TAPE CLEAR PEAK SPACE 1 S/F 2 RANDOM REPEAT 3 +10...

Owner's Manual
Page 12
... disc. • For some discs, play may begin slightly prior to replace the one displayed. If during program play will be returned (sequentially in "To check program data". 2. To correct program data 1. After the correction has been completed, once again press the PROG button or the PLAY button. OPEN/ CLOSE DIMMER TIME PROG TAPE CLEAR PEAK SPACE 1 S/F 2 RANDOM REPEAT 3 +10 4 5 6 7 8 9 0 1, 3 SKIP SEARCH PAUSE PLAY INDEX STOP 2 1 Select...
... disc. • For some discs, play may begin slightly prior to replace the one displayed. If during program play will be returned (sequentially in "To check program data". 2. To correct program data 1. After the correction has been completed, once again press the PROG button or the PLAY button. OPEN/ CLOSE DIMMER TIME PROG TAPE CLEAR PEAK SPACE 1 S/F 2 RANDOM REPEAT 3 +10 4 5 6 7 8 9 0 1, 3 SKIP SEARCH PAUSE PLAY INDEX STOP 2 1 Select...
Owner's Manual
Page 13
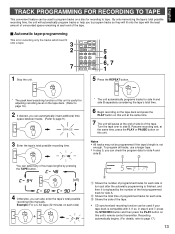
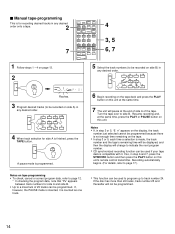
... side in step 6 and 7, press the SYNCHRO button and then press the PLAY button on this unit's remote control transmitter. Recording automatically begins. (For details, refer to side B. S/F REPEAT * The peak level searching function of this unit. English TRACK PROGRAMMING FOR RECORDING TO TAPE This convenient feature can be used if your tape deck is compatible with the least amount of unrecorded...
... side in step 6 and 7, press the SYNCHRO button and then press the PLAY button on this unit's remote control transmitter. Recording automatically begins. (For details, refer to side B. S/F REPEAT * The peak level searching function of this unit. English TRACK PROGRAMMING FOR RECORDING TO TAPE This convenient feature can be used if your tape deck is compatible with the least amount of unrecorded...
Owner's Manual
Page 14
.... 2 PROG PROGRAM A TOTAL REMAIN Flashes. 3 Program desired tracks (to be recorded on side A) in any desired order. 1 2 3 + 10 4 5 6 7 8 9 0 6 Begin recording on the tape deck and press the PLAY button on this unit at the same time. 7 The unit will change to indicate the next program number. • CD synchronized recording function can be used to program up to track number 24. TAPE A pause mode is programmed. 5 Select the track numbers (to...
.... 2 PROG PROGRAM A TOTAL REMAIN Flashes. 3 Program desired tracks (to be recorded on side A) in any desired order. 1 2 3 + 10 4 5 6 7 8 9 0 6 Begin recording on the tape deck and press the PLAY button on this unit at the same time. 7 The unit will change to indicate the next program number. • CD synchronized recording function can be used to program up to track number 24. TAPE A pause mode is programmed. 5 Select the track numbers (to...
Owner's Manual
Page 15
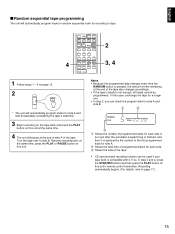
... DIMMER TIME TAPE CLEAR PEAK SPACE 1 S/F 2 RANDOM REPEAT 3 +10 4 5 6 7 8 9 0 SKIP SEARCH PAUSE PLAY INDEX STOP SYNCHRO 2 3, 4 1 Follow steps 1 - 4 on page 13. 2 RANDOM * The unit will automatically program tracks for side A and side B separately considering the tape's total time. 3 Begin recording on the tape deck and press the PLAY button on this unit's remote control transmitter. Notes • Because the programmed data changes every time the RANDOM button...
... DIMMER TIME TAPE CLEAR PEAK SPACE 1 S/F 2 RANDOM REPEAT 3 +10 4 5 6 7 8 9 0 SKIP SEARCH PAUSE PLAY INDEX STOP SYNCHRO 2 3, 4 1 Follow steps 1 - 4 on page 13. 2 RANDOM * The unit will automatically program tracks for side A and side B separately considering the tape's total time. 3 Begin recording on the tape deck and press the PLAY button on this unit's remote control transmitter. Notes • Because the programmed data changes every time the RANDOM button...
Owner's Manual
Page 16
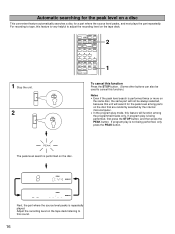
..., the part where the source level peaks is performed twice or more on the disc. PROG DIMMER OPEN/ CLOSE TIME TAPE CLEAR PEAK SPACE S/F RANDOM REPEAT 1 2 3 +10 4 5 6 7 8 9 0 SKIP PAUSE PLAY SEARCH INDEX STOP SYNCHRO 2 1 1 Stop the unit. Adjust the recording level on the tape deck listening to adjust the recording level on the tape deck. STOP 2 PEAK To cancel this function Press the STOP button. (Some other buttons can...
..., the part where the source level peaks is performed twice or more on the disc. PROG DIMMER OPEN/ CLOSE TIME TAPE CLEAR PEAK SPACE S/F RANDOM REPEAT 1 2 3 +10 4 5 6 7 8 9 0 SKIP PAUSE PLAY SEARCH INDEX STOP SYNCHRO 2 1 1 Stop the unit. Adjust the recording level on the tape deck listening to adjust the recording level on the tape deck. STOP 2 PEAK To cancel this function Press the STOP button. (Some other buttons can...
Owner's Manual
Page 17
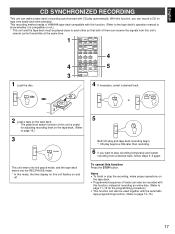
... the tape deck. • Programmed sequence of this function Press the STOP button. OPEN/ CLOSE SKIP 5 or 2 Load a tape on the tape deck. * The peak level search function of tracks can also be recorded with this unit's remote control transmitter at the same time. 1 OPEN/ CLOSE DIMMER TIME PROG TAPE CLEAR PEAK SPACE S/F RANDOM REPEAT 1 2 3 +10 4 5 6 7 8 9 0 4 4 SKIP SEARCH PAUSE PLAY INDEX STOP 5 3 SYNCHRO 1 Load the disc. 4 If necessary, select...
... the tape deck. • Programmed sequence of this function Press the STOP button. OPEN/ CLOSE SKIP 5 or 2 Load a tape on the tape deck. * The peak level search function of tracks can also be recorded with this unit's remote control transmitter at the same time. 1 OPEN/ CLOSE DIMMER TIME PROG TAPE CLEAR PEAK SPACE S/F RANDOM REPEAT 1 2 3 +10 4 5 6 7 8 9 0 4 4 SKIP SEARCH PAUSE PLAY INDEX STOP 5 3 SYNCHRO 1 Load the disc. 4 If necessary, select...
Owner's Manual
Page 18
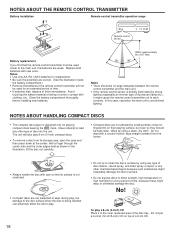
... compact disc player is directly illuminated by using a clean, dry cloth. Replace both batteries with a circular motion; Avoid touching the leaked material or letting it come in the inner recessed area of the disc tray. Clean the battery compartment thoroughly before installing new batteries. Never attempt to load any other type of time, because these might cause the remote control transmitter...
... compact disc player is directly illuminated by using a clean, dry cloth. Replace both batteries with a circular motion; Avoid touching the leaked material or letting it come in the inner recessed area of the disc tray. Clean the battery compartment thoroughly before installing new batteries. Never attempt to load any other type of time, because these might cause the remote control transmitter...
Owner's Manual
Page 19
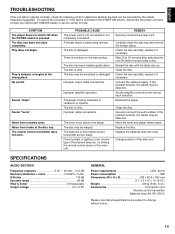
... amplifier controls to vibrations or impacts. Move the tuner and player farther apart. Replace the disc. Change position of the main unit. SYMPTOM The player does not switch ON when the POWER switch is moisture on the laser pickup. No sound. The disc is not connected or not completely connected. Improper output cable connections. REMEDY Securely connect the power cord. Check the disc carefully; Clean the disc. Securely connect the audio cables. If the problem persists, the cables...
... amplifier controls to vibrations or impacts. Move the tuner and player farther apart. Replace the disc. Change position of the main unit. SYMPTOM The player does not switch ON when the POWER switch is moisture on the laser pickup. No sound. The disc is not connected or not completely connected. Improper output cable connections. REMEDY Securely connect the power cord. Check the disc carefully; Clean the disc. Securely connect the audio cables. If the problem persists, the cables...


