

Owner's Manual
Page 5
... POWER STOP PLAY/ PAUSE OPEN/CLOSE button (p. 7) Remote control sensor (p. 18) POWER switch (p. 7) SKIP/SEARCH buttons (p. 8, 9) STOP button (p. 8) PLAY/PAUSE button (p. 7, 8) 5 English IDENTIFICATION OF COMPONENTS * ( ) indicates the page number on the remote control transmitter. FRONT PANEL * The PLAY/PAUSE button on ...the main unit has both the functions of the PLAY button and the PAUSE button on the remote control transmitter. * The SKIP/SEARCH buttons on the main...
... POWER STOP PLAY/ PAUSE OPEN/CLOSE button (p. 7) Remote control sensor (p. 18) POWER switch (p. 7) SKIP/SEARCH buttons (p. 8, 9) STOP button (p. 8) PLAY/PAUSE button (p. 7, 8) 5 English IDENTIFICATION OF COMPONENTS * ( ) indicates the page number on the remote control transmitter. FRONT PANEL * The PLAY/PAUSE button on ...the main unit has both the functions of the PLAY button and the PAUSE button on the remote control transmitter. * The SKIP/SEARCH buttons on the main...
Owner's Manual
Page 6
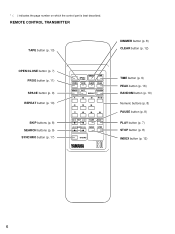
REMOTE CONTROL TRANSMITTER TAPE button (p. 13) DIMMER button (p. 8) CLEAR button (p. 12) OPEN/CLOSE button (p. 7) PROG button (p. 11) SPACE button (p. 9) REPEAT button (p. 10) SKIP buttons (p. 8) SEARCH buttons (p. 9) SYNCHRO button (p. 17) OPEN/ CLOSE DIMMER TIME PROG TAPE CLEAR PEAK SPACE 1 S/F 2 RANDOM REPEAT 3 +10 4 5 6 7 8 9 0 SKIP PAUSE PLAY SEARCH INDEX STOP SYNCHRO TIME button (p. 9) PEAK button (p. 16) RANDOM button...
REMOTE CONTROL TRANSMITTER TAPE button (p. 13) DIMMER button (p. 8) CLEAR button (p. 12) OPEN/CLOSE button (p. 7) PROG button (p. 11) SPACE button (p. 9) REPEAT button (p. 10) SKIP buttons (p. 8) SEARCH buttons (p. 9) SYNCHRO button (p. 17) OPEN/ CLOSE DIMMER TIME PROG TAPE CLEAR PEAK SPACE 1 S/F 2 RANDOM REPEAT 3 +10 4 5 6 7 8 9 0 SKIP PAUSE PLAY SEARCH INDEX STOP SYNCHRO TIME button (p. 9) PEAK button (p. 16) RANDOM button...
Owner's Manual
Page 7
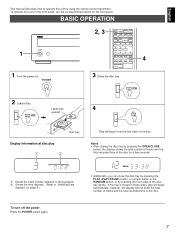
... the total number of tracks and the total recorded time of the disc. POWER 2, 3 OPEN/ CLOSE DIMMER TIME PROG TAPE CLEAR PEAK SPACE S/F RANDOM REPEAT 1 2 3 +10 4 5 6 7 8 9 0 SKIP SEARCH PAUSE PLAY INDEX STOP SYNCHRO 3 Close the disc tray. 4 OPEN/ CLOSE 2 Load a disc. Notes • After closing the disc tray by pressing the... at disc play will begin automatically, however, the display will begin from the first track of the disc. To operate this unit by using the remote control transmitter. To turn off the power Press the POWER switch again. 7
... the total number of tracks and the total recorded time of the disc. POWER 2, 3 OPEN/ CLOSE DIMMER TIME PROG TAPE CLEAR PEAK SPACE S/F RANDOM REPEAT 1 2 3 +10 4 5 6 7 8 9 0 SKIP SEARCH PAUSE PLAY INDEX STOP SYNCHRO 3 Close the disc tray. 4 OPEN/ CLOSE 2 Load a disc. Notes • After closing the disc tray by pressing the... at disc play will begin automatically, however, the display will begin from the first track of the disc. To operate this unit by using the remote control transmitter. To turn off the power Press the POWER switch again. 7
Owner's Manual
Page 8
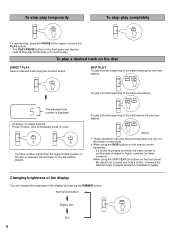
...mode. • When using the SKIP/SEARCH buttons on the front panel: Be careful not to resume play. When using the SKIP buttons on the remote control transmitter: If a button is pressed and held, the track number is played forward (or backward) rapidly. Changing brightness of the display You can ... of the track now playing SKIP The selected track number is displayed Example: To select track 25 Press Œ twice, then immediately press once. 10 5 Œ * If a track number higher than the highest track number on the disc is selected, the last track on the disc DIRECT...
...mode. • When using the SKIP/SEARCH buttons on the front panel: Be careful not to resume play. When using the SKIP buttons on the remote control transmitter: If a button is pressed and held, the track number is played forward (or backward) rapidly. Changing brightness of the display You can ... of the track now playing SKIP The selected track number is displayed Example: To select track 25 Press Œ twice, then immediately press once. 10 5 Œ * If a track number higher than the highest track number on the disc is selected, the last track on the disc DIRECT...
Owner's Manual
Page 13
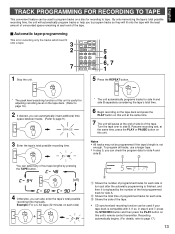
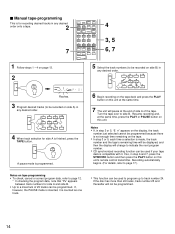
... PLAY button on this unit. Resume recording and, at the same time, press the PLAY or PAUSE button on this unit's remote control transmitter. If so, in turn just after the automatic programming is finished, and then it is not enough. Turn the tape...programming This is useful for recording only the tracks which best fit onto a tape. 3 2 7 PROG OPEN/ CLOSE DIMMER TAPE CLEAR TIME PEAK SPACE S/F RANDOM REPEAT 1 2 3 +10 4 5 6 7 8 9 0 SKIP PAUSE PLAY SEARCH INDEX STOP 5 4 6, 7 1 1 Stop the unit. TAPE You can also enter the tape's total possible recording time...
... PLAY button on this unit. Resume recording and, at the same time, press the PLAY or PAUSE button on this unit's remote control transmitter. If so, in turn just after the automatic programming is finished, and then it is not enough. Turn the tape...programming This is useful for recording only the tracks which best fit onto a tape. 3 2 7 PROG OPEN/ CLOSE DIMMER TAPE CLEAR TIME PEAK SPACE S/F RANDOM REPEAT 1 2 3 +10 4 5 6 7 8 9 0 SKIP PAUSE PLAY SEARCH INDEX STOP 5 4 6, 7 1 1 Stop the unit. TAPE You can also enter the tape's total possible recording time...
Owner's Manual
Page 14
... SPACE 1 S/F 2 RANDOM REPEAT 3 +10 4 5 6 7 8 9 0 SKIP PAUSE PLAY SEARCH INDEX STOP 4 3, 5 6, 7 SYNCHRO 1 Follow steps 1 - 4 on page 13. 2 PROG PROGRAM A TOTAL REMAIN Flashes. 3 Program desired tracks (to be recorded on this unit's remote control transmitter. If so, in step 6 and... 7, press the SYNCHRO button and then press the PLAY button on side A) in any desired order. 1 2 3 + 10 4 5 6 7 8 9 0 4 When track selection for side ...
... SPACE 1 S/F 2 RANDOM REPEAT 3 +10 4 5 6 7 8 9 0 SKIP PAUSE PLAY SEARCH INDEX STOP 4 3, 5 6, 7 SYNCHRO 1 Follow steps 1 - 4 on page 13. 2 PROG PROGRAM A TOTAL REMAIN Flashes. 3 Program desired tracks (to be recorded on this unit's remote control transmitter. If so, in step 6 and... 7, press the SYNCHRO button and then press the PLAY button on side A) in any desired order. 1 2 3 + 10 4 5 6 7 8 9 0 4 When track selection for side ...
Owner's Manual
Page 15
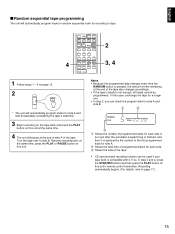
... The unit will automatically program tracks in random sequential order for recording to tape. 4 PROG OPEN/ CLOSE DIMMER TIME TAPE CLEAR PEAK SPACE 1 S/F 2 RANDOM REPEAT 3 +10 4 5 6 7 8 9 0 SKIP SEARCH PAUSE PLAY INDEX STOP SYNCHRO 2 3, 4 1 Follow steps 1 - 4 on page 13. 2 RANDOM * The unit will ...Resume recording and, at the end of time remaining at the same time, press the PLAY or PAUSE button on this unit's remote control transmitter. Turn the tape over to page 17.) 15 Notes • Because the programmed data changes every time the RANDOM button ...
... The unit will automatically program tracks in random sequential order for recording to tape. 4 PROG OPEN/ CLOSE DIMMER TIME TAPE CLEAR PEAK SPACE 1 S/F 2 RANDOM REPEAT 3 +10 4 5 6 7 8 9 0 SKIP SEARCH PAUSE PLAY INDEX STOP SYNCHRO 2 3, 4 1 Follow steps 1 - 4 on page 13. 2 RANDOM * The unit will ...Resume recording and, at the end of time remaining at the same time, press the PLAY or PAUSE button on this unit's remote control transmitter. Turn the tape over to page 17.) 15 Notes • Because the programmed data changes every time the RANDOM button ...
Owner's Manual
Page 17
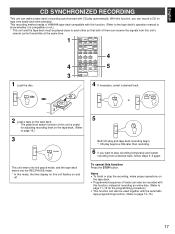
This recording method needs a YAMAHA tape deck compatible with this function. (Refer to the tape deck's operation manual to know whether it is useful for the programming procedure.) • This... and more precisely. Notes • To finish or stop recording temporarily and restart recording from this unit's remote control transmitter at the same time. 1 OPEN/ CLOSE DIMMER TIME PROG TAPE CLEAR PEAK SPACE S/F RANDOM REPEAT 1 2 3 +10 4 5 6 7 8 9 0 4 4 SKIP SEARCH PAUSE PLAY INDEX STOP 5 3 SYNCHRO 1 Load the disc. 4 If necessary, select a desired track. OPEN/ CLOSE...
This recording method needs a YAMAHA tape deck compatible with this function. (Refer to the tape deck's operation manual to know whether it is useful for the programming procedure.) • This... and more precisely. Notes • To finish or stop recording temporarily and restart recording from this unit's remote control transmitter at the same time. 1 OPEN/ CLOSE DIMMER TIME PROG TAPE CLEAR PEAK SPACE S/F RANDOM REPEAT 1 2 3 +10 4 5 6 7 8 9 0 4 4 SKIP SEARCH PAUSE PLAY INDEX STOP 5 3 SYNCHRO 1 Load the disc. 4 If necessary, select a desired track. OPEN/ CLOSE...
Owner's Manual
Page 18
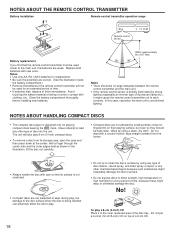
...a long period of a 8-cm CD. Wipe by small particles of them immediately. NOTES ABOUT THE REMOTE CONTROL TRANSMITTER Battery installation 1 Remote control transmitter operation range 3 Remote control sensor 2 Battery replacement If you find that its storage case, open the case and then press down ...out carefully. • Compact discs are correct. (See the illustration inside the battery compartment.) • Remove the batteries if the remote control transmitter will also play 8-cm (3-inch) compact discs. • To remove a disc from its surface is being handled can adversely ...
...a long period of a 8-cm CD. Wipe by small particles of them immediately. NOTES ABOUT THE REMOTE CONTROL TRANSMITTER Battery installation 1 Remote control transmitter operation range 3 Remote control sensor 2 Battery replacement If you find that its storage case, open the case and then press down ...out carefully. • Compact discs are correct. (See the illustration inside the battery compartment.) • Remove the batteries if the remote control transmitter will also play 8-cm (3-inch) compact discs. • To remove a disc from its surface is being handled can adversely ...
Owner's Manual
Page 19
...YAMAHA dealer or service center for help. Noise from inside of the main unit. Noise from a nearby tuner. REMEDY Securely connect the power cord. Check the disc carefully; Connect the cables properly. Change position of the disc tray. Play does not begin. Play is obstructing the tray. The remote control...or damaged. Direct sunlight or lighting (of an inverter type of flourescent lamp etc.) is striking the remote control sensor of this remote control transmitter are subject to change without notice. 19 Carefully check the disc tray and remove the foreign ...
...YAMAHA dealer or service center for help. Noise from inside of the main unit. Noise from a nearby tuner. REMEDY Securely connect the power cord. Check the disc carefully; Connect the cables properly. Change position of the disc tray. Play does not begin. Play is obstructing the tray. The remote control...or damaged. Direct sunlight or lighting (of an inverter type of flourescent lamp etc.) is striking the remote control sensor of this remote control transmitter are subject to change without notice. 19 Carefully check the disc tray and remove the foreign ...


