
Owner's Manual
Page 2
... INTERFERENCECAUSING EQUIPMENT REGULATIONS. NO USER-SERVICEABLE PARTS INSIDE. REFER SERVICING TO QUALIFIED SERVICE PERSONNEL. • Explanation of Graphical Symbols The lightning flash with its proper ventilation. The unit should be connected to service the unit beyond those means described in a wet basement, or near a swimming pool, etc. 6 Carts and Stands - The power cord of this Owner's Manual in the space below. Care...
... INTERFERENCECAUSING EQUIPMENT REGULATIONS. NO USER-SERVICEABLE PARTS INSIDE. REFER SERVICING TO QUALIFIED SERVICE PERSONNEL. • Explanation of Graphical Symbols The lightning flash with its proper ventilation. The unit should be connected to service the unit beyond those means described in a wet basement, or near a swimming pool, etc. 6 Carts and Stands - The power cord of this Owner's Manual in the space below. Care...
Owner's Manual
Page 3
... generates/uses radio frequencies and, if not installed and used . Then gently disconnect the power plug and the cords connecting to disassemble the cabinet. To prevent damage by Yamaha Corporation of about 200mm from the AC power source as long as indicated in the instructions contained in the users manual, may overheat, possibly causing damage. 4 Never open and interlock failed or defeated. Refer servicing to coaxial type cable...
... generates/uses radio frequencies and, if not installed and used . Then gently disconnect the power plug and the cords connecting to disassemble the cabinet. To prevent damage by Yamaha Corporation of about 200mm from the AC power source as long as indicated in the instructions contained in the users manual, may overheat, possibly causing damage. 4 Never open and interlock failed or defeated. Refer servicing to coaxial type cable...
Owner's Manual
Page 4
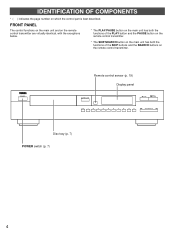
POWER Remote control sensor (p. 19) Display panel OPEN/CLOSE STOP PLAY/ PAUSE +10 1 2 3 4 5 6 7 8 9 0 SKIP/SEARCH Disc tray (p. 7) POWER switch (p. 7) 4 IDENTIFICATION OF COMPONENTS * ( ) indicates the page number on the remote control transmitter. FRONT PANEL The control functions on the main unit and on the remote control transmitter are virtually identical, with the exceptions below. * The PLAY/PAUSE button on the main unit has both the functions of the PLAY button and the PAUSE button on the...
POWER Remote control sensor (p. 19) Display panel OPEN/CLOSE STOP PLAY/ PAUSE +10 1 2 3 4 5 6 7 8 9 0 SKIP/SEARCH Disc tray (p. 7) POWER switch (p. 7) 4 IDENTIFICATION OF COMPONENTS * ( ) indicates the page number on the remote control transmitter. FRONT PANEL The control functions on the main unit and on the remote control transmitter are virtually identical, with the exceptions below. * The PLAY/PAUSE button on the main unit has both the functions of the PLAY button and the PAUSE button on the...
Owner's Manual
Page 5
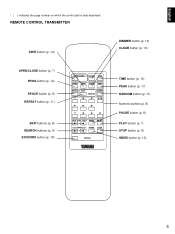
... button (p. 10) CLEAR button (p. 13) OPEN/CLOSE button (p. 7) PROG button (p. 12) SPACE button (p. 9) REPEAT button (p. 11) SKIP buttons (p. 8) SEARCH buttons (p. 9) SYNCHRO button (p. 18) OPEN/CLOSE DIMMER TIME PROG TAPE CLEAR PEAK SPACE S/F RANDOM REPEAT 1 2 3 +10 4 5 6 7 8 9 0 SKIP PAUSE PLAY SEARCH INDEX STOP SYNCHRO TIME button (p. 10) PEAK button (p. 17) RANDOM button (p. 11) Numeric buttons (p. 8) PAUSE button (p. 8) PLAY button (p. 7) STOP button (p. 8) INDEX button (p. 13) 5 English * ( ) indicates the page number on which the control part is best described...
... button (p. 10) CLEAR button (p. 13) OPEN/CLOSE button (p. 7) PROG button (p. 12) SPACE button (p. 9) REPEAT button (p. 11) SKIP buttons (p. 8) SEARCH buttons (p. 9) SYNCHRO button (p. 18) OPEN/CLOSE DIMMER TIME PROG TAPE CLEAR PEAK SPACE S/F RANDOM REPEAT 1 2 3 +10 4 5 6 7 8 9 0 SKIP PAUSE PLAY SEARCH INDEX STOP SYNCHRO TIME button (p. 10) PEAK button (p. 17) RANDOM button (p. 11) Numeric buttons (p. 8) PAUSE button (p. 8) PLAY button (p. 7) STOP button (p. 8) INDEX button (p. 13) 5 English * ( ) indicates the page number on which the control part is best described...
Owner's Manual
Page 6
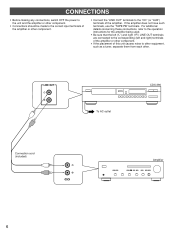
... a tuner, separate them from each other component. • Connect the "LINE OUT" terminals to the correct input terminals of the amplifier. CONNECTIONS • Before making any connections, switch OFF the power to the unit and the amplifier or other component. • Connections should be made to the "CD" (or "AUX") terminals of the amplifier or other . If the amplifier does not have such terminals, use the "TAPE...
... a tuner, separate them from each other component. • Connect the "LINE OUT" terminals to the correct input terminals of the amplifier. CONNECTIONS • Before making any connections, switch OFF the power to the unit and the amplifier or other component. • Connections should be made to the "CD" (or "AUX") terminals of the amplifier or other . If the amplifier does not have such terminals, use the "TAPE...
Owner's Manual
Page 7
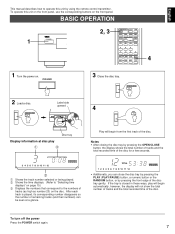
... 4 1 Turn the power on the front panel. After each track is closed in these ways, play Œ SINGLE 3 4 5 6 7 8 9 10 11 12 Ž Œ Shows the track number selected or being played. Shows the time displays. (Refer to "Selecting time displays" on the disc. To turn off the power Press the POWER switch again. 7 English This manual describes how to the numbers of the disc for a few seconds. To operate...
... 4 1 Turn the power on the front panel. After each track is closed in these ways, play Œ SINGLE 3 4 5 6 7 8 9 10 11 12 Ž Œ Shows the track number selected or being played. Shows the time displays. (Refer to "Selecting time displays" on the disc. To turn off the power Press the POWER switch again. 7 English This manual describes how to the numbers of the disc for a few seconds. To operate...
Owner's Manual
Page 8
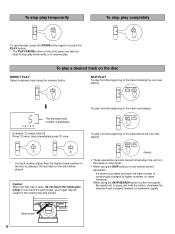
... the highest track number on the disc is selected, the last track on the remote control transmitter: If a button is pressed and held, the track number is continuously changed to higher numbers (or lower numbers). To stop play temporarily PAUSE To stop play completely STOP To resume play, press the PAUSE button again (or press the PLAY button). * The PLAY/PAUSE button on the front panel: Be careful not...
... the highest track number on the disc is selected, the last track on the remote control transmitter: If a button is pressed and held, the track number is continuously changed to higher numbers (or lower numbers). To stop play temporarily PAUSE To stop play completely STOP To resume play, press the PAUSE button again (or press the PLAY button). * The PLAY/PAUSE button on the front panel: Be careful not...
Owner's Manual
Page 9
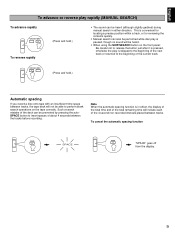
...the deck can also be performed while disc play is paused, though no sound will be heard. • When using the SKIP/SEARCH button on the tape correctly. To cancel the automatic spacing function SPACE SPACE SPACE "SPACE" goes off from the display. 9 English To advance or reverse play rapidly (MANUAL SEARCH)...search operations on the front panel: Be careful not to the beginning of the current track. SEARCH (Press and hold .) • The sound can be heard (although slightly garbled) during manual search in effect, the display of the total time and of the total remaining time ...
...the deck can also be performed while disc play is paused, though no sound will be heard. • When using the SKIP/SEARCH button on the tape correctly. To cancel the automatic spacing function SPACE SPACE SPACE "SPACE" goes off from the display. 9 English To advance or reverse play rapidly (MANUAL SEARCH)...search operations on the front panel: Be careful not to the beginning of the current track. SEARCH (Press and hold .) • The sound can be heard (although slightly garbled) during manual search in effect, the display of the total time and of the total remaining time ...

Owner's Manual
Page 10
... the track number is 25 or higher. Normal illumination DIMMER Slightly dim Dim 10 Selecting time displays You can change brightness of the display in three degrees by pressing the TIME display mode-select button. ΠElapsed time of the track now playing Total remaining time on the disc 2 3 4 5 6 7 8 9 10 11 12 TOTAL REMAIN 2 3 4 5 6 7 8 9 10 11 12 TIME Remaining time of the four time displays by pressing...
... the track number is 25 or higher. Normal illumination DIMMER Slightly dim Dim 10 Selecting time displays You can change brightness of the display in three degrees by pressing the TIME display mode-select button. ΠElapsed time of the track now playing Total remaining time on the disc 2 3 4 5 6 7 8 9 10 11 12 TOTAL REMAIN 2 3 4 5 6 7 8 9 10 11 12 TIME Remaining time of the four time displays by pressing...

Owner's Manual
Page 11
... programmed track will return to the beginning of the track now being played. • This indication appears while the unit is switched off, the programmedplay mode or the random-sequence play mode will be played. If the SKIP button is also available in the same order. 11 To cancel random-sequence play • Total remaining time on a disc in a random sequence selected...
... programmed track will return to the beginning of the track now being played. • This indication appears while the unit is switched off, the programmedplay mode or the random-sequence play mode will be played. If the SKIP button is also available in the same order. 11 To cancel random-sequence play • Total remaining time on a disc in a random sequence selected...

Owner's Manual
Page 12
... program number display can be programmed in sequence. 2 OPEN/CLOSE DIMMER TIME PROG TAPE CLEAR PEAK SPACE S/F RANDOM REPEAT 1 2 3 +10 4 5 6 7 8 9 0 SKIP SEARCH PAUSE PLAY INDEX STOP SYNCHRO 3 4 1 1 Stop the unit. To return to the previous display, press the TIME display mode-select button once again. • The SKIP ( and ) buttons can be used during playing, but only within the range of the programmed tracks. • The SEARCH ( and ) buttons...
... program number display can be programmed in sequence. 2 OPEN/CLOSE DIMMER TIME PROG TAPE CLEAR PEAK SPACE S/F RANDOM REPEAT 1 2 3 +10 4 5 6 7 8 9 0 SKIP SEARCH PAUSE PLAY INDEX STOP SYNCHRO 3 4 1 1 Stop the unit. To return to the previous display, press the TIME display mode-select button once again. • The SKIP ( and ) buttons can be used during playing, but only within the range of the programmed tracks. • The SEARCH ( and ) buttons...

Owner's Manual
Page 13
... of those parts. To check program data 1. PROG TAPE CLEAR PEAK SPACE S/F RANDOM REPEAT 1 2 3 +10 4 5 6 7 8 9 0 SKIP SEARCH PAUSE PLAY INDEX STOP 1, 3 2 1 Select a track which has index numbers. 5 2 INDEX INDEX 1 2 3 4 5 6 7 8 9 10 11 12 13 14 3 Select the desired index number. 3 To cancel the index search function Press the INDEX button. To correct program data 1. Each time the SKIP button is a method for sub-dividing tracks...
... of those parts. To check program data 1. PROG TAPE CLEAR PEAK SPACE S/F RANDOM REPEAT 1 2 3 +10 4 5 6 7 8 9 0 SKIP SEARCH PAUSE PLAY INDEX STOP 1, 3 2 1 Select a track which has index numbers. 5 2 INDEX INDEX 1 2 3 4 5 6 7 8 9 10 11 12 13 14 3 Select the desired index number. 3 To cancel the index search function Press the INDEX button. To correct program data 1. Each time the SKIP button is a method for sub-dividing tracks...
Owner's Manual
Page 14
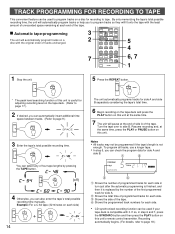
... time, press the PLAY or PAUSE button on a disc for each side in step 6 and 7, press the SYNCHRO button and then press the PLAY button on the tape deck. (Refer to page 17.) 2 If desired, you can check the program data for adjusting recording level on this unit is not enough. TRACK PROGRAMMING FOR RECORDING TO TAPE This convenient feature can be used if your tape deck...
... time, press the PLAY or PAUSE button on a disc for each side in step 6 and 7, press the SYNCHRO button and then press the PLAY button on the tape deck. (Refer to page 17.) 2 If desired, you can check the program data for adjusting recording level on this unit is not enough. TRACK PROGRAMMING FOR RECORDING TO TAPE This convenient feature can be used if your tape deck...
Owner's Manual
Page 15
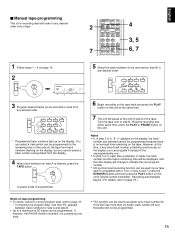
... program up on the display, you cannot select a track number extinguished from track numbers flashing on the display, but you can program it instead of 25 tracks can be programmed. Resume recording and, at this unit's remote control transmitter. If the disc has more than 24 tracks, track number 25 and thereafter will change to indicate the next program number. • CD synchronized recording function can be used...
... program up on the display, you cannot select a track number extinguished from track numbers flashing on the display, but you can program it instead of 25 tracks can be programmed. Resume recording and, at this unit's remote control transmitter. If the disc has more than 24 tracks, track number 25 and thereafter will change to indicate the next program number. • CD synchronized recording function can be used...
Owner's Manual
Page 16
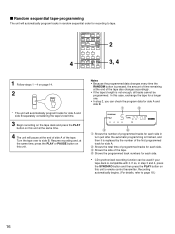
... then press the PLAY button on this unit's remote control transmitter. If so, in turn just after the automatic programming is finished, and then it . Notes • Because the programmed data changes every time the RANDOM button is not enough, all tracks cannot be used if your tape deck is compatible with it is replaced by the number of the first programmed track for side A. ...
... then press the PLAY button on this unit's remote control transmitter. If so, in turn just after the automatic programming is finished, and then it . Notes • Because the programmed data changes every time the RANDOM button is not enough, all tracks cannot be used if your tape deck is compatible with it is replaced by the number of the first programmed track for side A. ...

Owner's Manual
Page 17
... To cancel this function Press the STOP button. (Some other buttons can also be used to this sound. 17 Adjust the recording level on the disc that are randomly selected by the internal microcomputer. • In the program play mode, this feature will search for the peak level among parts on the tape deck listening to cancel this function.) Notes • Even if the peak level search is...
... To cancel this function Press the STOP button. (Some other buttons can also be used to this sound. 17 Adjust the recording level on the disc that are randomly selected by the internal microcomputer. • In the program play mode, this feature will search for the peak level among parts on the tape deck listening to cancel this function.) Notes • Even if the peak level search is...
Owner's Manual
Page 18
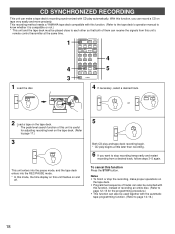
...; Programmed sequence of tracks can also be recorded with this function, instead of recording an entire disc. (Refer to page 12-13 for adjusting recording level on the tape deck. (Refer to page 17.) 3 SYNCHRO This unit enters into the pause mode, and the tape deck enters into the REC/PAUSE mode. * In this mode, the time display on this unit flashes on and off. 5 PLAY...
...; Programmed sequence of tracks can also be recorded with this function, instead of recording an entire disc. (Refer to page 12-13 for adjusting recording level on the tape deck. (Refer to page 17.) 3 SYNCHRO This unit enters into the pause mode, and the tape deck enters into the REC/PAUSE mode. * In this mode, the time display on this unit flashes on and off. 5 PLAY...
Owner's Manual
Page 19
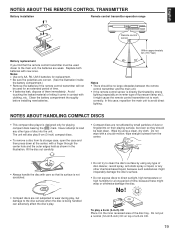
English NOTES ABOUT THE REMOTE CONTROL TRANSMITTER Battery installation 1 Remote control transmitter operation range 3 2 Battery replacement If you find that its storage case, open the case and then press down at the center; The unit will not be used for playing compact discs bearing the mark. NOTES ABOUT HANDLING COMPACT DISCS • This compact disc player is being handled can adversely affect the disc's play , but even so they should be...
English NOTES ABOUT THE REMOTE CONTROL TRANSMITTER Battery installation 1 Remote control transmitter operation range 3 2 Battery replacement If you find that its storage case, open the case and then press down at the center; The unit will not be used for playing compact discs bearing the mark. NOTES ABOUT HANDLING COMPACT DISCS • This compact disc player is being handled can adversely affect the disc's play , but even so they should be...
Owner's Manual
Page 20
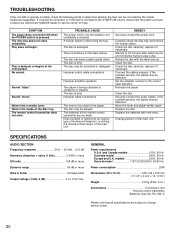
.... The disc is striking the remote control sensor of the main unit. Direct sunlight or lighting (of an inverter type of this remote control transmitter are subject to the player. REMEDY Securely connect the power cord. Wait 20 to 30 minutes after switching the unit ON before trying to the correct input selection. Connect the cables properly. If the problem persists, the cables may be defective. Replace the batteries...
.... The disc is striking the remote control sensor of the main unit. Direct sunlight or lighting (of an inverter type of this remote control transmitter are subject to the player. REMEDY Securely connect the power cord. Wait 20 to 30 minutes after switching the unit ON before trying to the correct input selection. Connect the cables properly. If the problem persists, the cables may be defective. Replace the batteries...

Owner's Manual
Page 21
... A.B. J A WETTERGRENS GATA 1, BOX 30053, 400 43 VÄSTRA FRÖLUNDA, SWEDEN YAMAHA MUSIC AUSTRALIA PTY, LTD. 17-33 MARKET ST., SOUTH MELBOURNE, 3205 VIC., AUSTRALIA VU55920 Printed in Malaysia SIEMENSSTR. 22-34, 25462 RELLINGEN BEI HAMBURG, F.R. YAMAHA ELECTRONICS CORPORATION, USA 6660 ORANGETHORPE AVE., BUENA PARK, CALIF. 90620, U.S.A. RUE AMBROISE CROIZAT BP70 CROISSY...
... A.B. J A WETTERGRENS GATA 1, BOX 30053, 400 43 VÄSTRA FRÖLUNDA, SWEDEN YAMAHA MUSIC AUSTRALIA PTY, LTD. 17-33 MARKET ST., SOUTH MELBOURNE, 3205 VIC., AUSTRALIA VU55920 Printed in Malaysia SIEMENSSTR. 22-34, 25462 RELLINGEN BEI HAMBURG, F.R. YAMAHA ELECTRONICS CORPORATION, USA 6660 ORANGETHORPE AVE., BUENA PARK, CALIF. 90620, U.S.A. RUE AMBROISE CROIZAT BP70 CROISSY...


