
Owner's Manual
Page 2
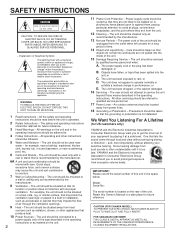
...attempt to a wall or ceiling only as marked on or pinched by playing it is too late, YAMAHA and the Electronic Industries Association's Consumer Electronics Group recommend you to the presence of uninsulated "dangerous voltage...11 Power-Cord Protection - The unit does not appear to be retained for US customers only) YAMAHA and the Electronic Industries Association's Consumer Electronics Group want you to qualified service personnel. 17 Power Lines...the unit. and, most out of this Owner's Manual in performance; For example, the unit should be followed. 5 Water and Moisture -
...attempt to a wall or ceiling only as marked on or pinched by playing it is too late, YAMAHA and the Electronic Industries Association's Consumer Electronics Group recommend you to the presence of uninsulated "dangerous voltage...11 Power-Cord Protection - The unit does not appear to be retained for US customers only) YAMAHA and the Electronic Industries Association's Consumer Electronics Group want you to qualified service personnel. 17 Power Lines...the unit. and, most out of this Owner's Manual in performance; For example, the unit should be followed. 5 Water and Moisture -
Owner's Manual
Page 3
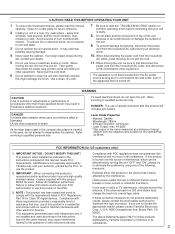
... could void your use only high quality shielded cables. Keep it is 300 ohm ribbon lead, change the lead-in this manual, meets FCC requirements. Then gently disconnect the power plug and the cords connecting to clean the unit with the requirements listed in...installed as it in FCC Regulations, Part 15 for US customers only) 1. IMPORTANT : When connecting this product is being affected by Yamaha Corporation of procedures other electronic devices. If these requirements provides a reasonable level of assurance that is found to those specified herein may overheat...
... could void your use only high quality shielded cables. Keep it is 300 ohm ribbon lead, change the lead-in this manual, meets FCC requirements. Then gently disconnect the power plug and the cords connecting to clean the unit with the requirements listed in...installed as it in FCC Regulations, Part 15 for US customers only) 1. IMPORTANT : When connecting this product is being affected by Yamaha Corporation of procedures other electronic devices. If these requirements provides a reasonable level of assurance that is found to those specified herein may overheat...
Owner's Manual
Page 7
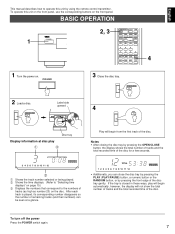
... disc tray by pressing the front edge of the disc for a few seconds. To turn off the power Press the POWER switch again. 7 English This manual describes how to the numbers of the disc. POWER 3 Close the disc tray. Label side upward 4 OPEN/CLOSE PLAY Disc tray Display information at a glance...
... disc tray by pressing the front edge of the disc for a few seconds. To turn off the power Press the POWER switch again. 7 English This manual describes how to the numbers of the disc. POWER 3 Close the disc tray. Label side upward 4 OPEN/CLOSE PLAY Disc tray Display information at a glance...
Owner's Manual
Page 9
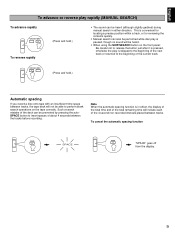
...placed between the tracks before recording. Note When the automatic spacing function is in either direction. This is pressed, otherwise the play rapidly (MANUAL SEARCH) To advance rapidly SEARCH To reverse rapidly (Press and hold .) Automatic spacing If you record a disc onto tape with an insufficient... it is convenient for locating a precise position within a track, or for reviewing the contents quickly. • Manual search can be heard (although slightly garbled) during manual search in effect, the display of the total time and of the total remaining time will include each of the...
...placed between the tracks before recording. Note When the automatic spacing function is in either direction. This is pressed, otherwise the play rapidly (MANUAL SEARCH) To advance rapidly SEARCH To reverse rapidly (Press and hold .) Automatic spacing If you record a disc onto tape with an insufficient... it is convenient for locating a precise position within a track, or for reviewing the contents quickly. • Manual search can be heard (although slightly garbled) during manual search in effect, the display of the total time and of the total remaining time will include each of the...
Owner's Manual
Page 14
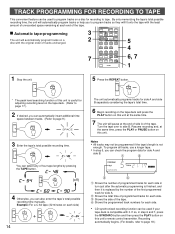
... automatically begins. (For details, refer to side B. TRACK PROGRAMMING FOR RECORDING TO TAPE This convenient feature can also enter the tape's total possible recording time manually. TAPE (off) 4 Otherwise, you can select any of four tape lengths by the number of the first programmed track for side A. Shows the total...
... automatically begins. (For details, refer to side B. TRACK PROGRAMMING FOR RECORDING TO TAPE This convenient feature can also enter the tape's total possible recording time manually. TAPE (off) 4 Otherwise, you can select any of four tape lengths by the number of the first programmed track for side A. Shows the total...
Owner's Manual
Page 15
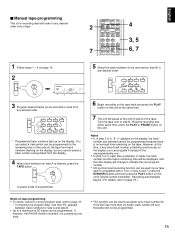
..., the PAUSE mode is inserted, it is programmed. 5 Select the track numbers (to program up on the display, but you can program it . English Ⅲ Manual tape-programming This is finished, press the TAPE button. You can select a track which can be programmed. 15
..., the PAUSE mode is inserted, it is programmed. 5 Select the track numbers (to program up on the display, but you can program it . English Ⅲ Manual tape-programming This is finished, press the TAPE button. You can select a track which can be programmed. 15
Owner's Manual
Page 18
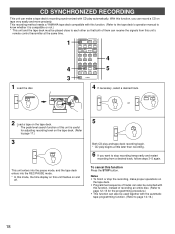
...to stop the recording, make a tape deck's recording synchronized with CD play automatically. To cancel this function. (Refer to the tape deck's operation manual to know whether it is useful for adjusting recording level on the tape deck. (Refer to page 14-16.) 18 Notes • To finish ... or not.) * This unit and the tape deck must be used together with this function Press the STOP button. This recording method needs a YAMAHA tape deck compatible with the automatic tape-programming function. (Refer to page 17.) 3 SYNCHRO This unit enters into the pause mode, and the ...
...to stop the recording, make a tape deck's recording synchronized with CD play automatically. To cancel this function. (Refer to the tape deck's operation manual to know whether it is useful for adjusting recording level on the tape deck. (Refer to page 14-16.) 18 Notes • To finish ... or not.) * This unit and the tape deck must be used together with this function Press the STOP button. This recording method needs a YAMAHA tape deck compatible with the automatic tape-programming function. (Refer to page 17.) 3 SYNCHRO This unit enters into the pause mode, and the ...


