User Guide
Page 2
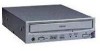
...: Address: Telephone: FAX: Type of Equipment: Model Name: Yamaha Systems Technology, Inc. 100 Century Center Court San Jose, California 95112 (408) 467-2330 (408) 437-8791 CD Recorder CRW4260t-B CRW4260t-NB This device complies with other electronic devices. IMPORTANT: When connecting this product in a residential environment will not occur in the users manual, may void your authority, granted by...
...: Address: Telephone: FAX: Type of Equipment: Model Name: Yamaha Systems Technology, Inc. 100 Century Center Court San Jose, California 95112 (408) 467-2330 (408) 437-8791 CD Recorder CRW4260t-B CRW4260t-NB This device complies with other electronic devices. IMPORTANT: When connecting this product in a residential environment will not occur in the users manual, may void your authority, granted by...
User Guide
Page 5
... any of the CRW4260t. A dust particle on the CD-RW discs. • Do not subject the CRW4260t and computer to qualified personnel. • If any data or information losses resulting from the operation of the following precautions before recording is finished, store the disc in a clean, dust-free environment. • The CRW4260t contains no user serviceable parts.
... any of the CRW4260t. A dust particle on the CD-RW discs. • Do not subject the CRW4260t and computer to qualified personnel. • If any data or information losses resulting from the operation of the following precautions before recording is finished, store the disc in a clean, dust-free environment. • The CRW4260t contains no user serviceable parts.
User Guide
Page 6
System Configuration 3 Computer 3 Software 3 Tools 4 Discs 4 Chapter 2 - Drive 5 CRW4260t drive settings 5 Installing the CRW4260t drive 8 Chapter 3 - All Rights Reserved. Unix is a registered trademark of machine readable form without prior consent in writing from Yamaha. Operation 13 Front Panel 13 Loading a Disc 14 Ejecting the Disc 15 Manual Eject (emergency use 16 Troubleshooting 17 Appendix 18 Specifications 18 Front Panel Indicator Key 19 ©1997 Yamaha Corporation. All...
System Configuration 3 Computer 3 Software 3 Tools 4 Discs 4 Chapter 2 - Drive 5 CRW4260t drive settings 5 Installing the CRW4260t drive 8 Chapter 3 - All Rights Reserved. Unix is a registered trademark of machine readable form without prior consent in writing from Yamaha. Operation 13 Front Panel 13 Loading a Disc 14 Ejecting the Disc 15 Manual Eject (emergency use 16 Troubleshooting 17 Appendix 18 Specifications 18 Front Panel Indicator Key 19 ©1997 Yamaha Corporation. All...
User Guide
Page 7
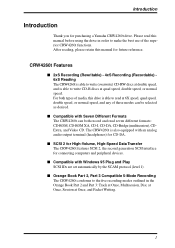
... best use of media, this manual for CD-DA. The CRW4260t is also equipped with Windows 95 Plug and Play SCSI IDs are set automatically by the SCAM protocol (level 1). CRW4260t Features s 2xS Recording (Rewritable) - 4xS Recording (Recordable) 6xS Reading The CRW4260t is able to write (overwrite) CD-RW discs at double speed, and is able to write CD-R discs at 6X speed, quad...
... best use of media, this manual for CD-DA. The CRW4260t is also equipped with Windows 95 Plug and Play SCSI IDs are set automatically by the SCAM protocol (level 1). CRW4260t Features s 2xS Recording (Rewritable) - 4xS Recording (Recordable) 6xS Reading The CRW4260t is able to write (overwrite) CD-RW discs at double speed, and is able to write CD-R discs at 6X speed, quad...
User Guide
Page 8
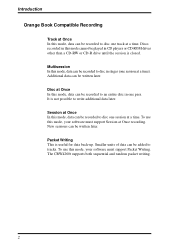
... disc one session at a time). Discs recorded in CD players or CD-ROM drives other than a CD-RW or CD-R drive until the session is useful for data back-up. To use this mode cannot be played in this mode, your software must support Packet Writing. The CRW4260t supports both sequential and random packet writing. 2 Additional data can be recorded to an entire disc in stages...
... disc one session at a time). Discs recorded in CD players or CD-ROM drives other than a CD-RW or CD-R drive until the session is useful for data back-up. To use this mode cannot be played in this mode, your software must support Packet Writing. The CRW4260t supports both sequential and random packet writing. 2 Additional data can be recorded to an entire disc in stages...
User Guide
Page 9
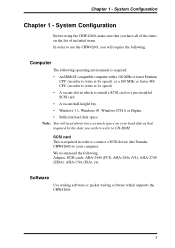
... operating environment is required in which supports the CRW4260t. 3 System Configuration Before using the CRW4260t, make sure that required by the data you will need about twice as ...device (the Yamaha CRW4260t) to install a SCSI card or a pre-installed SCSI card • A vacant half-height bay • Windows 3.1, Windows 95, Windows NT4.0 or Higher • Sufficient hard disk space Note: You will require the following : Adaptec SCSI cards: AHA-2940 (PCI), AHA-284x (VL), AHA-2740 (EISA), AHA-154x (ISA), etc. Software Use writing software or packet writing software...
... operating environment is required in which supports the CRW4260t. 3 System Configuration Before using the CRW4260t, make sure that required by the data you will need about twice as ...device (the Yamaha CRW4260t) to install a SCSI card or a pre-installed SCSI card • A vacant half-height bay • Windows 3.1, Windows 95, Windows NT4.0 or Higher • Sufficient hard disk space Note: You will require the following : Adaptec SCSI cards: AHA-2940 (PCI), AHA-284x (VL), AHA-2740 (EISA), AHA-154x (ISA), etc. Software Use writing software or packet writing software...
User Guide
Page 10
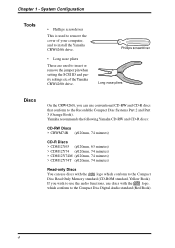
...;120mm, 74 minutes) Read-only Discs You can use conventional CD-RW and CD-R discs that conform to insert or remove the jumper pin when setting the SCSI ID and parity settings etc.of the Yamaha CRW4260t drive. System Configuration Tools • Phillips screwdriver This is used to remove the cover of your computer, and to install the Yamaha CRW4260t drive. • Long nose...
...;120mm, 74 minutes) Read-only Discs You can use conventional CD-RW and CD-R discs that conform to insert or remove the jumper pin when setting the SCSI ID and parity settings etc.of the Yamaha CRW4260t drive. System Configuration Tools • Phillips screwdriver This is used to remove the cover of your computer, and to install the Yamaha CRW4260t drive. • Long nose...
User Guide
Page 11
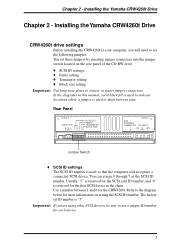
o SCSI ID settings o Parity setting o Terminator setting o Block size setting Important: Use long-nose pliers to set the following jumpers. In the diagrams in this manual, solid black fill is used to indicate locations where a jumper is "3". Installing the Yamaha CRW4260t Drive CRW4260t drive settings Before installing the CRW4260t in the chain. Refer to use a unique ID number for each device. 5 The factory set these jumpers by inserting jumper connectors into the...
o SCSI ID settings o Parity setting o Terminator setting o Block size setting Important: Use long-nose pliers to set the following jumpers. In the diagrams in this manual, solid black fill is used to indicate locations where a jumper is "3". Installing the Yamaha CRW4260t Drive CRW4260t drive settings Before installing the CRW4260t in the chain. Refer to use a unique ID number for each device. 5 The factory set these jumpers by inserting jumper connectors into the...

User Guide
Page 12
... Check will automatically assign an unused number to another SCSI device, the Plug and Play component of Windows 95 will not be performed. Chapter 2 - o Parity setting Parity ON (with a jumper) - Parity OFF (without a jumper) - Installing the Yamaha CRW4260t Drive Note: When you are using Windows 95, and if the SCSI ID setting on the rear panel is the same as the...
... Check will automatically assign an unused number to another SCSI device, the Plug and Play component of Windows 95 will not be performed. Chapter 2 - o Parity setting Parity ON (with a jumper) - Parity OFF (without a jumper) - Installing the Yamaha CRW4260t Drive Note: When you are using Windows 95, and if the SCSI ID setting on the rear panel is the same as the...
User Guide
Page 13
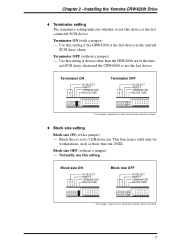
... locations shown in the inter- Installing the Yamaha CRW4260t Drive o Terminator setting The terminator setting indicates whether or not this setting. Terminator ON (with a jumper) - Terminator ON 124 ID SELECT PARITY TERMINATOR BLOCK SIZE Terminator OFF 124 ID SELECT PARITY TERMINATOR BLOCK SIZE * Use jumper connectors to 512Byte/sector. Use this setting if devices other than the CRW4260t are in black. 7 o Block...
... locations shown in the inter- Installing the Yamaha CRW4260t Drive o Terminator setting The terminator setting indicates whether or not this setting. Terminator ON (with a jumper) - Terminator ON 124 ID SELECT PARITY TERMINATOR BLOCK SIZE Terminator OFF 124 ID SELECT PARITY TERMINATOR BLOCK SIZE * Use jumper connectors to 512Byte/sector. Use this setting if devices other than the CRW4260t are in black. 7 o Block...
User Guide
Page 14
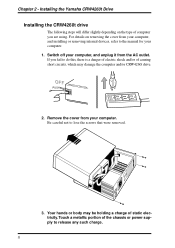
..., and installing or removing internal devices, refer to do this, there is a danger of electric shock and/or of causing short circuits, which may be holding a charge of the chassis or power supply to lose the screws that were removed. 3. If you are using. Remove the cover from the AC outlet. Installing the Yamaha CRW4260t Drive Installing the CRW4260t drive The...
..., and installing or removing internal devices, refer to do this, there is a danger of electric shock and/or of causing short circuits, which may be holding a charge of the chassis or power supply to lose the screws that were removed. 3. If you are using. Remove the cover from the AC outlet. Installing the Yamaha CRW4260t Drive Installing the CRW4260t drive The...
User Guide
Page 15
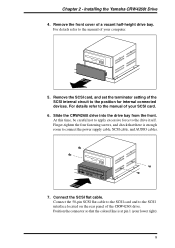
... to connect the power supply cable, SCSI cable, and AUDIO cables. 7. Chapter 2 - For details refer to the position for internal connected devices. Connect the 50-pin SCSI flat cable. Slide the CRW4260t drive into the drive bay from the front. At this time, be careful not to apply excessive force to the manual of your SCSI card. 6. Installing the Yamaha CRW4260t Drive 4. Finger-tighten...
... to connect the power supply cable, SCSI cable, and AUDIO cables. 7. Chapter 2 - For details refer to the position for internal connected devices. Connect the 50-pin SCSI flat cable. Slide the CRW4260t drive into the drive bay from the front. At this time, be careful not to apply excessive force to the manual of your SCSI card. 6. Installing the Yamaha CRW4260t Drive 4. Finger-tighten...
User Guide
Page 16
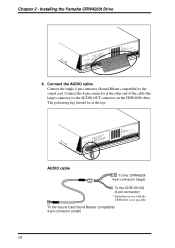
...-0 AUDIO OUT R G L 1 2 4 IPTBDAELORRSEIMCTLKIYNESACITTZOER VZ49880-0 SICNCOTSNEINREFACCTOE+R5VDC INPUT G +12V 1 AUDIO cable To the CRW4260t 4-pin connector (large) To the CDR100/102 (3-pin connector) * Simultaneous use with the CRW4260t is not possible. To the Sound Card (Sond Blaster compatible) 4-pin connector (small) 10 Installing the Yamaha CRW4260t Drive VZ49880-0 AUDIO OUT R G L 1 2 4 IPTBDAELORRSEIMCTLKIYNESACITTZOER VZ49880-0 SICNCOTSNE1INREFACCTOE+R5VDC INPUT G +12V 8. Chapter 2 - Connect...
...-0 AUDIO OUT R G L 1 2 4 IPTBDAELORRSEIMCTLKIYNESACITTZOER VZ49880-0 SICNCOTSNEINREFACCTOE+R5VDC INPUT G +12V 1 AUDIO cable To the CRW4260t 4-pin connector (large) To the CDR100/102 (3-pin connector) * Simultaneous use with the CRW4260t is not possible. To the Sound Card (Sond Blaster compatible) 4-pin connector (small) 10 Installing the Yamaha CRW4260t Drive VZ49880-0 AUDIO OUT R G L 1 2 4 IPTBDAELORRSEIMCTLKIYNESACITTZOER VZ49880-0 SICNCOTSNE1INREFACCTOE+R5VDC INPUT G +12V 8. Chapter 2 - Connect...
User Guide
Page 17
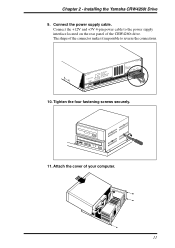
The shape of the CRW4260t drive. Connect the +12V and +5V 4-pin power cable to the power supply interface located on the rear panel of the connector makes it impossible to reverse the connections. Connect the power supply cable. VZ49880-0 AUDIO OUT R G L 1 2 4 IPTBDAELORRSEIMCTLKIYNESACITTZOER VZ49880-0 SICNCOTSNE1INREFACCTOE+R5VDC INPUT G +12V 10. Tighten the four fastening screws securely. 11. Installing the Yamaha CRW4260t Drive 9. Attach the cover of your computer. 11 Chapter 2 -
The shape of the CRW4260t drive. Connect the +12V and +5V 4-pin power cable to the power supply interface located on the rear panel of the connector makes it impossible to reverse the connections. Connect the power supply cable. VZ49880-0 AUDIO OUT R G L 1 2 4 IPTBDAELORRSEIMCTLKIYNESACITTZOER VZ49880-0 SICNCOTSNE1INREFACCTOE+R5VDC INPUT G +12V 10. Tighten the four fastening screws securely. 11. Installing the Yamaha CRW4260t Drive 9. Attach the cover of your computer. 11 Chapter 2 -
User Guide
Page 18
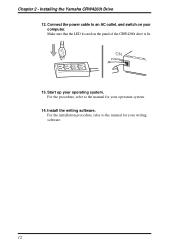
For the procedure, refer to the manual for your operation system. 14. ON PUSH 13. Make sure that the LED located on your operating system. Install the writing software. Connect the power cable to the manual for your writing software. 12 For the installation procedure, refer to an AC outlet, and switch on the panel of the CRW4260t drive is lit. Installing the Yamaha CRW4260t Drive 12. Start up your computer. Chapter 2 -
For the procedure, refer to the manual for your operation system. 14. ON PUSH 13. Make sure that the LED located on your operating system. Install the writing software. Connect the power cable to the manual for your writing software. 12 For the installation procedure, refer to an AC outlet, and switch on the panel of the CRW4260t drive is lit. Installing the Yamaha CRW4260t Drive 12. Start up your computer. Chapter 2 -
User Guide
Page 19
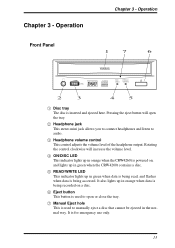
... lights up in green when data is being read, and flashes when data is used to open the tray. 2 Headphone jack This stereo mini jack allows you to connect headphones and listen to manually eject a disc that cannot be ejected in orange when data is being accessed. It also... control clockwise will open or close the tray. 7 Manual Eject hole This is being recorded on , and lights up in green when the CRW4260t contains a disc. 5 READ/WRITE LED This indicator lights up in orange when the CRW4260t is powered on a disc. 6 Eject button This button is used to audio. 3 Headphone volume...
... lights up in green when data is being read, and flashes when data is used to open the tray. 2 Headphone jack This stereo mini jack allows you to connect headphones and listen to manually eject a disc that cannot be ejected in orange when data is being accessed. It also... control clockwise will open or close the tray. 7 Manual Eject hole This is being recorded on , and lights up in green when the CRW4260t contains a disc. 5 READ/WRITE LED This indicator lights up in orange when the CRW4260t is powered on a disc. 6 Eject button This button is used to audio. 3 Headphone volume...

User Guide
Page 21
Chapter 3 - Note: You cannot eject the disc if the SCSI command prohibits the eject operation while the CRW4260t is powered on : Pressing the eject button will not eject the disc. 15 Caution: Be sure to remove the disc after it is completely ejected. (Trying to remove the disc before it is completely ejected may cause the drive to malfunction.) Press the eject button If the CRW4260t is not powered on : Press the eject button to eject the disc. Operation Ejecting the Disc If the CRW4260t is reading data.
Chapter 3 - Note: You cannot eject the disc if the SCSI command prohibits the eject operation while the CRW4260t is powered on : Pressing the eject button will not eject the disc. 15 Caution: Be sure to remove the disc after it is completely ejected. (Trying to remove the disc before it is completely ejected may cause the drive to malfunction.) Press the eject button If the CRW4260t is not powered on : Press the eject button to eject the disc. Operation Ejecting the Disc If the CRW4260t is reading data.
User Guide
Page 23
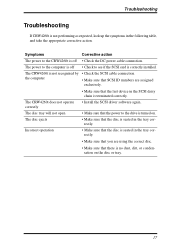
... that the last device in the tray correctly. The power to the computer is off • Check the DC power cable connection. The CRW4260t does not operate correctly • Install the SCSI driver software again. Incorrect operation • Make sure that the disc is seated in the following table, and take the appropriate corrective action. Troubleshooting Troubleshooting If CRW4260t is off...
... that the last device in the tray correctly. The power to the computer is off • Check the DC power cable connection. The CRW4260t does not operate correctly • Install the SCSI driver software again. Incorrect operation • Make sure that the disc is seated in the following table, and take the appropriate corrective action. Troubleshooting Troubleshooting If CRW4260t is off...
User Guide
Page 24
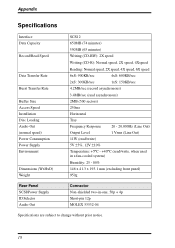
Appendix Specifications Interface Data Capacity Record/Read Speed Data Transfer Rate Burst Transfer Rate Buffer Size Access Speed Installation Disc Loading Audio Out (normal speed) Power Consumption Power Supply Environment Dimensions (WxHxD) Weight SCSI 2 650MB (74 minutes) 550MB (63 minutes) Writing (CD-RW): 2X speed Writing (CD-R): Normal speed, 2X speed, 4Xspeed Reading: Normal speed, 2X speed, 4X speed, 6X speed 6xS...
Appendix Specifications Interface Data Capacity Record/Read Speed Data Transfer Rate Burst Transfer Rate Buffer Size Access Speed Installation Disc Loading Audio Out (normal speed) Power Consumption Power Supply Environment Dimensions (WxHxD) Weight SCSI 2 650MB (74 minutes) 550MB (63 minutes) Writing (CD-RW): 2X speed Writing (CD-R): Normal speed, 2X speed, 4Xspeed Reading: Normal speed, 2X speed, 4X speed, 6X speed 6xS...
User Guide
Page 26
....jp GERMANY, SWITZERLAND, AUSTRIA, EASTERN EUROPE and RUSSIA Yamaha Europa GmbH Multi Media Division Siemensstrasse 22-34, D-25462 Rellingen, GERMANY TEL: +49 4101 303 200 FAX: +49 4101 303 277 Internet: www.yamaha-europe.com FRANCE Yamaha Musique France S.A. Media Technology Division Sherbourne Drive, Tilbrook, Milton Keynes MK7 8BL ENGLAND TEL: +44 1 908 366700 FAX...
....jp GERMANY, SWITZERLAND, AUSTRIA, EASTERN EUROPE and RUSSIA Yamaha Europa GmbH Multi Media Division Siemensstrasse 22-34, D-25462 Rellingen, GERMANY TEL: +49 4101 303 200 FAX: +49 4101 303 277 Internet: www.yamaha-europe.com FRANCE Yamaha Musique France S.A. Media Technology Division Sherbourne Drive, Tilbrook, Milton Keynes MK7 8BL ENGLAND TEL: +44 1 908 366700 FAX...


