
Owner's Manual
Page 1
Make sure that the voltage selector is initially shipped. Owner's Manual IMPORTANT Check Your Power Supply Make sure that your area. To change the setting use a "minus" screwdriver to rotate the selector dial so that the correct voltage appears next to the pointer on the bottom panel. In some areas a voltage selector may be provided on the bottom panel of the main keyboard unit near the power cord. The voltage selector is set at 240V when the unit is set for the voltage in your local AC mains voltage matches the voltage specified on the name plate on the panel.
Make sure that the voltage selector is initially shipped. Owner's Manual IMPORTANT Check Your Power Supply Make sure that your area. To change the setting use a "minus" screwdriver to rotate the selector dial so that the correct voltage appears next to the pointer on the bottom panel. In some areas a voltage selector may be provided on the bottom panel of the main keyboard unit near the power cord. The voltage selector is set at 240V when the unit is set for the voltage in your local AC mains voltage matches the voltage specified on the name plate on the panel.

Owner's Manual
Page 2
...page. NOTICE: Service charges incurred due to lack of battery. REFER SERVICING TO QUALIFIED SERVICE PERSONNEL. IMPORTANT NOTICE: All Yamaha electronic products are tested and approved by an independent safety testing laboratory in order that are located on this type of ... graphic symbol markings. When replacement becomes necessary, contact a qualified service representative to produce them, meet these graphics on this manual carefully and consult your purchase. The lightning flash with both user safe and environmentally friendly. SPECIFICATIONS SUBJECT TO CHANGE: The ...
...page. NOTICE: Service charges incurred due to lack of battery. REFER SERVICING TO QUALIFIED SERVICE PERSONNEL. IMPORTANT NOTICE: All Yamaha electronic products are tested and approved by an independent safety testing laboratory in order that are located on this type of ... graphic symbol markings. When replacement becomes necessary, contact a qualified service representative to produce them, meet these graphics on this manual carefully and consult your purchase. The lightning flash with both user safe and environmentally friendly. SPECIFICATIONS SUBJECT TO CHANGE: The ...

Owner's Manual
Page 4
... Corporation. • Windows is Yamaha's original style file format, which significantly expands and improves on your performances. q Floppy Disk Use this blank disk to as the CVP-103 in a safe and handy place for the future. q Reference Booklet This manual contains lists of displaying lyrics when... computers. XG Format XG is compatible with SMF Formats 0 and 1, and records "song" data using the Custom Style feature. 2 4 CVP-103 The Clavinova uses the SFF internally, reads optional SFF style disks, and creates SFF styles using SMF Format 0.) Disk Orchestra Collection The DOC ...
... Corporation. • Windows is Yamaha's original style file format, which significantly expands and improves on your performances. q Floppy Disk Use this blank disk to as the CVP-103 in a safe and handy place for the future. q Reference Booklet This manual contains lists of displaying lyrics when... computers. XG Format XG is compatible with SMF Formats 0 and 1, and records "song" data using the Custom Style feature. 2 4 CVP-103 The Clavinova uses the SFF internally, reads optional SFF style disks, and creates SFF styles using SMF Format 0.) Disk Orchestra Collection The DOC ...

Owner's Manual
Page 6
...80 Playing Back Your Custom Styles 84 Messages in Custom Style Mode 84 Using Style Files 86 About the Yamaha Style File Format 86 Loading Styles from the Main Display 30 Keyboard Percussion 31 Changing the Keyboard Settings ...Voice 34 Exiting the Dual Mode 35 Playing Two Voices on Different Sides of Contents CHAPTER 1: Getting Ready About This Manual 8 Handling the Floppy Disk Drive (FDD) and Floppy Disks 9 Setting Up the Clavinova 10 Music Stand 10 Key... VOICE SELECT Display 29 Selecting Voices from a Disk 86 Playing Loaded Style Files 88 6 CVP-103 4
...80 Playing Back Your Custom Styles 84 Messages in Custom Style Mode 84 Using Style Files 86 About the Yamaha Style File Format 86 Loading Styles from the Main Display 30 Keyboard Percussion 31 Changing the Keyboard Settings ...Voice 34 Exiting the Dual Mode 35 Playing Two Voices on Different Sides of Contents CHAPTER 1: Getting Ready About This Manual 8 Handling the Floppy Disk Drive (FDD) and Floppy Disks 9 Setting Up the Clavinova 10 Music Stand 10 Key... VOICE SELECT Display 29 Selecting Voices from a Disk 86 Playing Loaded Style Files 88 6 CVP-103 4

Owner's Manual
Page 8
... [DEMO] in the LCD display, as well as they appear on your Clavinova. s Bold characters ...Bold type represents items shown in this manual. Operation steps n ¿ p ...indicates that you should do n, then do p. s Arrows in m. 8 CVP-103 6 CHAPTER 1: Getting Ready About This Manual This section explains the notation conventions that are used throughout this...
... [DEMO] in the LCD display, as well as they appear on your Clavinova. s Bold characters ...Bold type represents items shown in this manual. Operation steps n ¿ p ...indicates that you should do n, then do p. s Arrows in m. 8 CVP-103 6 CHAPTER 1: Getting Ready About This Manual This section explains the notation conventions that are used throughout this...

Owner's Manual
Page 11
... the plugs at the left end of headphones can connect other instruments that lets you connect it to match the pin configuration of this manual for details. 9 CVP-103 11 These connectors are located at the left of the Clavinova, and the other audio and MIDI equipment. propriate level. another MIDI instrument. Setting...
... the plugs at the left end of headphones can connect other instruments that lets you connect it to match the pin configuration of this manual for details. 9 CVP-103 11 These connectors are located at the left of the Clavinova, and the other audio and MIDI equipment. propriate level. another MIDI instrument. Setting...

Owner's Manual
Page 21
... determines whether reverb, chorus, effect, and other sorts of the last piano voice that are automatically selected when a voice is selected. DIRECT ACCESS CVP-103 21 19 Using the LCD Display Controls By pressing the LCD button under KEY TOUCH, for example, you can usually use [EXIT] to get...are other settings are displayed in non-rounded rectangles, like the ones you press the LCD button, the highlighted setting switches between AUTO and MANUAL. You can set the KEY TOUCH and VOICE SETTING functions back to page 137. For more details on the VOICE SETTING function, refer to...
... determines whether reverb, chorus, effect, and other sorts of the last piano voice that are automatically selected when a voice is selected. DIRECT ACCESS CVP-103 21 19 Using the LCD Display Controls By pressing the LCD button under KEY TOUCH, for example, you can usually use [EXIT] to get...are other settings are displayed in non-rounded rectangles, like the ones you press the LCD button, the highlighted setting switches between AUTO and MANUAL. You can set the KEY TOUCH and VOICE SETTING functions back to page 137. For more details on the VOICE SETTING function, refer to...
Owner's Manual
Page 32
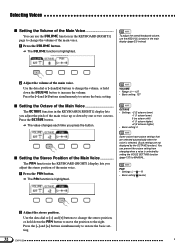
...(page 23) instead. Press the [-] and [+] buttons simultaneously to restore the basic setting. Press the [-] and [+] buttons simultaneously to restore the basic setting. 32 CVP-103 30 R • Basic setting: (center) X Adjust the stereo position. VOLUME • Range: 0 - 127 • Basic setting: 127 s Setting the ...Use the data dial or [-] and [+] buttons to change the volume, or hold down the PAN button to move the position to MANUAL. Some voices have octave settings that are selected automatically when the voice is selected. (Such settings are not displayed by the OCTAVE ...
...(page 23) instead. Press the [-] and [+] buttons simultaneously to restore the basic setting. Press the [-] and [+] buttons simultaneously to restore the basic setting. 32 CVP-103 30 R • Basic setting: (center) X Adjust the stereo position. VOLUME • Range: 0 - 127 • Basic setting: 127 s Setting the ...Use the data dial or [-] and [+] buttons to change the volume, or hold down the PAN button to move the position to MANUAL. Some voices have octave settings that are selected automatically when the voice is selected. (Such settings are not displayed by the OCTAVE ...
Owner's Manual
Page 34
... in the KEYBOARD [RIGHT2] display page to change the volume, octave, pan and detune of the second voice up or down the VOLUME button to MANUAL. 34 CVP-103 32 s Setting the Volume of the Second Voice You can use the settings in the main display (page 23) instead. Z Press the VOLUME button...
... in the KEYBOARD [RIGHT2] display page to change the volume, octave, pan and detune of the second voice up or down the VOLUME button to MANUAL. 34 CVP-103 32 s Setting the Volume of the Second Voice You can use the settings in the main display (page 23) instead. Z Press the VOLUME button...
Owner's Manual
Page 38
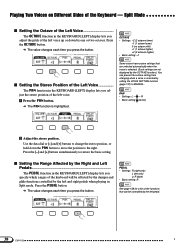
... voice up or down the PAN button to move the position to change the stereo position, or hold down by the left pedal. 36 38 CVP-103 Use the data dial or [-] and [+] buttons to the right. PEDAL • Settings: R (right only) L (left only) L+R (both) • Basic setting...functions controlled by the left voice. R • Basic setting: (center) X Adjust the stereo position. Press the [-] and [+] buttons simultaneously to MANUAL. Split Mode s Setting the Octave of the Left Voice The OCTAVE function in the KEYBOARD [LEFT] display lets you adjust the pitch of the left...
... voice up or down the PAN button to move the position to change the stereo position, or hold down by the left pedal. 36 38 CVP-103 Use the data dial or [-] and [+] buttons to the right. PEDAL • Settings: R (right only) L (left only) L+R (both) • Basic setting...functions controlled by the left voice. R • Basic setting: (center) X Adjust the stereo position. Press the [-] and [+] buttons simultaneously to MANUAL. Split Mode s Setting the Octave of the Left Voice The OCTAVE function in the KEYBOARD [LEFT] display lets you adjust the pitch of the left...

Owner's Manual
Page 137
... of notes produced by the Clavinova's keyboard. This is frequently referred to play the keys. This setting lets you to in this manual as the basic setting. This setting requires you produce a relatively loud sound even when playing the keys softly. Use the FIXED VELOCITY...TYPE 70 Harmony SPEED 71 Harmony VOLUME 71 OCTAVE settings 32, 34, 38 135 CVP-103 137 Press the VOICE SETTING button to the selected voice, type of the keys. VOICE SETTING • Settings: AUTO, MANUAL • Basic Setting: AUTO The following settings are automatically selected when a voice is...
... of notes produced by the Clavinova's keyboard. This is frequently referred to play the keys. This setting lets you to in this manual as the basic setting. This setting requires you produce a relatively loud sound even when playing the keys softly. Use the FIXED VELOCITY...TYPE 70 Harmony SPEED 71 Harmony VOLUME 71 OCTAVE settings 32, 34, 38 135 CVP-103 137 Press the VOICE SETTING button to the selected voice, type of the keys. VOICE SETTING • Settings: AUTO, MANUAL • Basic Setting: AUTO The following settings are automatically selected when a voice is...

Owner's Manual
Page 161
... with the Windows 95 and Windows 98 operating systems. This driver software may be set the [HOST SELECT] switch to "PC-1." CVP-103 161 159 Data Connections s Connecting to an Apple Macintosh or Compatible Computer ...Connect the [TO HOST] connector of the Clavinova to ...HOST SELECT PC-2 PC-1 MIDI Mac TO HOST q "PC-2" Cable Connections If your system doesn't work properly with your software owner's manual). Set to your Clavinova contains special MIDI driver software intended for installation instructions. You may require different settings. Refer to the text files ...
... with the Windows 95 and Windows 98 operating systems. This driver software may be set the [HOST SELECT] switch to "PC-1." CVP-103 161 159 Data Connections s Connecting to an Apple Macintosh or Compatible Computer ...Connect the [TO HOST] connector of the Clavinova to ...HOST SELECT PC-2 PC-1 MIDI Mac TO HOST q "PC-2" Cable Connections If your system doesn't work properly with your software owner's manual). Set to your Clavinova contains special MIDI driver software intended for installation instructions. You may require different settings. Refer to the text files ...
Owner's Manual
Page 172
...and MF2HD (double sided, high density), and each type has different formatting systems. • CVP-103 can playback the data recorded by referring to the MIDI Implementation Chart in the owner's manual for the CVP-103 is found on page 38 in the Reference Booklet. q Voice Allocation Format With MIDI, voices... devices can be made in various music books and magazines. Even if the devices and data used with various Yamaha software. • The CVP-103 is avail- The MIDI Implementation Chart for that instrument. You can check whether your instrument supports certain data types by...
...and MF2HD (double sided, high density), and each type has different formatting systems. • CVP-103 can playback the data recorded by referring to the MIDI Implementation Chart in the owner's manual for the CVP-103 is found on page 38 in the Reference Booklet. q Voice Allocation Format With MIDI, voices... devices can be made in various music books and magazines. Even if the devices and data used with various Yamaha software. • The CVP-103 is avail- The MIDI Implementation Chart for that instrument. You can check whether your instrument supports certain data types by...
Owner's Manual
Page 175
...listed in all installation instructions. Failure to follow instructions could void your plug proceed as indicated in the instructions contained in the users manual, may not correspond with the letter L or coloured RED. The wire which is coloured BROWN must be connected to the terminal... which can not locate the appropriate retailer, please contact Yamaha Corporation of America, Electronic Service Division, 6600 Orangethorpe Ave, Buena Park, CA90620 The above statements apply ONLY to the terminal which is...
...listed in all installation instructions. Failure to follow instructions could void your plug proceed as indicated in the instructions contained in the users manual, may not correspond with the letter L or coloured RED. The wire which is coloured BROWN must be connected to the terminal... which can not locate the appropriate retailer, please contact Yamaha Corporation of America, Electronic Service Division, 6600 Orangethorpe Ave, Buena Park, CA90620 The above statements apply ONLY to the terminal which is...
Owner's Manual
Page 176
.... 2. or b. scribed in performance; Placement of producing sound levels that is required. 7. or e. If you should also be capable of this manual. 3. Please make sure that unobstructed ventilation is recommended by Yamaha. 5. For longer extension cords, consult a local electrician. 6. If instructions for use in combination with proper ventilation. sory mounting fixtures that...
.... 2. or b. scribed in performance; Placement of producing sound levels that is required. 7. or e. If you should also be capable of this manual. 3. Please make sure that unobstructed ventilation is recommended by Yamaha. 5. For longer extension cords, consult a local electrician. 6. If instructions for use in combination with proper ventilation. sory mounting fixtures that...

