
Owner's Manual
Page 1
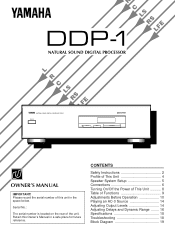
... Adjusting Output Levels 14 Adjusting Delays and Dynamic Range ........ 16 Specifications 18 Troubleshooting 18 Block Diagram 19 Please record the serial number of this Owner's Manual in the space below. CONTENTS Safety Instructions 2 Profile of This Unit 4 Speaker System Setup 5 Connections 6 Turning On/Off the Power of This Unit 8 Table of...
... Adjusting Output Levels 14 Adjusting Delays and Dynamic Range ........ 16 Specifications 18 Troubleshooting 18 Block Diagram 19 Please record the serial number of this Owner's Manual in the space below. CONTENTS Safety Instructions 2 Profile of This Unit 4 Speaker System Setup 5 Connections 6 Turning On/Off the Power of This Unit 8 Table of...

Owner's Manual
Page 3
... of humming (transformers, motors). Never pull the wires themselves. 6 Do not attempt to use this unit for US customers only) YAMAHA and the Electronic Industries Association's Consumer Electronics Group want you to provide. Use a clean, dry cloth. 7 To prevent lightning damage...the following measures: Relocate either this product is too late, YAMAHA and the Electronic Industries Association's Consumer Electronics Group recommend you can be used according to the instructions found to read this manual carefully. If these requirements provides a reasonable level of other ...
... of humming (transformers, motors). Never pull the wires themselves. 6 Do not attempt to use this unit for US customers only) YAMAHA and the Electronic Industries Association's Consumer Electronics Group want you to provide. Use a clean, dry cloth. 7 To prevent lightning damage...the following measures: Relocate either this product is too late, YAMAHA and the Electronic Industries Association's Consumer Electronics Group recommend you can be used according to the instructions found to read this manual carefully. If these requirements provides a reasonable level of other ...

Owner's Manual
Page 5
... R A simple system without it is ideal to use a center speaker, you have already set up from the floor. CENTER SP.) to the owner's manual of the RX-V2090 for this unit connecting with TV sets, use a magnetically shielded speaker.) Surround L 5 Speaker placement Main L Main R Center Surround ...for details.) Main speakers should be equal to the main speakers. Center: Precisely between the main speakers. (To avoid interference with the Yamaha RX-V2090. You can always upgrade to the five speaker system later. * For the best performance of your system that can enjoy ...
... R A simple system without it is ideal to use a center speaker, you have already set up from the floor. CENTER SP.) to the owner's manual of the RX-V2090 for this unit connecting with TV sets, use a magnetically shielded speaker.) Surround L 5 Speaker placement Main L Main R Center Surround ...for details.) Main speakers should be equal to the main speakers. Center: Precisely between the main speakers. (To avoid interference with the Yamaha RX-V2090. You can always upgrade to the five speaker system later. * For the best performance of your system that can enjoy ...
Owner's Manual
Page 6
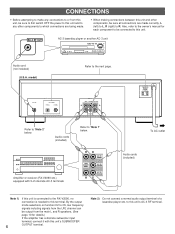
... made . • When making connections between this unit's SUBWOOFER 6 OUTPUT terminal. AC OUTLET UNSWITCHED I20V 60Hz I.6A MAX. 200W MAX. Also, refer to the owner's manual for each component to be output from the main L and R speakers. (See page 10 for details.) If the amplifier has a discrete subwoofer input terminal, connect...
... made . • When making connections between this unit's SUBWOOFER 6 OUTPUT terminal. AC OUTLET UNSWITCHED I20V 60Hz I.6A MAX. 200W MAX. Also, refer to the owner's manual for each component to be output from the main L and R speakers. (See page 10 for details.) If the amplifier has a discrete subwoofer input terminal, connect...
Owner's Manual
Page 12
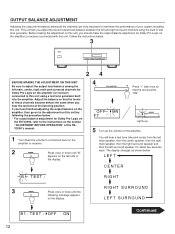
... : RIGHT 3 MENU Press once or more until the following the procedure below . Before making the adjustment on the section "ADJUSTMENT BEFORE OPERATION" of the RXV2090's manual. 4 PARAMETER Press "+" side once so that the levels of your system including this unit, you hear the test tone at the listening position. RIGHT SURROUND...
... : RIGHT 3 MENU Press once or more until the following the procedure below . Before making the adjustment on the section "ADJUSTMENT BEFORE OPERATION" of the RXV2090's manual. 4 PARAMETER Press "+" side once so that the levels of your system including this unit, you hear the test tone at the listening position. RIGHT SURROUND...

Owner's Manual
Page 14
... 14-17 for details.) ADJUSTING OUTPUT LEVELS The following output level adjustments are adjusted. LEFT SURROUND LEVEL B3. OUTPUT TRIM Description of the RX-V2090's manual.) 4 Play an AC-3 source on the AC-3 unit. 5 Turn up the volume on the amplifier. 6 If desired, adjust output levels, delays, dynamic range, etc. OUTPUT...
... 14-17 for details.) ADJUSTING OUTPUT LEVELS The following output level adjustments are adjusted. LEFT SURROUND LEVEL B3. OUTPUT TRIM Description of the RX-V2090's manual.) 4 Play an AC-3 source on the AC-3 unit. 5 Turn up the volume on the amplifier. 6 If desired, adjust output levels, delays, dynamic range, etc. OUTPUT...


