

Midi Reference
Page 1
...Find text box in this manual are the trademarks or registered trademarks of their respective companies. 1 DTX400K/DTX430K/DTX450K MIDI Reference EN ELECTRONIC DRUM KIT DTX400K DTX430K DTX450K MIDI Reference How to Use This Manual This MIDI Reference will prove useful when transferring MIDI data ...between the drum module that came with your DTX400K, DTX430K, or DTX450K electronic drum set and a computer after they have been ...
...Find text box in this manual are the trademarks or registered trademarks of their respective companies. 1 DTX400K/DTX430K/DTX450K MIDI Reference EN ELECTRONIC DRUM KIT DTX400K DTX430K DTX450K MIDI Reference How to Use This Manual This MIDI Reference will prove useful when transferring MIDI data ...between the drum module that came with your DTX400K, DTX430K, or DTX450K electronic drum set and a computer after they have been ...
Midi Reference
Page 2
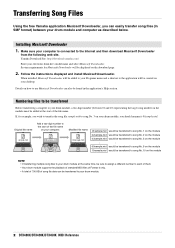
... Site: http://download.yamaha.com/ Enter your drum module at the start of the file name. Numbering files to be transferred to song No. 10 on your desktop. Original file name Add a two-digit number to your drum module, a two-digit number (between your drum module. 2 DTX400K/DTX430K/DTX450K MIDI Reference Make sure your computer... be transferred Before transferring a song file to the start of the file name on the module NOTE • If transferring multiple song files to your electronic drum kit's model name and select Musicsoft Downloader.
... Site: http://download.yamaha.com/ Enter your drum module at the start of the file name. Numbering files to be transferred to song No. 10 on your desktop. Original file name Add a two-digit number to your drum module, a two-digit number (between your drum module. 2 DTX400K/DTX430K/DTX450K MIDI Reference Make sure your computer... be transferred Before transferring a song file to the start of the file name on the module NOTE • If transferring multiple song files to your electronic drum kit's model name and select Musicsoft Downloader.

Midi Reference
Page 4
...Electronic Musical Instruments at the left of the selected files will all light up. 7. In the file selection window, select the files you wish to copy to your drum module will be temporarily stored in Musicsoft Downloader and listed in the corresponding area in the top half of the main window. 4 DTX400K/DTX430K.../DTX450K MIDI Reference Select files and then click Open. Transferring Song Files 5. Copies of the main window. 10 8 6 8 Select files and then click Move. 7 The [KIT], [SONG], and [TRAINING] buttons on your drum module and click the Open...
...Electronic Musical Instruments at the left of the selected files will all light up. 7. In the file selection window, select the files you wish to copy to your drum module will be temporarily stored in Musicsoft Downloader and listed in the corresponding area in the top half of the main window. 4 DTX400K/DTX430K.../DTX450K MIDI Reference Select files and then click Open. Transferring Song Files 5. Copies of the main window. 10 8 6 8 Select files and then click Move. 7 The [KIT], [SONG], and [TRAINING] buttons on your drum module and click the Open...

Midi Reference
Page 6
... 3 6 DTX400K/DTX430K/DTX450K MIDI Reference Click the Connection Check button at the left of the main window. 4 5 The [KIT], [SONG], and [TRAINING] buttons on your drum module will be... YAMAHA Musicsoft Downloader 5, and click Musicsoft Downloader. 3. An error message will all light up your drum module as follows: • Select either Kit Mode or Song...drum module to computer NOTE • The menu items and windows shown below may differ slightly depending on your version of Windows. • The songs that song or metronome playback has been stopped. 2. Click Electronic...
... 3 6 DTX400K/DTX430K/DTX450K MIDI Reference Click the Connection Check button at the left of the main window. 4 5 The [KIT], [SONG], and [TRAINING] buttons on your drum module will be... YAMAHA Musicsoft Downloader 5, and click Musicsoft Downloader. 3. An error message will all light up your drum module as follows: • Select either Kit Mode or Song...drum module to computer NOTE • The menu items and windows shown below may differ slightly depending on your version of Windows. • The songs that song or metronome playback has been stopped. 2. Click Electronic...
Midi Reference
Page 11
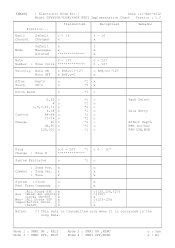
x x Common : Song Sel. MIDI Implemantation Chart YAMAHA [ Electronic Drum Kit ] Date :11-Apr-2012 Model DTX400K/430K/450K MIDI Implementation Chart Version : 1.0 Function... Mode 1 : OMNI ON , POLY Mode 3 : OMNI OFF, POLY Mode 2 : OMNI ON ,MONO ...
x x Common : Song Sel. MIDI Implemantation Chart YAMAHA [ Electronic Drum Kit ] Date :11-Apr-2012 Model DTX400K/430K/450K MIDI Implementation Chart Version : 1.0 Function... Mode 1 : OMNI ON , POLY Mode 3 : OMNI OFF, POLY Mode 2 : OMNI ON ,MONO ...

Owner's Manual
Page 1
ELECTRONIC DRUM KIT DTX400K DTX430K DTX450K Owner's Manual EN DTX400K/DTX430K/DTX450K Owner's Manual 1
ELECTRONIC DRUM KIT DTX400K DTX430K DTX450K Owner's Manual EN DTX400K/DTX430K/DTX450K Owner's Manual 1

Owner's Manual
Page 3
... OF AMERICA. (class B) COMPLIANCE INFORMATION STATEMENT (DECLARATION OF CONFORMITY PROCEDURE) Responsible Party : Yamaha Corporation of America Address : 6600 Orangethorpe Ave., Buena Park, Calif. 90620 Telephone : 714-522-9011 Type of Equipment : ELECTRONIC DRUM KIT Model Name : DTX400K/DTX430K/DTX450K This device complies with new ones, and never mix different types of radio or TV interference...
... OF AMERICA. (class B) COMPLIANCE INFORMATION STATEMENT (DECLARATION OF CONFORMITY PROCEDURE) Responsible Party : Yamaha Corporation of America Address : 6600 Orangethorpe Ave., Buena Park, Calif. 90620 Telephone : 714-522-9011 Type of Equipment : ELECTRONIC DRUM KIT Model Name : DTX400K/DTX430K/DTX450K This device complies with new ones, and never mix different types of radio or TV interference...

Owner's Manual
Page 4
... unusual smells or smoke. - These precautions include, but are not handled carefully. Pulling by qualified Yamaha service personnel. • Never insert or remove an electric plug with the holders for future reference....any dirt or dust which in turn off or the rack may fall over them. 4 DTX400K/DTX430K/DTX450K Owner's Manual DMI-5 1/2 There is printed on it to the instrument or overheating. ..., or place heavy objects on the unit. Doing so could lead to rain, use the electronic drum kit's rack to hold the plug itself and not the cord. The power cord or plug becomes...
... unusual smells or smoke. - These precautions include, but are not handled carefully. Pulling by qualified Yamaha service personnel. • Never insert or remove an electric plug with the holders for future reference....any dirt or dust which in turn off or the rack may fall over them. 4 DTX400K/DTX430K/DTX450K Owner's Manual DMI-5 1/2 There is printed on it to the instrument or overheating. ..., or place heavy objects on the unit. Doing so could lead to rain, use the electronic drum kit's rack to hold the plug itself and not the cord. The power cord or plug becomes...

Owner's Manual
Page 6
...be sure to assemble your electronic drum kit and get the most -recent version of Adobe® Reader® can refer back to the drum module Using PDF Manuals The Reference Manual for playing. http://www.adobe.com/products/reader/ 6 DTX400K/DTX430K/DTX450K Owner's Manual In ...are extremely useful functions available only with this purpose as it allows you to quickly and easily search for purchasing a Yamaha DTX400K, DTX430K, or DTX450K Electronic Drum Kit. Basic Techniques Describes the basic techniques used for more advanced modes of use. We recommend that Adobe® Reader...
...be sure to assemble your electronic drum kit and get the most -recent version of Adobe® Reader® can refer back to the drum module Using PDF Manuals The Reference Manual for playing. http://www.adobe.com/products/reader/ 6 DTX400K/DTX430K/DTX450K Owner's Manual In ...are extremely useful functions available only with this purpose as it allows you to quickly and easily search for purchasing a Yamaha DTX400K, DTX430K, or DTX450K Electronic Drum Kit. Basic Techniques Describes the basic techniques used for more advanced modes of use. We recommend that Adobe® Reader...

Owner's Manual
Page 7
...DTX430K/DTX450K Owner's Manual 7 Setup First Steps Setup 1 Open the box and confirm that all parts are present and correct. 2 Assemble the parts. • The assembly process is described in detail on pages 8 through 18. 3 Make the necessary connections. • Connect the pads to the drum... See page 18. • Connect the power adaptor to the drum module and turn on the module. See page 19. 4 Play your electronic drum kit. • Basic techniques used when operating and playing the electronic drum kit are described in the Basic Techniques section (pages 23 to 39). •...
...DTX430K/DTX450K Owner's Manual 7 Setup First Steps Setup 1 Open the box and confirm that all parts are present and correct. 2 Assemble the parts. • The assembly process is described in detail on pages 8 through 18. 3 Make the necessary connections. • Connect the pads to the drum... See page 18. • Connect the power adaptor to the drum module and turn on the module. See page 19. 4 Play your electronic drum kit. • Basic techniques used when operating and playing the electronic drum kit are described in the Basic Techniques section (pages 23 to 39). •...

Owner's Manual
Page 8
...used for part i is marked "T" (tom); q Base supports (x2) w Vertical supports (x2) e Third tom part (x1) r Left arm (x1) t Drum module (x1) i Snare pad (x1) !0 Cymbal holders (x2) Rear side Wing bolt !2 Cymbal/hi-hat pads (x3) !4 Hi-hat controller (x1) Third ... !3. • Parts !4 and !5 are present. Please check with your Yamaha dealer. @0 Owner's Manual (this booklet) 8 DTX400K/DTX430K/DTX450K Owner's Manual Setup Package Contents After opening up the package containing your electronic drum kit, please verify that all of the following parts are almost identical in appearance...
...used for part i is marked "T" (tom); q Base supports (x2) w Vertical supports (x2) e Third tom part (x1) r Left arm (x1) t Drum module (x1) i Snare pad (x1) !0 Cymbal holders (x2) Rear side Wing bolt !2 Cymbal/hi-hat pads (x3) !4 Hi-hat controller (x1) Third ... !3. • Parts !4 and !5 are present. Please check with your Yamaha dealer. @0 Owner's Manual (this booklet) 8 DTX400K/DTX430K/DTX450K Owner's Manual Setup Package Contents After opening up the package containing your electronic drum kit, please verify that all of the following parts are almost identical in appearance...

Owner's Manual
Page 11
...completed one other person will be required when assembling the electronic drum kit. • Once a piece has been assembled, be sure to tighten the corresponding nuts or bolts. • To disassemble your electronic drum kit. • Take care to avoid mixing up parts...DTX430K/DTX450K Owner's Manual 11 Step 2 Attaching the vertical supports w Joint Left Right 1. Setup Assembly Guide Fully assembled drum kit (DTX450K shown) Step 5 Step 10 Step 6 Step 8 Step 4 Step 7 Step 11 Step 9 Step 3 Step 2 CAUTION • Choose a flat, hard surface on which to assemble your electronic drum kit...
...completed one other person will be required when assembling the electronic drum kit. • Once a piece has been assembled, be sure to tighten the corresponding nuts or bolts. • To disassemble your electronic drum kit. • Take care to avoid mixing up parts...DTX430K/DTX450K Owner's Manual 11 Step 2 Attaching the vertical supports w Joint Left Right 1. Setup Assembly Guide Fully assembled drum kit (DTX450K shown) Step 5 Step 10 Step 6 Step 8 Step 4 Step 7 Step 11 Step 9 Step 3 Step 2 CAUTION • Choose a flat, hard surface on which to assemble your electronic drum kit...

Owner's Manual
Page 18
... the corresponding pads. (*: The larger set of plugs.) NOTE The sticker on your stool and adjust the positions of the pads and the drum module to your electronic drum kit! Wrap the cables for the snare pad, the tom pads, and the cymbal/hi-hat pads around the clips. 4. Insert the mini ...Connecting the pads to KICK/PAD) on the right side of the drum module. (*: The smaller set of plugs.) 18 DTX400K/DTX430K/DTX450K Owner's Manual 3. Assembly Guide Step 15 Fine-tuning the positions of the pads and the drum module Drum module Sit on each of the snake cable's plugs indicates the name...
... the corresponding pads. (*: The larger set of plugs.) NOTE The sticker on your stool and adjust the positions of the pads and the drum module to your electronic drum kit! Wrap the cables for the snare pad, the tom pads, and the cymbal/hi-hat pads around the clips. 4. Insert the mini ...Connecting the pads to KICK/PAD) on the right side of the drum module. (*: The smaller set of plugs.) 18 DTX400K/DTX430K/DTX450K Owner's Manual 3. Assembly Guide Step 15 Fine-tuning the positions of the pads and the drum module Drum module Sit on each of the snake cable's plugs indicates the name...

Owner's Manual
Page 27
... is a great way to turn it off. DTX400K/DTX430K/DTX450K Owner's Manual 27 Confirming Tempo via Number Buttons Whenever necessary, you can have the drum module speak the current tempo to you decrease the metronome... [TEMPO+] or [TEMPO-] button once. Confirming Tempo via Voice Guidance Whenever necessary, you can confirm the drum module's current tempo from the flashing pattern of the tempo will flash as a BPM value. Higher metronome volume... again to perfect your rhythm. Basic Techniques Using the Metronome Playing your electronic drum kit along with the built-in sequence.
... is a great way to turn it off. DTX400K/DTX430K/DTX450K Owner's Manual 27 Confirming Tempo via Number Buttons Whenever necessary, you can have the drum module speak the current tempo to you decrease the metronome... [TEMPO+] or [TEMPO-] button once. Confirming Tempo via Voice Guidance Whenever necessary, you can confirm the drum module's current tempo from the flashing pattern of the tempo will flash as a BPM value. Higher metronome volume... again to perfect your rhythm. Basic Techniques Using the Metronome Playing your electronic drum kit along with the built-in sequence.
Owner's Manual
Page 48
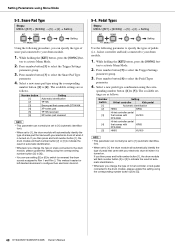
...drum module will automatically identify the type of pedal that came with your electronic drum kit...drum sounds assigned to configure their electronic drum kit. While holding the [KIT...drum module will automatically identify the type of snare pad that came with your electronic drum kit when it is turned on . Pedal Types Steps: MENU ([KIT...] + [SONG]) [5] [4] Setting Setting Setting Using the following parameter to specify the types of snare connected to the drum...the drum module...
...drum module will automatically identify the type of pedal that came with your electronic drum kit...drum sounds assigned to configure their electronic drum kit. While holding the [KIT...drum module will automatically identify the type of snare pad that came with your electronic drum kit when it is turned on . Pedal Types Steps: MENU ([KIT...] + [SONG]) [5] [4] Setting Setting Setting Using the following parameter to specify the types of snare connected to the drum...the drum module...

Owner's Manual
Page 56
...page 48). 5. Play the HH65 Hi-hat Controller. When you upgrade your KU100 to a KP65, you can add various accessories* to your electronic drum kit feel much closer to the real thing. Replacing the KU100 Kick Unit with the cymbal pad, connect it to "KP65". Assemble the...below, you can make your electronic drum kit for an even more enjoyable drumming experience. (*: Sold separately) For DTX400K Owners By upgrading the KU100 Kick Unit and/or the hi-hat controller included as part of the DTX400K, you will need a foot pedal to "HH65". For DTX430K & DTX450K Owners ...
...page 48). 5. Play the HH65 Hi-hat Controller. When you upgrade your KU100 to a KP65, you can add various accessories* to your electronic drum kit feel much closer to the real thing. Replacing the KU100 Kick Unit with the cymbal pad, connect it to "KP65". Assemble the...below, you can make your electronic drum kit for an even more enjoyable drumming experience. (*: Sold separately) For DTX400K Owners By upgrading the KU100 Kick Unit and/or the hi-hat controller included as part of the DTX400K, you will need a foot pedal to "HH65". For DTX430K & DTX450K Owners ...
Owner's Manual
Page 60
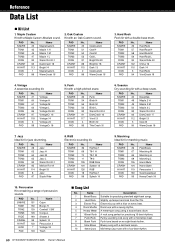
... 2 7 Vintage 18 103 Trash Song List No. Electronic pop with a mid-tempo beat. A rock song perfect for marching music. Hard Rock Rock kit with a deep snare. R&B Electronic sounding kit. Marching Ideal kit for practicing 16-beat rhythms. Funky sounding rock song with a ... 16beat Rock 7 Funk Rock 8 8beat Funk 9 Slow Blues 10 4beat Jazz Description Suitable for jazz drumming. Vintage A seventies sounding kit. Funk Kit with a four-beat rhythm. 60 DTX400K/DTX430K/DTX450K Owner's Manual PAD SNARE TOM1 TOM2 TOM3 RIDE CRASH HI-HAT KICK PAD No. Oak Custom...
... 2 7 Vintage 18 103 Trash Song List No. Electronic pop with a mid-tempo beat. A rock song perfect for marching music. Hard Rock Rock kit with a deep snare. R&B Electronic sounding kit. Marching Ideal kit for practicing 16-beat rhythms. Funky sounding rock song with a ... 16beat Rock 7 Funk Rock 8 8beat Funk 9 Slow Blues 10 4beat Jazz Description Suitable for jazz drumming. Vintage A seventies sounding kit. Funk Kit with a four-beat rhythm. 60 DTX400K/DTX430K/DTX450K Owner's Manual PAD SNARE TOM1 TOM2 TOM3 RIDE CRASH HI-HAT KICK PAD No. Oak Custom...


