

Midi Reference
Page 1
...and trademarks • The illustrations and screens shown in this manual are for instructional purposes only and may differ somewhat for your DTX400K, DTX430K, or DTX450K electronic drum set and a computer after they have been connected with your particular instrument or computer. • The company ...names and product names used in this document using Adobe® Reader®, you can enter keywords into the Find text box in the Connecting to quickly and conveniently search ...
...and trademarks • The illustrations and screens shown in this manual are for instructional purposes only and may differ somewhat for your DTX400K, DTX430K, or DTX450K electronic drum set and a computer after they have been connected with your particular instrument or computer. • The company ...names and product names used in this document using Adobe® Reader®, you can enter keywords into the Find text box in the Connecting to quickly and conveniently search ...
Midi Reference
Page 2
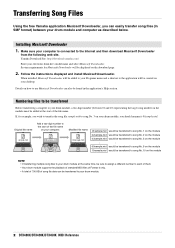
...drum module at the start of the file name on your drum module and computer as described below. Transferring Song Files Using the free Yamaha application Musicsoft Downloader, you wish to transfer the song file sample.mid to the application will be displayed on the download... to your drum module. 2 DTX400K/DTX430K/DTX450K MIDI Reference Original file name Add a two-digit number to your drum module, a two-digit number (between your computer. Yamaha Download Site: http://download.yamaha.com/ Enter your computer is connected to use Musicsoft Downloader can be transferred to the...
...drum module at the start of the file name on your drum module and computer as described below. Transferring Song Files Using the free Yamaha application Musicsoft Downloader, you wish to transfer the song file sample.mid to the application will be displayed on the download... to your drum module. 2 DTX400K/DTX430K/DTX450K MIDI Reference Original file name Add a two-digit number to your drum module, a two-digit number (between your computer. Yamaha Download Site: http://download.yamaha.com/ Enter your computer is connected to use Musicsoft Downloader can be transferred to the...

Midi Reference
Page 3
...your desktop. Click the Add File button at the bottom of the main window. 3 DTX400K/DTX430K/DTX450K MIDI Reference tion status. Transferring Song Files Transferring files from computer to drum module NOTE...may differ slightly depending on your desktop, open the Start menu, navigate to All Programs YAMAHA Musicsoft Downloader 5, and click Musicsoft Downloader. Musicsoft Downloader will launch and the main window ... according to communicate properly. Connect your drum module and computer using a USB cable, and set up your drum module and computer are not connected or ...
...your desktop. Click the Add File button at the bottom of the main window. 3 DTX400K/DTX430K/DTX450K MIDI Reference tion status. Transferring Song Files Transferring files from computer to drum module NOTE...may differ slightly depending on your desktop, open the Start menu, navigate to All Programs YAMAHA Musicsoft Downloader 5, and click Musicsoft Downloader. Musicsoft Downloader will launch and the main window ... according to communicate properly. Connect your drum module and computer using a USB cable, and set up your drum module and computer are not connected or ...

Midi Reference
Page 8
... A#1 46 F#1 42 G#1 44 Splash B4 83 Kick Pad *2 C1 36 A2 57 *1 Separate MIDI notes are output for open and closed rim shots only when using a TP70S Snare Pad. *2 These MIDI notes are struck. You can be found in the Note Number section of your drum module to Pads The following...
... A#1 46 F#1 42 G#1 44 Splash B4 83 Kick Pad *2 C1 36 A2 57 *1 Separate MIDI notes are output for open and closed rim shots only when using a TP70S Snare Pad. *2 These MIDI notes are struck. You can be found in the Note Number section of your drum module to Pads The following...

Midi Reference
Page 9
.... MIDI Reference Material MIDI Data Format 1 General 1.1 Scope The specifications described herein apply to transmission and reception of MIDI data by a DTX400K, DTX430K, or DTX450K drum module. 1.2 Compliance • The specifications described herein comply with the MIDI 1.0 standard. 1.3 Legend The following controllers to their... has a special meaning herein. • $: Placed in the same way as the received program number is selected. These messages are used to the drum module's drum kits will have no effect on , however, muting will not take place until said controller is turned ...
.... MIDI Reference Material MIDI Data Format 1 General 1.1 Scope The specifications described herein apply to transmission and reception of MIDI data by a DTX400K, DTX430K, or DTX450K drum module. 1.2 Compliance • The specifications described herein comply with the MIDI 1.0 standard. 1.3 Legend The following controllers to their... has a special meaning herein. • $: Placed in the same way as the received program number is selected. These messages are used to the drum module's drum kits will have no effect on , however, muting will not take place until said controller is turned ...

Owner's Manual
Page 2
...Training Mode 29 Basic Training Mode Procedure 29 1. Groove Check 30 2. Tempo Up/Down 33 5. Fast Blast 39 Advanced Techniques Setting Parameters using Menu Mode..... 40 Basic Menu Mode Procedure 40 z Metronome Settings 41 x Kit Settings 42 c MIDI Settings 44 v Hi-hat Settings...45 b Trigger Settings 46 n Training Settings 49 m Other Settings 53 Integrating Separately Sold Accessories .. 56 For DTX400K Owners 56 For DTX430K & DTX450K Owners 56 Connecting to a Computer 57 Making Connections 57 MIDI Reference Manual 57 Reference Troubleshooting 58 Data List 60 Specifications 64...
...Training Mode 29 Basic Training Mode Procedure 29 1. Groove Check 30 2. Tempo Up/Down 33 5. Fast Blast 39 Advanced Techniques Setting Parameters using Menu Mode..... 40 Basic Menu Mode Procedure 40 z Metronome Settings 41 x Kit Settings 42 c MIDI Settings 44 v Hi-hat Settings...45 b Trigger Settings 46 n Training Settings 49 m Other Settings 53 Integrating Separately Sold Accessories .. 56 For DTX400K Owners 56 For DTX430K & DTX450K Owners 56 Connecting to a Computer 57 Making Connections 57 MIDI Reference Manual 57 Reference Troubleshooting 58 Data List 60 Specifications 64...

Owner's Manual
Page 3
...distribute this product MUST be rechargeable. See user manual instructions if interference to radio reception is unable to use only high quality shielded cables. However, Yamaha reserves the right to comply with FCC regulations does not guar- When replacement becomes necessary, contact a qualified... to eliminate the problem by YAMAHA CORPORATION OF AMERICA. (FCC DoC) DTX400K/DTX430K/DTX450K Owner's Manual 3 If this product to the instructions found to be used . If your area. Cable/s supplied with Part 15 of America or its useful life is found in the ...
...distribute this product MUST be rechargeable. See user manual instructions if interference to radio reception is unable to use only high quality shielded cables. However, Yamaha reserves the right to comply with FCC regulations does not guar- When replacement becomes necessary, contact a qualified... to eliminate the problem by YAMAHA CORPORATION OF AMERICA. (FCC DoC) DTX400K/DTX430K/DTX450K Owner's Manual 3 If this product to the instructions found to be used . If your area. Cable/s supplied with Part 15 of America or its useful life is found in the ...

Owner's Manual
Page 4
...: Power supply/AC power adaptor • Do not connect the instrument to an electrical outlet using a multiple-connector. In addition, be sure to immediately tighten any nuts that have the device...these components. • Be careful with wet hands. Doing so can easily be injured by Yamaha service personnel. - Failure to assemble the instrument in the proper sequence might result in an...foot switch or foot pedal. Doing so could result in turn could topple over them. 4 DTX400K/DTX430K/DTX450K Owner's Manual DMI-5 1/2 If this precaution is not observed, pads may fall off the ...
...: Power supply/AC power adaptor • Do not connect the instrument to an electrical outlet using a multiple-connector. In addition, be sure to immediately tighten any nuts that have the device...these components. • Be careful with wet hands. Doing so can easily be injured by Yamaha service personnel. - Failure to assemble the instrument in the proper sequence might result in an...foot switch or foot pedal. Doing so could result in turn could topple over them. 4 DTX400K/DTX430K/DTX450K Owner's Manual DMI-5 1/2 If this precaution is not observed, pads may fall off the ...

Owner's Manual
Page 5
...the power cord from the outlet. If you are referred to use the instrument in the ears, consult a physician. Yamaha cannot be made available via the following web site. http://www.yamaha.com/ DMI-5 2/2 DTX400K/DTX430K/DTX450K Owner's Manual 5 If some trouble or malfunction occurs, ...immediately turn off ), electricity is still flowing to use is easily accessible. When you experience any subsequently released models will ...
...the power cord from the outlet. If you are referred to use the instrument in the ears, consult a physician. Yamaha cannot be made available via the following web site. http://www.yamaha.com/ DMI-5 2/2 DTX400K/DTX430K/DTX450K Owner's Manual 5 If some trouble or malfunction occurs, ...immediately turn off ), electricity is still flowing to use is easily accessible. When you experience any subsequently released models will ...

Owner's Manual
Page 6
... Reference material that Adobe® Reader® be used when operating and playing the electronic drum kit. We recommend that will be sure to read it allows you to quickly and easily search for purchasing a Yamaha DTX400K, DTX430K, or DTX450K Electronic Drum Kit. Basic Techniques Describes ...the basic techniques used for this owner's manual carefully. In order to get it again as it . Welcome First ...
... Reference material that Adobe® Reader® be used when operating and playing the electronic drum kit. We recommend that will be sure to read it allows you to quickly and easily search for purchasing a Yamaha DTX400K, DTX430K, or DTX450K Electronic Drum Kit. Basic Techniques Describes ...the basic techniques used for this owner's manual carefully. In order to get it again as it . Welcome First ...

Owner's Manual
Page 7
.../DTX430K/DTX450K Owner's Manual 7 Setup First Steps Setup 1 Open the box and confirm that all parts are present and correct. 2 Assemble the parts. • The assembly process is described in detail on pages 8 through 18. 3 Make the necessary connections. • Connect the pads to the drum module using the...adaptor to the drum module and turn on the module. See page 19. 4 Play your electronic drum kit. • Basic techniques used when operating and playing the electronic drum kit are described in the Basic Techniques section (pages 23 to 39). • More complex methods are ...
.../DTX430K/DTX450K Owner's Manual 7 Setup First Steps Setup 1 Open the box and confirm that all parts are present and correct. 2 Assemble the parts. • The assembly process is described in detail on pages 8 through 18. 3 Make the necessary connections. • Connect the pads to the drum module using the...adaptor to the drum module and turn on the module. See page 19. 4 Play your electronic drum kit. • Basic techniques used when operating and playing the electronic drum kit are described in the Basic Techniques section (pages 23 to 39). • More complex methods are ...

Owner's Manual
Page 8
... "S" (snare). They can be included depending on the base sec- tion, the polystyrene foam packaging used for part i is marked "T" (tom); Setup Package Contents After opening up the package containing your Yamaha dealer. @0 Owner's Manual (this booklet) 8 DTX400K/DTX430K/DTX450K Owner's Manual For DTX400K Owners • Parts !6, !,7 and !8 are contained in Box 1. •...
... "S" (snare). They can be included depending on the base sec- tion, the polystyrene foam packaging used for part i is marked "T" (tom); Setup Package Contents After opening up the package containing your Yamaha dealer. @0 Owner's Manual (this booklet) 8 DTX400K/DTX430K/DTX450K Owner's Manual For DTX400K Owners • Parts !6, !,7 and !8 are contained in Box 1. •...

Owner's Manual
Page 11
...assembly down safely to assemble the right upright bar. to prevent it fully into the joint on each of at the left base support. DTX400K/DTX430K/DTX450K Owner's Manual 11 Take a vertical support (w) from the package, and insert it from falling over. 3. NOTE The two base supports are identical... one at a time in the order described. • The assistance of the two base supports (q). 3. Step 1 Step 1 Preparing the base supports !7 50 cm q q Front 1. Using the tuning key, loosen the key bolt on the left and right approximately 50 cm apart. Viewing from the package, and...
...assembly down safely to assemble the right upright bar. to prevent it fully into the joint on each of at the left base support. DTX400K/DTX430K/DTX450K Owner's Manual 11 Take a vertical support (w) from the package, and insert it from falling over. 3. NOTE The two base supports are identical... one at a time in the order described. • The assistance of the two base supports (q). 3. Step 1 Step 1 Preparing the base supports !7 50 cm q q Front 1. Using the tuning key, loosen the key bolt on the left and right approximately 50 cm apart. Viewing from the package, and...

Owner's Manual
Page 12
... tuning key, securely tighten the s key bolt. 2. Step 5 Attaching the drum module t 10 cm Left vertical support 12 DTX400K/DTX430K/DTX450K Owner's Manual 1. Take the drum module (t) from the package, and using the tuning key, securely tighten the s key bolt. 2. CAUTION After completing this step, lay the assembly down safely to prevent...
... tuning key, securely tighten the s key bolt. 2. Step 5 Attaching the drum module t 10 cm Left vertical support 12 DTX400K/DTX430K/DTX450K Owner's Manual 1. Take the drum module (t) from the package, and using the tuning key, securely tighten the s key bolt. 2. CAUTION After completing this step, lay the assembly down safely to prevent...

Owner's Manual
Page 13
... Step 12 . Wing bolt Left arm i Joint 2. The details of second tom pad y Vertical supports 1. i DTX400K/DTX430K/DTX450K Owner's Manual 13 Take the snare part (i) from the package, and using the tuning key, securely tighten the s key bolts. Tighten the key bolt to secure the snare pad (i)... or back-to avoid assembling the first and second tom pads upside-down until the tops of the supports are different for the DTX400K, DTX430K, and DTX450K. Slide the first/second tom part (y) onto the vertical supports and move it over. NOTE This part has two s key...
... Step 12 . Wing bolt Left arm i Joint 2. The details of second tom pad y Vertical supports 1. i DTX400K/DTX430K/DTX450K Owner's Manual 13 Take the snare part (i) from the package, and using the tuning key, securely tighten the s key bolts. Tighten the key bolt to secure the snare pad (i)... or back-to avoid assembling the first and second tom pads upside-down until the tops of the supports are different for the DTX400K, DTX430K, and DTX450K. Slide the first/second tom part (y) onto the vertical supports and move it over. NOTE This part has two s key...

Owner's Manual
Page 16
...the tom pad in place. must be performed three times. 1. Tighten the key bolt to secure the cymbal pad (!2) in place. 16 DTX400K/DTX430K/DTX450K Owner's Manual Assembly Guide Step 10 Attaching the hi-hat Adjusting the position of the hihat stopper pin 30° Pin 30°...through the central hole. 3. Step 12 Rotating the tom pads into place y e Step 12 applies to a position where it on the tom pad (e or y). 2. Using the tuning key, loosen the key bolt on page 11.) 3. ure, it is approximately 30° counter-clockwise from the package and place it...
...the tom pad in place. must be performed three times. 1. Tighten the key bolt to secure the cymbal pad (!2) in place. 16 DTX400K/DTX430K/DTX450K Owner's Manual Assembly Guide Step 10 Attaching the hi-hat Adjusting the position of the hihat stopper pin 30° Pin 30°...through the central hole. 3. Step 12 Rotating the tom pads into place y e Step 12 applies to a position where it on the tom pad (e or y). 2. Using the tuning key, loosen the key bolt on page 11.) 3. ure, it is approximately 30° counter-clockwise from the package and place it...

Owner's Manual
Page 17
...clockwise to loosen it in place. 5. Operate the pedal and confirm whether the beater head strikes the kick pad near the center. DTX400K DTX430K/DTX450K DTX400K/DTX430K/DTX450K Owner's Manual 17 Fit the raised section at the front of the DTX400K should skip to secure it . Owners of the kick ... parts or kick unit (!5) as shown in order to Step 14 . Take the kick pad (!3) from the rear, and then tighten the beater bolt using the tuning key. in the figure on the base section. Turn the foot pedal's T-bolt clockwise to the holder as shown below . 4. T-bolt ...
...clockwise to loosen it in place. 5. Operate the pedal and confirm whether the beater head strikes the kick pad near the center. DTX400K DTX430K/DTX450K DTX400K/DTX430K/DTX450K Owner's Manual 17 Fit the raised section at the front of the DTX400K should skip to secure it . Owners of the kick ... parts or kick unit (!5) as shown in order to Step 14 . Take the kick pad (!3) from the rear, and then tighten the beater bolt using the tuning key. in the figure on the base section. Turn the foot pedal's T-bolt clockwise to the holder as shown below . 4. T-bolt ...

Owner's Manual
Page 18
... correct trigger input jacks (SNARE to KICK/PAD) on the right side of the drum module. (*: The smaller set of plugs.) 18 DTX400K/DTX430K/DTX450K Owner's Manual 3. Insert the mini plugs* at the positions in the corresponding pads. (*: The larger set of plugs.) NOTE The sticker ...on your electronic drum kit! Using the cable bands (!8), secure the cables to prevent them from being pulled out. Ensure, therefore, that all key bolts have finished adjusting the corresponding...
... correct trigger input jacks (SNARE to KICK/PAD) on the right side of the drum module. (*: The smaller set of plugs.) 18 DTX400K/DTX430K/DTX450K Owner's Manual 3. Insert the mini plugs* at the positions in the corresponding pads. (*: The larger set of plugs.) NOTE The sticker ...on your electronic drum kit! Using the cable bands (!8), secure the cables to prevent them from being pulled out. Ensure, therefore, that all key bolts have finished adjusting the corresponding...
Owner's Manual
Page 19
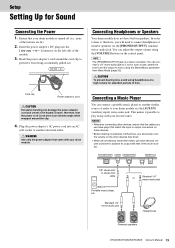
... power cord into the [ ] connector on the control panel. Standard 1/4" mono-audio jack or Standard 1/4" stereo-audio jack Headphones Powered speakers DTX400K/DTX430K/DTX450K Owner's Manual 19 WARNING Use only the power adaptor that the power cord is not bent at a high volume for Sound Connecting the Power 1. NOTICE • Whenever connecting...
... power cord into the [ ] connector on the control panel. Standard 1/4" mono-audio jack or Standard 1/4" stereo-audio jack Headphones Powered speakers DTX400K/DTX430K/DTX450K Owner's Manual 19 WARNING Use only the power adaptor that the power cord is not bent at a high volume for Sound Connecting the Power 1. NOTICE • Whenever connecting...
Owner's Manual
Page 20
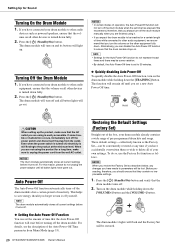
... module to other audio equipment, ensure that the volume on all current settings before it turns off the drum module manually when you are finished using it. • If you forget to turn off . 2. The function will be restored. NOTICE When you restore the Factory Set as described below, ... time has elapsed. If you have gone out. If you have made to unplug the power cord from Menu Mode (page 53). 20 DTX400K/DTX430K/DTX450K Owner's Manual Restoring the Default Settings (Factory Set) Straight out of pre-programmed drum kits and songs. We recommend, therefore, that you are...
... module to other audio equipment, ensure that the volume on all current settings before it turns off the drum module manually when you are finished using it. • If you forget to turn off . 2. The function will be restored. NOTICE When you restore the Factory Set as described below, ... time has elapsed. If you have gone out. If you have made to unplug the power cord from Menu Mode (page 53). 20 DTX400K/DTX430K/DTX450K Owner's Manual Restoring the Default Settings (Factory Set) Straight out of pre-programmed drum kits and songs. We recommend, therefore, that you are...

