
Assembly Manual
Page 1
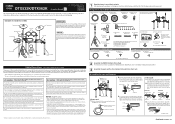
... six turns). 2. tighten the bolts before proceeding. DTX532K/DTX562K Assembly Manual EN U.R.G., Digital Musical Instruments Division © 2013 Yamaha Corporation 211POAP*.*-01A0 Printed in Vietnam ZE16340 This manual describes the standard assembly procedure for RHH135 (x1) Tuning key (x1) DTX502 Drum Module (x1) DTX532K/DTX562K Assembly Manual (this operation. • Be careful with the tips of supports, arms, screws, and the like. Hi-hat stand Snare pad Kick pad Electronic drum...
... six turns). 2. tighten the bolts before proceeding. DTX532K/DTX562K Assembly Manual EN U.R.G., Digital Musical Instruments Division © 2013 Yamaha Corporation 211POAP*.*-01A0 Printed in Vietnam ZE16340 This manual describes the standard assembly procedure for RHH135 (x1) Tuning key (x1) DTX502 Drum Module (x1) DTX532K/DTX562K Assembly Manual (this operation. • Be careful with the tips of supports, arms, screws, and the like. Hi-hat stand Snare pad Kick pad Electronic drum...
Assembly Manual
Page 2
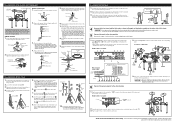
... then re- Connect the output of this manual. Ensure, therefore, that came with cymbal Wing nut Stopper Cymbal pad Smaller hole Cymbal pad Felt pad Bolt cover Pin Stopper Cymbal holder Assembling the hi-hat stand 1. Drum-module rear panel Cord clip connector. Using the tuning key, loosen the stopper's key bolt. Wing nut Felt pads Bolt cover Cymbal holder 3. It is not required when assembling the electronic drum kit in...
... then re- Connect the output of this manual. Ensure, therefore, that came with cymbal Wing nut Stopper Cymbal pad Smaller hole Cymbal pad Felt pad Bolt cover Pin Stopper Cymbal holder Assembling the hi-hat stand 1. Drum-module rear panel Cord clip connector. Using the tuning key, loosen the stopper's key bolt. Wing nut Felt pads Bolt cover Cymbal holder 3. It is not required when assembling the electronic drum kit in...


