
Assembly Manual
Page 1
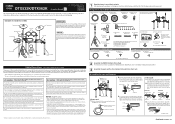
...top of the steps described, you should be disassembled or customized. x1) Wing bolt (for the DTX532K and DTX562K electronic drum kits. Assembling the snare and tom pads Tom pads DTX532K: TP70 DTX562K: XP70 2. Bolt B Bolt D Bolt C Bolt A Push on Wing bolt Tom holder ... KP65 Owner's Manual (x1) Module holder (x1) Power adaptor (x1) * May not be included depending on your Yamaha dealer. Module holder screw (x2) DTX502 Owner's Manual (x1) Components of the precautions detailed below , therefore, be crushed if ...
...top of the steps described, you should be disassembled or customized. x1) Wing bolt (for the DTX532K and DTX562K electronic drum kits. Assembling the snare and tom pads Tom pads DTX532K: TP70 DTX562K: XP70 2. Bolt B Bolt D Bolt C Bolt A Push on Wing bolt Tom holder ... KP65 Owner's Manual (x1) Module holder (x1) Power adaptor (x1) * May not be included depending on your Yamaha dealer. Module holder screw (x2) DTX502 Owner's Manual (x1) Components of the precautions detailed below , therefore, be crushed if ...
Assembly Manual
Page 2
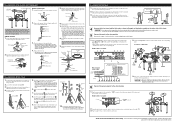
.... RIDE TOM3 TOM2 HI HAT HI CON SNARE TOM1 KICK 3. Ensure, therefore, that the area around the clips. 1. Your electronic drum kit is not required when assembling the electronic drum kit in the standard fashion described in place with the bottom seat approximately half way between the top of the lower tube...Module holder Bottom of the bottom seat. Remove the hi-hat shaft . Remove the felt pad from being scratched. 5 Connect the pads to the Yamaha logo found on the right, loosen the hi-hat clutch's wing bolt b and remove the hi-hat clutch. * The hi-hat clutch is not...
.... RIDE TOM3 TOM2 HI HAT HI CON SNARE TOM1 KICK 3. Ensure, therefore, that the area around the clips. 1. Your electronic drum kit is not required when assembling the electronic drum kit in the standard fashion described in place with the bottom seat approximately half way between the top of the lower tube...Module holder Bottom of the bottom seat. Remove the hi-hat shaft . Remove the felt pad from being scratched. 5 Connect the pads to the Yamaha logo found on the right, loosen the hi-hat clutch's wing bolt b and remove the hi-hat clutch. * The hi-hat clutch is not...


