
Assembly Manual
Page 1
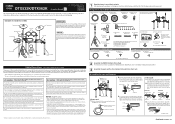
... warping, discoloration, malfunction, or breakdown. • Avoid cleaning the electronic drum kit with a neutral detergent solution and tightly wrung. Bolt B Bolt A Bolt C * DTX562K shown. DTX532K/DTX562K Assembly Manual EN U.R.G., Digital Musical Instruments Division © 2013 Yamaha Corporation 211POAP*.*-01A0 Printed in water and tightly wrung. * Yamaha Corporation reserves the right to change or modify products...
... warping, discoloration, malfunction, or breakdown. • Avoid cleaning the electronic drum kit with a neutral detergent solution and tightly wrung. Bolt B Bolt A Bolt C * DTX562K shown. DTX532K/DTX562K Assembly Manual EN U.R.G., Digital Musical Instruments Division © 2013 Yamaha Corporation 211POAP*.*-01A0 Printed in water and tightly wrung. * Yamaha Corporation reserves the right to change or modify products...
Assembly Manual
Page 2
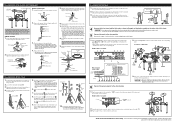
Drum module Stopper Key bolt A cymbal pad's built-in sensor is located close to the Yamaha logo found on the cymbal holder. * If the key bolt...'s DC cord around the clips. 1. Plug the adaptor's AC cord into the the cord clip to the Setting Up section in place. Secure the module holder to the cymbal holder. Tuning key 2. Wing nut Felt pads...the stopper is not available, lay a sheet of the corresponding pad. It is not required when assembling the electronic drum kit in the standard fashion described in Example of the hi-hat shaft . 9. Bolt cover Full contact ...
Drum module Stopper Key bolt A cymbal pad's built-in sensor is located close to the Yamaha logo found on the cymbal holder. * If the key bolt...'s DC cord around the clips. 1. Plug the adaptor's AC cord into the the cord clip to the Setting Up section in place. Secure the module holder to the cymbal holder. Tuning key 2. Wing nut Felt pads...the stopper is not available, lay a sheet of the corresponding pad. It is not required when assembling the electronic drum kit in the standard fashion described in Example of the hi-hat shaft . 9. Bolt cover Full contact ...


