

Owner's Manual
Page 4
... place: - This is called the standby mode. For Customer Use: Read carefully the information located at the rear panel of free space all connections are complete. 8 Do not operate this unit upside-down. Containers with a newspaper, tablecloth, curtain, etc. LASER Type Wave length Output Power Beam divergence Semiconductor laser GaAlAs 650 nm (DVD) 780 nm (VCD/CD) 7 mW (DVD) 10 mW (VCD/CD) 60...
... place: - This is called the standby mode. For Customer Use: Read carefully the information located at the rear panel of free space all connections are complete. 8 Do not operate this unit upside-down. Containers with a newspaper, tablecloth, curtain, etc. LASER Type Wave length Output Power Beam divergence Semiconductor laser GaAlAs 650 nm (DVD) 780 nm (VCD/CD) 7 mW (DVD) 10 mW (VCD/CD) 60...

Owner's Manual
Page 5
English Introduction Region codes 3 Supplied accessories 3 Notes about discs/content format 3 Cleaning discs 4 Patent information 4 Functional Overview Front panel 5 Rear panel 5 Remote control 6 Connections General notes on connections 7 Audio connections 7 Digital connection 7 Analog connection 7 Video connections 8 Component video jacks
English Introduction Region codes 3 Supplied accessories 3 Notes about discs/content format 3 Cleaning discs 4 Patent information 4 Functional Overview Front panel 5 Rear panel 5 Remote control 6 Connections General notes on connections 7 Audio connections 7 Digital connection 7 Analog connection 7 Video connections 8 Component video jacks
Owner's Manual
Page 6
...code 24 Audio setup menu 24 Setting the analog output 24 Setting the digital output 25 Setting the HDMI audio 26 CD upsampling 26 Night mode 26 Lip synchronization 27 Video setup menu 27 TV type 27 Setting the TV display 27 Progressive 28 Picture setting 29 Selecting the black level 30 Closed caption 30 HDMI setup 30 Preference setup menu 31 Audio, subtitle and disc menu 32 Restricting playback with parental control ..........32 Playback of VR format 32 MP3/JPEG menu 34 Displaying DivX external subtitle files 34 Changing the password 35 PBC (Playback control 35 Resetting...
...code 24 Audio setup menu 24 Setting the analog output 24 Setting the digital output 25 Setting the HDMI audio 26 CD upsampling 26 Night mode 26 Lip synchronization 27 Video setup menu 27 TV type 27 Setting the TV display 27 Progressive 28 Picture setting 29 Selecting the black level 30 Closed caption 30 HDMI setup 30 Preference setup menu 31 Audio, subtitle and disc menu 32 Restricting playback with parental control ..........32 Playback of VR format 32 MP3/JPEG menu 34 Displaying DivX external subtitle files 34 Changing the password 35 PBC (Playback control 35 Resetting...
Owner's Manual
Page 7
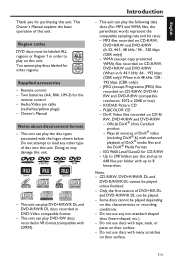
... play DVD-RW discs recorded in DVD-Video compatible format. - DivX Video files recorded on their surface. - This unit can play discs labeled for other type of this unit. KODAK Picture CD - Some discs cannot be labeled ALL regions or Region 1 in fs 48 kHz: 128 - 192 kbps (CBR only)) - This Owner's Manual explains the basic operation of disc into this unit. - Audio/Video pin cable (red/white/yellow plugs) - Owner's Manual Notes about discs/content format - WMA (except copy protected WMA) files recorded...
... play DVD-RW discs recorded in DVD-Video compatible format. - DivX Video files recorded on their surface. - This unit can play discs labeled for other type of this unit. KODAK Picture CD - Some discs cannot be labeled ALL regions or Region 1 in fs 48 kHz: 128 - 192 kbps (CBR only)) - This Owner's Manual explains the basic operation of disc into this unit. - Audio/Video pin cable (red/white/yellow plugs) - Owner's Manual Notes about discs/content format - WMA (except copy protected WMA) files recorded...
Owner's Manual
Page 9
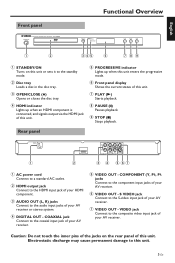
... VIDEO OUT - COMPONENT (Y, PB, PR jacks Connect to the audio input jacks of your AV receiver. English Front panel Functional Overview HDMI 1 2 345 6 789 1 STANDBY/ON Turns on the rear panel of this unit. Electrostatic discharge may cause permanent damage to this unit. 7 PLAY (B) Starts playback. 8 PAUSE (;) Pauses playback. 9 STOP (9) Stops playback. VIDEO jack Connect to the standby mode. 2 Disc tray Loads a disc in the disc tray. 3 OPEN/CLOSE (/) Opens or closes the disc tray. 4 HDMI indicator Lights up when an HDMI component is connected, and signals output via the HDMI jack...
... VIDEO OUT - COMPONENT (Y, PB, PR jacks Connect to the audio input jacks of your AV receiver. English Front panel Functional Overview HDMI 1 2 345 6 789 1 STANDBY/ON Turns on the rear panel of this unit. Electrostatic discharge may cause permanent damage to this unit. 7 PLAY (B) Starts playback. 8 PAUSE (;) Pauses playback. 9 STOP (9) Stops playback. VIDEO jack Connect to the standby mode. 2 Disc tray Loads a disc in the disc tray. 3 OPEN/CLOSE (/) Opens or closes the disc tray. 4 HDMI indicator Lights up when an HDMI component is connected, and signals output via the HDMI jack...

Owner's Manual
Page 10
... the audio output. Frame-by-frame playback. Functional Overview Remote control 1 2 3 4 5 6 7 8 9 0 1 2 3 4 5 6 7 8 TOPMENU RETURN 0 MENU 9 ON SCREEN SETUP ENTER OK STOP PLAY PAUSE SUBTITLE ANGLE ZOOM AUDIO REPEAT A B SCAN MUTE DVD13 q w e r t y u i o p 1 Turns on this unit or sets it to the next chapter or track. rT Searches forward.* Moves to the standby mode. 2 TOP MENU/RETURN Displays the top-level disc (DVD). Moves back to the previous menu (DVD*/ VCD). 3 MENU Accesses the menu of this unit. Opens the disc tray.* 6 En 7 SUBTITLE Selects the subtitle language...
... the audio output. Frame-by-frame playback. Functional Overview Remote control 1 2 3 4 5 6 7 8 9 0 1 2 3 4 5 6 7 8 TOPMENU RETURN 0 MENU 9 ON SCREEN SETUP ENTER OK STOP PLAY PAUSE SUBTITLE ANGLE ZOOM AUDIO REPEAT A B SCAN MUTE DVD13 q w e r t y u i o p 1 Turns on this unit or sets it to the next chapter or track. rT Searches forward.* Moves to the standby mode. 2 TOP MENU/RETURN Displays the top-level disc (DVD). Moves back to the previous menu (DVD*/ VCD). 3 MENU Accesses the menu of this unit. Opens the disc tray.* 6 En 7 SUBTITLE Selects the subtitle language...

Owner's Manual
Page 11
Audio connections Digital connection This unit has a coaxial digital out jack. Connections You need to set "DIGITAL OUTPUT" to "ALL" (see "DIGITAL OUTPUT" on the disc. Pressing AUDIO on the remote control once or more may change connections. • Depending on the equipment you must connect this unit to an AV receiver that supports these formats. Make sure to select the appropriate audio format from the menu screen on page 25). If you wish to enjoy Dolby Digital, DTS and MPEG...
Audio connections Digital connection This unit has a coaxial digital out jack. Connections You need to set "DIGITAL OUTPUT" to "ALL" (see "DIGITAL OUTPUT" on the disc. Pressing AUDIO on the remote control once or more may change connections. • Depending on the equipment you must connect this unit to an AV receiver that supports these formats. Make sure to select the appropriate audio format from the menu screen on page 25). If you wish to enjoy Dolby Digital, DTS and MPEG...
Owner's Manual
Page 13
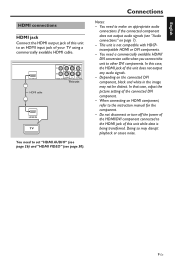
... "HDMI VIDEO" (see "Audio connections" on the connected DVI component, black and white in the image may disrupt playback or cause noise. 9 En This unit is being transferred. When connecting an HDMI component, refer to an HDMI input jack of your TV using a commercially available HDMI cable. English HDMI connections HDMI jack Connect the HDMI output jack of this unit to the instruction manual for the component. - In that case, adjust the picture setting of this unit does not output any audio signals...
... "HDMI VIDEO" (see "Audio connections" on the connected DVI component, black and white in the image may disrupt playback or cause noise. 9 En This unit is being transferred. When connecting an HDMI component, refer to an HDMI input jack of your TV using a commercially available HDMI cable. English HDMI connections HDMI jack Connect the HDMI output jack of this unit to the instruction manual for the component. - In that case, adjust the picture setting of this unit does not output any audio signals...
Owner's Manual
Page 15
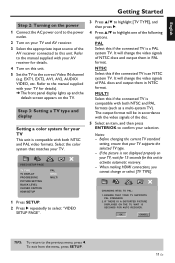
... TYPE TV DISPLAY PROGRESSIVE PICTURE SETTING BLACK LEVEL CLOSED CAPTION HDMI SETUP PAL NTSC MULTI 1 Press SETUP. 2 Press 2 repeatedly to select "VIDEO SETUP PAGE". 3 Press 3/4 to highlight [TV TYPE], and then press 2. 4 Press 3/4 to highlight one of NTSC discs and output them in accordance with both NTSC and PAL formats (such as a multi-system TV). CHANGING NTSC TO PAL: 1. Refer to the manual supplied with your AV receiver for details). ➜ The front panel display lights up and the default screen...
... TYPE TV DISPLAY PROGRESSIVE PICTURE SETTING BLACK LEVEL CLOSED CAPTION HDMI SETUP PAL NTSC MULTI 1 Press SETUP. 2 Press 2 repeatedly to select "VIDEO SETUP PAGE". 3 Press 3/4 to highlight [TV TYPE], and then press 2. 4 Press 3/4 to highlight one of NTSC discs and output them in accordance with both NTSC and PAL formats (such as a multi-system TV). CHANGING NTSC TO PAL: 1. Refer to the manual supplied with your AV receiver for details). ➜ The front panel display lights up and the default screen...
Owner's Manual
Page 16
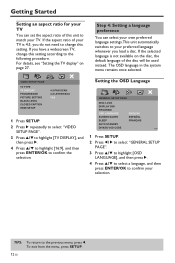
... Language GENERAL SETUP PAGE DISC LOCK DISPLAY DIM PROGRAM OSD LANGUAGE SCREEN SAVER SLEEP AUTO STANDBY DIVX(R) VOD CODE ENGLISH ESPAÑOL FRANÇAIS 1 Press SETUP. 2 Press 1 / 2 to select "GENERAL SETUP PAGE". 3 Press 3/4 to highlight [OSD LANGUAGE], and then press 2. 4 Press 3/4 to select a language, and then press ENTER/OK to confirm your TV. If you load a disc. TIPS: To return to confirm the selection. VIDEO SETUP PAGE TV TYPE TV DISPLAY PROGRESSIVE PICTURE SETTING BLACK LEVEL CLOSED CAPTION HDMI SETUP 4:3 PAN SCAN...
... Language GENERAL SETUP PAGE DISC LOCK DISPLAY DIM PROGRAM OSD LANGUAGE SCREEN SAVER SLEEP AUTO STANDBY DIVX(R) VOD CODE ENGLISH ESPAÑOL FRANÇAIS 1 Press SETUP. 2 Press 1 / 2 to select "GENERAL SETUP PAGE". 3 Press 3/4 to highlight [OSD LANGUAGE], and then press 2. 4 Press 3/4 to select a language, and then press ENTER/OK to confirm your TV. If you load a disc. TIPS: To return to confirm the selection. VIDEO SETUP PAGE TV TYPE TV DISPLAY PROGRESSIVE PICTURE SETTING BLACK LEVEL CLOSED CAPTION HDMI SETUP 4:3 PAN SCAN...
Owner's Manual
Page 20
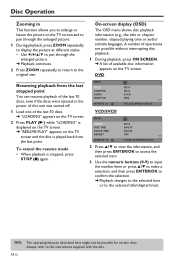
... different scales. • Use 1 / 2/3/4 to pan through the enlarged picture. ➜ Playback continues. 2 Press ZOOM repeatedly to return to the original size. Always refer to the selected title/chapter/track. Disc Operation Zooming in This function allows you to enlarge or lessen the picture on the TV screen. On-screen display (OSD) The OSD menu shows disc playback information (e.g., the title or chapter number, elapsed playing time or audio/ subtitle language).
... different scales. • Use 1 / 2/3/4 to pan through the enlarged picture. ➜ Playback continues. 2 Press ZOOM repeatedly to return to the original size. Always refer to the selected title/chapter/track. Disc Operation Zooming in This function allows you to enlarge or lessen the picture on the TV screen. On-screen display (OSD) The OSD menu shows disc playback information (e.g., the title or chapter number, elapsed playing time or audio/ subtitle language).
Owner's Manual
Page 28
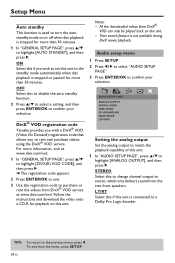
.../OK to exit. 3 Use the registration code to stereo, which only delivers sound from the menu, press SETUP. 24 En ON Select this unit to the standby mode automatically when disc playback is stopped or paused for more information, visit at www.divx.com/vod. Follow the instructions and download the video onto a CD-R for playback on this to disable the auto standby function. 2 Press 3/4 to select a setting, and then press ENTER...
.../OK to exit. 3 Use the registration code to stereo, which only delivers sound from the menu, press SETUP. 24 En ON Select this unit to the standby mode automatically when disc playback is stopped or paused for more information, visit at www.divx.com/vod. Follow the instructions and download the video onto a CD-R for playback on this to disable the auto standby function. 2 Press 3/4 to select a setting, and then press ENTER...
Owner's Manual
Page 30
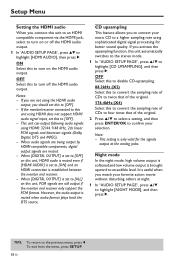
... HDMI audio output. This unit can output following audio signals using HDMI does not support HDMI audio signal input, set to [OFF] on this unit, PCM signals are muted. - Night mode In the night mode, high volume output is softened and low volume output is muted when audio format plays back the DTS source. To exit from the menu, press SETUP. 26 En If the monitor/receiver connected to this unit using HDMI: 32/44.1/48 kHz, 2ch linear PCM signals and bitstream signals (Dolby Digital...
... HDMI audio output. This unit can output following audio signals using HDMI does not support HDMI audio signal input, set to [OFF] on this unit, PCM signals are muted. - Night mode In the night mode, high volume output is softened and low volume output is muted when audio format plays back the DTS source. To exit from the menu, press SETUP. 26 En If the monitor/receiver connected to this unit using HDMI: 32/44.1/48 kHz, 2ch linear PCM signals and bitstream signals (Dolby Digital...
Owner's Manual
Page 32
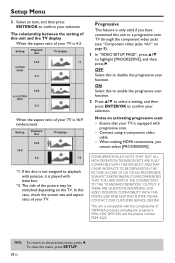
... the menu, press SETUP. 28 En Connect using a component video cable. - IN CASE OF 525 OR 625 PROGRESSIVE SCAN PICTURE PROBLEMS, IT IS RECOMMENDED THAT THE USER SWITCH THE CONNECTION TO THE "STANDARD DEFINITION" OUTPUT. ON Select this to the previous menu, press 1. Ensure that your TV. OFF Select this to enable the progressive scan function. 2 Press 3/4 to select a setting, and then press ENTER/OK to confirm your TV is 16:9 (widescreen): Setting Playback disc TV display...
... the menu, press SETUP. 28 En Connect using a component video cable. - IN CASE OF 525 OR 625 PROGRESSIVE SCAN PICTURE PROBLEMS, IT IS RECOMMENDED THAT THE USER SWITCH THE CONNECTION TO THE "STANDARD DEFINITION" OUTPUT. ON Select this to the previous menu, press 1. Ensure that your TV. OFF Select this to enable the progressive scan function. 2 Press 3/4 to select a setting, and then press ENTER/OK to confirm your TV is 16:9 (widescreen): Setting Playback disc TV display...
Owner's Manual
Page 34
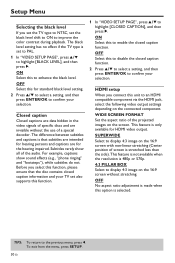
... function. 1 In "VIDEO SETUP PAGE", press 3/4 to display 4:3 image on the screen. SUPERWIDE Select to highlight [CLOSED CAPTION], and then press 2. The black level setting has no effect if the TV type is made when this unit to enhance the black level. ON Select this to an HDMI compatible component via the HDMI jack, select the following video output settings depending on the 16:9 screen without the use of the audio. WIDE SCREEN FORMAT Set the aspect ratio...
... function. 1 In "VIDEO SETUP PAGE", press 3/4 to display 4:3 image on the screen. SUPERWIDE Select to highlight [CLOSED CAPTION], and then press 2. The black level setting has no effect if the TV type is made when this unit to enhance the black level. ON Select this to an HDMI compatible component via the HDMI jack, select the following video output settings depending on the 16:9 screen without the use of the audio. WIDE SCREEN FORMAT Set the aspect ratio...
Owner's Manual
Page 35
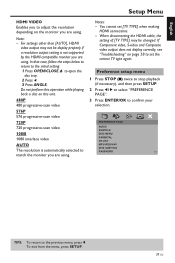
... changed. Preference setup menu 1 Press STOP (9) twice to stop playback (if necessary), and then press SETUP. 2 Press 1 / 2 to select "PREFERENCE PAGE". 3 Press ENTER/OK to open the disc tray. 2 Press 1. 3 Press ANGLE. PREFERENCE PAGE AUDIO SUBTITLE DISC MENU PARENTAL VR LIST MP3/JPEG NAV DIVX SUBTITLE PASSWORD TIPS: To return to match the monitor you are using . You cannot set the correct TV type again. Notes: - If Component video, S-video and Composite video output does not display correctly, see "Troubleshooting...
... changed. Preference setup menu 1 Press STOP (9) twice to stop playback (if necessary), and then press SETUP. 2 Press 1 / 2 to select "PREFERENCE PAGE". 3 Press ENTER/OK to open the disc tray. 2 Press 1. 3 Press ANGLE. PREFERENCE PAGE AUDIO SUBTITLE DISC MENU PARENTAL VR LIST MP3/JPEG NAV DIVX SUBTITLE PASSWORD TIPS: To return to match the monitor you are using . You cannot set the correct TV type again. Notes: - If Component video, S-video and Composite video output does not display correctly, see "Troubleshooting...

Owner's Manual
Page 42
... instruction below to change the [HDMI VIDEO] to [AUTO]; 1. Change the TV channel until you do not use progressive scan connections (using the component video jacks) Completely distorted picture or black/white picture or no picture Distorted picture The screen size looks unnatural, or the caption is set to Component/Interlaced video. - Press OPEN/CLOSE (/) on the front panel or press and hold STOP (9) on the front panel to deactivate progressive scan. Press 1 on the remote control to turn off the progressive scan; 1. This unit is displayed...
... instruction below to change the [HDMI VIDEO] to [AUTO]; 1. Change the TV channel until you do not use progressive scan connections (using the component video jacks) Completely distorted picture or black/white picture or no picture Distorted picture The screen size looks unnatural, or the caption is set to Component/Interlaced video. - Press OPEN/CLOSE (/) on the front panel or press and hold STOP (9) on the front panel to deactivate progressive scan. Press 1 on the remote control to turn off the progressive scan; 1. This unit is displayed...

Owner's Manual
Page 43
... the disc for repair. - For MP3/WMA files, check that the disc is compatible (see page 25). - English Troubleshooting Problem No audio at digital output Disc does not play Picture freezes momentarily during playback This unit does not respond to the remote control Buttons do not work This unit does not respond to some menu items cannot be selected No sound during playback This unit cannot read CDs/ DVDs Menu items cannot be selected. - Check the digital connections. - Check...
... the disc for repair. - For MP3/WMA files, check that the disc is compatible (see page 25). - English Troubleshooting Problem No audio at digital output Disc does not play Picture freezes momentarily during playback This unit does not respond to the remote control Buttons do not work This unit does not respond to some menu items cannot be selected No sound during playback This unit cannot read CDs/ DVDs Menu items cannot be selected. - Check the digital connections. - Check...
Owner's Manual
Page 44
... "www.hdmi.org/" 40 En Disc menu: A screen display prepared for an interactive media experience: interactive video menus, chapter points, multi-language subtitles and alternate audio tracks. Digital sound is assigned a chapter number enabling you to locate the chapter you use the digital audio output jacks.These jacks send audio through two channels, the left and right, center and subwoofer). When used to another system (TV, Stereo, etc.). Aspect ratio: The ratio of...
... "www.hdmi.org/" 40 En Disc menu: A screen display prepared for an interactive media experience: interactive video menus, chapter points, multi-language subtitles and alternate audio tracks. Digital sound is assigned a chapter number enabling you to locate the chapter you use the digital audio output jacks.These jacks send audio through two channels, the left and right, center and subwoofer). When used to another system (TV, Stereo, etc.). Aspect ratio: The ratio of...
Owner's Manual
Page 45
... audio software. By using MP3 format, one CD-R or CD-RW can contain about 10 times as much data volume as software having a search function. You can find the region code of your TV has S-video input jack. VR (Video Recording) format: A format which features small decrease in image quality in spite of its high compression ratio. PCM (Pulse Code Modulation): A system for converting analog sound signal to digital signal...
... audio software. By using MP3 format, one CD-R or CD-RW can contain about 10 times as much data volume as software having a search function. You can find the region code of your TV has S-video input jack. VR (Video Recording) format: A format which features small decrease in image quality in spite of its high compression ratio. PCM (Pulse Code Modulation): A system for converting analog sound signal to digital signal...


