
Owners Manual
Page 7
... expected to: 1. Does the warranty cover incidental costs such as oil and spark plugs. However, if a particular failure is held responsible for his setup, service and warranty repair work. A. In addition, each Yamaha generator dealer is caused by operation or maintenance...at the time of your new address by a Yamaha generator dealer. by an authorized Yamaha generator dealer for advice. lack of the generator before sale. 2. Q. The warranty on . Q. A. Check the operation of proper maintenance; Each Yamaha generator dealer is in the Owner's Manual instead of ...
... expected to: 1. Does the warranty cover incidental costs such as oil and spark plugs. However, if a particular failure is held responsible for his setup, service and warranty repair work. A. In addition, each Yamaha generator dealer is caused by operation or maintenance...at the time of your new address by a Yamaha generator dealer. by an authorized Yamaha generator dealer for advice. lack of the generator before sale. 2. Q. The warranty on . Q. A. Check the operation of proper maintenance; Each Yamaha generator dealer is in the Owner's Manual instead of ...

Owners Manual
Page 10
...- a 1 m (3 ft) 741-086 9 Avoid operating the engine with wet hands or electrical shock will occur. 741-089 9 Be sure to carry the generator only by its carrying handle. 1 Carrying handle 741-077 AE01020 ELECTRIC SHOCK PREVENTION 9 Never operate the engine in rain or snow. 741-088 9 Never touch... the generator with a dust cover. a ings or other equipment, or the engine may over- heat. NOTE: Use ground (earth) lead of sufficient current capacity. 741-078...
...- a 1 m (3 ft) 741-086 9 Avoid operating the engine with wet hands or electrical shock will occur. 741-089 9 Be sure to carry the generator only by its carrying handle. 1 Carrying handle 741-077 AE01020 ELECTRIC SHOCK PREVENTION 9 Never operate the engine in rain or snow. 741-088 9 Never touch... the generator with a dust cover. a ings or other equipment, or the engine may over- heat. NOTE: Use ground (earth) lead of sufficient current capacity. 741-078...

Owners Manual
Page 12
t !0 793-105a AE00103 CONTROL PANEL 1 Overload indicator light 2 AC pilot light 3 Oil warning light 4 Engine switch (Red) 5 Choke knob 6 Fuel cock knob 7 Ground (Earth) terminal 8 Economy control switch (Black) 9 DC protector 0 AC receptacle q DC receptacle qw e y !2 u AE00101 CONTROL FUNCTION r i o !1 !2 w e q 793-104a AE00102 DESCRIPTION 1 Fuel tank 2 Fuel tank cap 3 Fuel tank cap air vent knob 4 Fuel cock knob 5 Air filter cover 6 Spark plug 7 Muffler 8 Choke knob 9 Ground (Earth) terminal 0 Oil filler cap q Recoil starter w Carrying handle q w ert y !1 !0 o i u 793-106a -7-
t !0 793-105a AE00103 CONTROL PANEL 1 Overload indicator light 2 AC pilot light 3 Oil warning light 4 Engine switch (Red) 5 Choke knob 6 Fuel cock knob 7 Ground (Earth) terminal 8 Economy control switch (Black) 9 DC protector 0 AC receptacle q DC receptacle qw e y !2 u AE00101 CONTROL FUNCTION r i o !1 !2 w e q 793-104a AE00102 DESCRIPTION 1 Fuel tank 2 Fuel tank cap 3 Fuel tank cap air vent knob 4 Fuel cock knob 5 Air filter cover 6 Spark plug 7 Muffler 8 Choke knob 9 Ground (Earth) terminal 0 Oil filler cap q Recoil starter w Carrying handle q w ert y !1 !0 o i u 793-106a -7-

Owners Manual
Page 14
...tank to the carburetor. 763-227 OFF q ON 707-098 Remove the cover 1 and the fuel cock lever can be used to the specified generator rated 763-224a output if the DC protector turns off again, consult a Yamaha dealer. If it is not in use, tighten the air vent knob ...clockwise until it turns off . AE01099 DC PROTECTOR The DC protector turns off automatically when the load exceeds the generator rated output....
...tank to the carburetor. 763-227 OFF q ON 707-098 Remove the cover 1 and the fuel cock lever can be used to the specified generator rated 763-224a output if the DC protector turns off again, consult a Yamaha dealer. If it is not in use, tighten the air vent knob ...clockwise until it turns off . AE01099 DC PROTECTOR The DC protector turns off automatically when the load exceeds the generator rated output....
Owners Manual
Page 23
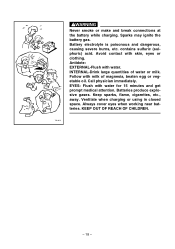
... quantities of magnesia, beaten egg or vegetable oil. Sparks may ignite the battery gas. Battery electrolyte is poisonous and dangerous, causing severe burns, etc. Always cover eyes when working near batteries.
... quantities of magnesia, beaten egg or vegetable oil. Sparks may ignite the battery gas. Battery electrolyte is poisonous and dangerous, causing severe burns, etc. Always cover eyes when working near batteries.
Owners Manual
Page 27
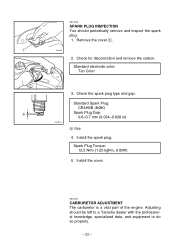
... 760-024 3. Spark Plug Torque: 12.5 N•m (1.25 kgf•m, 9 lbf•ft) 5. Check for discoloration and remove the carbon. Install the cover. Adjusting should periodically remove and inspect the spark plug. 1. q 760-025 2. Check the spark plug type and gap. Install the spark plug. AE00431 CARBURETOR ADJUSTMENT... Plug: CR4HSB (NGK) a Spark Plug Gap: 0.6-0.7 mm (0.024-0.028 in) 760-001a a Gap 4. AE01026 SPARK PLUG INSPECTION You should be left to a Yamaha dealer with the professional knowledge, specialized data, and equipment to do so properly. - 22 -
... 760-024 3. Spark Plug Torque: 12.5 N•m (1.25 kgf•m, 9 lbf•ft) 5. Check for discoloration and remove the carbon. Install the cover. Adjusting should periodically remove and inspect the spark plug. 1. q 760-025 2. Check the spark plug type and gap. Install the spark plug. AE00431 CARBURETOR ADJUSTMENT... Plug: CR4HSB (NGK) a Spark Plug Gap: 0.6-0.7 mm (0.024-0.028 in) 760-001a a Gap 4. AE01026 SPARK PLUG INSPECTION You should be left to a Yamaha dealer with the professional knowledge, specialized data, and equipment to do so properly. - 22 -

Owners Manual
Page 28
...30 ç SAE #20 ∂ SAE 10W Engine oil quantity: 0.32 L (0.28 lmp qt, 0.34 US qt) - 23 - Loosen the screw 1 and remove the cover 2. 4 3. This could result in overfilling and damage to the oil filler hole. 5 700-118b 700-120 6 700-126a 0°C 25°C A YAMALUBE 4(10W-30)...filler guide. 6 Oil filler guide cC Do not tilt the generator when adding engine oil. Attach the oil drain joint 5 to the engine. Replace the generator on a level surface and warm q up the engine for several minutes. Place the generator on a level surface and remove the oil drain joint. ...
...30 ç SAE #20 ∂ SAE 10W Engine oil quantity: 0.32 L (0.28 lmp qt, 0.34 US qt) - 23 - Loosen the screw 1 and remove the cover 2. 4 3. This could result in overfilling and damage to the oil filler hole. 5 700-118b 700-120 6 700-126a 0°C 25°C A YAMALUBE 4(10W-30)...filler guide. 6 Oil filler guide cC Do not tilt the generator when adding engine oil. Attach the oil drain joint 5 to the engine. Replace the generator on a level surface and warm q up the engine for several minutes. Place the generator on a level surface and remove the oil drain joint. ...
Owners Manual
Page 29
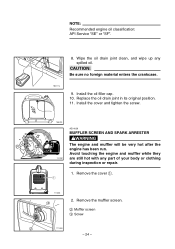
... - Replace the oil drain joint in its original position. 11. q 711-068 3 2. NOTE: Recommended engine oil classification: API Service "SE" or "SF". 8. Remove the cover 1. Wipe the oil drain joint clean, and wipe up any part of your body or clothing during inspection or repair. 1. Avoid touching the engine and...while they 741-091 are still hot with any spilled oil. cC Be sure no foreign material enters the crankcase. 700-117a 9. Install the cover and tighten the screw. 788-010 AE01028 MUFFLER SCREEN AND SPARK ARRESTER w The engine and muffler will be very hot after the engine has...
... - Replace the oil drain joint in its original position. 11. q 711-068 3 2. NOTE: Recommended engine oil classification: API Service "SE" or "SF". 8. Remove the cover 1. Wipe the oil drain joint clean, and wipe up any part of your body or clothing during inspection or repair. 1. Avoid touching the engine and...while they 741-091 are still hot with any spilled oil. cC Be sure no foreign material enters the crankcase. 700-117a 9. Install the cover and tighten the screw. 788-010 AE01028 MUFFLER SCREEN AND SPARK ARRESTER w The engine and muffler will be very hot after the engine has...

Owners Manual
Page 31
Remove the cover 1. Remove the air filter cover and element 4. 4. Wash the element in solvent and dry. The element should be wet but not dripping. r 5. NOTE: Be sure the element sealing surface matches .... 710-059a - 26 - Oil the element and squeeze out excess oil. Insert the element into the air filter. Remove the clip 2 holding the air filter cover 3. 788-002a 3. q 788-001 w e 2. Recommended oil: Foam-air-filter oil or SAE #20 motor oil cC Do not wring out the element. 9. Install the...
Remove the cover 1. Remove the air filter cover and element 4. 4. Wash the element in solvent and dry. The element should be wet but not dripping. r 5. NOTE: Be sure the element sealing surface matches .... 710-059a - 26 - Oil the element and squeeze out excess oil. Insert the element into the air filter. Remove the clip 2 holding the air filter cover 3. 788-002a 3. q 788-001 w e 2. Recommended oil: Foam-air-filter oil or SAE #20 motor oil cC Do not wring out the element. 9. Install the...

Owners Manual
Page 32
Remove the fuel tank cap and filter. If damaged, replace. 3. w Be sure the tank cap is tightened securely. 707-094 - 27 - excessive piston and cylinder wear may result. Replace the air filter cover in the vicinity of an open flame. 7. Install the cover. AE00471 FUEL TANK FILTER 1. w Never use solvent while smoking or in its original position and install the clip. 8. Wipe the filter and insert it. cC The engine should never run without the element; q 1 Filter 2. Clean the filter with solvent.
Remove the fuel tank cap and filter. If damaged, replace. 3. w Be sure the tank cap is tightened securely. 707-094 - 27 - excessive piston and cylinder wear may result. Replace the air filter cover in the vicinity of an open flame. 7. Install the cover. AE00471 FUEL TANK FILTER 1. w Never use solvent while smoking or in its original position and install the clip. 8. Wipe the filter and insert it. cC The engine should never run without the element; q 1 Filter 2. Clean the filter with solvent.

Owners Manual
Page 35
... the spark plug. This will require some preventive procedures to coat the cylinder walls with the cover placed over several times (with ignition off) to guard against deterioration. Drain the fuel from rusting). 3. Store the generator in a dry, well-ventilated place, with oil. 2. Then, install the fuel tank cap. Check "SAFETY INFORMATION...
... the spark plug. This will require some preventive procedures to coat the cylinder walls with the cover placed over several times (with ignition off) to guard against deterioration. Drain the fuel from rusting). 3. Store the generator in a dry, well-ventilated place, with oil. 2. Then, install the fuel tank cap. Check "SAFETY INFORMATION...