
Owner's Manual
Page 2
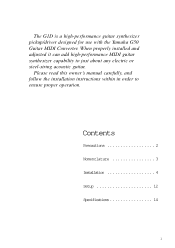
When properly installed and adjusted it can add high-performance MIDI guitar synthesizer capability to ensure proper operation. Contents Precautions 2 Nomenclature 3 Installation 4 Setup 12 Specifications 14 1 The G1D is a high-performance guitar synthesizer pickup/driver designed for use with the Yamaha G50 Guitar MIDI Converter. Please read this owner's manual carefully, and follow the installation instructions within in order to just about any electric or steel-string acoustic guitar.
When properly installed and adjusted it can add high-performance MIDI guitar synthesizer capability to ensure proper operation. Contents Precautions 2 Nomenclature 3 Installation 4 Setup 12 Specifications 14 1 The G1D is a high-performance guitar synthesizer pickup/driver designed for use with the Yamaha G50 Guitar MIDI Converter. Please read this owner's manual carefully, and follow the installation instructions within in order to just about any electric or steel-string acoustic guitar.
Owner's Manual
Page 3
...; Never use the direct guitar sound. s Service and Modification • The G1D contains no user serviceable parts. s Handling and Transport • Never apply excessive force to the controls, connectors or other parts of the instrument. • Physical shocks caused by dropping, bumping, or placing heavy objects on a stand. The direct guitar cable is not responsible for proper grounding, to minimize noise and prevent electric shock...
...; Never use the direct guitar sound. s Service and Modification • The G1D contains no user serviceable parts. s Handling and Transport • Never apply excessive force to the controls, connectors or other parts of the instrument. • Physical shocks caused by dropping, bumping, or placing heavy objects on a stand. The direct guitar cable is not responsible for proper grounding, to minimize noise and prevent electric shock...
Owner's Manual
Page 4
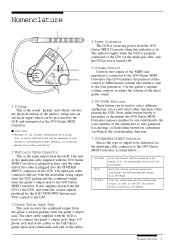
...-pin cable supplied with the G1D is used to select different synthesizer voices and select other end of the cable is quite delicate and can be processed by one (and thereby the voice number of the cable). 4 Power Indicator The G1D is receiving power from the G50 Guitar MIDI Converter when this control to MIDI master volume data which can be used to connect the guitar's output jack (large 1/4" phone jack end of the cable) to the G1D direct guitar input jack...
...-pin cable supplied with the G1D is used to select different synthesizer voices and select other end of the cable is quite delicate and can be processed by one (and thereby the voice number of the cable). 4 Power Indicator The G1D is receiving power from the G50 Guitar MIDI Converter when this control to MIDI master volume data which can be used to connect the guitar's output jack (large 1/4" phone jack end of the cable) to the G1D direct guitar input jack...

Owner's Manual
Page 5
... not to someone experienced in guitar modification or repair. Make sure your guitar's neck (truss rod) and string height/intonation (bridge) are provided: • Screw. • Double-sided adhesive tape. • Re-usable adhesive pads. • Velcro fastener. • Bracket. • Suction cups. A number of mechanical ability. Installation Installing the G1D on most electric and steel-string acoustic guitars, with the following exceptions...
... not to someone experienced in guitar modification or repair. Make sure your guitar's neck (truss rod) and string height/intonation (bridge) are provided: • Screw. • Double-sided adhesive tape. • Re-usable adhesive pads. • Velcro fastener. • Bracket. • Suction cups. A number of mechanical ability. Installation Installing the G1D on most electric and steel-string acoustic guitars, with the following exceptions...

Owner's Manual
Page 6
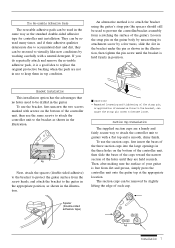
... following parts are provided for installation of the guitar to prevent accidental damage. Please make sure you choose will not affect your picking-hand at any of the guitar's controls: tone, volume, bridge adjustments (especially watch out for installation. s Hardware The following points carefully when deciding on the best location to install the controller: Pickup Controller • Re-usable double-sided adhesive pads (transparent). ..... 3 GUITAR...
... following parts are provided for installation of the guitar to prevent accidental damage. Please make sure you choose will not affect your picking-hand at any of the guitar's controls: tone, volume, bridge adjustments (especially watch out for installation. s Hardware The following points carefully when deciding on the best location to install the controller: Pickup Controller • Re-usable double-sided adhesive pads (transparent). ..... 3 GUITAR...

Owner's Manual
Page 7
... in the multi-pin cable recess of the controller) on the body of your guitar makes you might be a good idea to the bottom of tape/pad at the marked location. DO NOT use the adhesive pads if you drilled one side of the adhesive tape patches and attach them to...any type of the adhesive tape, and carefully attach the controller to ensure that the screw hole in the controller is to be attached to position the controller as shown in your guitar. See "The Re-usable Adhesive Pads" below ). Screw only "finger tight" - Mark and drill the controller screw hole (see "NOTES"...
... in the multi-pin cable recess of the controller) on the body of your guitar makes you might be a good idea to the bottom of tape/pad at the marked location. DO NOT use the adhesive pads if you drilled one side of the adhesive tape patches and attach them to...any type of the adhesive tape, and carefully attach the controller to ensure that the screw hole in the controller is to be attached to position the controller as shown in your guitar. See "The Re-usable Adhesive Pads" below ). Screw only "finger tight" - Mark and drill the controller screw hole (see "NOTES"...
Owner's Manual
Page 8
... by a few turns, slide the slot in the bracket under the pin as shown in the guitar. The Re-usable Adhesive Pads The re-usable adhesive pads can be used to prevent the controller/bracket assembly from dirt and grease, simply press the controller unit onto the guitar top at the appropriate...the large openings in the three holes on the guitar body by unscrewing its attachment screw by slightly lifting the edge of the guitar). Suction Cup Installation The supplied suction cups are not in use the suction cups, first insert the bases of the controller unit, then use the bracket,...
... by a few turns, slide the slot in the bracket under the pin as shown in the guitar. The Re-usable Adhesive Pads The re-usable adhesive pads can be used to prevent the controller/bracket assembly from dirt and grease, simply press the controller unit onto the guitar top at the appropriate...the large openings in the three holes on the guitar body by unscrewing its attachment screw by slightly lifting the edge of the guitar). Suction Cup Installation The supplied suction cups are not in use the suction cups, first insert the bases of the controller unit, then use the bracket,...

Owner's Manual
Page 9
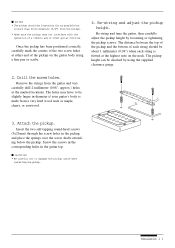
...guitar is a humbucking type, attach the divided pickup to mark directly on different guitars, and the pickup will function properly as long as possible, but no more than 20 millimeters away from the bridge. Installing the Pickup Once you've installed the controller, the pickup can be located as far as each string. s Hardware The following parts, supplied...usable double-sided adhesive pads 2 8 Installation Pickup OK OK No more than 20 millimeters (3/4") NG String Pickup's magnetic yokes s NOTES • Make sure the pickup does not interfere with the G1D, are required or ...
...guitar is a humbucking type, attach the divided pickup to mark directly on different guitars, and the pickup will function properly as long as possible, but no more than 20 millimeters away from the bridge. Installing the Pickup Once you've installed the controller, the pickup can be located as far as each string. s Hardware The following parts, supplied...usable double-sided adhesive pads 2 8 Installation Pickup OK OK No more than 20 millimeters (3/4") NG String Pickup's magnetic yokes s NOTES • Make sure the pickup does not interfere with the G1D, are required or ...
Owner's Manual
Page 10
... that the strings do not touch the pickup when fretted at the marked position, then re-string and tune the guitar. Attach the pickup. Cut Double-sided adhesive tape s NOTES • The re-usable double-sided adhesive pads (page 8) can be used in contact with a good pair of adhesive tape (guitar side). Cut the pads to their normal pitch. using a number of spacers...
... that the strings do not touch the pickup when fretted at the marked position, then re-string and tune the guitar. Attach the pickup. Cut Double-sided adhesive tape s NOTES • The re-usable double-sided adhesive pads (page 8) can be used in contact with a good pair of adhesive tape (guitar side). Cut the pads to their normal pitch. using a number of spacers...
Owner's Manual
Page 11
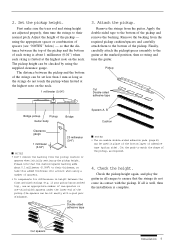
s Installation Procedure - s NOTES • Screw installation requires at least a 13 millimeter (1/2") space between the guitar top and strings. • Adjust the pickup height using spacers (no springs) if the distance between guitar top and strings is more secure, the height of the pickup can be sure to the uppermost spacer, then re-string and tune the guitar. 1 0 Installation 1. Finally, attach fresh double-sided tape...
s Installation Procedure - s NOTES • Screw installation requires at least a 13 millimeter (1/2") space between the guitar top and strings. • Adjust the pickup height using spacers (no springs) if the distance between guitar top and strings is more secure, the height of the pickup can be sure to the uppermost spacer, then re-string and tune the guitar. 1 0 Installation 1. Finally, attach fresh double-sided tape...
Owner's Manual
Page 12
...note on the guitar body using the supplied clearance gauge. 2. Attach the pickup. s CAUTION! • Be careful not to be checked by loosening or tightening the pickup screws. Insert the two self-tapping round-head screws (3x25mm) through the screw holes in the guitar top. Re-string and tune the guitar, then carefully adjust... bottom of a tremolo arm or other guitar controls. Once the pickup has been positioned correctly, carefully mark the centers of the two screw holes at the marked locations. The holes may have to damage the pickup cable when installing the pickup.
...note on the guitar body using the supplied clearance gauge. 2. Attach the pickup. s CAUTION! • Be careful not to be checked by loosening or tightening the pickup screws. Insert the two self-tapping round-head screws (3x25mm) through the screw holes in the guitar top. Re-string and tune the guitar, then carefully adjust... bottom of a tremolo arm or other guitar controls. Once the pickup has been positioned correctly, carefully mark the centers of the two screw holes at the marked locations. The holes may have to damage the pickup cable when installing the pickup.
Owner's Manual
Page 13
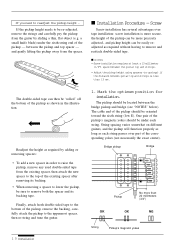
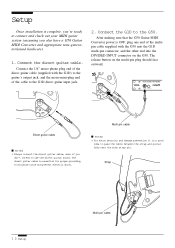
... end into the DIVIDED INPUT connector on the multi-pin plug should face outward. Strap GUITAR MIX SYNTH UP DOWN VOL 1 2 Setup Multi-pin cable Connect the G1D to the G50. DIVIDED MONO SYNTH UP DOWN VOL Direct guitar cable s NOTES • Always connect the direct guitar cable, even if you also have a G50 Guitar MIDI Converter and appropriate tone-generator/sound hardware). 1. Multi-pin cable s NOTES • For extra...
... end into the DIVIDED INPUT connector on the multi-pin plug should face outward. Strap GUITAR MIX SYNTH UP DOWN VOL 1 2 Setup Multi-pin cable Connect the G1D to the G50. DIVIDED MONO SYNTH UP DOWN VOL Direct guitar cable s NOTES • Always connect the direct guitar cable, even if you also have a G50 Guitar MIDI Converter and appropriate tone-generator/sound hardware). 1. Multi-pin cable s NOTES • For extra...

Owner's Manual
Page 14
... is turned ON, the G1D power indicator should light indicating that your G50, tone generator, and other equipment are set up properly (refer to the appropriate owner's manuals for G50 setup and operation details. • The multi-pin cable plug release button must be pressed when unplugging the multi-pin cable from the G50. 4. When the G50 power is receiving power from the G1D. GUITAR MIDI CONVERTER1. Unplug cable...
... is turned ON, the G1D power indicator should light indicating that your G50, tone generator, and other equipment are set up properly (refer to the appropriate owner's manuals for G50 setup and operation details. • The multi-pin cable plug release button must be pressed when unplugging the multi-pin cable from the G50. 4. When the G50 power is receiving power from the G1D. GUITAR MIDI CONVERTER1. Unplug cable...
Owner's Manual
Page 15
Specifications s Functions • Volume Control (VOL) • GUITAR/MIX/SYNTH Selector • UP/DOWN Buttons • Power Indicator • Pickup (individual-string synthesizer output) • Direct Guitar Input Jack • Multi-pin Cable Connector (individual-string synthesizer output + direct guitar sound) s Package Contents • Pickup & Controller Unit • Direct guitar cable (1/4" mono phone mono mini-plug) • Installing hardware parts s Dimensions (W x H x D) 85.1mm x 75.9mm x 28.8mm (3-1/3" x 3" x 1-1/8") s Weight 70 g (2.5 oz) 1 4 Specifications
Specifications s Functions • Volume Control (VOL) • GUITAR/MIX/SYNTH Selector • UP/DOWN Buttons • Power Indicator • Pickup (individual-string synthesizer output) • Direct Guitar Input Jack • Multi-pin Cable Connector (individual-string synthesizer output + direct guitar sound) s Package Contents • Pickup & Controller Unit • Direct guitar cable (1/4" mono phone mono mini-plug) • Installing hardware parts s Dimensions (W x H x D) 85.1mm x 75.9mm x 28.8mm (3-1/3" x 3" x 1-1/8") s Weight 70 g (2.5 oz) 1 4 Specifications

Owner's Manual
Page 16
M.D.G., EMI Division © Yamaha Corporation 1996 VU83880 706POCP5.2-03C0 Printed in Japan 15
M.D.G., EMI Division © Yamaha Corporation 1996 VU83880 706POCP5.2-03C0 Printed in Japan 15


