
Owner's Manual
Page 2
The G1D is a high-performance guitar synthesizer pickup/driver designed for use with the Yamaha G50 Guitar MIDI Converter. Please read this owner's manual carefully, and follow the installation instructions within in order to just about any electric or steel-string acoustic guitar. Contents Precautions 2 Nomenclature 3 Installation 4 Setup 12 Specifications 14 1 When properly installed and adjusted it can add high-performance MIDI guitar synthesizer capability to ensure proper operation.
The G1D is a high-performance guitar synthesizer pickup/driver designed for use with the Yamaha G50 Guitar MIDI Converter. Please read this owner's manual carefully, and follow the installation instructions within in order to just about any electric or steel-string acoustic guitar. Contents Precautions 2 Nomenclature 3 Installation 4 Setup 12 Specifications 14 1 When properly installed and adjusted it can add high-performance MIDI guitar synthesizer capability to ensure proper operation.
Owner's Manual
Page 4
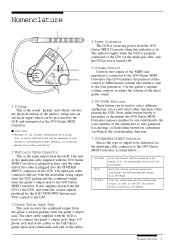
... of the cable is sent to the G50. 3 Direct Guitar Input Jack This jack receives the combined output from the guitar's normal pickups from the G1D. Both the direct guitar sound and individual-string synthesizer output will be produced). Press either button briefly to increment or decrement the G50 ...which can be heard. The multi-pin cable connector delivers both the individual string output from the G1D pickup and the combined output from the G50 Guitar MIDI Converter when this control to the G1D direct guitar input jack (small mini-jack end of the multi-pin cable supplied with the...
... of the cable is sent to the G50. 3 Direct Guitar Input Jack This jack receives the combined output from the guitar's normal pickups from the G1D. Both the direct guitar sound and individual-string synthesizer output will be produced). Press either button briefly to increment or decrement the G50 ...which can be heard. The multi-pin cable connector delivers both the individual string output from the G1D pickup and the combined output from the G50 Guitar MIDI Converter when this control to the G1D direct guitar input jack (small mini-jack end of the multi-pin cable supplied with the...

Owner's Manual
Page 5
...care and at least a modicum of your guitar, or between the guitar's bridge and bridge pickup. Installing the Controller Unit Install the controller unit before installing the G1D. Installation may not be installed on a guitar is designed for use with 12-string guitars... It will not work properly with 6-string guitars. IMPORTANT! Installation Installing the G1D on most electric and steel-string acoustic guitars, with the following exceptions: • Since the G1D employs a magnetic pickup, it will not work with nylon or other non-standard string configurations. &#...
...care and at least a modicum of your guitar, or between the guitar's bridge and bridge pickup. Installing the Controller Unit Install the controller unit before installing the G1D. Installation may not be installed on a guitar is designed for use with 12-string guitars... It will not work properly with 6-string guitars. IMPORTANT! Installation Installing the G1D on most electric and steel-string acoustic guitars, with the following exceptions: • Since the G1D employs a magnetic pickup, it will not work with nylon or other non-standard string configurations. &#...

Owner's Manual
Page 6
... Installation 5 Determine the optimum location for installation. s Hardware The following points carefully when deciding on the best location to install the controller: Pickup Controller • Re-usable double-sided adhesive pads (transparent). ..... 3 GUITAR MIX SYNTH UP DOWN VOL • Spacer (double-sided adhesive... Velcro fastener 1 • Bracket 1 • Suction cups 3 Direct guitar's cable Multi-pin cable • The controller and pickup cable should extend beyond the body of the guitar to any of the guitar's controls: tone, volume, bridge adjustments (especially watch ...
... Installation 5 Determine the optimum location for installation. s Hardware The following points carefully when deciding on the best location to install the controller: Pickup Controller • Re-usable double-sided adhesive pads (transparent). ..... 3 GUITAR MIX SYNTH UP DOWN VOL • Spacer (double-sided adhesive... Velcro fastener 1 • Bracket 1 • Suction cups 3 Direct guitar's cable Multi-pin cable • The controller and pickup cable should extend beyond the body of the guitar to any of the guitar's controls: tone, volume, bridge adjustments (especially watch ...

Owner's Manual
Page 9
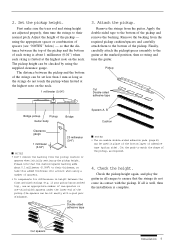
...mark the position on different guitars, and the pickup will function properly as long as possible, but no more than 20 millimeters (3/4") NG String Pickup's magnetic yokes s NOTES • Make sure the pickup does not interfere with the G1D, are required or optional for installation. Mark ...the optimum position for installation of the pickup. If the ideal 20-mm placement is a humbucking ...
...mark the position on different guitars, and the pickup will function properly as long as possible, but no more than 20 millimeters (3/4") NG String Pickup's magnetic yokes s NOTES • Make sure the pickup does not interfere with the G1D, are required or optional for installation. Mark ...the optimum position for installation of the pickup. If the ideal 20-mm placement is a humbucking ...
Owner's Manual
Page 10
... of the strings can be set less than 1 mm as long as required. 4. using the supplied clearance gauge. Remove the backing from the required pickup cushion/spacers and carefully attach them to the guitar at the highest note on the neck. 1 millimeter (0.04") 3. Cut Double-sided adhesive tape s... using a number of spacers. • To compensate for differences in contact with a good pair of spacers (see "NOTES" below) - Check the pickup height again, and play the guitar in all is well, then the installation is fretted at the marked position, then re-string and tune the...
... of the strings can be set less than 1 mm as long as required. 4. using the supplied clearance gauge. Remove the backing from the required pickup cushion/spacers and carefully attach them to the guitar at the highest note on the neck. 1 millimeter (0.04") 3. Cut Double-sided adhesive tape s... using a number of spacers. • To compensate for differences in contact with a good pair of spacers (see "NOTES" below) - Check the pickup height again, and play the guitar in all is well, then the installation is fretted at the marked position, then re-string and tune the...
Owner's Manual
Page 11
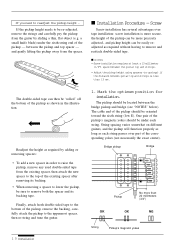
...be easily readjusted as each string. Finally, attach fresh double-sided tape to the top of the pickup - One pair of the pickup can then be re-adjusted, remove the strings and carefully pry the pickup from the guitar by adding or removing spacers: • To add a new spacer in the ... to remove and reattach double-sided tape. If you need to the uppermost spacer, then re-string and tune the guitar. 1 0 Installation 1. The pickup should be sure to remove both the spacer and its backing. • When removing a spacer to be "rolled" off the bottom of the...
...be easily readjusted as each string. Finally, attach fresh double-sided tape to the top of the pickup - One pair of the pickup can then be re-adjusted, remove the strings and carefully pry the pickup from the guitar by adding or removing spacers: • To add a new spacer in the ... to remove and reattach double-sided tape. If you need to the uppermost spacer, then re-string and tune the guitar. 1 0 Installation 1. The pickup should be sure to remove both the spacer and its backing. • When removing a spacer to be "rolled" off the bottom of the...
Owner's Manual
Page 12
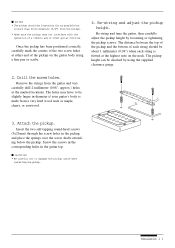
...tapping round-head screws (3x25mm) through the screw holes in the guitar top. Installation 1 1 Re-string and tune the guitar, then carefully adjust the pickup height by using a fine pen or scribe. 4. s CAUTION! • Be careful not to be slightly larger in diameter if your guitar's body ... than 20 millimeters (3/4") from the guitar and very carefully drill 2-millimeter (0.08", approx.) holes at either end of the pickup on the neck. Once the pickup has been positioned correctly, carefully mark the centers of the two screw holes at the marked locations. Re-string and adjust ...
...tapping round-head screws (3x25mm) through the screw holes in the guitar top. Installation 1 1 Re-string and tune the guitar, then carefully adjust the pickup height by using a fine pen or scribe. 4. s CAUTION! • Be careful not to be slightly larger in diameter if your guitar's body ... than 20 millimeters (3/4") from the guitar and very carefully drill 2-millimeter (0.08", approx.) holes at either end of the pickup on the neck. Once the pickup has been positioned correctly, carefully mark the centers of the two screw holes at the marked locations. Re-string and adjust ...
Owner's Manual
Page 15
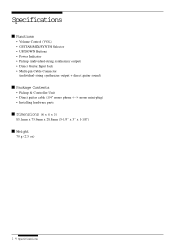
Specifications s Functions • Volume Control (VOL) • GUITAR/MIX/SYNTH Selector • UP/DOWN Buttons • Power Indicator • Pickup (individual-string synthesizer output) • Direct Guitar Input Jack • Multi-pin Cable Connector (individual-string synthesizer output + direct guitar sound) s Package Contents • Pickup & Controller Unit • Direct guitar cable (1/4" mono phone mono mini-plug) • Installing hardware parts s Dimensions (W x H x D) 85.1mm x 75.9mm x 28.8mm (3-1/3" x 3" x 1-1/8") s Weight 70 g (2.5 oz) 1 4 Specifications
Specifications s Functions • Volume Control (VOL) • GUITAR/MIX/SYNTH Selector • UP/DOWN Buttons • Power Indicator • Pickup (individual-string synthesizer output) • Direct Guitar Input Jack • Multi-pin Cable Connector (individual-string synthesizer output + direct guitar sound) s Package Contents • Pickup & Controller Unit • Direct guitar cable (1/4" mono phone mono mini-plug) • Installing hardware parts s Dimensions (W x H x D) 85.1mm x 75.9mm x 28.8mm (3-1/3" x 3" x 1-1/8") s Weight 70 g (2.5 oz) 1 4 Specifications


