
Owner's Manual
Page 8
... connections ........ 5 Installing batteries in the remote control 5 Remote control operation range 5 Connections 6 Setting the clock 8 Adjusting brightness of the display 8 CD player operation 9 Basic play 10 To change the disc play mode 11 To select another disc 11 To directly select the desired track 11 To play the desired track (Skip 12 To advance or reverse play rapidly (Search) .... 12 To exchange a disc (or discs) while playing (PLAYXCHANGE 12 Program play 13 Repeat play 14 Random play 15 Switching the time display 15 Tuning operation 16 Automatic tuning...
... connections ........ 5 Installing batteries in the remote control 5 Remote control operation range 5 Connections 6 Setting the clock 8 Adjusting brightness of the display 8 CD player operation 9 Basic play 10 To change the disc play mode 11 To select another disc 11 To directly select the desired track 11 To play the desired track (Skip 12 To advance or reverse play rapidly (Search) .... 12 To exchange a disc (or discs) while playing (PLAYXCHANGE 12 Program play 13 Repeat play 14 Random play 15 Switching the time display 15 Tuning operation 16 Automatic tuning...
Owner's Manual
Page 9
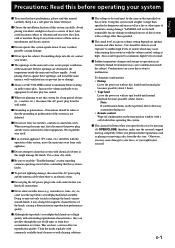
... read the "Troubleshooting" section regarding common operating errors before operating this system. This can get dirty through the use this system upside-down. Precautions: Read this before starting an audio source play. Keep it in a safe place for any damage resulting from dust accumulation over time. s Never open the disc tray by pressing OPEN/CLOSE; If something drops into the set the VOLUME control to a source of this system is faulty...
... read the "Troubleshooting" section regarding common operating errors before operating this system. This can get dirty through the use this system upside-down. Precautions: Read this before starting an audio source play. Keep it in a safe place for any damage resulting from dust accumulation over time. s Never open the disc tray by pressing OPEN/CLOSE; If something drops into the set the VOLUME control to a source of this system is faulty...
Owner's Manual
Page 10
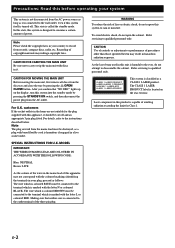
... state, this product is capable of emitting radiation exceeding the limit for the plug supplied with discs in hazardous radiation exposure. Note The plug severed from the disc tray and close the tray by pressing the STANDBY/ON switch, and then disconnect the power plug from the AC outlet. Making sure that "NO DISC" lights up on the rear exterior. Refer servicing to the instructions described below. As...
... state, this product is capable of emitting radiation exceeding the limit for the plug supplied with discs in hazardous radiation exposure. Note The plug severed from the disc tray and close the tray by pressing the STANDBY/ON switch, and then disconnect the power plug from the AC outlet. Making sure that "NO DISC" lights up on the rear exterior. Refer servicing to the instructions described below. As...
Owner's Manual
Page 13
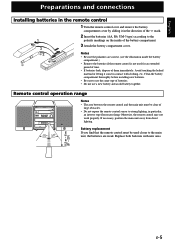
...; Do not expose the remote control sensor to the main unit, the batteries are correct. (see the illustration inside of the battery compartment. 3 Attach the battery compartment cover. Otherwise, the remote control may not work properly. Remote control operation range 3-DISC CD CHANGER STANDBY / ON STANDBY TIMER INPUT DISC1 DISC2 DISC3 DISC CHANGE OPEN/CLOSE PRESET/TUNING/BAND A/B/C/D/E / PTY SELECT R.D.S DIGITAL AUDIO YMERSION B.BOOST MUSIC UP DOWN VOLUME MINI COMPONENT SYSTEM GX-505 DIRECTION AUTO REVERSE CASSETTE DECK DOLBY B NR OPEN/ CLOSE 30° 30...
...; Do not expose the remote control sensor to the main unit, the batteries are correct. (see the illustration inside of the battery compartment. 3 Attach the battery compartment cover. Otherwise, the remote control may not work properly. Remote control operation range 3-DISC CD CHANGER STANDBY / ON STANDBY TIMER INPUT DISC1 DISC2 DISC3 DISC CHANGE OPEN/CLOSE PRESET/TUNING/BAND A/B/C/D/E / PTY SELECT R.D.S DIGITAL AUDIO YMERSION B.BOOST MUSIC UP DOWN VOLUME MINI COMPONENT SYSTEM GX-505 DIRECTION AUTO REVERSE CASSETTE DECK DOLBY B NR OPEN/ CLOSE 30° 30...
Owner's Manual
Page 14
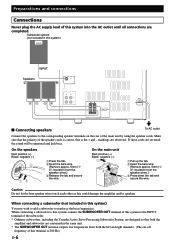
... subwoofer. * Ordinary subwoofers, including the Yamaha Active Servo Processing Subwoofer System, are completed. markings are reversed, the sound will be unnatural and lack bass. When connecting a subwoofer to this system, connect the SUBWOOFER OUT terminal of this system to the corresponding speaker terminals on the rear of the main unit by using the speaker cords. When connecting a subwoofer (not included in this system) INPUT Speakers L SUBWOOFER OUT R AUX/MD R L OUT IN R L 6 MIN./SPEAKER SEE OWNER'S MANUAL FOR CONNECTION. On the speakers Red...
... subwoofer. * Ordinary subwoofers, including the Yamaha Active Servo Processing Subwoofer System, are completed. markings are reversed, the sound will be unnatural and lack bass. When connecting a subwoofer to this system, connect the SUBWOOFER OUT terminal of this system to the corresponding speaker terminals on the rear of the main unit by using the speaker cords. When connecting a subwoofer (not included in this system) INPUT Speakers L SUBWOOFER OUT R AUX/MD R L OUT IN R L 6 MIN./SPEAKER SEE OWNER'S MANUAL FOR CONNECTION. On the speakers Red...
Owner's Manual
Page 15
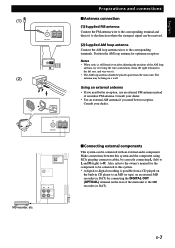
.... (1) Supplied FM antenna Connect the FM antenna wire to the corresponding terminal and direct it to the direction where the strongest signal can be connected to this system and the component using RCA pin plug connector cables, by connecting the DIGITAL OUT (OPTICAL) terminal on a wall. The antenna may be received. (2) Supplied AM loop antenna Connect the AM loop antenna wires to be connected with an external audio component. Also, refer to the owner's manual for optimum reception. (2) ANTENNA FM...
.... (1) Supplied FM antenna Connect the FM antenna wire to the corresponding terminal and direct it to the direction where the strongest signal can be connected to this system and the component using RCA pin plug connector cables, by connecting the DIGITAL OUT (OPTICAL) terminal on a wall. The antenna may be received. (2) Supplied AM loop antenna Connect the AM loop antenna wires to be connected with an external audio component. Also, refer to the owner's manual for optimum reception. (2) ANTENNA FM...
Owner's Manual
Page 16
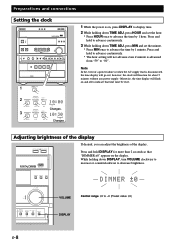
... if minute is disconnected, the time display will go out; PTY SEEK - Preparations and connections Setting the clock DISC1 DISC2 DISC3 DISC CHANGE OPEN/CLOSE 3-DISC CD CHANGER STANDBY / ON STANDBY TIMER DIGITAL AUDIO YMERSION B.BOOST MUSIC INPUT PRESET/TUNING/BAND A/B/C/D/E / PTY SELECT R.D.S UP DOWN VOLUME PHONES BASS TREBLE MODE DOLBY NR REC/ PAUSE AUTO/ MANUAL MEMORY FREQ PS/ PTY/RT/CT RANDOM MODE - MEMORY RANDOM REPEAT Changes. Note In the event of the display. Press and hold to advance...
... if minute is disconnected, the time display will go out; PTY SEEK - Preparations and connections Setting the clock DISC1 DISC2 DISC3 DISC CHANGE OPEN/CLOSE 3-DISC CD CHANGER STANDBY / ON STANDBY TIMER DIGITAL AUDIO YMERSION B.BOOST MUSIC INPUT PRESET/TUNING/BAND A/B/C/D/E / PTY SELECT R.D.S UP DOWN VOLUME PHONES BASS TREBLE MODE DOLBY NR REC/ PAUSE AUTO/ MANUAL MEMORY FREQ PS/ PTY/RT/CT RANDOM MODE - MEMORY RANDOM REPEAT Changes. Note In the event of the display. Press and hold to advance...
Owner's Manual
Page 17
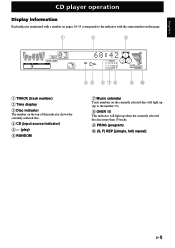
... 1K 3.5K 10K TOTAL REM MUSIC PROGRAM RANDOM CD 123456 7 8 9 10 11 12 13 14 15 OVER 15 4 5 6 78 S F REP PROG VOLUME 90 1 TRACK (track number) 2 Time display 3 Disc indicator The number on the top of this indicator shows the currently selected disc. 4 CD (input source indicator) 5 (play) 6 RANDOM 7 Music calendar Track numbers on the currently selected disc will light up (up to the number 15). 8 OVER 15 This...
... 1K 3.5K 10K TOTAL REM MUSIC PROGRAM RANDOM CD 123456 7 8 9 10 11 12 13 14 15 OVER 15 4 5 6 78 S F REP PROG VOLUME 90 1 TRACK (track number) 2 Time display 3 Disc indicator The number on the top of this indicator shows the currently selected disc. 4 CD (input source indicator) 5 (play) 6 RANDOM 7 Music calendar Track numbers on the currently selected disc will light up (up to the number 15). 8 OVER 15 This...
Owner's Manual
Page 18
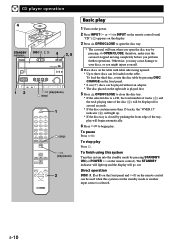
... the disc tray is selected. To stop ) / (play/pause) YMERSION MUSIC SLEEP INPUT 2 VOLUME Basic play Press . START REPEAT TIME DISPLAY 2 / (play/pause) (stop) POWER 1 2 3 1 2 3 4 5 6 4 5 6 7 8 9 7 8 0 TUNER +I0 PRESET PRESET TIME PROG R.TIME A EDIT B C DISC SKIP MODE D E CD / DIRECTION TAPE REC/ PAUSE 1 (stop play 1 Turn on the power. 2 Press INPUT or (or INPUT on the remote control) until "CD" (2) appears on the table. CD player operation 4 STANDBY indicator DISC (1, 2, 3) DISC1 DISC2 DISC3 4 DISC CHANGE OPEN/CLOSE 3, 5 3-DISC CD...
... the disc tray is selected. To stop ) / (play/pause) YMERSION MUSIC SLEEP INPUT 2 VOLUME Basic play Press . START REPEAT TIME DISPLAY 2 / (play/pause) (stop) POWER 1 2 3 1 2 3 4 5 6 4 5 6 7 8 9 7 8 0 TUNER +I0 PRESET PRESET TIME PROG R.TIME A EDIT B C DISC SKIP MODE D E CD / DIRECTION TAPE REC/ PAUSE 1 (stop play 1 Turn on the power. 2 Press INPUT or (or INPUT on the remote control) until "CD" (2) appears on the table. CD player operation 4 STANDBY indicator DISC (1, 2, 3) DISC1 DISC2 DISC3 4 DISC CHANGE OPEN/CLOSE 3, 5 3-DISC CD...
Owner's Manual
Page 19
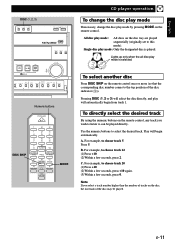
...To directly select the desired track By using the numeric buttons on the remote control, any track you select a track number higher than the number of tracks on the remote control once or more (so that the corresponding disc number comes to this mode). START REPEAT TIME DISPLAY TIMER TIME ADJ HOUR MIN Numeric buttons POWER DISC SKIP 1 2 3 1 2 3 4 5 6 4 5 6 7 8 9 7 8 0 TUNER +I0 PRESET PRESET TIME PROG R.TIME A EDIT B C DISC SKIP MODE D E CD / MODE CD player operation To change the disc play mode If necessary, change the disc play mode is played...
...To directly select the desired track By using the numeric buttons on the remote control, any track you select a track number higher than the number of tracks on the remote control once or more (so that the corresponding disc number comes to this mode). START REPEAT TIME DISPLAY TIMER TIME ADJ HOUR MIN Numeric buttons POWER DISC SKIP 1 2 3 1 2 3 4 5 6 4 5 6 7 8 9 7 8 0 TUNER +I0 PRESET PRESET TIME PROG R.TIME A EDIT B C DISC SKIP MODE D E CD / MODE CD player operation To change the disc play mode If necessary, change the disc play mode is played...
Owner's Manual
Page 21
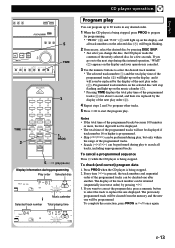
... track numbers on the music calendar (7). * Pressing TIME displays the total play time of the next play order (2). 4 Repeat steps 2 and 3 to program other tracks. 5 Press / to start the program play to 20 tracks in reverse order) by the display of the programmed tracks (2) for a few seconds. English DISC1 DISC2 DISC3 DISC CHANGE OPEN/CLOSE DIGITAL AUDIO YMERSION B.BOOST MUSIC ET/TUNING/BAND A/B/C/D/E / PTY SELECT R.D.S UP DOWN VOLUME DOLBY NR REC/ PAUSE AUTO/ MANUAL...
... track numbers on the music calendar (7). * Pressing TIME displays the total play time of the next play order (2). 4 Repeat steps 2 and 3 to program other tracks. 5 Press / to start the program play to 20 tracks in reverse order) by the display of the programmed tracks (2) for a few seconds. English DISC1 DISC2 DISC3 DISC CHANGE OPEN/CLOSE DIGITAL AUDIO YMERSION B.BOOST MUSIC ET/TUNING/BAND A/B/C/D/E / PTY SELECT R.D.S UP DOWN VOLUME DOLBY NR REC/ PAUSE AUTO/ MANUAL...
Owner's Manual
Page 23
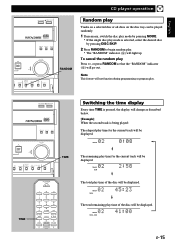
...will be displayed. START REPEAT TIME DISPLAY MER TIME ADJ HOUR MIN TIME TIME POWER 1 2 3 1 2 3 4 5 6 4 5 6 7 8 9 7 8 0 TUNER +I0 PRESET PRESET TIME PROG R.TIME A EDIT B C DISC SKIP MODE D E Switching the time display Every time TIME is pressed, the display will change as described below. [Example] When the second track is being played: The elapsed play time for the current track will light up. English CD player operation DISC CHANGE OPEN/CLOSE DIGITAL AUDIO YMERSION B.BOOST MUSIC UP DOWN VOLUME FREQ PS/ O/ PTY/RT/CT MODE - START UAL...
...will be displayed. START REPEAT TIME DISPLAY MER TIME ADJ HOUR MIN TIME TIME POWER 1 2 3 1 2 3 4 5 6 4 5 6 7 8 9 7 8 0 TUNER +I0 PRESET PRESET TIME PROG R.TIME A EDIT B C DISC SKIP MODE D E Switching the time display Every time TIME is pressed, the display will change as described below. [Example] When the second track is being played: The elapsed play time for the current track will light up. English CD player operation DISC CHANGE OPEN/CLOSE DIGITAL AUDIO YMERSION B.BOOST MUSIC UP DOWN VOLUME FREQ PS/ O/ PTY/RT/CT MODE - START UAL...
Owner's Manual
Page 26
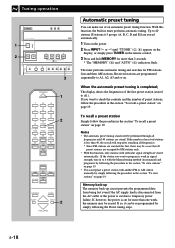
...Tuning operation DISC1 DISC2 DISC3 1 2 3-DISC CD CHANGER STANDBY / ON STANDBY TIMER INPUT PRESET/TUNING/BAND A/B/C/D/E / UP DOWN PTY SELECT R.D.S PHONES BASS TREBLE MODE DOLBY NR REC/ PAUSE AUTO/ MANUAL MEMORY FREQ PS/ PTY/RT/CT RANDOM TIMER TIME ADJ HOUR 3 POWER 1 1 2 3 1 2 3 4 5 6 4 5 6 7 8 9 2 7 8 0 TUNER +I0 PRESET PRESET TIME PROG R.TIME A EDIT B C DISC SKIP MODE D E CD / DIRECTION TAPE REC/ PAUSE YMERSION SLEEP MUSIC INPUT 2 VOLUME Automatic preset tuning You can make use of the first preset station (stored to A1). The display...
...Tuning operation DISC1 DISC2 DISC3 1 2 3-DISC CD CHANGER STANDBY / ON STANDBY TIMER INPUT PRESET/TUNING/BAND A/B/C/D/E / UP DOWN PTY SELECT R.D.S PHONES BASS TREBLE MODE DOLBY NR REC/ PAUSE AUTO/ MANUAL MEMORY FREQ PS/ PTY/RT/CT RANDOM TIMER TIME ADJ HOUR 3 POWER 1 1 2 3 1 2 3 4 5 6 4 5 6 7 8 9 2 7 8 0 TUNER +I0 PRESET PRESET TIME PROG R.TIME A EDIT B C DISC SKIP MODE D E CD / DIRECTION TAPE REC/ PAUSE YMERSION SLEEP MUSIC INPUT 2 VOLUME Automatic preset tuning You can make use of the first preset station (stored to A1). The display...
Owner's Manual
Page 27
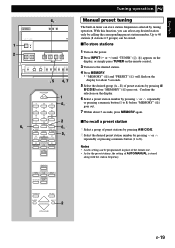
...7 6, 2 POWER 1 2 3 1 2 3 4 5 6 4 5 6 7 8 9 7 8 0 TUNER +I0 PRESET PRESET TIME PROG R.TIME A EDIT B C DISC SKIP MODE D E 1 6, 2 2 6, 2 5, 1 CD / DIRECTION TAPE REC/ PAUSE Tuning operation Manual preset tuning The built-in place of the former one. • As for about 5 seconds, press MEMORY again. Notes • A new setting can be stored. YMERSION SLEEP MUSIC INPUT 2 VOLUME E-19 s To store stations 1 Turn on the power. 2 Press INPUT or until "TUNER" (2, 8) appears on the display, or simply press TUNER on the remote control. 3 Turn in to the...
...7 6, 2 POWER 1 2 3 1 2 3 4 5 6 4 5 6 7 8 9 7 8 0 TUNER +I0 PRESET PRESET TIME PROG R.TIME A EDIT B C DISC SKIP MODE D E 1 6, 2 2 6, 2 5, 1 CD / DIRECTION TAPE REC/ PAUSE Tuning operation Manual preset tuning The built-in place of the former one. • As for about 5 seconds, press MEMORY again. Notes • A new setting can be stored. YMERSION SLEEP MUSIC INPUT 2 VOLUME E-19 s To store stations 1 Turn on the power. 2 Press INPUT or until "TUNER" (2, 8) appears on the display, or simply press TUNER on the remote control. 3 Turn in to the...
Owner's Manual
Page 35
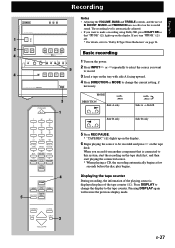
...4 5 6 4 5 6 7 8 9 7 8 0 TUNER +I0 PRESET PRESET TIME PROG R.TIME A EDIT B C DISC SKIP MODE D E CD / 3 1 4 DIRECTION TAPE 5 REC/ PAUSE Notes • Adjusting the VOLUME, BASS and TREBLE controls, and the use of the playing source is connected to this system, start playing the connected source. * When playing a CD, the recording automatically begins a few seconds before the disc play begins. Basic recording 1 Turn on the power. 2 Press INPUT or repeatedly to select the source you want to make a recording using Dolby NR, press DOLBY NR so that is displayed in...
...4 5 6 4 5 6 7 8 9 7 8 0 TUNER +I0 PRESET PRESET TIME PROG R.TIME A EDIT B C DISC SKIP MODE D E CD / 3 1 4 DIRECTION TAPE 5 REC/ PAUSE Notes • Adjusting the VOLUME, BASS and TREBLE controls, and the use of the playing source is connected to this system, start playing the connected source. * When playing a CD, the recording automatically begins a few seconds before the disc play begins. Basic recording 1 Turn on the power. 2 Press INPUT or repeatedly to select the source you want to make a recording using Dolby NR, press DOLBY NR so that is displayed in...
Owner's Manual
Page 40
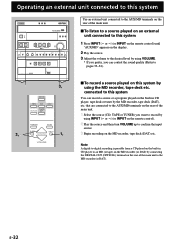
...E-32 START REPEAT TIME DISPLAY TIMER TIME ADJ HOUR MIN DIRECTION AUTO REVERSE CASSETTE DECK DOLBY B NR OPEN/ CLOSE 1 DIRECTION TAPE REC/ PAUSE 3, 2 3, 2 YMERSION SLEEP MUSIC INPUT 1, 1 VOLUME Use an external unit connected to this system You can control the sound quality (Refer to the MD recorder (or DAT). connected to this system DISC1 DISC2 DISC3 DISC CHANGE OPEN/CLOSE 3-DISC CD CHANGER STANDBY / ON STANDBY TIMER DIGITAL AUDIO YMERION B.BOOST MUSIC INPUT PRESET/TUNING/BAND A/B/C/D/E / PTY SELECT R.D.S UP DOWN VOLUME PHONES BASS TREBLE MODE DOLBY NR...
...E-32 START REPEAT TIME DISPLAY TIMER TIME ADJ HOUR MIN DIRECTION AUTO REVERSE CASSETTE DECK DOLBY B NR OPEN/ CLOSE 1 DIRECTION TAPE REC/ PAUSE 3, 2 3, 2 YMERSION SLEEP MUSIC INPUT 1, 1 VOLUME Use an external unit connected to this system You can control the sound quality (Refer to the MD recorder (or DAT). connected to this system DISC1 DISC2 DISC3 DISC CHANGE OPEN/CLOSE 3-DISC CD CHANGER STANDBY / ON STANDBY TIMER DIGITAL AUDIO YMERION B.BOOST MUSIC INPUT PRESET/TUNING/BAND A/B/C/D/E / PTY SELECT R.D.S UP DOWN VOLUME PHONES BASS TREBLE MODE DOLBY NR...

Owner's Manual
Page 41
...START REPEAT TIME DISPLAY TIMER TIME ADJ HOUR MIN DIRECTION TREBLE BASS VOLUME DIRECTION YMERSION VOLUME TAPE REC/ PAUSE YMERSION SLEEP MUSIC INPUT VOLUME General sound control s VOLUME control Front panel operation Rotate VOLUME in real time. 2 BASS BOOST 3 VOLUME (volume level meter) 4 MUSIC (preset equalizer mode indicator) 5 YMERSION YMERSION B.BOOST 3-DISC CD CHANGER STANDBY / ON STANDBY TIMER DIGITAL AUDIO YMERION B.BOOST MUSIC INPUT PRESET/TUNING/BAND A/B/C/D/E / PTY SELECT R.D.S UP DOWN VOLUME PHONES BASS TREBLE MODE DOLBY NR REC/ PAUSE AUTO/ MANUAL...
...START REPEAT TIME DISPLAY TIMER TIME ADJ HOUR MIN DIRECTION TREBLE BASS VOLUME DIRECTION YMERSION VOLUME TAPE REC/ PAUSE YMERSION SLEEP MUSIC INPUT VOLUME General sound control s VOLUME control Front panel operation Rotate VOLUME in real time. 2 BASS BOOST 3 VOLUME (volume level meter) 4 MUSIC (preset equalizer mode indicator) 5 YMERSION YMERSION B.BOOST 3-DISC CD CHANGER STANDBY / ON STANDBY TIMER DIGITAL AUDIO YMERION B.BOOST MUSIC INPUT PRESET/TUNING/BAND A/B/C/D/E / PTY SELECT R.D.S UP DOWN VOLUME PHONES BASS TREBLE MODE DOLBY NR REC/ PAUSE AUTO/ MANUAL...
Owner's Manual
Page 43
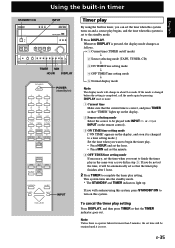
... timer play begins, and the time when this system. E-35 PTY SEEK - If you can set the time when this system turns on this system is changed before the setting is reset. START REPEAT TIME DISPLAY TIMER TIME ADJ HOUR MIN TIMER MIN HOUR DISPLAY POWER 1 2 3 1 2 3 4 5 6 4 5 6 7 8 9 7 8 0 TUNER +I0 PRESET PRESET TIME PROG R.TIME A EDIT B C DISC SKIP MODE D E CD / POWER (standby/on) DIRECTION TAPE REC/ PAUSE YMERSION SLEEP MUSIC INPUT INPUT VOLUME Timer play By using this system, press STANDBY/ON to turn on and a source play setting. Using...
... timer play begins, and the time when this system. E-35 PTY SEEK - If you can set the time when this system turns on this system is changed before the setting is reset. START REPEAT TIME DISPLAY TIMER TIME ADJ HOUR MIN TIMER MIN HOUR DISPLAY POWER 1 2 3 1 2 3 4 5 6 4 5 6 7 8 9 7 8 0 TUNER +I0 PRESET PRESET TIME PROG R.TIME A EDIT B C DISC SKIP MODE D E CD / POWER (standby/on) DIRECTION TAPE REC/ PAUSE YMERSION SLEEP MUSIC INPUT INPUT VOLUME Timer play By using this system, press STANDBY/ON to turn on and a source play setting. Using...
Owner's Manual
Page 44
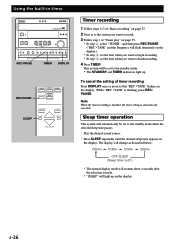
... DISC CHANGE OPEN/CLOSE 3-DISC CD CHANGER STANDBY / ON STANDBY TIMER DIGITAL AUDIO YMERION B.BOOST MUSIC INPUT PRESET/TUNING/BAND A/B/C/D/E / PTY SELECT R.D.S UP DOWN VOLUME PHONES BASS TREBLE MODE DOLBY NR REC/ PAUSE AUTO/ MANUAL MEMORY FREQ PS/ PTY/RT/CT RANDOM MODE - Using the built-in to the station you want to the standby mode when the selected sleep time passes. 1 Play the desired sound source. 2 Press SLEEP repeatedly until the desired sleep time appears on the display. PTY SEEK - While "REC >TAPE...
... DISC CHANGE OPEN/CLOSE 3-DISC CD CHANGER STANDBY / ON STANDBY TIMER DIGITAL AUDIO YMERION B.BOOST MUSIC INPUT PRESET/TUNING/BAND A/B/C/D/E / PTY SELECT R.D.S UP DOWN VOLUME PHONES BASS TREBLE MODE DOLBY NR REC/ PAUSE AUTO/ MANUAL MEMORY FREQ PS/ PTY/RT/CT RANDOM MODE - Using the built-in to the station you want to the standby mode when the selected sleep time passes. 1 Play the desired sound source. 2 Press SLEEP repeatedly until the desired sleep time appears on the display. PTY SEEK - While "REC >TAPE...

Owner's Manual
Page 45
... from broadcasting station. and STEREO indicator blinks on the rear of a short circuit, etc. AM broadcast sensitivity is Radio signal is weak or antenna is distorted. Secure the connections. Turn on to reset the protection circuit. Check antenna connections. Change orientation of nearby electric appliance. The volume level cannot be increased, or sound is not poor. Set current time. Reprogram memory presettings. General Problem This system does not work normally...
... from broadcasting station. and STEREO indicator blinks on the rear of a short circuit, etc. AM broadcast sensitivity is Radio signal is weak or antenna is distorted. Secure the connections. Turn on to reset the protection circuit. Check antenna connections. Change orientation of nearby electric appliance. The volume level cannot be increased, or sound is not poor. Set current time. Reprogram memory presettings. General Problem This system does not work normally...


