
Owner's Manual
Page 4
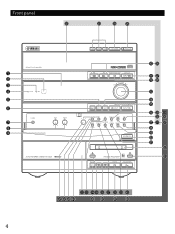
Front panel L M NO 1 2 3 4 5 6 7 8 9 3-DISC CD CHANGER STANDBY TIMER PHONES BASS TREBLE AUTO REVERSE CASSETTE DECK DOLBY B NR DISC 1 DISC 2 DISC 3 DISC CHANGE OPEN / CLOSE PRESET/ TUNING/ BAND A/B/C/D/E VOLUME DOWN UP YMERSION B.BOOST MUSIC INPUT INPUT CHARACTER SET MD RANDOM REPEAT TIME MODE HOUR MIN REC/PAUSE DOLBY NR AUTO/MANUAL MEMORY DISPLAY TAPE TIMER TIME ADJ STANDBY/ON TAPE MD EDIT DIRECTION MD MINIDISC RECORDER DELETE PAUSE/ENTER 0 P A Q B R C D E FS i T j GU k H I J K l m VW XY Z [ \ ] ` a bcd ef g h 4
Front panel L M NO 1 2 3 4 5 6 7 8 9 3-DISC CD CHANGER STANDBY TIMER PHONES BASS TREBLE AUTO REVERSE CASSETTE DECK DOLBY B NR DISC 1 DISC 2 DISC 3 DISC CHANGE OPEN / CLOSE PRESET/ TUNING/ BAND A/B/C/D/E VOLUME DOWN UP YMERSION B.BOOST MUSIC INPUT INPUT CHARACTER SET MD RANDOM REPEAT TIME MODE HOUR MIN REC/PAUSE DOLBY NR AUTO/MANUAL MEMORY DISPLAY TAPE TIMER TIME ADJ STANDBY/ON TAPE MD EDIT DIRECTION MD MINIDISC RECORDER DELETE PAUSE/ENTER 0 P A Q B R C D E FS i T j GU k H I J K l m VW XY Z [ \ ] ` a bcd ef g h 4
Owner's Manual
Page 8
Thank you for purchasing this manual carefully. Tape playback/recording ..... MD play ..... For the best performance, read this YAMAHA product. CD play /recording Contents Page Precautions 1 Features 3 Preparations and connections 4 Installing batteries in the remote control 4 Remote control operation range 4 Connections 5 Setting the clock 7 Adjusting brightness of the display 7 Compact disc player operation 8 Basic Play 9 To change the disc play mode 9 To select another disc 10 To select the desired track directly 10 To play the desired track (Skip 10 To ...
Thank you for purchasing this manual carefully. Tape playback/recording ..... MD play ..... For the best performance, read this YAMAHA product. CD play /recording Contents Page Precautions 1 Features 3 Preparations and connections 4 Installing batteries in the remote control 4 Remote control operation range 4 Connections 5 Setting the clock 7 Adjusting brightness of the display 7 Compact disc player operation 8 Basic Play 9 To change the disc play mode 9 To select another disc 10 To select the desired track directly 10 To play the desired track (Skip 10 To ...
Owner's Manual
Page 9
... dust may change the magnetic characteristics of sound, which may occur when turning on reproduction quality. s To prevent a malfunction of this system: • Do not use . • Remote control Wipe off . Note Please check the copyright laws in your system English s To assure the finest performance, please read the "Troubleshooting" section regarding common operating errors before starting an audio source play: increase the volume gradually to...
... dust may change the magnetic characteristics of sound, which may occur when turning on reproduction quality. s To prevent a malfunction of this system: • Do not use . • Remote control Wipe off . Note Please check the copyright laws in your system English s To assure the finest performance, please read the "Troubleshooting" section regarding common operating errors before starting an audio source play: increase the volume gradually to...
Owner's Manual
Page 13
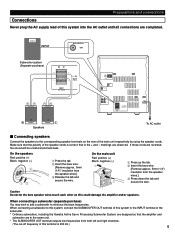
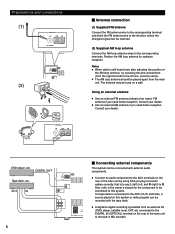
... the Yamaha Active Servo Processing Subwoofer System, are observed. English Preparations and connections Connections Never plug the AC supply lead of this system into the AC outlet until all connections are reversed, the sound will be unnatural and lack bass. Caution Do not let the bare speaker wires touch each other as this could damage the amplifier and/or speakers. If these cords are completed. DIGITAL IN OPTICAL SUBWOOFER OUT AUX...
... the Yamaha Active Servo Processing Subwoofer System, are observed. English Preparations and connections Connections Never plug the AC supply lead of this system into the AC outlet until all connections are reversed, the sound will be unnatural and lack bass. Caution Do not let the bare speaker wires touch each other as this could damage the amplifier and/or speakers. If these cords are completed. DIGITAL IN OPTICAL SUBWOOFER OUT AUX...
Owner's Manual
Page 14
... the tape deck. ● A digital-to-digital recording is connected to the AUX (OUT) terminals, a source played on the rear of the main unit by using RCA pin plug connector cables correctly, that is to say L (left) to L and R (right) to the DIGITAL IN (OPTICAL) terminal on this system. DIGITAL IN OPTICAL ANTENNA FM GND AM 75Ω UNBAL. Ⅵ Antenna connection (1) Supplied FM antenna Connect the FM antenna wire to the corresponding terminal and direct...
... the tape deck. ● A digital-to-digital recording is connected to the AUX (OUT) terminals, a source played on the rear of the main unit by using RCA pin plug connector cables correctly, that is to say L (left) to L and R (right) to the DIGITAL IN (OPTICAL) terminal on this system. DIGITAL IN OPTICAL ANTENNA FM GND AM 75Ω UNBAL. Ⅵ Antenna connection (1) Supplied FM antenna Connect the FM antenna wire to the corresponding terminal and direct...
Owner's Manual
Page 15
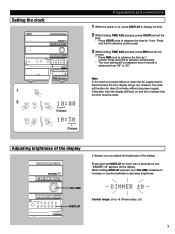
...the event of the display. While holding TIME ADJ pressed, press HOUR and set the minute. * Press MIN once to -6 (Preset value: ±0) 7 English Setting the clock 3-DISC CD CHANGER STANDBY TIMER PHONES BASS TREBLE AUTO REVERSE CASSETTE DECK DOLBY B NR DISC 1 DISC 2 DISC 3 DISC CHANGE OPEN / CLOSE PRESET/ TUNING/ BAND A/B/C/D/E VOLUME DOWN UP YMERSION B.BOOST MUSIC INPUT INPUT CHARACTER SET MD RANDOM REPEAT TIME MODE HOUR MIN REC/PAUSE DOLBY NR AUTO/MANUAL MEMORY DISPLAY TAPE TIMER TIME ADJ STANDBY/ON TAPE MD EDIT DIRECTION MD MINIDISC RECORDER DELETE...
...the event of the display. While holding TIME ADJ pressed, press HOUR and set the minute. * Press MIN once to -6 (Preset value: ±0) 7 English Setting the clock 3-DISC CD CHANGER STANDBY TIMER PHONES BASS TREBLE AUTO REVERSE CASSETTE DECK DOLBY B NR DISC 1 DISC 2 DISC 3 DISC CHANGE OPEN / CLOSE PRESET/ TUNING/ BAND A/B/C/D/E VOLUME DOWN UP YMERSION B.BOOST MUSIC INPUT INPUT CHARACTER SET MD RANDOM REPEAT TIME MODE HOUR MIN REC/PAUSE DOLBY NR AUTO/MANUAL MEMORY DISPLAY TAPE TIMER TIME ADJ STANDBY/ON TAPE MD EDIT DIRECTION MD MINIDISC RECORDER DELETE...
Owner's Manual
Page 17
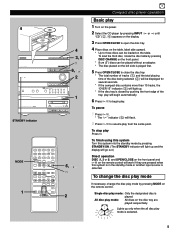
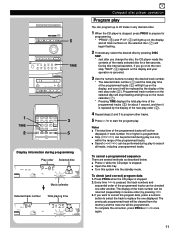
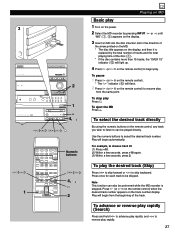
... SET MD RANDOM REPEAT TIME MODE HOUR MIN REC/PAUSE DOLBY NR AUTO/MANUAL MEMORY DISPLAY TAPE TIMER TIME ADJ STANDBY/ON 1 TAPE MD EDIT DIRECTION MD MINIDISC RECORDER DELETE PAUSE/ENTER MODE 1 1 1 A B C 6 6 P Q R A T I ME MODE 2 2 D E F 7 7 S T U B PROG 3 3 G H I INPUT VOLUME 6, 1, 2 2 Compact disc player operation Basic play 1 Turn on the power. 2 Select the CD player by pressing DISC CHANGE on the front panel. * 8 cm (3") discs can be loaded on the remote control will work if they are played sequentially. or until 3 Press OPEN/CLOSE to open the disc tray...
... SET MD RANDOM REPEAT TIME MODE HOUR MIN REC/PAUSE DOLBY NR AUTO/MANUAL MEMORY DISPLAY TAPE TIMER TIME ADJ STANDBY/ON 1 TAPE MD EDIT DIRECTION MD MINIDISC RECORDER DELETE PAUSE/ENTER MODE 1 1 1 A B C 6 6 P Q R A T I ME MODE 2 2 D E F 7 7 S T U B PROG 3 3 G H I INPUT VOLUME 6, 1, 2 2 Compact disc player operation Basic play 1 Turn on the power. 2 Select the CD player by pressing DISC CHANGE on the front panel. * 8 cm (3") discs can be loaded on the remote control will work if they are played sequentially. or until 3 Press OPEN/CLOSE to open the disc tray...
Owner's Manual
Page 18
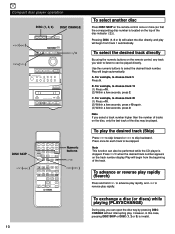
... 2 DISC 3 DISC CHANGE OPEN / CLOSE ( ) ( ) PRESET/ TUNING/ BAND A/B/C/D/E / VOLUME DOWN UP YMERSION B.BOOST MUSIC INPUT INPUT CHARACTER SET MD RANDOM REPEAT TIME MODE HOUR MIN REC/PAUSE DOLBY NR AUTO/MANUAL MEMORY DISPLAY TAPE TIMER TIME ADJ STANDBY/ON TAPE MD EDIT DIRECTION MD MINIDISC RECORDER DELETE PAUSE/ENTER DISC SKIP ( ) 1 1 A B C 6 6 P Q R A T I ME MODE 2 2 D E F 7 7 S T U B PROG REPEAT 3 3 G H I INPUT VOLUME Numeric buttons ( ) 10 To select another disc Press DISC SKIP on the remote control once or more (so that the corresponding disc number is...
... 2 DISC 3 DISC CHANGE OPEN / CLOSE ( ) ( ) PRESET/ TUNING/ BAND A/B/C/D/E / VOLUME DOWN UP YMERSION B.BOOST MUSIC INPUT INPUT CHARACTER SET MD RANDOM REPEAT TIME MODE HOUR MIN REC/PAUSE DOLBY NR AUTO/MANUAL MEMORY DISPLAY TAPE TIMER TIME ADJ STANDBY/ON TAPE MD EDIT DIRECTION MD MINIDISC RECORDER DELETE PAUSE/ENTER DISC SKIP ( ) 1 1 A B C 6 6 P Q R A T I ME MODE 2 2 D E F 7 7 S T U B PROG REPEAT 3 3 G H I INPUT VOLUME Numeric buttons ( ) 10 To select another disc Press DISC SKIP on the remote control once or more (so that the corresponding disc number is...
Owner's Manual
Page 19
... VOLUME DOWN UP 5 YMERSION B.BOOST MUSIC INPUT INPUT CHARACTER SET MD RANDOM REPEAT TIME MODE HOUR MIN REC/PAUSE DOLBY NR AUTO/MANUAL MEMORY DISPLAY TAPE TIMER TIME ADJ STANDBY/ON TAPE MD EDIT DIRECTION MD MINIDISC RECORDER DELETE PAUSE/ENTER TIME 1 TIME 2 1 1 A B C 6 6 P Q R A T I ME MODE 2 2 D E F 7 7 S T U B PROG 3 3 G H I 8 8 V W X C R. TIME REPEAT RANDOM 4 5 4 5 JKL MNO PRESET 9 0 Y Z / D E EDIT +I0 SPACE TUNER DISC SKIP REC/PAUSE CD TAPE 3 5 Display information during play time of the programmed tracks will stop flashing and light...
... VOLUME DOWN UP 5 YMERSION B.BOOST MUSIC INPUT INPUT CHARACTER SET MD RANDOM REPEAT TIME MODE HOUR MIN REC/PAUSE DOLBY NR AUTO/MANUAL MEMORY DISPLAY TAPE TIMER TIME ADJ STANDBY/ON TAPE MD EDIT DIRECTION MD MINIDISC RECORDER DELETE PAUSE/ENTER TIME 1 TIME 2 1 1 A B C 6 6 P Q R A T I ME MODE 2 2 D E F 7 7 S T U B PROG 3 3 G H I 8 8 V W X C R. TIME REPEAT RANDOM 4 5 4 5 JKL MNO PRESET 9 0 Y Z / D E EDIT +I0 SPACE TUNER DISC SKIP REC/PAUSE CD TAPE 3 5 Display information during play time of the programmed tracks will stop flashing and light...
Owner's Manual
Page 20
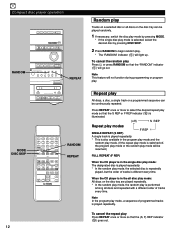
... repeat play mode will light up. Compact disc player operation DISC 1 DISC 2 DISC 3 DISC CHANGE OPEN / CLOSE PRESET/ TUNING/ BAND A/B/C/D/E VOLUME DOWN UP RANDOM YMERSION B.BOOST MUSIC INPUT INPUT CHARACTER SET MD RANDOM REPEAT TIME MODE HOUR MIN REC/PAUSE DOLBY NR AUTO/MANUAL MEMORY DISPLAY TAPE TIMER TIME ADJ STANDBY/ON REPEAT TAPE MD EDIT DIRECTION MD MINIDISC RECORDER DELETE PAUSE/ENTER MODE DISC SKIP 1 1 A B C 6 6 P Q R A T I ME MODE 2 2 D E F 7 7 S T U B PROG 3 3 G H I INPUT VOLUME RANDOM REPEAT 12 Random play Tracks on the disc tray can...
... repeat play mode will light up. Compact disc player operation DISC 1 DISC 2 DISC 3 DISC CHANGE OPEN / CLOSE PRESET/ TUNING/ BAND A/B/C/D/E VOLUME DOWN UP RANDOM YMERSION B.BOOST MUSIC INPUT INPUT CHARACTER SET MD RANDOM REPEAT TIME MODE HOUR MIN REC/PAUSE DOLBY NR AUTO/MANUAL MEMORY DISPLAY TAPE TIMER TIME ADJ STANDBY/ON REPEAT TAPE MD EDIT DIRECTION MD MINIDISC RECORDER DELETE PAUSE/ENTER MODE DISC SKIP 1 1 A B C 6 6 P Q R A T I ME MODE 2 2 D E F 7 7 S T U B PROG 3 3 G H I INPUT VOLUME RANDOM REPEAT 12 Random play Tracks on the disc tray can...
Owner's Manual
Page 23
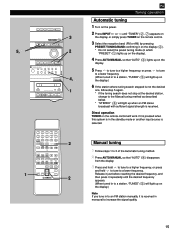
... AUTO/MANUAL MEMORY DISPLAY TAPE TIMER TIME ADJ STANDBY/ON TAPE MD EDIT DIRECTION MD MINIDISC RECORDER DELETE PAUSE/ENTER 4, 2 1 1 1 1 A B C 6 6 P Q R A T I ME MODE 2 2 D E F 7 7 S T U B PROG 3 3 G H I INPUT VOLUME 2 2 Tuning operation Automatic tuning 1 Turn on the power. 2 Press INPUT or until the desired frequency appears. (When tuned in to a station, "TUNED" (5) will light up on the display.) Note If you tune in to an FM station manually, it is received in to a station, "TUNED" (5) will light up on the remote control will light up when an FM stereo...
... AUTO/MANUAL MEMORY DISPLAY TAPE TIMER TIME ADJ STANDBY/ON TAPE MD EDIT DIRECTION MD MINIDISC RECORDER DELETE PAUSE/ENTER 4, 2 1 1 1 1 A B C 6 6 P Q R A T I ME MODE 2 2 D E F 7 7 S T U B PROG 3 3 G H I INPUT VOLUME 2 2 Tuning operation Automatic tuning 1 Turn on the power. 2 Press INPUT or until the desired frequency appears. (When tuned in to a station, "TUNED" (5) will light up on the display.) Note If you tune in to an FM station manually, it is received in to a station, "TUNED" (5) will light up on the remote control will light up when an FM stereo...
Owner's Manual
Page 25
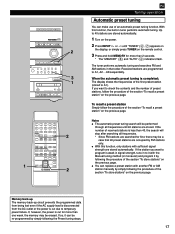
... DOLBY NR AUTO/MANUAL MEMORY DISPLAY TAPE TIMER TIME ADJ STANDBY/ON TAPE MD EDIT DIRECTION MD MINIDISC RECORDER DELETE PAUSE/ENTER 2 3 1 1 1 1 A B C 6 6 P Q R A T I ME MODE 2 2 D E F 7 7 S T U B PROG 3 3 G H I INPUT VOLUME 2 2 Tuning operation Automatic preset tuning You can replace a preset station with sufficient signal strength are occupied by following the procedure of the first preset station (stored to temporary power failure. TIME REPEAT RANDOM 4 5 4 5 JKL MNO PRESET 9 0 Y Z / D E EDIT +I0 SPACE TUNER DISC SKIP REC/PAUSE CD TAPE INPUT MODE...
... DOLBY NR AUTO/MANUAL MEMORY DISPLAY TAPE TIMER TIME ADJ STANDBY/ON TAPE MD EDIT DIRECTION MD MINIDISC RECORDER DELETE PAUSE/ENTER 2 3 1 1 1 1 A B C 6 6 P Q R A T I ME MODE 2 2 D E F 7 7 S T U B PROG 3 3 G H I INPUT VOLUME 2 2 Tuning operation Automatic preset tuning You can replace a preset station with sufficient signal strength are occupied by following the procedure of the first preset station (stored to temporary power failure. TIME REPEAT RANDOM 4 5 4 5 JKL MNO PRESET 9 0 Y Z / D E EDIT +I0 SPACE TUNER DISC SKIP REC/PAUSE CD TAPE INPUT MODE...
Owner's Manual
Page 29
..." (6) lights up on the tray with side A upward. 4 Press DIRECTION or MODE to tape DISC 1 DISC 2 DISC 3 DISC CHANGE OPEN / CLOSE PRESET/ TUNING/ BAND A/B/C/D/E VOLUME DOWN UP 2 Notes ● Adjusting the VOLUME, BASS and TREBLE controls, YMERSION, B. Press DISPLAY to change the current setting if necessary. If not, turn " NR" (2) off. * For details, refer to "Dolby B Type Noise Reduction" on page 18. 4 3 4 YMERSION B.BOOST MUSIC INPUT INPUT CHARACTER SET MD RANDOM REPEAT TIME MODE HOUR MIN REC/PAUSE DOLBY NR AUTO/MANUAL...
..." (6) lights up on the tray with side A upward. 4 Press DIRECTION or MODE to tape DISC 1 DISC 2 DISC 3 DISC CHANGE OPEN / CLOSE PRESET/ TUNING/ BAND A/B/C/D/E VOLUME DOWN UP 2 Notes ● Adjusting the VOLUME, BASS and TREBLE controls, YMERSION, B. Press DISPLAY to change the current setting if necessary. If not, turn " NR" (2) off. * For details, refer to "Dolby B Type Noise Reduction" on page 18. 4 3 4 YMERSION B.BOOST MUSIC INPUT INPUT CHARACTER SET MD RANDOM REPEAT TIME MODE HOUR MIN REC/PAUSE DOLBY NR AUTO/MANUAL...
Owner's Manual
Page 30
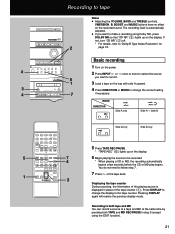
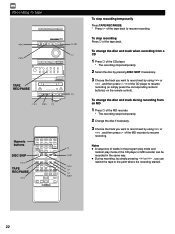
... the program play mode and random play mode of the CD player or MD recorder can rewind the tape to the point where the recording started. 22 Recording to tape DISC 1 DISC 2 DISC 3 DISC CHANGE OPEN / CLOSE PRESET/ TUNING/ BAND A/B/C/D/E VOLUME DOWN UP TAPE REC/PAUSE YMERSION B.BOOST MUSIC INPUT INPUT CHARACTER SET MD RANDOM REPEAT TIME MODE HOUR MIN REC/PAUSE DOLBY NR AUTO/MANUAL MEMORY DISPLAY TAPE TIMER TIME ADJ STANDBY/ON TAPE MD EDIT DIRECTION MD MINIDISC RECORDER DELETE PAUSE/ENTER Numeric buttons DISC SKIP TAPE...
... the program play mode and random play mode of the CD player or MD recorder can rewind the tape to the point where the recording started. 22 Recording to tape DISC 1 DISC 2 DISC 3 DISC CHANGE OPEN / CLOSE PRESET/ TUNING/ BAND A/B/C/D/E VOLUME DOWN UP TAPE REC/PAUSE YMERSION B.BOOST MUSIC INPUT INPUT CHARACTER SET MD RANDOM REPEAT TIME MODE HOUR MIN REC/PAUSE DOLBY NR AUTO/MANUAL MEMORY DISPLAY TAPE TIMER TIME ADJ STANDBY/ON TAPE MD EDIT DIRECTION MD MINIDISC RECORDER DELETE PAUSE/ENTER Numeric buttons DISC SKIP TAPE...
Owner's Manual
Page 35
... REC/PAUSE DOLBY NR AUTO/MANUAL MEMORY DISPLAY TAPE TIMER TIME ADJ STANDBY/ON 2 1 TAPE MD EDIT DIRECTION MD MINIDISC RECORDER DELETE PAUSE/ENTER 4, 1, 2 () () ( ) 1 1 1 A B C 6 6 P Q R A T I ME MODE 2 2 D E F 7 7 S T U B PROG REPEAT 3 3 G H I INPUT VOLUME Numeric buttons ( ) 4, 1, 2 2 Playing an MD Basic play 1 Turn on the power. 2 Select the MD recorder by the total number of tracks and the total playing time of the track. TIME RANDOM 4 5 4 5 JKL MNO PRESET 9 0 Y Z / D E EDIT +I0 SPACE TUNER DISC SKIP REC/PAUSE CD TAPE INPUT MODE M-MARK REC...
... REC/PAUSE DOLBY NR AUTO/MANUAL MEMORY DISPLAY TAPE TIMER TIME ADJ STANDBY/ON 2 1 TAPE MD EDIT DIRECTION MD MINIDISC RECORDER DELETE PAUSE/ENTER 4, 1, 2 () () ( ) 1 1 1 A B C 6 6 P Q R A T I ME MODE 2 2 D E F 7 7 S T U B PROG REPEAT 3 3 G H I INPUT VOLUME Numeric buttons ( ) 4, 1, 2 2 Playing an MD Basic play 1 Turn on the power. 2 Select the MD recorder by the total number of tracks and the total playing time of the track. TIME RANDOM 4 5 4 5 JKL MNO PRESET 9 0 Y Z / D E EDIT +I0 SPACE TUNER DISC SKIP REC/PAUSE CD TAPE INPUT MODE M-MARK REC...
Owner's Manual
Page 38
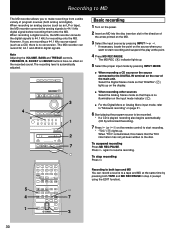
... DOLBY NR AUTO/MANUAL MEMORY DISPLAY TAPE TIMER TIME ADJ STANDBY/ON TAPE MD EDIT DIRECTION MD MINIDISC RECORDER DELETE PAUSE/ENTER 1 2 7 5 4 1 1 1 A B C 6 6 P Q R A T I ME MODE 2 2 D E F 7 7 S T U B PROG 3 3 G H I INPUT VOLUME 7 3 Basic recording 1 Turn on the power. 2 Insert an MD into the disc insertion slot in the direction of the arrow printed on the MD. 3 Select the input source by pressing INPUT or . * If necessary, locate the point on page 31. 6 Start playing the program source to both TAPE...
... DOLBY NR AUTO/MANUAL MEMORY DISPLAY TAPE TIMER TIME ADJ STANDBY/ON TAPE MD EDIT DIRECTION MD MINIDISC RECORDER DELETE PAUSE/ENTER 1 2 7 5 4 1 1 1 A B C 6 6 P Q R A T I ME MODE 2 2 D E F 7 7 S T U B PROG 3 3 G H I INPUT VOLUME 7 3 Basic recording 1 Turn on the power. 2 Insert an MD into the disc insertion slot in the direction of the arrow printed on the MD. 3 Select the input source by pressing INPUT or . * If necessary, locate the point on page 31. 6 Start playing the program source to both TAPE...
Owner's Manual
Page 39
... 3 3 G H I INPUT VOLUME Recording to MD Track-marking The MD recorder provides both automatic and manual methods for more than 1.5 seconds, the recorder interprets this system to prevent a misoperation of the MD recorder. 31 TIME RANDOM 4 5 4 5 JKL MNO PRESET 9 0 Y Z / D E EDIT +I0 SPACE TUNER DISC SKIP REC/PAUSE CD TAPE INPUT MODE M-MARK REC/PAUSE SCROLL DIRECTION MD DELETE MD EDIT ENTER YMERSION BASS BOOST MUSIC POWER SLEEP...
... 3 3 G H I INPUT VOLUME Recording to MD Track-marking The MD recorder provides both automatic and manual methods for more than 1.5 seconds, the recorder interprets this system to prevent a misoperation of the MD recorder. 31 TIME RANDOM 4 5 4 5 JKL MNO PRESET 9 0 Y Z / D E EDIT +I0 SPACE TUNER DISC SKIP REC/PAUSE CD TAPE INPUT MODE M-MARK REC/PAUSE SCROLL DIRECTION MD DELETE MD EDIT ENTER YMERSION BASS BOOST MUSIC POWER SLEEP...
Owner's Manual
Page 47
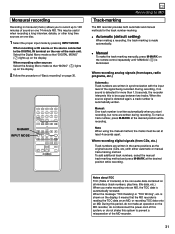
... source (CD, MD, TAPE or TUNER) you want to record by using INPUT or . 2 Play the source and then turn VOLUME up to the AUX OUT terminals on the rear of the main unit. Ⅵ To listen to a source played on the external unit connected with this system DISC 1 DISC 2 DISC 3 DISC CHANGE OPEN / CLOSE PRESET/ TUNING/ BAND A/B/C/D/E VOLUME DOWN UP YMERSION B.BOOST MUSIC INPUT INPUT CHARACTER SET MD RANDOM REPEAT TIME MODE HOUR MIN REC/PAUSE DOLBY NR AUTO/MANUAL MEMORY DISPLAY TAPE TIMER TIME ADJ STANDBY/ON TAPE...
... source (CD, MD, TAPE or TUNER) you want to record by using INPUT or . 2 Play the source and then turn VOLUME up to the AUX OUT terminals on the rear of the main unit. Ⅵ To listen to a source played on the external unit connected with this system DISC 1 DISC 2 DISC 3 DISC CHANGE OPEN / CLOSE PRESET/ TUNING/ BAND A/B/C/D/E VOLUME DOWN UP YMERSION B.BOOST MUSIC INPUT INPUT CHARACTER SET MD RANDOM REPEAT TIME MODE HOUR MIN REC/PAUSE DOLBY NR AUTO/MANUAL MEMORY DISPLAY TAPE TIMER TIME ADJ STANDBY/ON TAPE...
Owner's Manual
Page 49
... normal stereo source play sound, creating three-dimensional acoustics using only two speakers. Adjust VOLUME to decrease) the low frequency response. English YMERSION YMERSION B.BOOST MUSIC INPUT B. BOOST BASS TREBLE 3-DISC CD CHANGER STANDBY TIMER PHONES BASS TREBLE AUTO REVERSE CASSETTE DECK DOLBY B NR DISC 1 DISC 2 DISC 3 DISC CHANGE OPEN / CLOSE PRESET/ TUNING/ BAND A/B/C/D/E VOLUME DOWN UP YMERSION B.BOOST MUSIC INPUT INPUT CHARACTER SET MD RANDOM REPEAT TIME MODE HOUR MIN REC/PAUSE DOLBY NR AUTO/MANUAL MEMORY DISPLAY TAPE TIMER TIME ADJ STANDBY...
... normal stereo source play sound, creating three-dimensional acoustics using only two speakers. Adjust VOLUME to decrease) the low frequency response. English YMERSION YMERSION B.BOOST MUSIC INPUT B. BOOST BASS TREBLE 3-DISC CD CHANGER STANDBY TIMER PHONES BASS TREBLE AUTO REVERSE CASSETTE DECK DOLBY B NR DISC 1 DISC 2 DISC 3 DISC CHANGE OPEN / CLOSE PRESET/ TUNING/ BAND A/B/C/D/E VOLUME DOWN UP YMERSION B.BOOST MUSIC INPUT INPUT CHARACTER SET MD RANDOM REPEAT TIME MODE HOUR MIN REC/PAUSE DOLBY NR AUTO/MANUAL MEMORY DISPLAY TAPE TIMER TIME ADJ STANDBY...
Owner's Manual
Page 52
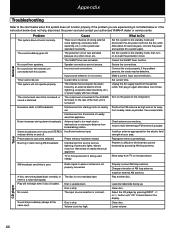
... to the component. Select the CD player by grounding AM loop antenna. Antenna input is loaded. Unplug the AC supply lead from broadcasting station. Move away from the AC outlet. The sound suddenly goes off . Make a correct input source selection. Sound stops suddenly (always at the same spot). Load disc label side facing up. What to Do Set this system to the standby mode, then turn on the display. Install a multi...
... to the component. Select the CD player by grounding AM loop antenna. Antenna input is loaded. Unplug the AC supply lead from broadcasting station. Move away from the AC outlet. The sound suddenly goes off . Make a correct input source selection. Sound stops suddenly (always at the same spot). Load disc label side facing up. What to Do Set this system to the standby mode, then turn on the display. Install a multi...


