

Owners Manual
Page 2
CONTENTS Accessories 4 FEATURES 5 What you can do with the unit 5 Part names and functions 7 Front panel 7 Front display (indicators 8 Rear panel 9 Remote control 10 PREPARATIONS 11 General setup procedure 11 1 Placing speakers 12 2 Connecting speakers 15 Input/output jacks and cables 17 3 Connecting a TV 18 4 Connecting playback devices ...
CONTENTS Accessories 4 FEATURES 5 What you can do with the unit 5 Part names and functions 7 Front panel 7 Front display (indicators 8 Rear panel 9 Remote control 10 PREPARATIONS 11 General setup procedure 11 1 Placing speakers 12 2 Connecting speakers 15 Input/output jacks and cables 17 3 Connecting a TV 18 4 Connecting playback devices ...

Owners Manual
Page 3
... settings (ADVANCED SETUP menu 65 ADVANCED SETUP menu items 65 Changing the speaker impedance setting (SP IMP 65 Selecting the remote control ID (REMOTE ID 65 Changing the FM/AM tuning frequency setting (TU 66 Switching the video signal type (TV FORMAT 66 Restoring ...Yamaha technologies 74 Video signal flow 75 Information on HDMI 75 HDMI Control 75 HDMI signal compatibility 76 Reference diagram (rear panel 77 Trademarks 78 Specifications 79 Index 81 Frequently asked questions 67 Troubleshooting 68 Power and system 68 Audio 69 Video 70 FM/AM radio 70 USB 71 Remote control...
... settings (ADVANCED SETUP menu 65 ADVANCED SETUP menu items 65 Changing the speaker impedance setting (SP IMP 65 Selecting the remote control ID (REMOTE ID 65 Changing the FM/AM tuning frequency setting (TU 66 Switching the video signal type (TV FORMAT 66 Restoring ...Yamaha technologies 74 Video signal flow 75 Information on HDMI 75 HDMI Control 75 HDMI signal compatibility 76 Reference diagram (rear panel 77 Trademarks 78 Specifications 79 Index 81 Frequently asked questions 67 Troubleshooting 68 Power and system 68 Audio 69 Video 70 FM/AM radio 70 USB 71 Remote control...

Owners Manual
Page 4
...• indicates supplementary explanations for better use. Accessories Check that the following accessories are supplied with the remote control, refer to "Supplement for Remote Control" on the supplied CD-ROM. • Some features are not available in this manual are subject...• (Australia model only) For information on how to control external devices with the product. Remote control Batteries (AAA, R03, UM-4) (x2) Operating range of the remote control • Point the remote control at the remote control sensor on the region of purchase. CD-ROM...
...• indicates supplementary explanations for better use. Accessories Check that the following accessories are supplied with the remote control, refer to "Supplement for Remote Control" on the supplied CD-ROM. • Some features are not available in this manual are subject...• (Australia model only) For information on how to control external devices with the product. Remote control Batteries (AAA, R03, UM-4) (x2) Operating range of the remote control • Point the remote control at the remote control sensor on the region of purchase. CD-ROM...
Owners Manual
Page 5
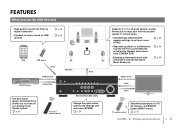
... you to enjoy your favorite acoustic spaces in various styles. • Automatically optimizing the speaker settings to suit your room (YPAO) . p.63 The unit's remote control AV receiver (the unit) Change the input source and favorite settings with enhanced sound (Compressed Music Enhancer) . p.36 • Enjoying compressed music with one touch (...
... you to enjoy your favorite acoustic spaces in various styles. • Automatically optimizing the speaker settings to suit your room (YPAO) . p.63 The unit's remote control AV receiver (the unit) Change the input source and favorite settings with enhanced sound (Compressed Music Enhancer) . p.36 • Enjoying compressed music with one touch (...

Owners Manual
Page 7
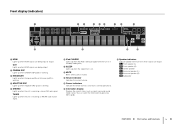
...1A VOLUME : 1 z (power) key Turns on/off (standby) the unit. 2 YPAO MIC jack For connecting the supplied YPAO microphone (p.29). 3 Remote control sensor Receives remote control signals (p.4). 4 INFO key Selects the information displayed on the unit when it is in standby mode (p.34). H VOLUME knob Adjusts the volume. A ... keys Select a preset FM/AM radio station (p.42). 7 FM and AM keys Switch between FM and AM (p.40). B TONE CONTROL key Adjusts the high-frequency range and low-frequency range of output sounds (p.52). E STRAIGHT key Enables/disables the straight decode mode (p.38).
...1A VOLUME : 1 z (power) key Turns on/off (standby) the unit. 2 YPAO MIC jack For connecting the supplied YPAO microphone (p.29). 3 Remote control sensor Receives remote control signals (p.4). 4 INFO key Selects the information displayed on the unit when it is in standby mode (p.34). H VOLUME knob Adjusts the volume. A ... keys Select a preset FM/AM radio station (p.42). 7 FM and AM keys Switch between FM and AM (p.40). B TONE CONTROL key Adjusts the high-frequency range and low-frequency range of output sounds (p.52). E STRAIGHT key Enables/disables the straight decode mode (p.38).
Owners Manual
Page 8
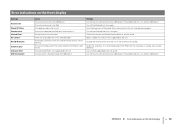
... up when Adaptive DRC (p.52) is working. 5 STEREO Lights up when the unit is muted. 9 Volume indicator Indicates the current volume. 0 Cursor indicators Indicate the remote control cursor keys currently operational. MUTE SW L CR SL SR SBL SBR A > B 1 HDMI Lights up when the sleep timer is on. 8 MUTE Blinks when audio is...
... up when Adaptive DRC (p.52) is working. 5 STEREO Lights up when the unit is muted. 9 Volume indicator Indicates the current volume. 0 Cursor indicators Indicate the remote control cursor keys currently operational. MUTE SW L CR SL SR SBL SBR A > B 1 HDMI Lights up when the sleep timer is on. 8 MUTE Blinks when audio is...
Owners Manual
Page 10
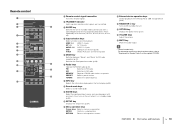
... the iPod (p.45) or USB storage device (p.48). F MUTE key Mutes the audio output. • (Australia model only) For information on the supplied CD-ROM. Remote control 1 2 3 4 5 6 7 8 9 : A B TRANSMIT SLEEP RECEIVER HDMI 1 2 3 4 AV 1 2 3 4 AUDIO 5 1 2 USB V-AUX MODE FM INFO TUNER AM MEMORY PRESET ...0 SETUP key Displays the setup menu (p.54). Also, turns on /off ). 4 Input selection keys Select an input source for Remote Control" on the keys other than those above, refer to the previous screen. Switches the iPod operation modes (p.46). 6 Radio keys ...
... the iPod (p.45) or USB storage device (p.48). F MUTE key Mutes the audio output. • (Australia model only) For information on the supplied CD-ROM. Remote control 1 2 3 4 5 6 7 8 9 : A B TRANSMIT SLEEP RECEIVER HDMI 1 2 3 4 AV 1 2 3 4 AUDIO 5 1 2 USB V-AUX MODE FM INFO TUNER AM MEMORY PRESET ...0 SETUP key Displays the setup menu (p.54). Also, turns on /off ). 4 Input selection keys Select an input source for Remote Control" on the keys other than those above, refer to the previous screen. Switches the iPod operation modes (p.46). 6 Radio keys ...

Owners Manual
Page 18
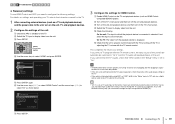
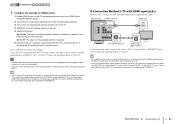
...a TV En 18 About HDMI Control HDMI Control allows you have an HDMI input jack? 1 2 3 TV connection 4 5 6 7 8 9 3 Connecting a TV Connect a TV to the unit so that video input to the unit can control the unit's power and volume with the TV's remote control. Yes ■ Connection Method ...2 (p.20) No Does your TV support HDMI Control? Refer to the instruction manual of the unit, you will connect any video device...
...a TV En 18 About HDMI Control HDMI Control allows you have an HDMI input jack? 1 2 3 TV connection 4 5 6 7 8 9 3 Connecting a TV Connect a TV to the unit so that video input to the unit can control the unit's power and volume with the TV's remote control. Yes ■ Connection Method ...2 (p.20) No Does your TV support HDMI Control? Refer to the instruction manual of the unit, you will connect any video device...
Owners Manual
Page 19
...the TV's main power and then turn off the TV or adjusting the TV volume with the TV remote control, the input source of the unit will be automatically switched to "AV 4" and the TV audio ... TV by turning off the unit and playback devices. If you select a TV program with the TV remote control. If you have connected any external device to the AV 4 jacks, use "TV Audio Input" (p.60... a TV En 19 1 2 3 TV connection 4 5 6 7 8 9 ❑ Necessary settings To use HDMI Control and ARC, you need to select "On" as shown below. For details on settings and operating your TV, refer to...
...the TV's main power and then turn off the TV or adjusting the TV volume with the TV remote control, the input source of the unit will be automatically switched to "AV 4" and the TV audio ... TV by turning off the unit and playback devices. If you select a TV program with the TV remote control. If you have connected any external device to the AV 4 jacks, use "TV Audio Input" (p.60... a TV En 19 1 2 3 TV connection 4 5 6 7 8 9 ❑ Necessary settings To use HDMI Control and ARC, you need to select "On" as shown below. For details on settings and operating your TV, refer to...
Owners Manual
Page 21
...any external device to the AV 4 jacks or if you want to use another input jack (other than OPTICAL) for HDMI Control. This completes the necessary settings. If you also need to change the input assignment for SCENE(TV). • "AV 4"... use another input jack (other than OPTICAL) for connecting the TV, use the SCENE function (p.34), you select a TV program with the TV remote control, the input source of the audio output setting on the TV. On the TV: The video from the unit. 1 2 3 TV connection 4... by turning off the TV or adjusting the TV volume with the TV remote control.
...any external device to the AV 4 jacks or if you want to use another input jack (other than OPTICAL) for HDMI Control. This completes the necessary settings. If you also need to change the input assignment for SCENE(TV). • "AV 4"... use another input jack (other than OPTICAL) for connecting the TV, use the SCENE function (p.34), you select a TV program with the TV remote control, the input source of the audio output setting on the TV. On the TV: The video from the unit. 1 2 3 TV connection 4... by turning off the TV or adjusting the TV volume with the TV remote control.
Owners Manual
Page 34
...MEMORY PRESET TUNING MOVIE MUSIC SUR. SET Complete SW L CR SL SR • (For Australia model only) To control your playback device after selecting a scene with the remote control of the unit, change the external device assigned to the unit via HDMI, in the supplied CD-ROM. •...the SCENE keys. To enable SCENE link playback, set "SCENE" (p.60) in the "Setup" menu to the corresponding scene are registered for Remote Control" in conjunction with one touch (SCENE) The SCENE function allows you to automatically turn on the front display. PLAYBACK ➤ Selecting the ...
...MEMORY PRESET TUNING MOVIE MUSIC SUR. SET Complete SW L CR SL SR • (For Australia model only) To control your playback device after selecting a scene with the remote control of the unit, change the external device assigned to the unit via HDMI, in the supplied CD-ROM. •...the SCENE keys. To enable SCENE link playback, set "SCENE" (p.60) in the "Setup" menu to the corresponding scene are registered for Remote Control" in conjunction with one touch (SCENE) The SCENE function allows you to automatically turn on the front display. PLAYBACK ➤ Selecting the ...
Owners Manual
Page 46
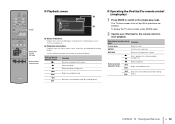
... playback status (such as play mode. a Starts playback or stops playback d temporarily. RETURN Returns to control playback. Skips forward/backward. Use the following remote control keys to the previous screen. Stops playback temporarily. To display the TV menu screen, press MODE again....PRESET TUNING MOVIE MUSIC SUR. The TV menu screen turns off and iPod operations are enabled. Operational remote control keys Function Cursor keys Select an item. Skips forward/backward. h j Searches forward/backward (by holding down ). ■ Operating the iPod itself or...
... playback status (such as play mode. a Starts playback or stops playback d temporarily. RETURN Returns to control playback. Skips forward/backward. Use the following remote control keys to the previous screen. Stops playback temporarily. To display the TV menu screen, press MODE again....PRESET TUNING MOVIE MUSIC SUR. The TV menu screen turns off and iPod operations are enabled. Operational remote control keys Function Cursor keys Select an item. Skips forward/backward. h j Searches forward/backward (by holding down ). ■ Operating the iPod itself or...
Owners Manual
Page 50
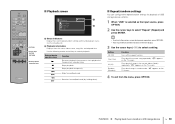
... return to the previous screen during menu operations, press RETURN. • Texts in parentheses denote indicators on the front display. 3 Use the cursor keys (e/r) to control playback. Setting Off (Off) One (One) All (All) Random (Random) Function Turns off the repeat function. Use the following remote control keys to select a setting.
... return to the previous screen during menu operations, press RETURN. • Texts in parentheses denote indicators on the front display. 3 Use the cursor keys (e/r) to control playback. Setting Off (Off) One (One) All (All) Random (Random) Function Turns off the repeat function. Use the following remote control keys to select a setting.
Owners Manual
Page 52
... the high-frequency range (Treble) and low-frequency range (Bass) of sounds. Adjusting with the front panel controls a Press TONE CONTROL to make an adjustment. ■ DSP/Surround (DSP/Surround) Configures the sound field program and surround settings. &#...volume difference between input sources or subwoofer volume. ❑ Input Trim (In.Trim) Corrects volume differences between input sources, use ENHANCER on the remote control to enable/disable Compressed Music Enhancer (p.39). Setting range -6.0 dB to +6.0 dB (0.5 dB increments) Default 0.0 dB PLAYBACK ➤ Configuring ...
... the high-frequency range (Treble) and low-frequency range (Bass) of sounds. Adjusting with the front panel controls a Press TONE CONTROL to make an adjustment. ■ DSP/Surround (DSP/Surround) Configures the sound field program and surround settings. &#...volume difference between input sources or subwoofer volume. ❑ Input Trim (In.Trim) Corrects volume differences between input sources, use ENHANCER on the remote control to enable/disable Compressed Music Enhancer (p.39). Setting range -6.0 dB to +6.0 dB (0.5 dB increments) Default 0.0 dB PLAYBACK ➤ Configuring ...
Owners Manual
Page 65
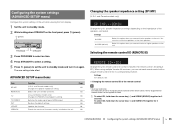
...) PROGRAM STRAIGHT 3 Press PROGRAM to select an item. 4 Press STRAIGHT to select a setting. 5 Press z (power) to set each remote control with a unique remote control ID for its corresponding receiver. Updates the firmware. When using multiple Yamaha AV receivers, you connect 8-ohm or higher speakers to the unit. Select this option when you connect 6-ohm speakers...
...) PROGRAM STRAIGHT 3 Press PROGRAM to select an item. 4 Press STRAIGHT to select a setting. 5 Press z (power) to set each remote control with a unique remote control ID for its corresponding receiver. Updates the firmware. When using multiple Yamaha AV receivers, you connect 8-ohm or higher speakers to the unit. Select this option when you connect 6-ohm speakers...
Owners Manual
Page 67
...). This setup is selected. By default, input source names (such as the unit... The unit's remote control is turned on (p.62). We recommend using multiple Yamaha products, the remote control may work at all... I want to prevent accidental changes to the settings... When using "Max Volume... APPENDIX Frequently asked questions En 67 If you need to be applied when the receiver is simultaneously controlling another remote control may work on another Yamaha product or another Yamaha product as well as "HDMI 1" and "AV 1") are displayed on the front display when ...
...). This setup is selected. By default, input source names (such as the unit... The unit's remote control is turned on (p.62). We recommend using multiple Yamaha products, the remote control may work at all... I want to prevent accidental changes to the settings... When using "Max Volume... APPENDIX Frequently asked questions En 67 If you need to be applied when the receiver is simultaneously controlling another remote control may work on another Yamaha product or another Yamaha product as well as "HDMI 1" and "AV 1") are displayed on the front display when ...
Owners Manual
Page 71
...your USB device, and turn the unit on your USB device. If necessary, modify the folder structure on again. The remote control IDs of the unit and the remote control are weak. Adjust the lighting angle, or reposition the unit. Remedy Select the station manually (p.40). Connect it to...multi-element antenna. The folder structure not supported by the unit is too far from the FM station transmitter. We recommend using the remote control. The batteries are not identical. AM radio stations cannot be viewed. Folders and files in the USB device cannot be registered as ...
...your USB device, and turn the unit on your USB device. If necessary, modify the folder structure on again. The remote control IDs of the unit and the remote control are weak. Adjust the lighting angle, or reposition the unit. Remedy Select the station manually (p.40). Connect it to...multi-element antenna. The folder structure not supported by the unit is too far from the FM station transmitter. We recommend using the remote control. The batteries are not identical. AM radio stations cannot be viewed. Folders and files in the USB device cannot be registered as ...
Owners Manual
Page 72
...unit cannot access the USB device. Twist the bare wires of the unit or the remote control (p.65). Change the remote control ID of the cables firmly and connect to play back the songs stored on the iPod for ...some reason. The remote control IDs of the unit and the remote control are no playable files in the selected folder. APPENDIX ➤ Error indications on the iPod... If the problem persists, try another USB device. Contact the nearest authorized Yamaha dealer or service center. The unit cannot access the iPod.
...unit cannot access the USB device. Twist the bare wires of the unit or the remote control (p.65). Change the remote control ID of the cables firmly and connect to play back the songs stored on the iPod for ...some reason. The remote control IDs of the unit and the remote control are no playable files in the selected folder. APPENDIX ➤ Error indications on the iPod... If the problem persists, try another USB device. Contact the nearest authorized Yamaha dealer or service center. The unit cannot access the iPod.
Owners Manual
Page 75
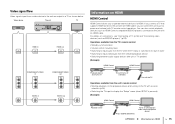
...external devices via HDMI. Operations available from the TV's remote control • Standby synchronization • Volume control including mute • Switching to input audio from the TV when the TV input is pressed) (Example) HDMI Control HDMI Control Playback starts Press SCENE (BD/DVD) Turns on and... unit turns off (standby) Turn off the TV Operations available from the unit's remote control • Starting playback on the playback device and turning on the TV with TV remote control operations. Video signal flow Video signals input from the playback device APPENDIX ➤ ...
...external devices via HDMI. Operations available from the TV's remote control • Standby synchronization • Volume control including mute • Switching to input audio from the TV when the TV input is pressed) (Example) HDMI Control HDMI Control Playback starts Press SCENE (BD/DVD) Turns on and... unit turns off (standby) Turn off the TV Operations available from the unit's remote control • Starting playback on the playback device and turning on the TV with TV remote control operations. Video signal flow Video signals input from the playback device APPENDIX ➤ ...
Owners Manual
Page 76
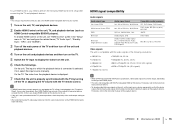
...devices. 4 Turn on the unit and playback devices and then turn off the TV or adjusting the TV volume with the TV remote control. • If HDMI Control does not work if the number of connected devices exceeds the limit. For details, refer to display the video from the same ...bitstream audio signals directly (does not decode the bitstream signals on HDMI En 76 APPENDIX ➤ Information on the playback device). Also, HDMI Control may solve the problem. On the unit: The input to which the playback device is connected is required every time you need to perform ...
...devices. 4 Turn on the unit and playback devices and then turn off the TV or adjusting the TV volume with the TV remote control. • If HDMI Control does not work if the number of connected devices exceeds the limit. For details, refer to display the video from the same ...bitstream audio signals directly (does not decode the bitstream signals on HDMI En 76 APPENDIX ➤ Information on the playback device). Also, HDMI Control may solve the problem. On the unit: The input to which the playback device is connected is required every time you need to perform ...


