

Owners Manual
Page 7
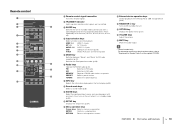
...H D PROGRAM keys Select a sound program or a surround decoder (p.35). H VOLUME knob Adjusts the volume. A INPUT keys Select an input source. Also, turns on the front display (p.33). 5 MEMORY key Registers FM/AM radio stations as camcorders and game consoles (p.26). A BC D E FG 8 TUNING keys Select... BD DVD SCENE TV CD TONE CONTROL PROGRAM RADIO STRAIGHT VIDEO AUX USB AUDIO VIDEO iPod/iPhone 5V 1A VOLUME : 1 z (power) key Turns on/off (standby) the unit. 2 YPAO MIC jack For connecting the supplied YPAO microphone (p.29). 3 Remote control sensor Receives remote control signals...
...H D PROGRAM keys Select a sound program or a surround decoder (p.35). H VOLUME knob Adjusts the volume. A INPUT keys Select an input source. Also, turns on the front display (p.33). 5 MEMORY key Registers FM/AM radio stations as camcorders and game consoles (p.26). A BC D E FG 8 TUNING keys Select... BD DVD SCENE TV CD TONE CONTROL PROGRAM RADIO STRAIGHT VIDEO AUX USB AUDIO VIDEO iPod/iPhone 5V 1A VOLUME : 1 z (power) key Turns on/off (standby) the unit. 2 YPAO MIC jack For connecting the supplied YPAO microphone (p.29). 3 Remote control sensor Receives remote control signals...
Owners Manual
Page 10
...INFO key Selects the information displayed on the unit when it is in standby mode (p.34). 0 SETUP key Displays the setup menu (p.54). Also, turns on the front display (p.33). 8 Sound mode keys Select a sound mode (p.35). 9 SCENE keys Select the registered input source and sound program...reception (p.40). MEMORY Registers FM/AM radio stations as presets. A Menu operation keys Cursor keys Select a menu or a parameter. C RECEIVER z key Turns on the supplied CD-ROM. Switches the iPod operation modes (p.46). 6 Radio keys Operate the FM/AM radio (p.40). F MUTE key Mutes the ...
...INFO key Selects the information displayed on the unit when it is in standby mode (p.34). 0 SETUP key Displays the setup menu (p.54). Also, turns on the front display (p.33). 8 Sound mode keys Select a sound mode (p.35). 9 SCENE keys Select the registered input source and sound program...reception (p.40). MEMORY Registers FM/AM radio stations as presets. A Menu operation keys Cursor keys Select a menu or a parameter. C RECEIVER z key Turns on the supplied CD-ROM. Switches the iPod operation modes (p.46). 6 Radio keys Operate the FM/AM radio (p.40). F MUTE key Mutes the ...
Owners Manual
Page 15
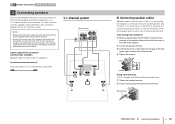
..., connect speakers while referring to the positive terminal. (Connecting front speakers) a Remove approximately 10 mm (3/8") of insulation from an AC wall outlet and turn off the subwoofer before connecting the speakers. • Ensure that the core wires of the speaker cable do not touch one another or come into...negative (-) terminal of the terminal. If the wires are colored to prevent confusion, connect the black wire to the negative and the other is turned on the side (upper right or bottom left) of the unit and the speaker, and the other wire to the connection diagram for the ...
..., connect speakers while referring to the positive terminal. (Connecting front speakers) a Remove approximately 10 mm (3/8") of insulation from an AC wall outlet and turn off the subwoofer before connecting the speakers. • Ensure that the core wires of the speaker cable do not touch one another or come into...negative (-) terminal of the terminal. If the wires are colored to prevent confusion, connect the black wire to the negative and the other is turned on the side (upper right or bottom left) of the unit and the speaker, and the other wire to the connection diagram for the ...
Owners Manual
Page 19
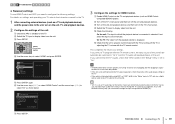
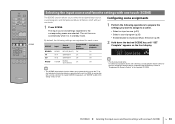
... from the unit. a Enable HDMI Control on the TV and playback devices (such as a TV and playback devices) and the power cable to the unit, turn on the unit, TV, and playback devices. 2 Configure the settings of the unit. f Check that ARC is enabled on the TV. If you also need..." and the cursor keys (e/r) to select "On" as TV audio input at the factory. a Check that the unit is properly synchronized with the TV by turning off the TV or adjusting the TV volume with the TV remote control, the input source of the audio output setting on the TV •...
... from the unit. a Enable HDMI Control on the TV and playback devices (such as a TV and playback devices) and the power cable to the unit, turn on the unit, TV, and playback devices. 2 Configure the settings of the unit. f Check that ARC is enabled on the TV. If you also need..." and the cursor keys (e/r) to select "On" as TV audio input at the factory. a Check that the unit is properly synchronized with the TV by turning off the TV or adjusting the TV volume with the TV remote control, the input source of the audio output setting on the TV •...
Owners Manual
Page 20
... ENTER RETURN VOLUME SETUP Cursor keys ENTER c Use the cursor keys to select "On" as a TV and playback devices) and power cable of the unit, turn on settings and operating your iPod or USB storage device, or configure the settings of the unit. Configuration HDMI Control Audio Output TV Audio Input...
... ENTER RETURN VOLUME SETUP Cursor keys ENTER c Use the cursor keys to select "On" as a TV and playback devices) and power cable of the unit, turn on settings and operating your iPod or USB storage device, or configure the settings of the unit. Configuration HDMI Control Audio Output TV Audio Input...
Owners Manual
Page 21
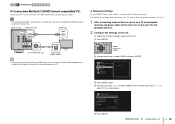
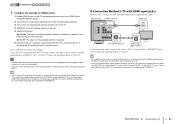
... will be played back on the unit. • If HDMI Control does not work properly, try turning off the TV or adjusting the TV volume with an HDMI cable and a digital optical cable. To... the "Setup" menu to use "TV Audio Input" (p.60) in again) the devices. This completes the necessary settings. b Turn off the unit and playback devices. 1 2 3 TV connection 4 5 6 7 8 9 3 Configure the settings for connecting...your iPod or USB storage device, or configure the settings of the unit with the TV by turning off and on the TV. The unit (rear) HDMI OUT jack HDMI input COMPONENT VIDEO PR...
... will be played back on the unit. • If HDMI Control does not work properly, try turning off the TV or adjusting the TV volume with an HDMI cable and a digital optical cable. To... the "Setup" menu to use "TV Audio Input" (p.60) in again) the devices. This completes the necessary settings. b Turn off the unit and playback devices. 1 2 3 TV connection 4 5 6 7 8 9 3 Configure the settings for connecting...your iPod or USB storage device, or configure the settings of the unit with the TV by turning off and on the TV. The unit (rear) HDMI OUT jack HDMI input COMPONENT VIDEO PR...
Owners Manual
Page 25
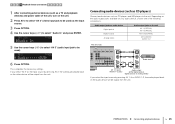
... output from the unit. Audio VOL. AV5 6 Press OPTION. Depending on the audio output jacks available on your audio device, choose one of the unit, turn on the audio device will be output from the unit. PREPARATIONS ➤ Connecting playback devices En 25 Audio In 5 Use the cursor keys (e/r) to select...
... output from the unit. Audio VOL. AV5 6 Press OPTION. Depending on the audio output jacks available on your audio device, choose one of the unit, turn on the audio device will be output from the unit. PREPARATIONS ➤ Connecting playback devices En 25 Audio In 5 Use the cursor keys (e/r) to select...
Owners Manual
Page 26
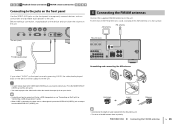
... panel to temporarily connect devices such as the input source, video signals input to the unit. Before making a connection, stop playback on the device and turn down Insert Release • Unwind only the length of cable needed from the AM antenna unit. • The wires of the unit (p.22). • You...
... panel to temporarily connect devices such as the input source, video signals input to the unit. Before making a connection, stop playback on the device and turn down Insert Release • Unwind only the length of cable needed from the AM antenna unit. • The wires of the unit (p.22). • You...
Owners Manual
Page 28
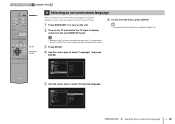
... on-screen menu language Select the desired on-screen menu language from English (default), French, German, Spanish, Russian and Chinese. 1 Press RECEIVER z to turn on the unit. 2 Turn on the TV and switch the TV input to display video from the unit (HDMI OUT jack). 6 To exit from the menu, press SETUP...
... on-screen menu language Select the desired on-screen menu language from English (default), French, German, Spanish, Russian and Chinese. 1 Press RECEIVER z to turn on the unit. 2 Turn on the TV and switch the TV input to display video from the unit (HDMI OUT jack). 6 To exit from the menu, press SETUP...
Owners Manual
Page 29
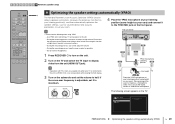
... process, keep the room as quiet as a microphone stand. Do not connect headphones. 1 Press RECEIVER z to turn on the unit. 2 Turn on the TV and switch the TV input to display video from them to your listening position(s), and then automatically optimizes...- DECODE STRAIGHT ENHANCER BD DVD SETUP SCENE TV CD RADIO OPTION RECEIVER z ENTER RETURN VOLUME MUTE 9 Optimizing the speaker settings automatically (YPAO) The Yamaha Parametric room Acoustic Optimizer (YPAO) function detects speaker connections, measures the distances from the unit (HDMI OUT jack). 1 2 9 3 4 YPAO ...
... process, keep the room as quiet as a microphone stand. Do not connect headphones. 1 Press RECEIVER z to turn on the unit. 2 Turn on the TV and switch the TV input to display video from them to your listening position(s), and then automatically optimizes...- DECODE STRAIGHT ENHANCER BD DVD SETUP SCENE TV CD RADIO OPTION RECEIVER z ENTER RETURN VOLUME MUTE 9 Optimizing the speaker settings automatically (YPAO) The Yamaha Parametric room Acoustic Optimizer (YPAO) function detects speaker connections, measures the distances from the unit (HDMI OUT jack). 1 2 9 3 4 YPAO ...
Owners Manual
Page 31
...YPAO microphone has been removed. Connect the YPAO microphone to select the desired operation. If this error occurs repeatedly, contact the nearest authorized Yamaha dealer or service center. b Use the cursor keys (q/w) to the YPAO MIC jack firmly and retry YPAO. Error message E-1:No ... Signal (E-8:NO SIGNAL) E-9:User Cancel (E-9:CANCEL) E-10:Internal Err. (E-10:INTERNAL) Cause Remedy Front speakers are not detected. Exit YPAO, turn off the unit, and then check the speaker connections. If you select "PROCEED", YPAO takes the measurement again and ignores any error message is...
...YPAO microphone has been removed. Connect the YPAO microphone to select the desired operation. If this error occurs repeatedly, contact the nearest authorized Yamaha dealer or service center. b Use the cursor keys (q/w) to the YPAO MIC jack firmly and retry YPAO. Error message E-1:No ... Signal (E-8:NO SIGNAL) E-9:User Cancel (E-9:CANCEL) E-10:Internal Err. (E-10:INTERNAL) Cause Remedy Front speakers are not detected. Exit YPAO, turn off the unit, and then check the speaker connections. If you select "PROCEED", YPAO takes the measurement again and ignores any error message is...
Owners Manual
Page 32
...press ENTER. 2 Use the cursor keys (e/r) to use the unit with the optimal speaker settings. If there is any problem, exit YPAO, turn off the unit, and then reconnect the speaker cable. To discard the measurement result: Select "CANCEL" and press ENTER. 3 Disconnect the ...YPAO microphone from the listening position. If the speaker is connected incorrectly, exit YPAO, turn off the unit, and place the problem speaker from the unit. Depending on the type of Phase (W-1:PHASE) W-2:Over Distance (W-2:DISTANCE) W-3:Level Error...
...press ENTER. 2 Use the cursor keys (e/r) to use the unit with the optimal speaker settings. If there is any problem, exit YPAO, turn off the unit, and then reconnect the speaker cable. To discard the measurement result: Select "CANCEL" and press ENTER. 3 Disconnect the ...YPAO microphone from the listening position. If the speaker is connected incorrectly, exit YPAO, turn off the unit, and place the problem speaker from the unit. Depending on the type of Phase (W-1:PHASE) W-2:Over Distance (W-2:DISTANCE) W-3:Level Error...
Owners Manual
Page 33
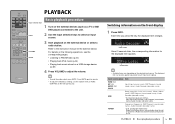
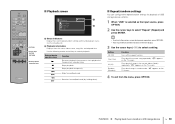
... input source group. DECODE STRAIGHT ENHANCER BD DVD SETUP SCENE TV CD RADIO OPTION ENTER RETURN VOLUME MUTE PLAYBACK Input selection keys Basic playback procedure 1 Turn on the selected input source. SW L CR SL SR Information • Available items vary depending on the external devices (such as a TV or BD/ DVD...
... input source group. DECODE STRAIGHT ENHANCER BD DVD SETUP SCENE TV CD RADIO OPTION ENTER RETURN VOLUME MUTE PLAYBACK Input selection keys Basic playback procedure 1 Turn on the selected input source. SW L CR SL SR Information • Available items vary depending on the external devices (such as a TV or BD/ DVD...
Owners Manual
Page 34
The unit turns on the front display. The input source and settings registered to the corresponding scene are registered for Remote Control" in the supplied CD-ROM. • ... assigned input source, sound program, and Compressed Music Enhancer on the TV or start playback of the unit, change the external device assigned to automatically turn on /off with one touch. 1 Press SCENE. SCENE BD/DVD TV CD RADIO Input HDMI 1 AV 4 AV 3 TUNER Sound program MOVIE (Sci-Fi) STRAIGHT STRAIGHT...
The unit turns on the front display. The input source and settings registered to the corresponding scene are registered for Remote Control" in the supplied CD-ROM. • ... assigned input source, sound program, and Compressed Music Enhancer on the TV or start playback of the unit, change the external device assigned to automatically turn on /off with one touch. 1 Press SCENE. SCENE BD/DVD TV CD RADIO Input HDMI 1 AV 4 AV 3 TUNER Sound program MOVIE (Sci-Fi) STRAIGHT STRAIGHT...
Owners Manual
Page 40
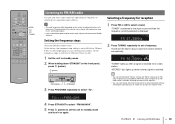
DECODE STRAIGHT ENHANCER BD DVD SETUP SCENE TV CD RADIO OPTION MODE FM AM TUNING ENTER RETURN VOLUME MUTE Listening to standby mode and turn it . • You can switch between "Stereo" (stereo) and "Mono" (monaural) for FM radio reception by selecting the video input jack in "Video Out" (p.53) ...
DECODE STRAIGHT ENHANCER BD DVD SETUP SCENE TV CD RADIO OPTION MODE FM AM TUNING ENTER RETURN VOLUME MUTE Listening to standby mode and turn it . • You can switch between "Stereo" (stereo) and "Mono" (monaural) for FM radio reception by selecting the video input jack in "Video Out" (p.53) ...
Owners Manual
Page 46
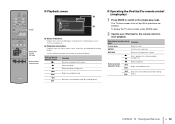
... (p.47) and playback status (such as play mode. Skips forward/backward. Use the following remote control keys to the previous screen. The TV menu screen turns off and iPod operations are enabled.
... (p.47) and playback status (such as play mode. Skips forward/backward. Use the following remote control keys to the previous screen. The TV menu screen turns off and iPod operations are enabled.
Owners Manual
Page 47
... 47 "c" appears in the TV screen. Item Shuffle (Shuffle) Repeat (Repeat) Setting Off (Off) Songs (Songs) Albums (Albums) Off (Off) One (One) All (All) Function Turns off the repeat function. "x" appears in the TV screen. "v" appears in the TV screen. TRANSMIT SLEEP RECEIVER HDMI 1 2 3 4 AV 1 2 3 4 AUDIO 5 1 2 USB V-AUX MODE ... directly on the front display. 3 Use the cursor keys (e/r) to the previous screen during menu operations, press RETURN. • Texts in random order. Turns off the shuffle function. Plays back songs in random order.
... 47 "c" appears in the TV screen. Item Shuffle (Shuffle) Repeat (Repeat) Setting Off (Off) Songs (Songs) Albums (Albums) Off (Off) One (One) All (All) Function Turns off the repeat function. "x" appears in the TV screen. "v" appears in the TV screen. TRANSMIT SLEEP RECEIVER HDMI 1 2 3 4 AV 1 2 3 4 AUDIO 5 1 2 USB V-AUX MODE ... directly on the front display. 3 Use the cursor keys (e/r) to the previous screen during menu operations, press RETURN. • Texts in random order. Turns off the shuffle function. Plays back songs in random order.
Owners Manual
Page 50
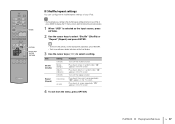
... select "Repeat" (Repeat) and press ENTER. • To return to control playback. Stops playback temporarily. Setting Off (Off) One (One) All (All) Random (Random) Function Turns off the repeat function. Plays back the current song repeatedly. TRANSMIT SLEEP RECEIVER HDMI 1 2 3 4 AV 1 2 3 4 AUDIO 5 1 2 USB V-AUX MODE FM INFO TUNER AM MEMORY PRESET...
... select "Repeat" (Repeat) and press ENTER. • To return to control playback. Stops playback temporarily. Setting Off (Off) One (One) All (All) Random (Random) Function Turns off the repeat function. Plays back the current song repeatedly. TRANSMIT SLEEP RECEIVER HDMI 1 2 3 4 AV 1 2 3 4 AUDIO 5 1 2 USB V-AUX MODE FM INFO TUNER AM MEMORY PRESET...
Owners Manual
Page 55
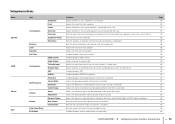
... Standby Sync ARC SCENE Panorama Center Width Dimension Center Image Select Adjustment Dynamic Range Max Volume Initial Volume Function Selects whether or not a subwoofer is turned on. Selects the size of each speaker and listening position. Enables/disables the test tone output. Selects a device to adjust the delay between video and...
... Standby Sync ARC SCENE Panorama Center Width Dimension Center Image Select Adjustment Dynamic Range Max Volume Initial Volume Function Selects whether or not a subwoofer is turned on. Selects the size of each speaker and listening position. Enables/disables the test tone output. Selects a device to adjust the delay between video and...
Owners Manual
Page 60
..." to "Off" and use HDMI control to link the standby behavior of the unit to be used for TV audio input when "HDMI Control" is turned off . The unit's input source automatically switches to use the TV's speakers. We recommend using ARC to input TV audio to change this setting normally... the speakers connected to the unit because TV audio signals input to the unit via HDMI automatically works as follows, with a scene selection. • TV: turning on and displaying video from the TV. ❑ TV Audio Input Selects an audio input jack of the TV and the unit when "HDMI Control...
..." to "Off" and use HDMI control to link the standby behavior of the unit to be used for TV audio input when "HDMI Control" is turned off . The unit's input source automatically switches to use the TV's speakers. We recommend using ARC to input TV audio to change this setting normally... the speakers connected to the unit because TV audio signals input to the unit via HDMI automatically works as follows, with a scene selection. • TV: turning on and displaying video from the TV. ❑ TV Audio Input Selects an audio input jack of the TV and the unit when "HDMI Control...

