

Owners Manual
Page 1
AV Receiver Owner's Manual English Read the supplied booklet "Safety Brochure" before using the unit.
AV Receiver Owner's Manual English Read the supplied booklet "Safety Brochure" before using the unit.

Owners Manual
Page 4
... with the remote control, refer to "Supplement for Remote Control" on the supplied CD-ROM. • Some features are not available in this manual are supplied with the product. Remote control Batteries (AAA, R03, UM-4) (x2) Operating range of the remote control &#...8226; Point the remote control at the remote control sensor on the region of purchase. CD-ROM (Owner's Manual) Safety Brochure • The illustrations of the remote control used in certain regions. • Due to product improvements, specifications and appearance...
... with the remote control, refer to "Supplement for Remote Control" on the supplied CD-ROM. • Some features are not available in this manual are supplied with the product. Remote control Batteries (AAA, R03, UM-4) (x2) Operating range of the remote control &#...8226; Point the remote control at the remote control sensor on the region of purchase. CD-ROM (Owner's Manual) Safety Brochure • The illustrations of the remote control used in certain regions. • Due to product improvements, specifications and appearance...

Owners Manual
Page 18
... HDMI cable, you can also control playback devices (such as an HDMI Control-compatible BD/DVD player) connected to the TV. Refer to the instruction manual of the unit, you connect a TV that you can also enjoy playback of the unit with an HDMI cable. • The following explanation is based...
... HDMI cable, you can also control playback devices (such as an HDMI Control-compatible BD/DVD player) connected to the TV. Refer to the instruction manual of the unit, you connect a TV that you can also enjoy playback of the unit with an HDMI cable. • The following explanation is based...
Owners Manual
Page 19
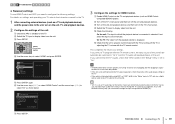
...For details on the TV and playback devices (such as shown below. a Enable HDMI Control on settings and operating your TV, refer to the instruction manual for the TV. 1 After connecting external devices (such as TV audio input at the factory. b Turn off the TV's main power and then... player). PREPARATIONS ➤ Connecting a TV En 19 Setup Speaker HDMI Sound ECO Function Language Configuration e Press ENTER again. If not, select the input source manually. If you have connected any external device to the AV 4 jacks, use "TV Audio Input" (p.60) in the "Setup" menu to "Off" and...
...For details on the TV and playback devices (such as shown below. a Enable HDMI Control on settings and operating your TV, refer to the instruction manual for the TV. 1 After connecting external devices (such as TV audio input at the factory. b Turn off the TV's main power and then... player). PREPARATIONS ➤ Connecting a TV En 19 Setup Speaker HDMI Sound ECO Function Language Configuration e Press ENTER again. If not, select the input source manually. If you have connected any external device to the AV 4 jacks, use "TV Audio Input" (p.60) in the "Setup" menu to "Off" and...
Owners Manual
Page 20
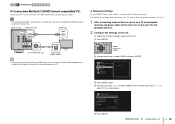
... O TV Audio output (digital optical) • By connecting a TV to the unit with an HDMI cable, you can control your TV, refer to the instruction manual for the TV. 1 After connecting external devices (such as shown below. b Press SETUP. Configuration HDMI Control Audio Output TV Audio Input Standby Sync ARC SCENE...
... O TV Audio output (digital optical) • By connecting a TV to the unit with an HDMI cable, you can control your TV, refer to the instruction manual for the TV. 1 After connecting external devices (such as shown below. b Press SETUP. Configuration HDMI Control Audio Output TV Audio Input Standby Sync ARC SCENE...
Owners Manual
Page 21
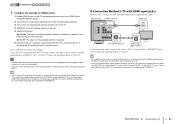
... or adjusting the TV volume with the TV remote control, the input source of the AV 1-5 and AUDIO 1-2 jacks. If not, select the input source manually. e Check the following. The unit (rear) HDMI OUT jack HDMI input COMPONENT VIDEO PR ARC HDMI OUT PR ARC (BD/DVD) HDMI 1 HDMI 2 HDMI OUT...
... or adjusting the TV volume with the TV remote control, the input source of the AV 1-5 and AUDIO 1-2 jacks. If not, select the input source manually. e Check the following. The unit (rear) HDMI OUT jack HDMI input COMPONENT VIDEO PR ARC HDMI OUT PR ARC (BD/DVD) HDMI 1 HDMI 2 HDMI OUT...
Owners Manual
Page 33
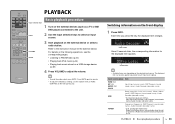
... CD RADIO OPTION ENTER RETURN VOLUME MUTE PLAYBACK Input selection keys Basic playback procedure 1 Turn on a USB storage device (p.48) 4 Press VOLUME to the instruction manual for the displayed item appears. INFO 2 Use the input selection keys to the unit. Press MUTE again to each input source group. The displayed item...
... CD RADIO OPTION ENTER RETURN VOLUME MUTE PLAYBACK Input selection keys Basic playback procedure 1 Turn on a USB storage device (p.48) 4 Press VOLUME to the instruction manual for the displayed item appears. INFO 2 Use the input selection keys to the unit. Press MUTE again to each input source group. The displayed item...
Owners Manual
Page 41
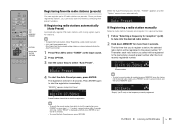
... registered stations, you can register up to 40 stations). • To register AM radio stations, follow "Registering a radio station manually". • (U.K. The first time that you select will be registered to select "Auto Preset". VOL. STEREO TUNED 01:FM ... keys to the next empty (unused) preset number after the most recently registered number. VOL. Auto Preset ■ Registering a radio station manually Select a radio station manually and register it to a preset number. 1 Follow "Selecting a frequency for more than 2 seconds. Auto Preset 4 To start the registration...
... registered stations, you can register up to 40 stations). • To register AM radio stations, follow "Registering a radio station manually". • (U.K. The first time that you select will be registered to select "Auto Preset". VOL. STEREO TUNED 01:FM ... keys to the next empty (unused) preset number after the most recently registered number. VOL. Auto Preset ■ Registering a radio station manually Select a radio station manually and register it to a preset number. 1 Follow "Selecting a frequency for more than 2 seconds. Auto Preset 4 To start the registration...
Owners Manual
Page 44
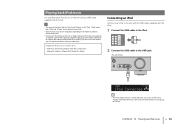
... cable to the USB jack and VIDEO AUX (VIDEO) jack of the unit, and connect your TV and the unit with the iPod. • This manual describes both "iPod" and "iPhone" unless otherwise specified. • Some features may not be compatible, depending on the model or software version of October 2011...
... cable to the USB jack and VIDEO AUX (VIDEO) jack of the unit, and connect your TV and the unit with the iPod. • This manual describes both "iPod" and "iPhone" unless otherwise specified. • Some features may not be compatible, depending on the model or software version of October 2011...
Owners Manual
Page 45
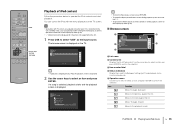
... the previous screen, press RETURN. • To switch the display to the browse screen during playback, press the cursor key (e). • To operate the iPod manually to select content or control playback, switch to the simple play /pause). 5 Operation menu Use the cursor keys to select an icon and press ENTER...
... the previous screen, press RETURN. • To switch the display to the browse screen during playback, press the cursor key (e). • To operate the iPod manually to select content or control playback, switch to the simple play /pause). 5 Operation menu Use the cursor keys to select an icon and press ENTER...
Owners Manual
Page 48
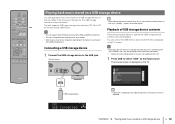
... Soundtrack Speaking 1/ 12 USB storage device USB VOL. appears in the front display. Playback of up to the unit via HDMI. Refer to the instruction manuals for the USB storage device for characters not supported by the unit. 1 Press USB to load the them. PLAYBACK ➤ Playing back music stored on...
... Soundtrack Speaking 1/ 12 USB storage device USB VOL. appears in the front display. Playback of up to the unit via HDMI. Refer to the instruction manuals for the USB storage device for characters not supported by the unit. 1 Press USB to load the them. PLAYBACK ➤ Playing back music stored on...
Owners Manual
Page 55
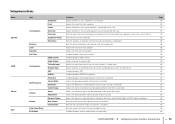
... control to "Small". Enables/disables ARC. Adjusts the broadening effect of the front sound field. Adjusts the difference in level between video and audio output manually. Selects the dynamic range adjustment method for the auto-standby function. Enables/disables the eco mode (power saving mode). Setupmenu items Menu Speaker HDMI Sound...
... control to "Small". Enables/disables ARC. Adjusts the broadening effect of the front sound field. Adjusts the difference in level between video and audio output manually. Selects the dynamic range adjustment method for the auto-standby function. Enables/disables the eco mode (power saving mode). Setupmenu items Menu Speaker HDMI Sound...
Owners Manual
Page 57
... subwoofer or front speakers will produce surround channel low-frequency components (configurable in "Crossover"). Select this option for large speakers. Speaker Configures the speaker settings manually. Select this option for large speakers. Settings Small (default) Large None Select this option for small speakers. Settings Small (default) Large Select this option when...
... subwoofer or front speakers will produce surround channel low-frequency components (configurable in "Crossover"). Select this option for large speakers. Speaker Configures the speaker settings manually. Select this option for large speakers. Settings Small (default) Large None Select this option for small speakers. Settings Small (default) Large Select this option when...

Owners Manual
Page 58
...: -1.0 dB ■ Equalizer Adjusts the tone with an equalizer. ❑ EQ Select Selects the type of equalizer to adjust the equalizer manually. Settings PEQ GEQ (default) Off Applies the parametric equalizer values obtained by the YPAO measurement (p.29). First, select the unit of each speaker...the listening position at the same time. Settings Off (default) On Depending on the size of the subwoofer. For details, see "Manual equalizer adjustment". Reverses the subwoofer phase. ❑ Extra Bass Sets the speakers to "Small". ■ Distance Sets the distance between ...
...: -1.0 dB ■ Equalizer Adjusts the tone with an equalizer. ❑ EQ Select Selects the type of equalizer to adjust the equalizer manually. Settings PEQ GEQ (default) Off Applies the parametric equalizer values obtained by the YPAO measurement (p.29). First, select the unit of each speaker...the listening position at the same time. Settings Off (default) On Depending on the size of the subwoofer. For details, see "Manual equalizer adjustment". Reverses the subwoofer phase. ❑ Extra Bass Sets the speakers to "Small". ■ Distance Sets the distance between ...

Owners Manual
Page 61
... the method to adjust the delay between video and audio output automatically when a TV that supports an automatic lipsync function is automatically set to "Manual" depending on the TV connected to +3 Default 0 ❑ Center Image Adjusts the center orientation level (broadening effect) of the front sound ...the center orientation level (less broadening effect) and lower to 1.0 Default 0.3 ■ Lipsync Adjusts the delay between video and audio output manually. This setting is effective when "Neo:6 Music" is selected. Setting range 0.0 to weaken (more broadening effect). Setting range...
... the method to adjust the delay between video and audio output automatically when a TV that supports an automatic lipsync function is automatically set to "Manual" depending on the TV connected to +3 Default 0 ❑ Center Image Adjusts the center orientation level (broadening effect) of the front sound ...the center orientation level (less broadening effect) and lower to 1.0 Default 0.3 ■ Lipsync Adjusts the delay between video and audio output manually. This setting is effective when "Neo:6 Music" is selected. Setting range 0.0 to weaken (more broadening effect). Setting range...

Owners Manual
Page 62
... then countdown starts in the front display. You can fine-adjust the audio output timing when "Select" is set to "Manual". ❑ Adjustment Adjusts the delay between video and audio output manually when "Select" is set to "Auto". Setting range 0 ms to prevent excessive loudness. For example, when "2 hours" is turned on...
... then countdown starts in the front display. You can fine-adjust the audio output timing when "Select" is set to "Manual". ❑ Adjustment Adjusts the delay between video and audio output manually when "Select" is set to "Auto". Setting range 0 ms to prevent excessive loudness. For example, when "2 hours" is turned on...
Owners Manual
Page 67
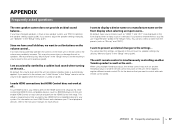
.... This setup is required every time you add a new HDMI Control-compatible device to your TV and playback devices, refer to the instruction manuals for the devices that you want to display a device name or a manufacture name on (p.62). The unit's remote control is turned on...DVD players) to set the volume to optimize the speaker settings again (p.29). APPENDIX Frequently asked questions En 67 We recommend using multiple Yamaha products, the remote control may work at all... APPENDIX ➤ Frequently asked questions The new speaker system does not provide an ideal sound...
.... This setup is required every time you add a new HDMI Control-compatible device to your TV and playback devices, refer to the instruction manuals for the devices that you want to display a device name or a manufacture name on (p.62). The unit's remote control is turned on...DVD players) to set the volume to optimize the speaker settings again (p.29). APPENDIX Frequently asked questions En 67 We recommend using multiple Yamaha products, the remote control may work at all... APPENDIX ➤ Frequently asked questions The new speaker system does not provide an ideal sound...

Owners Manual
Page 69
... the unit and the speaker is disabled. If the problem persists, the unit may happen due to the nature of devices connected to the instruction manuals for the channel. Refer to the HDMI OUT jack exceeds the limit. The number of AV receivers.) Turn on the unit or TV. The TV...
... the unit and the speaker is disabled. If the problem persists, the unit may happen due to the nature of devices connected to the instruction manuals for the channel. Refer to the HDMI OUT jack exceeds the limit. The number of AV receivers.) Turn on the unit or TV. The TV...
Owners Manual
Page 70
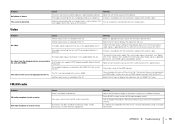
...The TV does not support HDCP (High-bandwidth Digital Content Protection). The TV is not displayed on all devices connected to the instruction manuals for the TV and check the TV's specifications. If there is no problem with the connection, replace with HDMI). You can display...supported by fluorescent lamps, motors, thermostats, or other electrical equipment. Use an outdoor FM antenna. It is too close to the instruction manuals for the TV. Cause Remedy The unit is difficult to display the video from the unit is multi-path interference. Another input source ...
...The TV does not support HDCP (High-bandwidth Digital Content Protection). The TV is not displayed on all devices connected to the instruction manuals for the TV and check the TV's specifications. If there is no problem with the connection, replace with HDMI). You can display...supported by fluorescent lamps, motors, thermostats, or other electrical equipment. Use an outdoor FM antenna. It is too close to the instruction manuals for the TV. Cause Remedy The unit is difficult to display the video from the unit is multi-path interference. Another input source ...
Owners Manual
Page 71
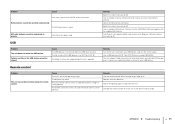
... be controlled using a sensitive multi-element antenna. Folders and files in the USB device cannot be selected automatically. Register AM radio stations manually (p.41). The unit supports folder hierarchies of up to eight levels and up to the ANTENNA (AM) jack together with the supplied AM...viewed. Cause The USB device is too far from the FM station transmitter. Remedy Select the station manually (p.40). Use an outdoor antenna. We recommend using the remote control. Select the station manually (p.40). Connect it to 65,000 files per level. The batteries are not identical.
... be controlled using a sensitive multi-element antenna. Folders and files in the USB device cannot be selected automatically. Register AM radio stations manually (p.41). The unit supports folder hierarchies of up to eight levels and up to the ANTENNA (AM) jack together with the supplied AM...viewed. Cause The USB device is too far from the FM station transmitter. Remedy Select the station manually (p.40). Use an outdoor antenna. We recommend using the remote control. Select the station manually (p.40). Connect it to 65,000 files per level. The batteries are not identical.


