
HTR-3067 Owners Manual
Page 2
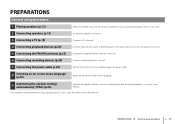
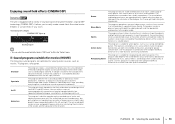
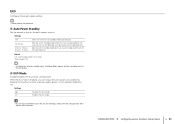
... as CD players 22 Connecting to the jack on the front panel 23 5 Connecting the FM/AM antennas 23 6 Connecting recording devices 24 7 Connecting the power cable 24 8 Selecting an on-screen menu language 25 9 Optimizing the speaker settings automatically (YPAO 26 Error messages 28 Warning messages 29 PLAYBACK 30 Basic...
... as CD players 22 Connecting to the jack on the front panel 23 5 Connecting the FM/AM antennas 23 6 Connecting recording devices 24 7 Connecting the power cable 24 8 Selecting an on-screen menu language 25 9 Optimizing the speaker settings automatically (YPAO 26 Error messages 28 Warning messages 29 PLAYBACK 30 Basic...
HTR-3067 Owners Manual
Page 3
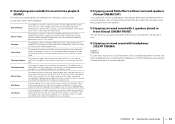
...(TV FORMAT 65 Restoring the default settings (INIT 65 Updating the firmware (UPDATE 66 Checking the firmware version (VERSION 66 APPENDIX 67 Yamaha technologies 74 Supported devices and file formats 75 Video signal flow 75 Information on HDMI 76 HDMI Control 76 Audio Return Channel (ARC ...77 HDMI signal compatibility 78 Reference diagram (rear panel 79 Trademarks 80 Specifications 81 Index 83 Frequently asked questions 67 Troubleshooting 68 Power, system and remote control 68 Audio 69 Video 70 FM/AM radio 71 USB 71 Error indications on the front display 72 Glossary...
...(TV FORMAT 65 Restoring the default settings (INIT 65 Updating the firmware (UPDATE 66 Checking the firmware version (VERSION 66 APPENDIX 67 Yamaha technologies 74 Supported devices and file formats 75 Video signal flow 75 Information on HDMI 76 HDMI Control 76 Audio Return Channel (ARC ...77 HDMI signal compatibility 78 Reference diagram (rear panel 79 Trademarks 80 Specifications 81 Index 83 Frequently asked questions 67 Troubleshooting 68 Power, system and remote control 68 Audio 69 Video 70 FM/AM radio 71 USB 71 Error indications on the front display 72 Glossary...

HTR-3067 Owners Manual
Page 5
...) . p.45 iPod USB storage device Audio 3D and 4K Ultra HD signals supported HDMI Control Speakers Audio BD/DVD player Audio/Video The ECO mode (power saving function) allows you to enjoy your favorite acoustic spaces in various styles. • Automatically optimizing the speaker settings to 5.1-channel speaker system.
...) . p.45 iPod USB storage device Audio 3D and 4K Ultra HD signals supported HDMI Control Speakers Audio BD/DVD player Audio/Video The ECO mode (power saving function) allows you to enjoy your favorite acoustic spaces in various styles. • Automatically optimizing the speaker settings to 5.1-channel speaker system.
HTR-3067 Owners Manual
Page 7
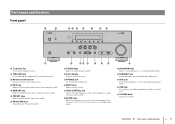
... PHONES SILENT CINEMA INFO MEMORY PRESET FM AM TUNING INPUT BD DVD SCENE TV CD TONE CONTROL PROGRAM RADIO STRAIGHT AUX AUDIO 5V 1A VOLUME : 1 z (power) key Turns on/off (standby) the unit. 2 YPAO MIC jack For connecting the supplied YPAO microphone (p.26). 3 Remote control sensor Receives remote control signals (p.4). 4 INFO...
... PHONES SILENT CINEMA INFO MEMORY PRESET FM AM TUNING INPUT BD DVD SCENE TV CD TONE CONTROL PROGRAM RADIO STRAIGHT AUX AUDIO 5V 1A VOLUME : 1 z (power) key Turns on/off (standby) the unit. 2 YPAO MIC jack For connecting the supplied YPAO microphone (p.26). 3 Remote control sensor Receives remote control signals (p.4). 4 INFO...
HTR-3067 Owners Manual
Page 9
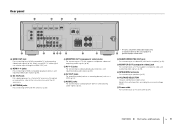
... For connecting to a Yamaha AV accessory. When using ARC, TV audio signal can also be input through the HDMI OUT jack. 2 HDMI 1-4 jacks For connecting to HDMI-compatible playback devices and inputting video/audio signals (p.20). 3 DC OUT jack For supplying power to speakers (p.15). ... connecting to a subwoofer (with built-in amplifier) (p.15). 0 MONITOR OUT (composite video) jack For connecting to your local voltage (p.24). C Power cable For connecting to an HDMI-compatible TV and outputting video/audio signals (p.18). Rear panel 1 2 3 4 COMPONENT VIDEO PR ARC HDMI OUT ...
... For connecting to a Yamaha AV accessory. When using ARC, TV audio signal can also be input through the HDMI OUT jack. 2 HDMI 1-4 jacks For connecting to HDMI-compatible playback devices and inputting video/audio signals (p.20). 3 DC OUT jack For supplying power to speakers (p.15). ... connecting to a subwoofer (with built-in amplifier) (p.15). 0 MONITOR OUT (composite video) jack For connecting to your local voltage (p.24). C Power cable For connecting to an HDMI-compatible TV and outputting video/audio signals (p.18). Rear panel 1 2 3 4 COMPONENT VIDEO PR ARC HDMI OUT ...
HTR-3067 Owners Manual
Page 11
... to suit your room (YPAO). PREPARATIONS ➤ General setup procedure En 11 This completes all the connections are using and place them in the power cable. 8 Selecting an on-screen menu language (p.25) Select the desired on-screen menu language. 9 Optimizing the speaker settings automatically (YPAO) ...(p.26) Optimize the speaker settings, such as volume balance and acoustic parameters, to the unit. 7 Connecting the power cable (p.24) After all the preparations. Enjoy playing movies, music, radio and other content with the unit!
... to suit your room (YPAO). PREPARATIONS ➤ General setup procedure En 11 This completes all the connections are using and place them in the power cable. 8 Selecting an on-screen menu language (p.25) Select the desired on-screen menu language. 9 Optimizing the speaker settings automatically (YPAO) ...(p.26) Optimize the speaker settings, such as volume balance and acoustic parameters, to the unit. 7 Connecting the power cable (p.24) After all the preparations. Enjoy playing movies, music, radio and other content with the unit!

HTR-3067 Owners Manual
Page 14
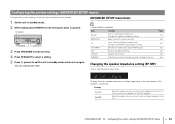
...AC wall outlet. 2 While holding down STRAIGHT on the front display. You are now ready to standby mode and remove the power cable from the AC wall outlet. PREPARATIONS ➤ Placing speakers En 14 and Canada models only) Under its default settings, ...the unit is displayed on the front panel, press z (power). 123456789 2.1-channel system 1 9 2 ■ Setting the speaker impedance (U.S.A. z (power) STRAIGHT 3 Check that "SP IMP." is configured for 8-ohm speakers. When connecting 6-ohm speakers, set the unit...
...AC wall outlet. 2 While holding down STRAIGHT on the front display. You are now ready to standby mode and remove the power cable from the AC wall outlet. PREPARATIONS ➤ Placing speakers En 14 and Canada models only) Under its default settings, ...the unit is displayed on the front panel, press z (power). 123456789 2.1-channel system 1 9 2 ■ Setting the speaker impedance (U.S.A. z (power) STRAIGHT 3 Check that "SP IMP." is configured for 8-ohm speakers. When connecting 6-ohm speakers, set the unit...
HTR-3067 Owners Manual
Page 15
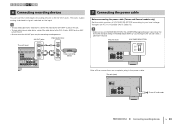
... AC wall outlet and turn off the subwoofer before connecting the speakers. • Ensure that the core wires of speakers) + + - - Caution • Remove the unit's power cable from the ends of the speaker cable and twist the bare wires of the terminal. For other systems, connect speakers while referring to the...
... AC wall outlet and turn off the subwoofer before connecting the speakers. • Ensure that the core wires of speakers) + + - - Caution • Remove the unit's power cable from the ends of the speaker cable and twist the bare wires of the terminal. For other systems, connect speakers while referring to the...

HTR-3067 Owners Manual
Page 18
... to the unit via HDMI. • If you will receive TV broadcasts only from the set -top box • If you can control the unit's power and volume with the TV's remote control. For details on the settings, see "Information on the unit. To maximize the performance of TV audio on...
... to the unit via HDMI. • If you will receive TV broadcasts only from the set -top box • If you can control the unit's power and volume with the TV's remote control. For details on the settings, see "Information on the unit. To maximize the performance of TV audio on...
HTR-3067 Owners Manual
Page 22
... video device will be used ). CHARGE ENHANCER STEREO TUNED SLEEP MUTE OUT VOL. 123456789 1 After connecting external devices (such as a TV and playback devices) and power cable of the following connections. This completes the necessary settings.
... video device will be used ). CHARGE ENHANCER STEREO TUNED SLEEP MUTE OUT VOL. 123456789 1 After connecting external devices (such as a TV and playback devices) and power cable of the following connections. This completes the necessary settings.
HTR-3067 Owners Manual
Page 24
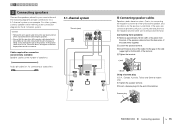
...R AUDIO Video recording device OPTICAL ( TV ) AV 1 COAXIAL AV 2 COAXIAL (CD) AV 3 AV 4 AV 5 AV OUT SUBWOOFER AUDIO PRE OUT 7 Connecting the power cable Before connecting the power cable (Taiwan and General models only) Set the switch position of VOLTAGE SELECTOR may cause damage to your local voltage. The unit (rear... an audio device, connect the audio device to the AV 4-5 jacks, AUDIO jacks, or AUX jack of the unit BEFORE plugging the power cable into an AC wall outlet. 123456789 6 Connecting recording devices You can connect video/audio recording devices to use the AV OUT jacks...
...R AUDIO Video recording device OPTICAL ( TV ) AV 1 COAXIAL AV 2 COAXIAL (CD) AV 3 AV 4 AV 5 AV OUT SUBWOOFER AUDIO PRE OUT 7 Connecting the power cable Before connecting the power cable (Taiwan and General models only) Set the switch position of VOLTAGE SELECTOR may cause damage to your local voltage. The unit (rear... an audio device, connect the audio device to the AV 4-5 jacks, AUDIO jacks, or AUX jack of the unit BEFORE plugging the power cable into an AC wall outlet. 123456789 6 Connecting recording devices You can connect video/audio recording devices to use the AV OUT jacks...
HTR-3067 Owners Manual
Page 33
...This program is ideal for natural and realistic reproduction of background music, special effects, and dialogue from small delicate sounds to powerful loud booms. This program clearly reproduces the finely elaborated sound design of expansiveness on the articulation of sound programs that emphasizes... a wide variety of action and adventure movies precisely. Standard Spectacle Sci-Fi Adventure This program creates a sound field that utilize Yamaha's original DSP technology (CINEMA DSP). It delivers an expansive sound space to the sound field for reproducing the sound design of ...
...This program is ideal for natural and realistic reproduction of background music, special effects, and dialogue from small delicate sounds to powerful loud booms. This program clearly reproduces the finely elaborated sound design of expansiveness on the articulation of sound programs that emphasizes... a wide variety of action and adventure movies precisely. Standard Spectacle Sci-Fi Adventure This program creates a sound field that utilize Yamaha's original DSP technology (CINEMA DSP). It delivers an expansive sound space to the sound field for reproducing the sound design of ...
HTR-3067 Owners Manual
Page 34
.... Fine, beautiful reverberations spread richly, creating a calming atmosphere. This program allows you are down the source to the left of a big live sound field delivers powerful sounds that reproduces the space of the arena. Use this program does not utilize CINEMA DSP). The listener's virtual seat is at parties. ■ Enjoying...
.... Fine, beautiful reverberations spread richly, creating a calming atmosphere. This program allows you are down the source to the left of a big live sound field delivers powerful sounds that reproduces the space of the arena. Use this program does not utilize CINEMA DSP). The listener's virtual seat is at parties. ■ Enjoying...
HTR-3067 Owners Manual
Page 37
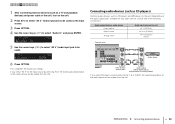
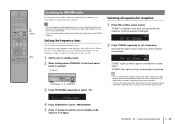
... on the country or region where the unit is received. • You can watch videos input from a radio station. z (power) PROGRAM STRAIGHT 3 Press PROGRAM repeatedly to search stations automatically. ECO TU••••FM50/AM9 ADAPTIVEDRC VIRTUAL 4 Press STRAIGHT... to select "FM100/AM10". 5 Press z (power) to set a frequency. Depending on your listening environment, set to radio by pressing MODE. "STEREO" also lights up when a signal is ...
... on the country or region where the unit is received. • You can watch videos input from a radio station. z (power) PROGRAM STRAIGHT 3 Press PROGRAM repeatedly to search stations automatically. ECO TU••••FM50/AM9 ADAPTIVEDRC VIRTUAL 4 Press STRAIGHT... to select "FM100/AM10". 5 Press z (power) to set a frequency. Depending on your listening environment, set to radio by pressing MODE. "STEREO" also lights up when a signal is ...
HTR-3067 Owners Manual
Page 53
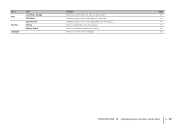
Enables/disables the eco mode (power saving mode). Prevents accidental changes to the settings. Select an on the front display. Page 61 61 62 62 62 63 CONFIGURATIONS ➤ Configuring various functions (Setup menu) En 53 Changes the input source name displayed on -screen menu language. Adjusts the brightness of time for the auto-standby function. Menu ECO Function Language Item Auto Power Standby ECO Mode Input Rename Dimmer Memory Guard Function Set the amount of the front display.
Enables/disables the eco mode (power saving mode). Prevents accidental changes to the settings. Select an on the front display. Page 61 61 62 62 62 63 CONFIGURATIONS ➤ Configuring various functions (Setup menu) En 53 Changes the input source name displayed on -screen menu language. Adjusts the brightness of time for the auto-standby function. Menu ECO Function Language Item Auto Power Standby ECO Mode Input Rename Dimmer Memory Guard Function Set the amount of the front display.
HTR-3067 Owners Manual
Page 61
... before the unit enters standby mode, "AutoPowerStdby" appears and then countdown starts in the front display. ■ ECO Mode Enables/disables the eco (power saving) mode. On Enables the eco mode. • Be sure to press ENTER to standby mode when you have not operated the unit and ... menu) En 61 Sets the unit to restart the unit after the unit is enabled, you can reduce the unit's power consumption by keeping the maximum volume, maximum output power, or front display's brightness low. Sets the unit to standby mode automatically. Settings Off Disables the eco mode. Default ...
... before the unit enters standby mode, "AutoPowerStdby" appears and then countdown starts in the front display. ■ ECO Mode Enables/disables the eco (power saving) mode. On Enables the eco mode. • Be sure to press ENTER to standby mode when you have not operated the unit and ... menu) En 61 Sets the unit to restart the unit after the unit is enabled, you can reduce the unit's power consumption by keeping the maximum volume, maximum output power, or front display's brightness low. Sets the unit to standby mode automatically. Settings Off Disables the eco mode. Default ...
HTR-3067 Owners Manual
Page 64
... 3 Press PROGRAM to select an item. 4 Press STRAIGHT to select a setting. 5 Press z (power) to set the unit to the unit. Restores the default settings. Page 64 65 65 65 65 66 66 Changing the speaker impedance setting (SP ... IMP. Settings 6 Ω MIN 8 Ω MIN Select this option when you connect 6-ohm speakers to standby mode and turn it on the front panel, press z (power). The new settings take effect. Selects the unit's remote control ID. (Asia, Taiwan and General models only) Changes the FM/AM tuning frequency setting. Updates...
... 3 Press PROGRAM to select an item. 4 Press STRAIGHT to select a setting. 5 Press z (power) to set the unit to the unit. Restores the default settings. Page 64 65 65 65 65 66 66 Changing the speaker impedance setting (SP ... IMP. Settings 6 Ω MIN 8 Ω MIN Select this option when you connect 6-ohm speakers to standby mode and turn it on the front panel, press z (power). The new settings take effect. Selects the unit's remote control ID. (Asia, Taiwan and General models only) Changes the FM/AM tuning frequency setting. Updates...

HTR-3067 Owners Manual
Page 68
... from the AC wall outlet and plug it again.) The power turns off the unit, disconnect the power cable, and contact the nearest authorized Yamaha dealer or service center. Power, system and remote control Problem Cause Remedy The power does not turn on while a speaker cable was not used To disable the ...to jacks on the unit and start playback again. Set the speaker impedance to match your nearest Yamaha dealer or service center to reboot the unit. (If the problem persists, disconnect the power cable from the AC wall outlet and plug it again.) The unit is out of each speaker...
... from the AC wall outlet and plug it again.) The power turns off the unit, disconnect the power cable, and contact the nearest authorized Yamaha dealer or service center. Power, system and remote control Problem Cause Remedy The power does not turn on while a speaker cable was not used To disable the ...to jacks on the unit and start playback again. Set the speaker impedance to match your nearest Yamaha dealer or service center to reboot the unit. (If the problem persists, disconnect the power cable from the AC wall outlet and plug it again.) The unit is out of each speaker...
HTR-3067 Owners Manual
Page 76
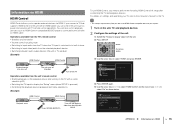
... keys ENTER TOP MENU POP-UP MENU MUTE c Use the cursor keys to select "On" as shown below. You can control the unit (such as power and volume) with an HDMI cable. Setup Speaker HDMI Sound ECO Function Language Configuration d Press ENTER again. e Use the cursor keys (q/w) to select "HDMI Control...
... keys ENTER TOP MENU POP-UP MENU MUTE c Use the cursor keys to select "On" as shown below. You can control the unit (such as power and volume) with an HDMI cable. Setup Speaker HDMI Sound ECO Function Language Configuration d Press ENTER again. e Use the cursor keys (q/w) to select "HDMI Control...

HTR-3067 Owners Manual
Page 77
... jack (HDMI jack marked "ARC") on the TV. • We recommend using ARC, set as HDMI Control-compatible BD/DVD players). 4 Turn off the main power of connected devices exceeds the limit. In this case, disable HDMI Control on the unit. "ARC" (p.57) in Step 3. If not, select the input source... the audio is interrupted while using TV and playback devices from the same manufacturer so that supports ARC. • "AV 4" is set to the TV's power operations, check the priority of the unit will be automatically switched to the TV.
... jack (HDMI jack marked "ARC") on the TV. • We recommend using ARC, set as HDMI Control-compatible BD/DVD players). 4 Turn off the main power of connected devices exceeds the limit. In this case, disable HDMI Control on the unit. "ARC" (p.57) in Step 3. If not, select the input source... the audio is interrupted while using TV and playback devices from the same manufacturer so that supports ARC. • "AV 4" is set to the TV's power operations, check the priority of the unit will be automatically switched to the TV.


