
Owner's Manual
Page 2
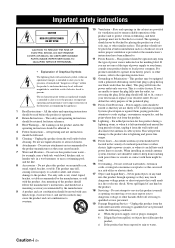
...plug having one way. REFER SERVICING TO QUALIFIED SERVICE PERSONNEL. • Explanation of any kind on the marking label. Do not use attachments not recommended by the manufacturer. 9 A product and cart combination should be moved with the product. This product may fall into... point within the product's enclosure that could result in the literature accompanying the appliance. 1 Read Instructions - All operating and use a mounting accessory recommended by the product manufacturer as opening or removing covers may touch dangerous voltage points or short-out parts that...
...plug having one way. REFER SERVICING TO QUALIFIED SERVICE PERSONNEL. • Explanation of any kind on the marking label. Do not use attachments not recommended by the manufacturer. 9 A product and cart combination should be moved with the product. This product may fall into... point within the product's enclosure that could result in the literature accompanying the appliance. 1 Read Instructions - All operating and use a mounting accessory recommended by the product manufacturer as opening or removing covers may touch dangerous voltage points or short-out parts that...

Owner's Manual
Page 3
... GROUND CLAMP ELECTRIC SERVICE EQUIPMENT NEC - Modifications not expressly approved by Yamaha may cause interference harmful to the instructions found in perfor- This equipment generates/uses radio frequencies and, if not installed and used according to the operation of other controls may result in to eliminate ... extensive work by turning the unit "OFF" and "ON", please try to coaxial type cable. Adjust only those products distributed by Yamaha Corporation of America or its normal operation, e) If the product has been dropped or damaged in any service or repairs to this ...
... GROUND CLAMP ELECTRIC SERVICE EQUIPMENT NEC - Modifications not expressly approved by Yamaha may cause interference harmful to the instructions found in perfor- This equipment generates/uses radio frequencies and, if not installed and used according to the operation of other controls may result in to eliminate ... extensive work by turning the unit "OFF" and "ON", please try to coaxial type cable. Adjust only those products distributed by Yamaha Corporation of America or its normal operation, e) If the product has been dropped or damaged in any service or repairs to this ...

Owner's Manual
Page 4
...complete. 8 Do not operate this unit itself is turned off by lightning, keep the power cord and outdoor antennas disconnected from use force on the surface of plug to obstruct heat radiation. This Class B digital apparatus complies with chemical solvents; Containers with a... newspaper, tablecloth, curtain, etc. Contact qualified Yamaha service personnel when any service is called the standby mode. This state is needed. IMPORTANT Please record the serial number of ...
...complete. 8 Do not operate this unit itself is turned off by lightning, keep the power cord and outdoor antennas disconnected from use force on the surface of plug to obstruct heat radiation. This Class B digital apparatus complies with chemical solvents; Containers with a... newspaper, tablecloth, curtain, etc. Contact qualified Yamaha service personnel when any service is called the standby mode. This state is needed. IMPORTANT Please record the serial number of ...

Owner's Manual
Page 5
...tuning 40 Automatic tuning 40 Manual tuning 40 Automatic preset tuning 41 Manual preset tuning 41 Selecting preset stations 42 Exchanging preset station 42 Using a USB memory device or a USB portable audio player 43 Playback operation 43 Recording 45 About this manual for your operation. •...the power cable 21 Turning on and off the power 21 Front panel display 22 Optimizing the speaker setting for your listening room 24 Using AUTO SETUP 24 ADDITIONAL INFORMATION Troubleshooting 61 Glossary 68 Specifications 70 Index 71 APPENDIX (at the end of this manual • y ...
...tuning 40 Automatic tuning 40 Manual tuning 40 Automatic preset tuning 41 Manual preset tuning 41 Selecting preset stations 42 Exchanging preset station 42 Using a USB memory device or a USB portable audio player 43 Playback operation 43 Recording 45 About this manual for your operation. •...the power cable 21 Turning on and off the power 21 Front panel display 22 Optimizing the speaker setting for your listening room 24 Using AUTO SETUP 24 ADDITIONAL INFORMATION Troubleshooting 61 Glossary 68 Specifications 70 Index 71 APPENDIX (at the end of this manual • y ...

Owner's Manual
Page 6
... function ◆ Preset SCENE templates for various situations ◆ SCENE template customizing capability Decoders and DSP circuits ◆ Proprietary Yamaha technology for the creation of multichannel surround sound ◆ Compressed Music Enhancer mode to improve the sound quality of compression artifacts ...is often undetectable until it at a safe level. "SILENT CINEMA" is too late, Yamaha and the Electronic Industries Association's Consumer Electronics Group recommend you to use other than audiovisual purposes. "HDMI", the "HDMI" logo and "High-Definition Multimedia ...
... function ◆ Preset SCENE templates for various situations ◆ SCENE template customizing capability Decoders and DSP circuits ◆ Proprietary Yamaha technology for the creation of multichannel surround sound ◆ Compressed Music Enhancer mode to improve the sound quality of compression artifacts ...is often undetectable until it at a safe level. "SILENT CINEMA" is too late, Yamaha and the Electronic Industries Association's Consumer Electronics Group recommend you to use other than audiovisual purposes. "HDMI", the "HDMI" logo and "High-Definition Multimedia ...

Owner's Manual
Page 7
... Indoor FM antenna FREQ/TEXT EON MODE - English 3 En the operation range of the remote control decreases. • Do not use an old battery and a new one together. • Do not use different types of batteries (such as these different types of batteries may be cleared. Notes • Change all of the...
... Indoor FM antenna FREQ/TEXT EON MODE - English 3 En the operation range of the remote control decreases. • Do not use an old battery and a new one together. • Do not use different types of batteries (such as these different types of batteries may be cleared. Notes • Change all of the...

Owner's Manual
Page 11
... OUTLETS for the power supply of the wire to this unit and other kind of this unit. Quick start guide ■ For further connections • Using the other components into the AC wall outlet. Note The shape of the AM and GND terminals may vary depending on the unit. 5 Connect the... ☞ P. 16 • Connecting a CD player and an MD recorder ☞ P. 19 • Connecting a DVD player via analog multi-channel audio connection ☞ P. 19 • Using the VIDEO AUX jacks on the front panel ☞ P. 20 • Connecting an outdoor FM/AM antenna ☞ P. 20 •...
... OUTLETS for the power supply of the wire to this unit and other kind of this unit. Quick start guide ■ For further connections • Using the other components into the AC wall outlet. Note The shape of the AM and GND terminals may vary depending on the unit. 5 Connect the... ☞ P. 16 • Connecting a CD player and an MD recorder ☞ P. 19 • Connecting a DVD player via analog multi-channel audio connection ☞ P. 19 • Using the VIDEO AUX jacks on the front panel ☞ P. 20 • Connecting an outdoor FM/AM antenna ☞ P. 20 •...

Owner's Manual
Page 12
...2 (or ESCENE 2) to this room..." See page 16 for this unit. 2 Press 1STANDBY/ON on the selected SCENE button turns off. ■ Using the other SCENE buttons In the following cases, try pressing the corresponding SCENE button to watch a TV program..." If the speakers are 6 ohm speakers, ...set "SP IMP." Quick start guide Step 3: Turn on the video monitor connected to select "Disc Listening". to "6Ω MIN" before using this unit consumes a small amount of the connected speakers. Note In the standby mode, this unit (see page 13). 4 Start playback of the desired...
...2 (or ESCENE 2) to this room..." See page 16 for this unit. 2 Press 1STANDBY/ON on the selected SCENE button turns off. ■ Using the other SCENE buttons In the following cases, try pressing the corresponding SCENE button to watch a TV program..." If the speakers are 6 ohm speakers, ...set "SP IMP." Quick start guide Step 3: Turn on the video monitor connected to select "Disc Listening". to "6Ω MIN" before using this unit consumes a small amount of the connected speakers. Note In the standby mode, this unit (see page 13). 4 Start playback of the desired...

Owner's Manual
Page 13
... the sound field programs ☞ P. 39 This unit is set this unit to receive infrared signals from the FM radio station..." Notes • To use the "Radio Listening" template, you can select and change the assigned SCENE template for the SCENE buttons. Press FSCENE 4 (or ESCENE 4) to the standby... tune into the desired radio station in order to the standby mode. See page 28 for details. See page 21 for details. ■ After using this unit from the standby mode, press 1STANDBY/ON (or MPOWER). Quick start guide What do with this unit? ■ Customizing the SCENE templates...
... the sound field programs ☞ P. 39 This unit is set this unit to receive infrared signals from the FM radio station..." Notes • To use the "Radio Listening" template, you can select and change the assigned SCENE template for the SCENE buttons. Press FSCENE 4 (or ESCENE 4) to the standby... tune into the desired radio station in order to the standby mode. See page 28 for details. See page 21 for details. ■ After using this unit from the standby mode, press 1STANDBY/ON (or MPOWER). Quick start guide What do with this unit? ■ Customizing the SCENE templates...

Owner's Manual
Page 15
...the full system. English 11 En You can do without it is better to reduce wall reflections. Subwoofer (SW) The use a center speaker, you can use it to use of the video monitor should be the same. Place these speakers at an equal distance from each speaker from the ideal ... (SL and SR) The surround speakers are obtained with a built-in amplifier, such as the Yamaha Active Servo Processing Subwoofer System, is for effect and surround sounds. Best results, however, are used for some reason it . Turn it is not practical to enjoy CINEMA DSP and multichannel audio sources...
...the full system. English 11 En You can do without it is better to reduce wall reflections. Subwoofer (SW) The use a center speaker, you can use it to use of the video monitor should be the same. Place these speakers at an equal distance from each speaker from the ideal ... (SL and SR) The surround speakers are obtained with a built-in amplifier, such as the Yamaha Active Servo Processing Subwoofer System, is for effect and surround sounds. Best results, however, are used for some reason it . Turn it is not practical to enjoy CINEMA DSP and multichannel audio sources...

Owner's Manual
Page 16
...the bare speaker wires touch each other or let them touch any metal part of this unit and/or the speakers. • Use the magnetically shielded speakers. Surround speakers Right Left Front speakers (B) Right Left Center speaker Subwoofer Center speaker COMPONENT VIDEO DVD DTV/CBL... with a stripe, groove or ridge. Connections Connecting speakers Be sure to the "-" (black) terminals. If the connections are to use 6 ohm speakers, be sure to "6Ω MIN" before using this type of insulated cables running side by side. R SURROUND L CENTER R FRONT B L IN MD/ OUT (PLAY) CD...
...the bare speaker wires touch each other or let them touch any metal part of this unit and/or the speakers. • Use the magnetically shielded speakers. Surround speakers Right Left Front speakers (B) Right Left Center speaker Subwoofer Center speaker COMPONENT VIDEO DVD DTV/CBL... with a stripe, groove or ridge. Connections Connecting speakers Be sure to the "-" (black) terminals. If the connections are to use 6 ohm speakers, be sure to "6Ω MIN" before using this type of insulated cables running side by side. R SURROUND L CENTER R FRONT B L IN MD/ OUT (PLAY) CD...

Owner's Manual
Page 17
... unit. 1 Make sure this unit is a single-pole electrical connector widely used to terminate speaker cables. Connecting the banana plug The banana plug is turned off this unit. 2 Press and hold 0TONE CONTROL and then press 1STANDBY/... knob. 2 Insert the bare end of the speaker wire into the end of the cable together to prevent short circuits. 10 mm (3/8") ■ Connecting to use 6 ohm speakers, set this unit and your speaker. English 13 En Cables are to the SPEAKERS terminals 2 1 3 Red: positive (+) Black: negative (-) Connections Setting the speaker...
... unit. 1 Make sure this unit is a single-pole electrical connector widely used to terminate speaker cables. Connecting the banana plug The banana plug is turned off this unit. 2 Press and hold 0TONE CONTROL and then press 1STANDBY/... knob. 2 Insert the bare end of the speaker wire into the end of the cable together to prevent short circuits. 10 mm (3/8") ■ Connecting to use 6 ohm speakers, set this unit and your speaker. English 13 En Cables are to the SPEAKERS terminals 2 1 3 Red: positive (+) Black: negative (-) Connections Setting the speaker...
Owner's Manual
Page 18
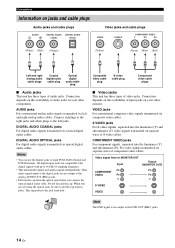
... plugs ■ Audio jacks This unit has three types of S-video cables. Notes • You can use the digital jacks to input PCM, Dolby Digital and DTS bitstreams. All digital input jacks are not using the optical jack, be sure to put the cap back in place. Do not discard the cap...
... plugs ■ Audio jacks This unit has three types of S-video cables. Notes • You can use the digital jacks to input PCM, Dolby Digital and DTS bitstreams. All digital input jacks are not using the optical jack, be sure to put the cap back in place. Do not discard the cap...

Owner's Manual
Page 19
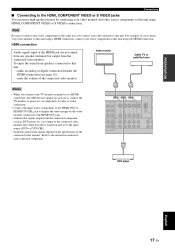
...the input source (DVD or DTV/CBL). mute the volume of the connected video monitor. Furthermore, available audio/video signals depend on it. • Use a conversion cable (HDMI jack ↔ DVI-D jack) to this unit, - Refer to the instruction manual of each connected component. ■ ...HDMI jack and cable plug HDMI HDMI cable plug y • We recommend using HDMI connections. make an analog or digital connection besides the HDMI connection (see page 16). - At that time, audio/video signals output from the...
...the input source (DVD or DTV/CBL). mute the volume of the connected video monitor. Furthermore, available audio/video signals depend on it. • Use a conversion cable (HDMI jack ↔ DVI-D jack) to this unit, - Refer to the instruction manual of each connected component. ■ ...HDMI jack and cable plug HDMI HDMI cable plug y • We recommend using HDMI connections. make an analog or digital connection besides the HDMI connection (see page 16). - At that time, audio/video signals output from the...
Owner's Manual
Page 20
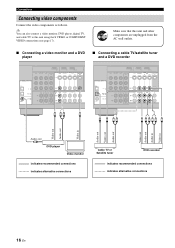
... recommended connections indicates alternative connections Cable TV or Satellite tuner DVD recorder indicates recommended connections indicates alternative connections 16 En Make sure that this unit using the S VIDEO or COMPONENT VIDEO connections (see page 17). Connections Connecting video components Connect the video components as follows.
... recommended connections indicates alternative connections Cable TV or Satellite tuner DVD recorder indicates recommended connections indicates alternative connections 16 En Make sure that this unit using the S VIDEO or COMPONENT VIDEO connections (see page 17). Connections Connecting video components Connect the video components as follows.
Owner's Manual
Page 21
For example, if you connect your video monitor to this unit using a HDMI connection, connect your video monitor to this unit. Refer to the instruction manual of the connected video monitor. mute the volume of each connected ... any speaker terminals but output from the connected component (such as DVD player etc.) are output to the connected video monitor only when this unit using the HDMI connection. Video monitor Cable TV or satellite tuner Notes • When you connect your video components to this unit, - IN MD/ (PLAY) CD...
For example, if you connect your video monitor to this unit using a HDMI connection, connect your video monitor to this unit. Refer to the instruction manual of the connected video monitor. mute the volume of each connected ... any speaker terminals but output from the connected component (such as DVD player etc.) are output to the connected video monitor only when this unit using the HDMI connection. Video monitor Cable TV or satellite tuner Notes • When you connect your video components to this unit, - IN MD/ (PLAY) CD...

Owner's Manual
Page 23
... sound field programs. • This unit does not redirect signals input at the DIGITAL INPUT jack. Make sure that you connect a 5.1-channel speaker system before using this unit and other components are unplugged from a multi-format player, external decoder or sound processor. We recommend that this feature.
... sound field programs. • This unit does not redirect signals input at the DIGITAL INPUT jack. Make sure that you connect a 5.1-channel speaker system before using this unit and other components are unplugged from a multi-format player, external decoder or sound processor. We recommend that this feature.

Owner's Manual
Page 24
... output Game console or video camera ANTENNA R AM GND FM 75 UNBAL. Connect each antenna correctly to a good earth ground. Consult the nearest authorized Yamaha dealer or service center about outdoor antennas. • The AM loop antenna should always be placed away from a window. Connections... a video camera to turn down the volume of vinyl-covered wire extended outdoors from this unit. Caution Be sure to this unit. Outdoor AM antenna Use a 5 to 10 m (16 to this unit. Notes To reproduce the source signals input at these antennas should be connected, even if an outdoor AM ...
... output Game console or video camera ANTENNA R AM GND FM 75 UNBAL. Connect each antenna correctly to a good earth ground. Consult the nearest authorized Yamaha dealer or service center about outdoor antennas. • The AM loop antenna should always be placed away from a window. Connections... a video camera to turn down the volume of vinyl-covered wire extended outdoors from this unit. Caution Be sure to this unit. Outdoor AM antenna Use a 5 to 10 m (16 to this unit. Notes To reproduce the source signals input at these antennas should be connected, even if an outdoor AM ...

Owner's Manual
Page 25
... ■ Turning on this unit Press 1STANDBY/ON (or MPOWER) to turn on this unit to the standby mode Power cable ■ AC OUTLETS (SWITCHED) Use these outlets.
... ■ Turning on this unit Press 1STANDBY/ON (or MPOWER) to turn on this unit to the standby mode Power cable ■ AC OUTLETS (SWITCHED) Use these outlets.
Owner's Manual
Page 26
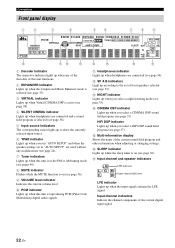
... Input channel indicators LFE indicator Lights up when you select a HiFi DSP sound field program (see page 36). D E F G A Headphones indicator Lights up when headphones are used without any of the decoders of this unit functions. 2 ENHANCER indicator Lights up when the Compressed Music Enhancer mode is selected (see page 37). 3 VIRTUAL...
... Input channel indicators LFE indicator Lights up when you select a HiFi DSP sound field program (see page 36). D E F G A Headphones indicator Lights up when headphones are used without any of the decoders of this unit functions. 2 ENHANCER indicator Lights up when the Compressed Music Enhancer mode is selected (see page 37). 3 VIRTUAL...


